Scotch Eggs in the Air Fryer

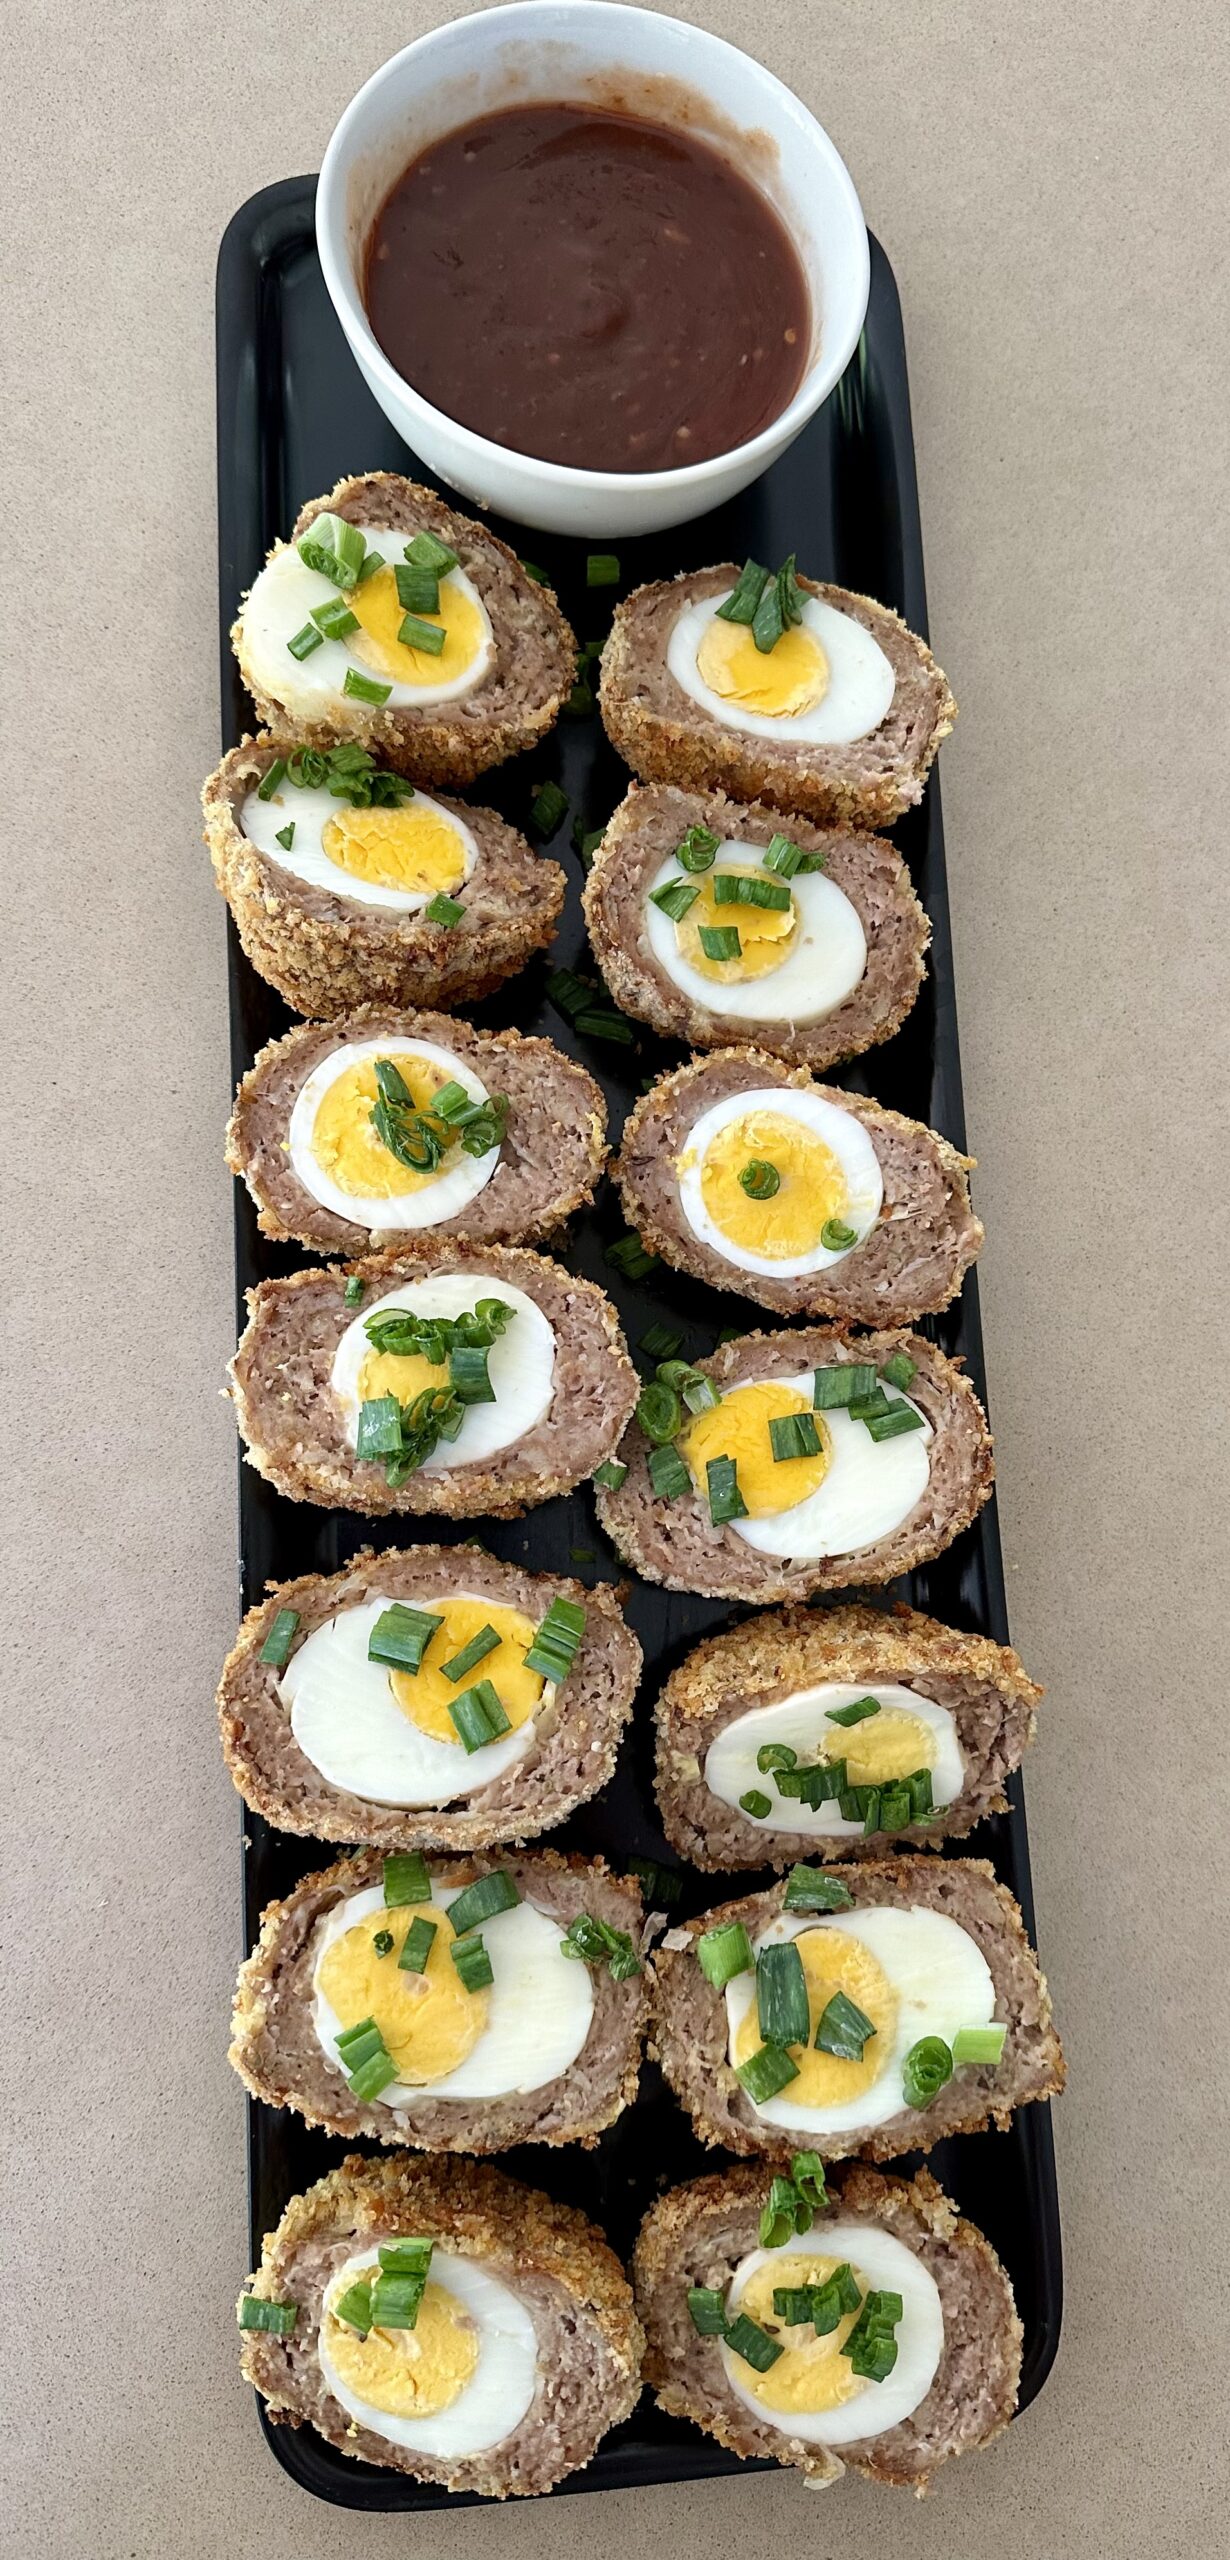
A hard boiled egg, wrapped in sausage meat, coated in breadcrumbs and deep fried becomes a Scotch egg.

There are various explanations regarding the origin of the name of these traditional British snacks. They were first mentioned in Britain in publications from the early 1800s, so they have been around for quite some time.

The advent of the air fryer makes cooking them so much easier and healthier. Instead of deep frying, just give them a quick spray with a can of oil before they go into the air fryer.

Served at room temperature they make a perfect addition to lunch boxes, summer buffets and picnics.

Serve with Spicy Tomato Sauce (recipe below) for dipping.

6 large eggs, hardboiled and peeled
600g pork sausages
1 very small onion, grated (optional)
1 tsp mixed dried herbs
Salt and freshly ground black pepper, to taste
2 eggs, beaten
1 cup (or maybe a bit more) panko breadcrumbs (or ordinary breadcrumbs)
Fresh herbs or thinly sliced spring onion to garnish
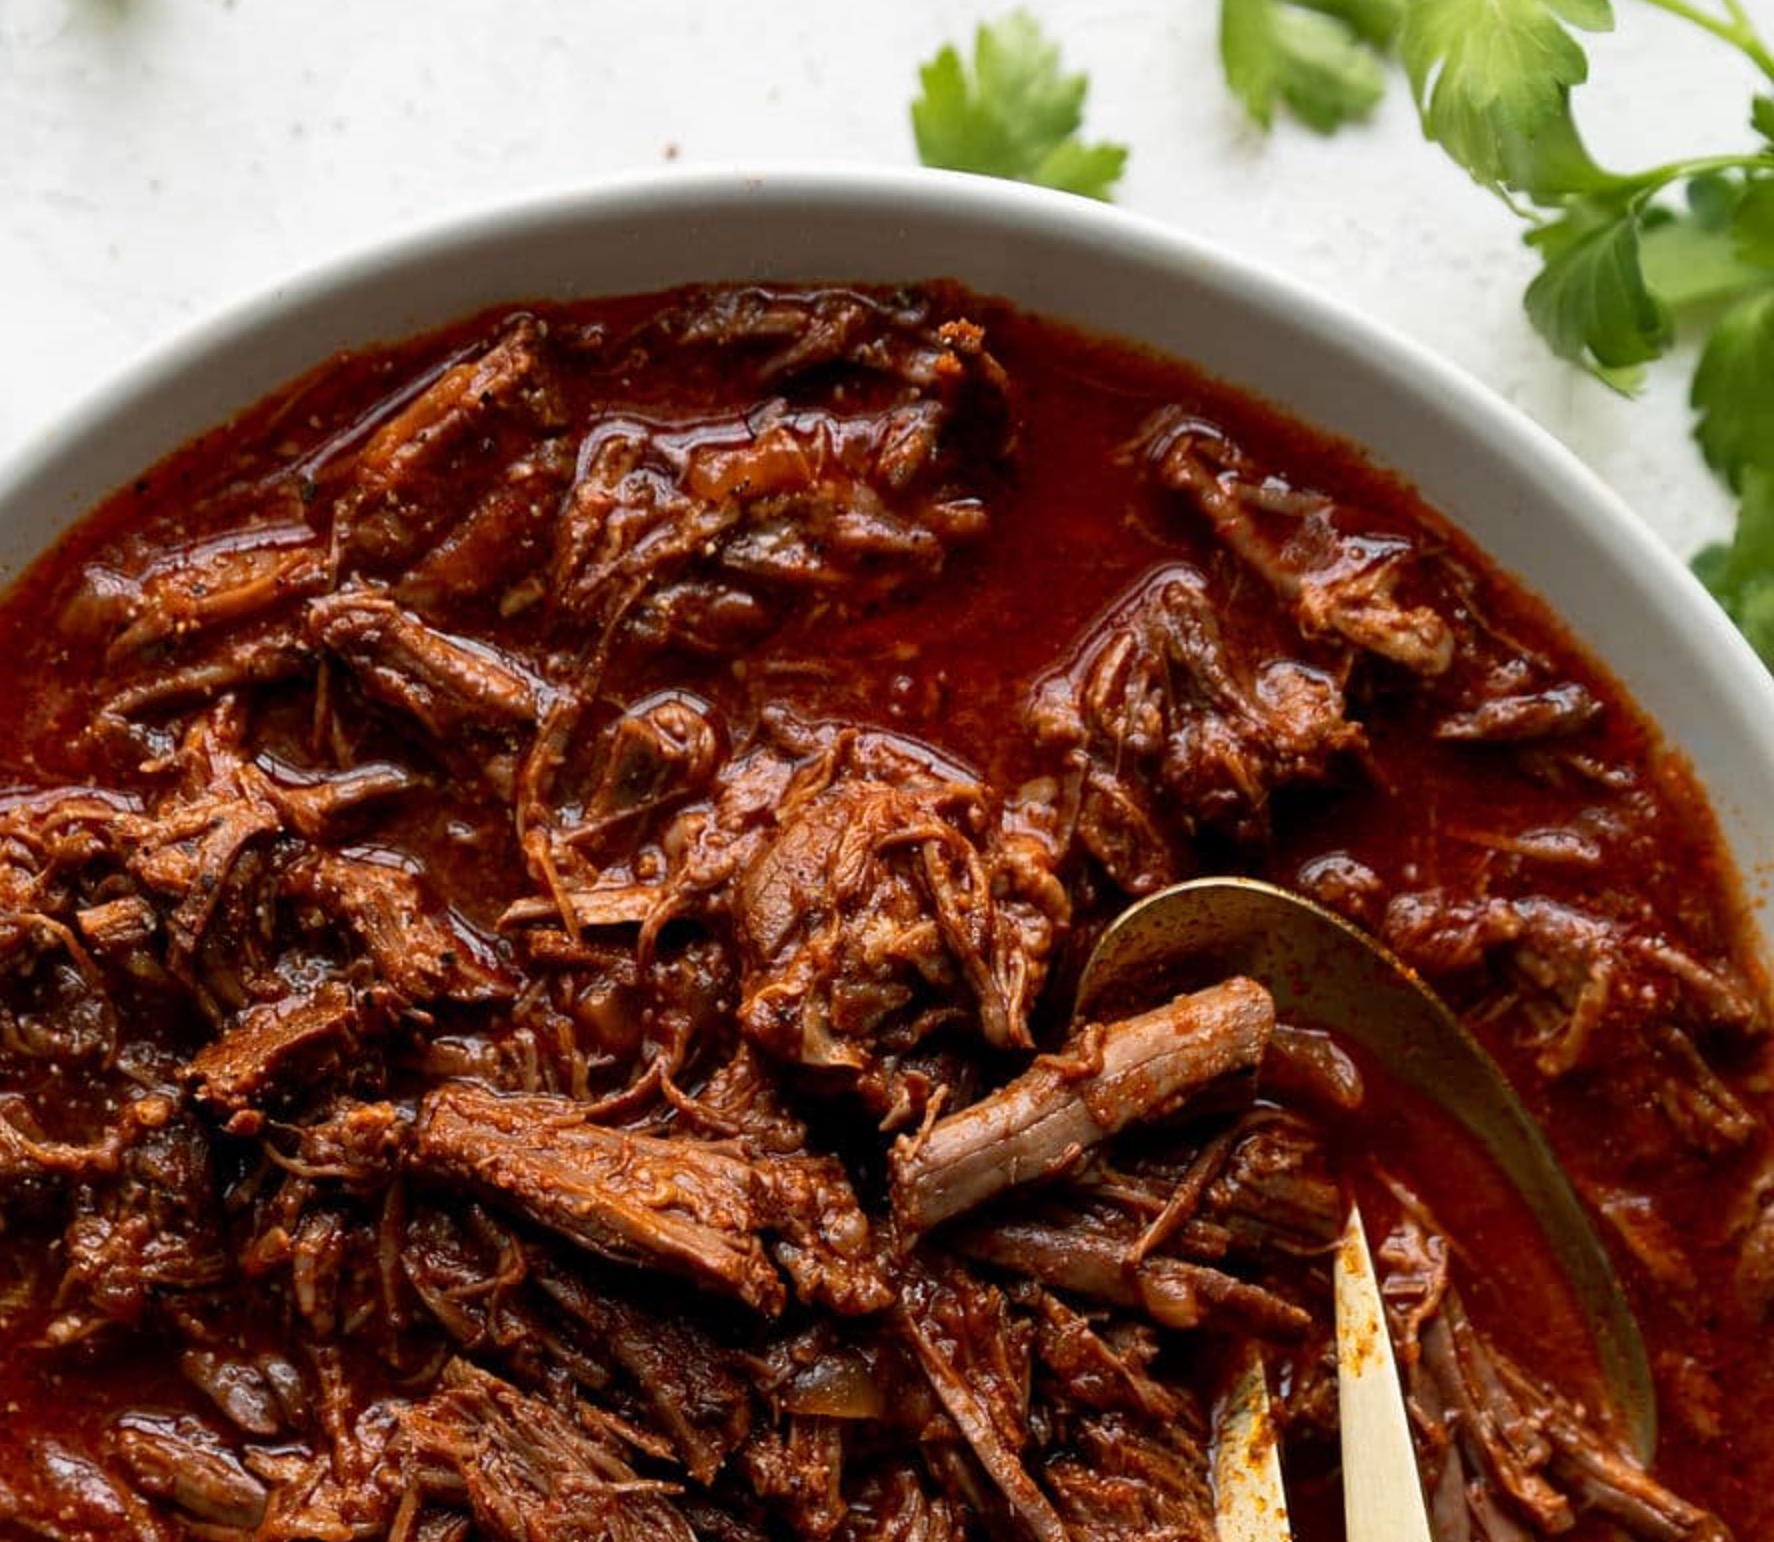
Spicy Tomato Dipping Sauce:
½ cup tomato ketchup
1 Tbs Worcestershire Sauce
1 clove garlic, crushed
2 Tbs vinegar
1 small onion, grated
1½ Tbs honey
½ tsp hot English mustard
2 tsp grated fresh ginger

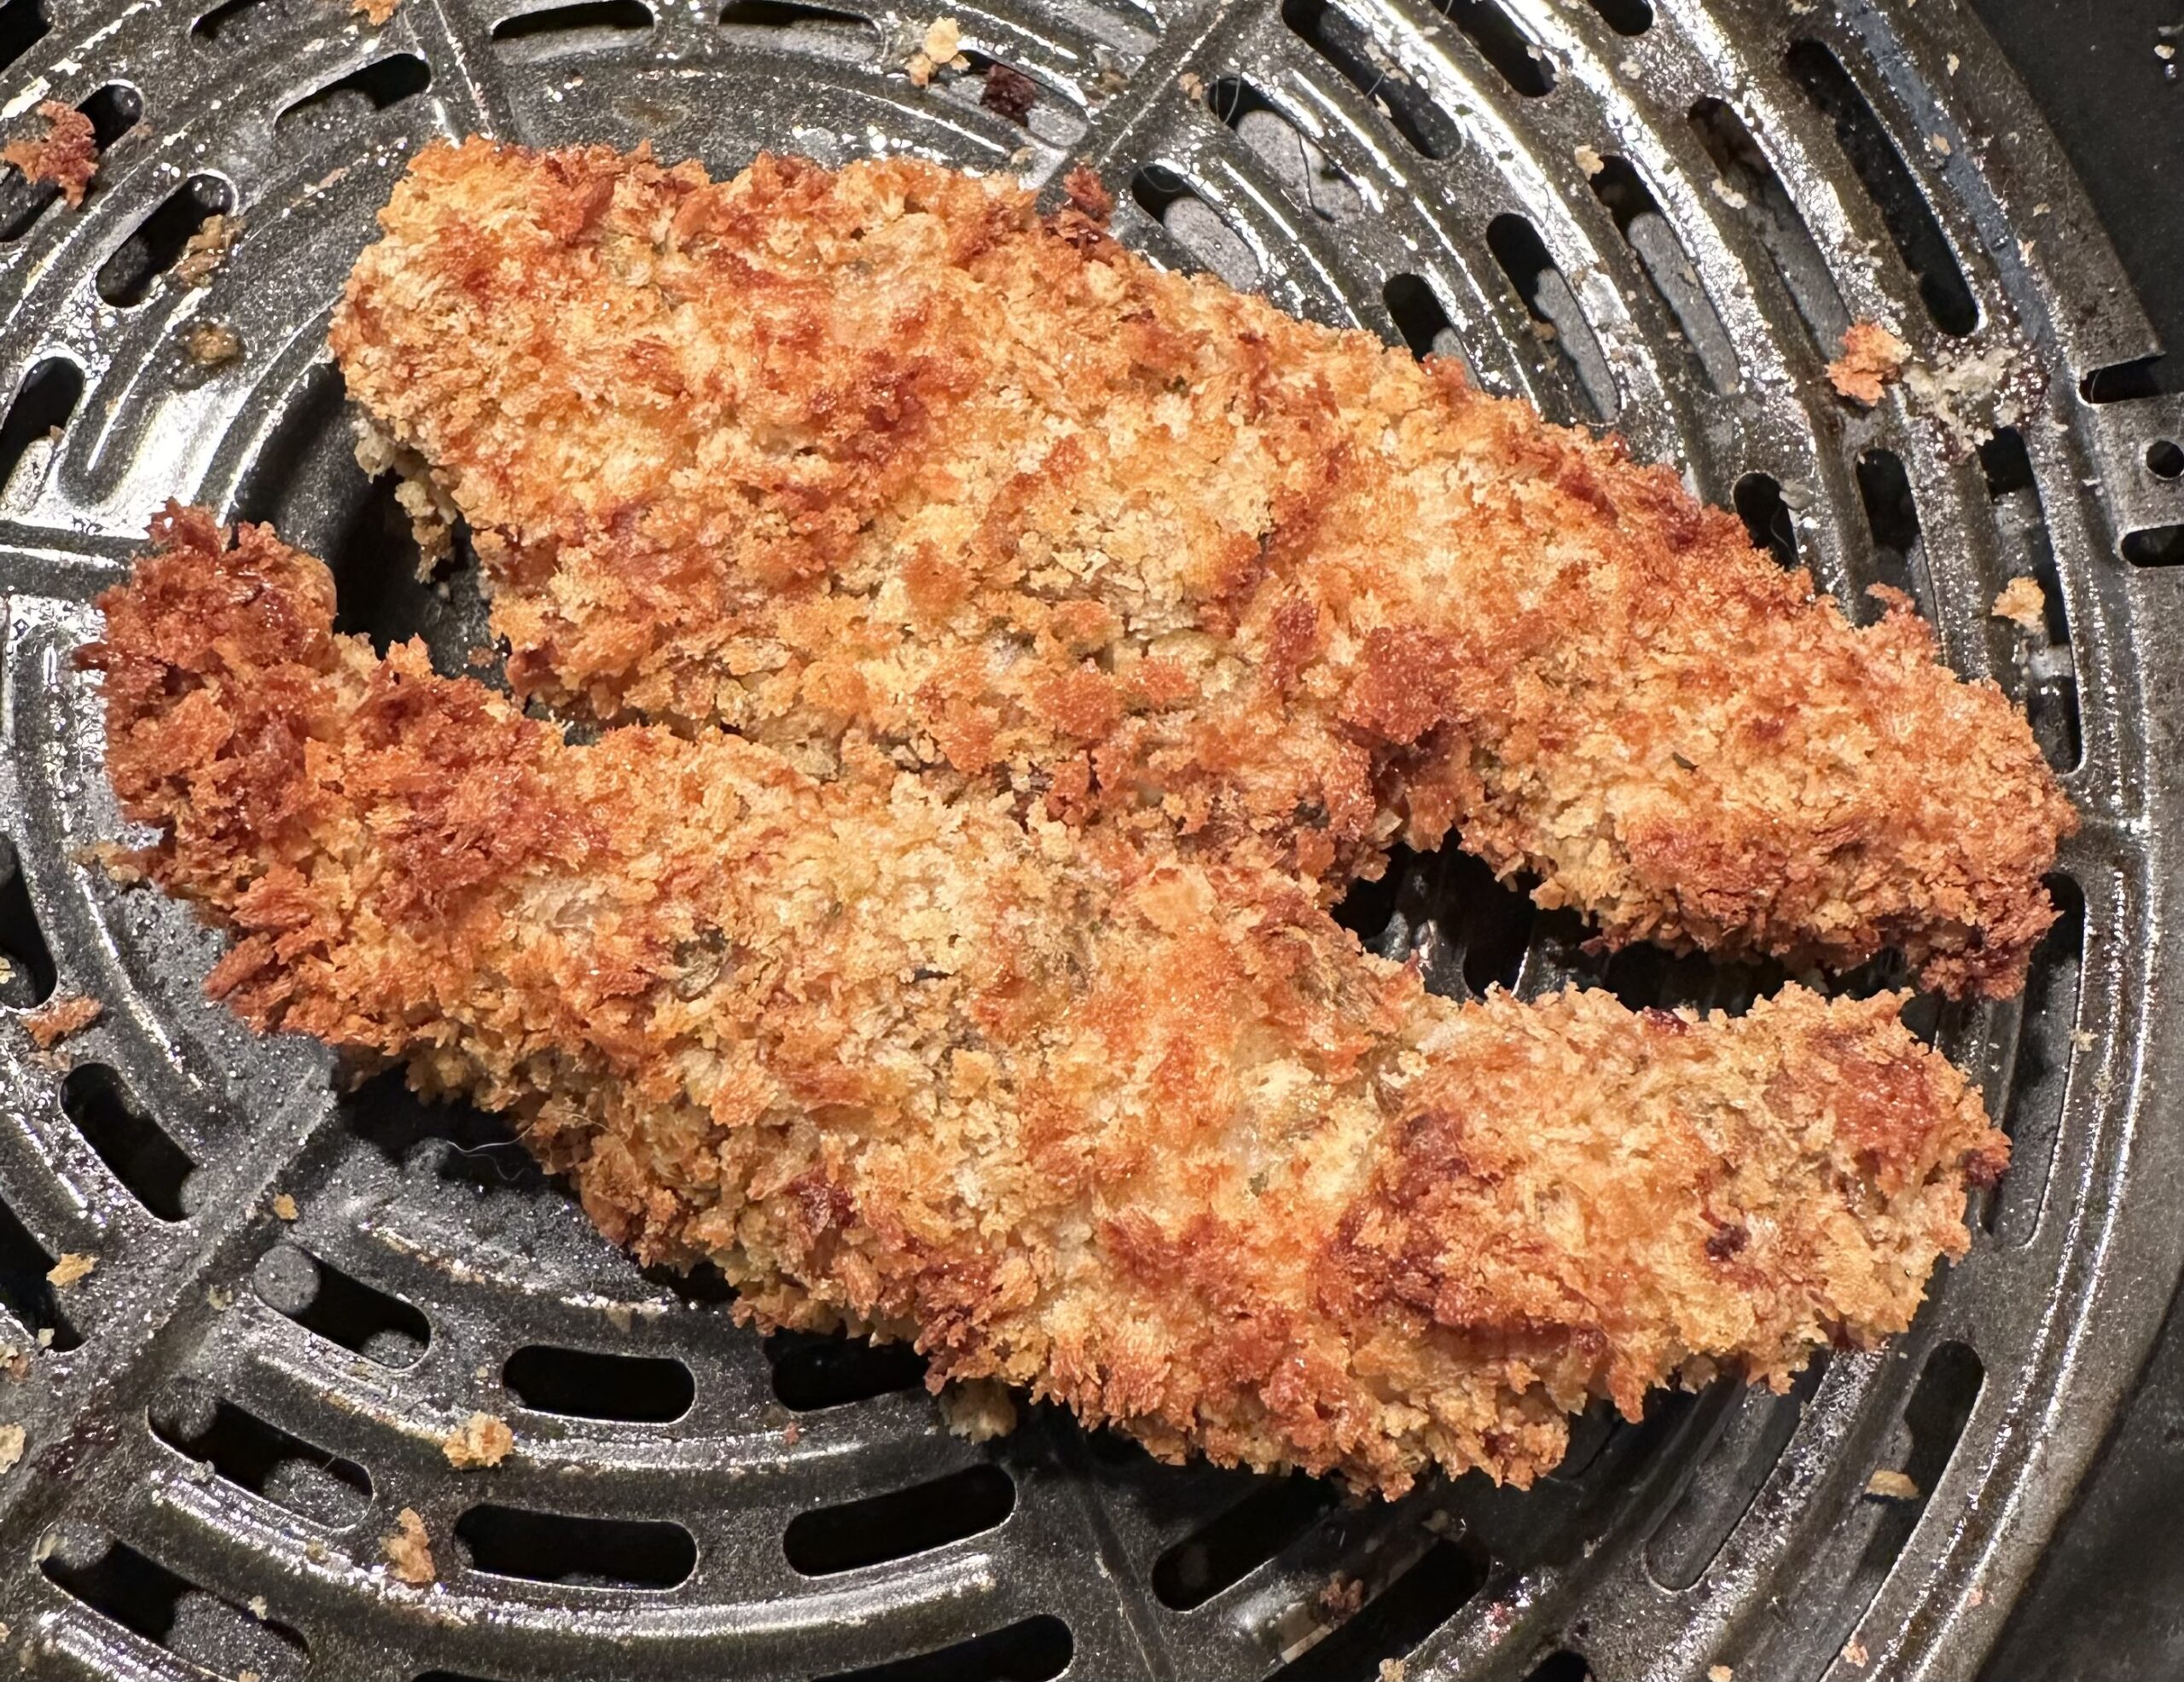
While the eggs are boiling, remove the casings from the sausages and discard them. Mix the sausage meat with the onion, herbs, salt and pepper. Divide the mixture into six and flatten each portion into a circle about four inches (10cm) in diameter. Place an egg on each, wrap the sausage meat around the egg and pinch to close any holes an make a nice oval ball. Roll each one in beaten egg then breadcrumbs, patting them in to cover evenly. Can be made ahead to this point and kept refrigerated for up to several hours. My eggs were not very big so I hardboiled 7 rather than 6.

Place the Scotch eggs in an air fryer in one layer and preferably not quite touching. Spray lightly with oil then cook at 200°C for about 20 minutes. After 10 minutes turn them over and spray again.

Remove from air fryer when cooked and leave to cool. Serve cut in half, garnished with herbs or spring onion and with the sauce for dipping.

Makes 12 egg halves

Sauce: heat ingredients together in a saucepan, then cool. Use as a dipping sauce for Scotch eggs, sausage rolls and empanadas.

Hutch’s Quick Cauliflower Cheese

This version of a traditional cauliflower cheese was sent to me by my brother, whose nickname is Hutch. It’s quick and easy. The oven heats up while you prepare the dish.

I didn’t have any nutritional yeast so looked on Google and came up with miso paste, which I did have, as a substitute. It’s quite salty so I didn’t need any additional salt for the sauce. It went very nicely with the last of the Christmas ham. The recipe is easy to halve.

1 large cauliflower cut into large florets
2 eggs
125ml milk
125ml oil (olive or canola)
200ml plain yoghurt
1 tsp paprika
Freshly ground black pepper
2 Tbs plain flour
1 tsp baking powder
2 Tbs nutritional yeast or white miso paste
Salt if necessary
Almond slivers or flakes
Grated cheese – I used cheddar

Pre-heat oven to 180°C. Cook cauliflower in boiling salted water for 3-4 minutes then drain. Mis remaining ingredients except the cheese and nuts, whisking to remove any lumps from the miso paste.

Add the cauliflower, turn to coat, then tip into a greased baking dish. I decided to divide it between two smaller dishes and keep one to serve the following day. Scrape the rest of the sauce over the top. Sprinkle with almonds and cover with grated cheese. The amount is up to you.

Bake for 15 minutes or until golden brown. Don’t overcook.

Serves 6-8


Salmon with Shaved Beetroot & Avocado

This colourful salmon dish will appeal to beetroot fans. Serve it as a light but satisfying main course for two or a starter for four. 

2 portions salmon (350-400g)
1 rounded Tbs each salt and sugar
1 medium beetroot
2 small avocados (or one large one)
Olive oil, Lemon juice
Salt and freshly ground black pepper
1 Tbs snipped chives
Balsamic glaze

Place salmon in a plastic container with a lid. Add the salt and sugar and turn to coat. Cover with the lid and refrigerate for a day or two, turning 2 or 3 times. Drain and pat dry with paper towels. Salmon can be wrapped in plastic wrap at this stage and frozen for up to a month. Thaw to use in this recipe. Remove and discard skin and cut salmon into 1cm dice. Add olive oil and lemon juice to taste.

Peel beetroot then shave thinly using a mandoline slicer, or the thin slicing attachment on a food processor. Season with olive oil, salt and pepper to taste, separating the slices so each one is well-coated. Arrange beetroot on 4 individual serving plates in an overlapping circle, leaving a space in the middle for the avocado.

Peel avocado and mash with a fork, adding salt, olive oil, lemon juice and pepper to taste. Divide between the four plates, piling into the middle. Top with the salmon, then garnish with the chives, balsamic glaze and freshly ground pepper.

Serves 4 as a starter or 2 as a light main dish

Grilled Steaks with Board Dressing

This dressing to serve with grilled steak is prepared on a chopping board, while the steaks are cooking. It comes from a website called Certified Angus Beef and takes an ordinary steak to another level.

I have heard several well-known chefs say that steaks should be seasoned with salt and pepper a good hour before cooking. Since I adopted this advice I have found that it really does make a difference to the flavour of the meat. If you only have time to make it half an hour, so be it, anything is better than nothing.

4 rib-eye steaks each weighing 200-250g
Salt and freshly ground black pepper, to taste
½ cup fresh parsley
8 sprigs fresh thyme, leaves only
2-3 leaves fresh sage
2 small sprigs fresh rosemary
2 cloves garlic
1 spring onion or shallot
3 Tbs olive oil
2 Tbs balsamic vinegar or glaze
2 tsp Dijon mustard
2 tsp soy sauce (optional)

Season steaks on both sides with salt and pepper at least an hour before cooking. Preheat grill or barbecue to medium high.

Place the herbs, garlic and spring onion or shallot on a chopping board and chop very finely, adding a little salt and pepper and one Tbs of the oil.

Cook steaks to desired doneness then place them on top of the herb mixture, turning to coat. Cover loosely with a piece of foil and leave for 5 minutes while you mix the sauce. In a small bowl mix the mustard, balsamic vinegar or glaze, soy sauce (if using) and 2 Tbs olive oil.

Slice steaks downwards, while they are on the herb mixture and arrange the meat on 4 serving plates or one large platter. Scrape the herbs and any pan drippings into the bowl with the dressing and whisk to combine. Spoon dressing over the steaks and serve.

Serves 4

Salmon Poke Bowl

According to Google, poke bowls (pronounced pokee) originated in Hawaii but are now deeply-rooted in Japanese cuisine. Poke means “cut into pieces” and refers to the slices or cubes of raw fish that are served in a bowl, along with rice, vegetables, dressing and seasoning.

A poke bowl is usually an individual serving, with the various ingredients arranged in groups. In this version, which I created as part of a buffet lunch where I had been asked to bring a plate, I made one large poke bowl, with the ingredients evenly layered in the serving dish.

I have always made my own salad dressings but this roasted sesame dressing is an exception. I buy it from Woolworths and we always have a bottle in the fridge. If you have never tried it I should warn you that it’s addictive. Guaranteed to perk up any salad!

1 cup sushi rice
2 Tbs rice wine vinegar
1 tsp sugar, or to taste
Salt and freshly ground pepper, to taste
300g fresh salmon
1 Tbs olive oil
2 tsp grated fresh ginger
1 finely chopped birds-eye chilli (optional)
1 Lebanese cucumber, half  the peel removed, sliced
1 carrot, peeled and shredded into fine julienne
1 avocado, sliced
3 eggs, hardboiled and quartered
½ red onion, thinly sliced (or spring onions)
Coriander leaves
Black sesame seeds
1 Tbs pink peppercorns (optional)
Kewpie Japanese roasted sesame dressing (see note below)

Cook the rice in boiling salted water then rinse, drain thoroughly and mix in the rice wine, sugar and seasoning to taste, while it’s still warm. Spread over the base of a large serving dish. Remove skin and trim any stringy bits from the salmon, then cut it into 1cm cubes. Mix it with the olive oil, grated ginger and chilli if using.

Arrange the ingredients evenly over the rice, in the order they are listed. Finish with a sprinkle of black sesame seeds and some pink peppercorns if you have them. Lastly drizzle with the dressing and serve immediately.

If preferred serve the ingredients in 3 or 4 individual bowls.

Serves 6-10 as a side dish

Note: Kewpie Japanese roasted sesame dressing is available in Australia in the Asian aisle of most supermarkets. Here is a photo of the bottle so you know what it looks like and a recipe to make your own if you can’t buy it where you live.

Variations: add baby tomatoes, halved. Use raw tuna instead of salmon.

Mediterranean Baked Fish with Feta

When we were posted to Israel we had a cleaning lady who was also called Linda. My Hebrew was pretty basic, but she spoke Italian and I speak Spanish so we communicated in a weird combination of all three. A certain amount was lost in translation, but we managed.

When Linda’s son had his Bar Mitzvah she invited us to the celebration. We got terribly lost on the way and as we pulled up at the address we had been given – a huge building in the centre of town – we were feeling somewhat frazzled. The sound of a big party was wafting down the stairs so we ran up to find a room packed with over 200 guests seated at tables for 10. Linda was nowhere to be seen, so not wanting to make a point of having arrived late we spotted a couple of empty seats in the far corner and sat down. We were onto our second glass of wine and having a jolly time when suddenly the band started to play, everyone stood up and in walked the bride and groom. “Holy Dooley” said Matthew, “wrong party.”

It was impossible to leave without shaking hands with the happy couple as they were blocking the only exit. We left them looking somewhat bemused and no doubt thinking, “Who invited them?”  We eventually found our party at the other end of the building.

Linda gave me this easy recipe for a Mediterranean all-in-one fish dish. If you have more mouths to feed, the onions and potatoes “pad it out”, as my mother used to say, but I often leave one or both of them out. If preferred, serve potatoes, rice or Israeli couscous as a side dish.

This recipe makes a quick midweek family dinner and is easy to halve or double. More people to feed? Bigger dish. It’s also great for casual entertaining and looks very colourful when you bring it to the table. I don’t usually measure the ingredients, just do it by eye.

1.5 kg firm white fish fillets
3-4 cloves garlic, crushed
Salt and freshly ground black pepper, to taste
200-300g feta cheese
200-300g olives, stoned (black or green)
12-15 baby onions or 1 large onion cut into 8.
12-15 peeled baby potatoes (optional)
200-250g cherry tomatoes, or sun-dried tomatoes, thickly sliced
½ cup olive oil
½ cup white wine or dry sherry
To serve:
3-4 Tbs chopped parsley, preferably flat-leafed
Extra Virgin Olive Oil (optional)

Preheat oven to 200°C . Cut fish into 2-3 cm chunks, mix with salt, pepper and crushed garlic and spread over a greased shallow baking dish. If using, cook baby onions and potatoes separately in boiling water for about 10 minutes, or until almost cooked then drain. If using a whole onion cut into 8, fry it for a few minutes in a little olive oil, or until softened.

Cut feta into cubes and evenly distribute, tucking them in between the fish to make a pretty picture. Add the olives, tomatoes, onions and, if using, the potatoes. Drizzle with the wine or sherry and then the oil. Recipe can be made ahead to this stage and kept refrigerated for up to a few hours.

Bake for 30 minutes or until fish is cooked. Sprinkle with chopped parsley and drizzle with a little more oil (optional). Serve with a crusty baguette to mop up the juices and a big green salad or some steamed green beans.

Serves 6-8

Mushroom Risotto

When making risotto it’s important to serve it when the rice is just cooked. It should be al dente as the Italians say. It’s not difficult – you just need to add the liquid slowly and check the rice each time, before adding more stock.

While the dried mushrooms aren’t essential in this recipe they add a depth of colour and flavour that you won’t achieve from just using fresh mushrooms.

About 30g of dried mushrooms (e.g. porcini)
2 cups boiling water
1 Tbs olive oil
2 tsp butter
1 medium onion, finely chopped
1 cloves garlic, crushed
250g mushrooms, peeled and sliced
2 tsp fresh thyme leaves, chopped
1 Tbs fresh parsley, chopped
1½ cups arborio rice
½ cup white wine
Salt and freshly ground black pepper
¼ cup grated Parmesan cheese
About 4 cups vegetable or chicken stock
To garnish:
Fresh rocket leaves
3 Tbs pine nuts, lightly toasted
¼ cup grated Parmesan cheese, extra
A drizzle of Extra Virgin olive oil (optional)

Cover the dried mushrooms with the boiling water and leave to soak for 5 minutes. Drain, keeping the liquid. Chop the drained mushrooms.

Heat olive oil and butter in a large heavy-bottomed saucepan and cook the onion and garlic for 5-7 minutes, stirring often, until soft but not browned. Add the mushrooms and continue to cook for 3-5 minutes, stirring. Add the herbs, the chopped dried mushrooms and the rice and cook, stirring for a minute or two. Add the wine and cook, stirring, for a minute or two, until there is no liquid left.

Add the liquid from the dried mushrooms and cook, stirring from time to time, until it has been absorbed. Continue to cook the risotto, adding the vegetable or chicken stock about a cup at a time and adding more when it has been absorbed. Stir often and keep tasting the rice. It is ready when it is tender, but still has a little bite to it. You may not need all the stock.

Mix in the Parmesan and season to taste.

Serve risotto garnished with the rocket, pine nuts, extra Parmesan and a drizzle of olive oil.

Serves 4

Quick Individual Christmas Puds

I first published this recipe in 2016. It’s such a good idea, I thought I would publish it again so newer subscribers can make it.

Everyone is busy at this time of year. Despite best intentions it’s easy to run out of time to make traditional Christmas puddings, cakes, mince pies and all the other Christmas fare.

Adapted from a recipe published some years ago in Delicious magazine, these individual Christmas puds, called Cheat’s mini Christmas puddings in the magazine, are very quick to make. The original recipe makes four one cup puddings, but I think half that amount is enough. I served them at a ladies Christmas lunch and we concluded that they were so small we could pretend they didn’t have any calories at all.

If you make these please let me have your comments by using the balloon at the top of the page, next to the title.

Puddings:
600g shop bought Christmas cake or dark fruit cake, crumbled (I used Aldi’s)
½ cup milk
4 eggs
⅓ cup mincemeat (fruit mince) (see note below)
¼ cup sherry
Glacé cherries to decorate
Custard:
1 cup milk
1 cup cream
2 tsp vanilla essence
4 egg yolks
1 Tbs cornflour
¼ cup caster sugar
To serve:
A jug of thick pouring cream (optional)

Preheat oven to 180°C. Grease 8 half cup (125ml) dariole moulds or ramekins. Chinese tea cups (see photo) are ideal. Place cake, milk, eggs, sherry and fruit mince in food processor and pulse a few times just to combine – you want it to remain nice and chunky. If preferred mix by hand.

Divide among the moulds and place in a large baking dish. They should be almost full to the top. Pour boiling water to come halfway up sides of moulds. Cover baking dish with foil. Bake 45 mins or until firm and slightly risen.

Individual serving dishes for Quick Individual Christmas Puds

Meanwhile make custard. Heat milk, cream, sugar and vanilla in a small non-stick saucepan to boiling point. Mix egg yolks and cornflour in a bowl. Tip some of the hot milk into the egg yolk mixture and stir to combine, then tip back into saucepan with the rest of the hot milk. Continue to cook over low heat, stirring constantly with a wooden spatula, until thickened. Don’t let it boil. Pour custard through a sieve to remove any tiny bits of cooked egg white. Chill or serve warm.

When puddings are cooked remove moulds from dish, rest 10 mins, then tip onto individual serving dishes. Serve with custard (warm or cold) and decorate with glacé cherries. Serve with a jug of cream.

Serves 8

Note: If you don’t have any fruit mince, replace it with a mixture of fruit jam or marmalade and dried fruit and nuts.

Crispy Air Fryer Chicken Burgers

Everyone loves crispy fried chicken, but few people these days are into deep fat frying. We know it’s not good for us.

The good news is that the recent arrival of air fryers in our lives has made it possible to achieve the same crispy finish without adding any oil – well, just a smidge from a spray can.

This recipe is simple and quick, not to mention healthy. A perfect mid-week dinner and one which will appeal to the kids. The photo shows the burger without the top of the bun, so you can see the filling. As you can see in the photo of the chicken on its own, it was really crispy.

4 chicken thighs
1/3 cup flour
1 egg, beaten
¾ cup panko breadcrumbs (you might need a bit more)
1 tsp salt and freshly ground black pepper, to taste
1 tsp paprika
1 tsp garlic powder
1 tsp dried thyme
1 tsp dried oregano
Spray oil (olive or canola)
4 brioche buns
8 Tbs mayonnaise, preferably home-made
A little chilli sauce such as Sriracha (optional)
1 avocado, sliced
Lettuce leaves
Thinly sliced red onion (optional)
1 tomato, sliced

Trim chicken thighs and open them out, so they are of an even thickness. Place the flour, egg and breadcrumbs in three separate bowls. Mix the salt, pepper, paprika, garlic powder and herbs into the flour. Coat the chicken pieces with the seasoned flour, then coat with egg and lastly the breadcrumbs, pressing them in well. Chicken can be prepared to this point and refrigerated for up to several hours.

Spray the base of an air fryer with oil, place chicken pieces on the base, in one layer. Cook for 15 minutes at 200°C, turning halfway through and spraying again. Chicken should be cooked after 15 minutes, but it may need up to another five minutes, depending on your air fryer and the thickness of the chicken. It will also take a little longer if chicken has been refrigerated.

While chicken is cooking prepare the other ingredients. Split the buns and lightly toast them. If liked, mix some  Chilli sauce such as Sriracha into the mayonnaise.

Spread mayonnaise on both sides of the buns. Fill with the crispy chicken, lettuce, avocado, tomato and onion.

Serves 4

Slow Cooker Shredded Beef

Shredded slow-cooked beef makes a great filling for wraps or to serve with rice, potatoes baked in their jackets or roti.

1.5 to 2kg beef brisket
2 Tbs honey
2 Tbs tomato ketchup
1 Tbs tomato paste
2 Tbs brown sugar
1 Tbs Sriracha chilli sauce (optional)
2 Tbs vinegar or lemon juice
3 tsp hot English mustard

Place meat, trimmed of any excess fat, in a slow cooker. Mix remaining ingredients and pour over the meat. Cook on Low for 10 to 12 hours, turning from time to time. The beef is ready when it’s so tender it’s falling apart. Use two forks to shred the meat.

Serve as a filling for wraps or taco shells. Side dishes of grated cheddar, sour cream, shredded lettuce, avocado or guacamole and onion and tomato salad go well.

Serves a crowd