Unbaked Granola Bars

These quick and easy granola bars are a welcome, healthy addition to children’s lunch boxes and provide a delicious snack for the rest of the family. They don’t require any baking and are perfect for kids to make themselves.

Both recipes are fairly flexible, so feel free to substitute different seeds or nuts or to leave out something you don’t like or don’t have, such as coconut. The second recipe has honey as a sweetener, while the first one relies on dates for sweetness. Both contain chocolate chips, but leave them out if you prefer. If you don’t have all the seeds, double up on the ones you have.

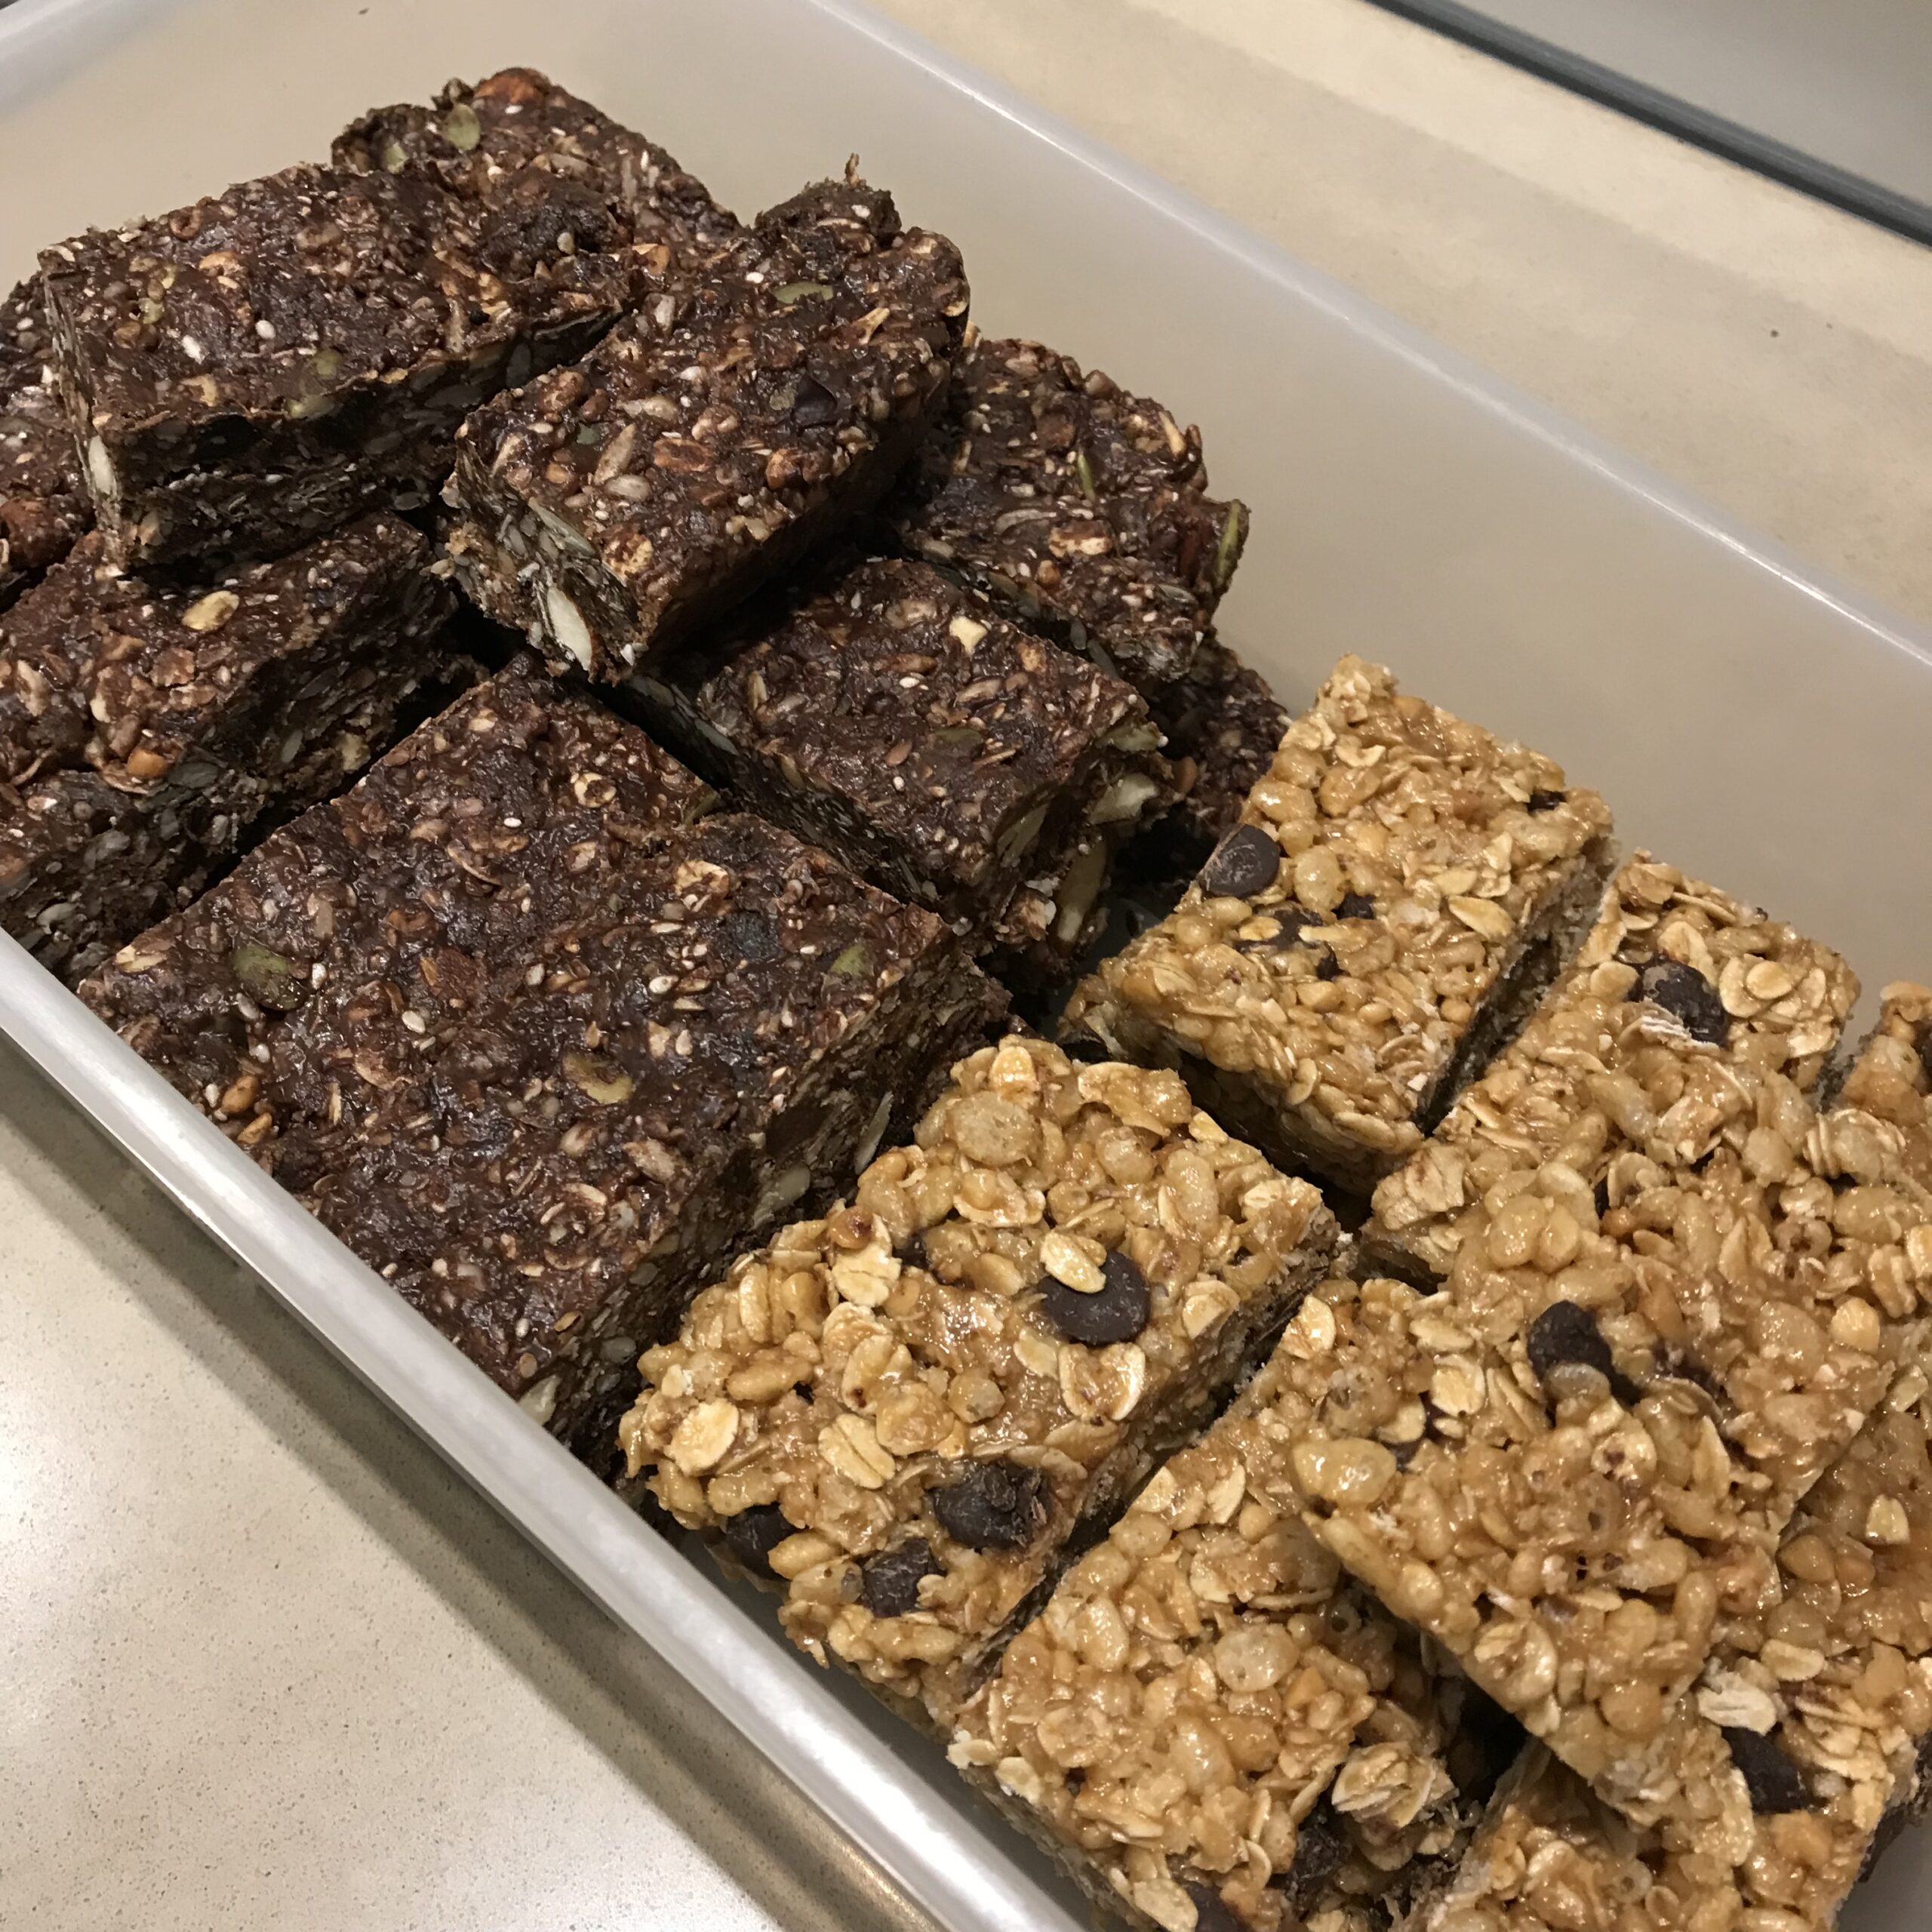
Superfood Granola Bars
1 cup peanut butter (or another nut butter)
2 cups pitted dates, pureed in food processor
3 Tbs cocoa powder (optional)
1 cup porridge oats
¼ cup coconut flakes or desiccated coconut
1 tsp cinnamon
¼ tsp salt (optional)
2 Tbs sesame seeds
2 Tbs flax seeds
2 Tbs hemp seeds
2 Tbs chia seeds
¼ cup pumpkin seeds
¼ cup sunflower seeds
½ cup almonds (or walnuts, peanuts, pecans, hazelnuts or macadamias)
½ cup chocolate chips

Place peanut butter in a small bowl and zap in the microwave for 20 seconds, or until softened. Add the pureed dates and, if using, the cocoa powder and mix well. Place remaining ingredients in a large mixing bowl, add the date mixture and mix thoroughly.

Grease a shallow square or oblong dish or container. This can be metal, glass, silicone, ceramic or plastic. Mine was 20cm or 9″ square dish and I sprayed it with oil. If the container is too big the muesli bars will be too thin.

Tip mixture into the container and use your hand or the bottom of a glass to flatten it evenly. Refrigerate for 2-3 hours, then cut into bars. Stored in an airtight tin they will keep for a week or more, though I doubt they will last that long.

Makes 12-16

Rice Krispie Granola Bars
2 cups Rice Krispies or another brand of puffed rice breakfast cereal
1½ cups porridge oats
¼ cup coconut flakes or desiccated coconut
¾ cup honey
1 cup peanut butter (or another nut butter)
1 tsp vanilla essence
¼ cup chocolate chips (dark, milk, white, your choice)

Place Rice Krispies, porridge oats and coconut in a large mixing bowl. Heat honey in a saucepan or in the microwave, just enough to make it liquid, then mix in the peanut butter and vanilla till smooth. Mix into the dry ingredients and lastly add the chocolate chips.

Grease a shallow square or oblong container. This can be made of metal, glass, silicone, ceramic or plastic. Mine was 20cm or 9″ square and I sprayed it with oil. If the container is too big the granola bars will be too thin.

Tip mixture into the container and use your hand or the bottom of a glass to flatten it evenly. Refrigerate for 2-3 hours, then cut into bars. Stored in an airtight tin they will keep for a week or more, though I doubt they will last that long.

Makes 12-16


Tahini Cookies

The Middle Eastern paste known as tahini can be used in both savoury and sweet dishes. Made by pulverising sesame seeds, it’s an integral ingredient in hummus, a dip we’ve all grown to love since it has become widely available in supermarkets and delis.

These very quick and easy cookies use tahini, combined with ground nuts and honey or maple syrup, and don’t contain any butter or oil.

2 cups ground almonds or walnuts (make in the food processor then measure)
½ tsp salt
¾ cup tahini
½ cup maple syrup or honey or half and half
2 tsp vanilla essence
To decorate:
Pecan or Walnut halves

Preheat oven to 150°C. Place ground nuts and salt in a bowl. Place tahini, maple syrup or honey and vanilla essence in a small saucepan and heat, mixing, just enough to make it smooth. Mix into the dry ingredients.

Pinch off pieces the size of a large walnut and roll into balls. Arrange on a biscuit tray lined with baking paper, leaving enough room for them to spread. Press each ball with your finger to flatten slightly, then decorate with a pecan or walnut half and press them in.

Bake for 10-12 minutes or until golden brown. Cool then store in a sealed container.

Makes 16-20

Note: I didn’t have quite enough ground nuts so I used 1½ cups of ground nuts and ½ cup plain flour. If you want to make them gluten-free, just use ground nuts.

Tilly’s Ginger Nuts

My mother-in-law’s sister, Tilly Archer, gave me this recipe for ginger nuts when I was newly-married and recently arrived in Australia.

Tilly was a sprightly lady in her late seventies when I met her and she was always busy – baking, making preserves, gardening and travelling. She said the secret to longevity was that she didn’t have time to die, her diary was too full. This philosophy certainly worked for Tilly who lived to a ripe old age.

Tilly had a fabulous garden and gave me lots of tips on flower arranging, back in the days when arrangements were more formal and less natural-looking. I was very chuffed when I won first prize with my arrangement at the annual horticultural show.

These super-crunchy biscuits are perfect with a cup of tea or coffee or to pack in school lunch boxes. Kids love them. Oh by the way, I made them once and forgot to add the bicarbonate of soda. They don’t work.

125g butter
¾ cup sugar
¼ cup golden syrup
1 egg, beaten
325g self-raising flour
4 tsp ground ginger
1 tsp bicarbonate of soda

Preheat oven to 180°C. Using a medium-sized saucepan, gently heat butter, sugar and golden syrup. Stir until butter melts and sugar dissolves. Cool for 15 minutes then add the beaten egg and remaining ingredients, sifted and mix well.

While still warm, pinch off pieces of dough the size of a large walnut and roll into balls. Place on oven trays (greased or lined with non-stick baking paper) allowing space for spreading. Depending on the size of your trays you will fit 12 or 16 on each.  Press each ball once in the middle with a finger or a fork to flatten a bit. Bake for 10 minutes, or until deep golden brown. Cool then store in an airtight tin.

Makes 35-40

Peanut Caramel Slice

If you have a packet of miso paste in the fridge, bought for a recipe which only required a tablespoonful or two and you’re wondering what to do with the rest, this is the recipe for you. If not, go and buy some.

Miso paste keeps for weeks in the fridge and is a useful addition to all sorts of dishes, both sweet and savoury. It adds an intensity of flavour known as umami, the fifth taste sensation after sweet, sour, bitter and salty. Try adding a tablespoonful to your next casserole or bolognese sauce.

This yummy slice has miso in the shortbread base where it combines with the other ingredients to make a very moreish snack. If you like peanut brittle you will like this slice which is totally addictive. If you don’t have any miso you could just leave it out.

Shortbread base:
125g butter at room temperature
5 Tbs sugar
1 egg yolk
1 Tbs miso paste
1 cup flour
2 Tbs cornflour
½ tsp salt
1/8 tsp baking powder
Caramel:
1 cup brown sugar
2 Tbs honey
50g butter
Good pinch of chilli powder (optional)
250g salted roast peanuts
½ tsp salt

Preheat oven to 180°C. Line the base of a 9″ (22cm) square cake pan with baking paper and grease the pan. Place butter and sugar in food processor and mix till creamy. Add egg yolk and miso then lastly the flour, cornflour, salt and baking powder. Mix well, stopping halfway to scrape down the sides. Put blobs all over the base of the tin, then press it to a uniform thickness with slightly damp fingers. Bake for 10 minutes or until golden.

Meanwhile, heat brown sugar, honey and butter in a saucepan until melted, stirring. Add chilli powder, peanuts and salt and mix well. Put blobs all over the shortbread base, then spread evenly with a knife. Put back in the oven for 10-15 minutes, or until golden brown.

Cool for 20 minutes, then cut into about 20 squares while still warm. Keep in an airtight tin. If kept in the fridge the slice will be more chewy. As an after dinner nibble cut the pieces in half again so you get 40.

Makes about 20 pieces

Variations: use slivered almonds, roughly chopped macadamias or a mixture of nuts instead of the peanuts.

Caramel Slice

I was staying at Hill House, a dairy farm in County Durham in my early teens when I learnt to make this recipe. They called it Triple Decker Slice and everyone loved it. There are heaps of versions online, often called Millionaire’s Shortbread, but this is my version. I’ve added the salt flakes, which weren’t in the original recipe, but appeal to anyone who likes salted caramel.

This slice is high in sugar and calories, so I don’t make it often, but when I do it always puts a smile on Matthew’s face.

If you can find dulce de leche or Nestle Top n Fill, make Filling (1). If not then make Filling (2).

Shortbread:
125g butter at room temp
½ cup soft brown sugar
1 cup plain flour
½ cup cornflour
Filling (1):
250g dulce de leche or Nestle Top ‘n Fill
125g butter
½ cup soft brown sugar
Filling (2):
1 can condensed milk
2 Tbs golden syrup
125g butter
½ cup soft brown sugar
Topping:
250g dark chocolate
2 Tbs Copha or butter
To finish:
Maldon sea salt flakes (optional)

Preheat oven to 170°C. Mix butter and sugar in food processor. Add flour and cornflour and process till mixture sticks together into a ball. Press into a greased shallow rectangular baking tin measuring about 25x30cm, lined with greased baking paper. You don’t need to roll it out, just drop lumps evenly over the tin, then press with your fingers till you have a more or less even thickness. Bake 15-20 mins. It should be very lightly coloured, not brown.

Heat filling ingredients (1 or 2) and when bubbling cook gently for 2-3 mins, stirring. If using Filling (2) you will need to cook it a bit longer, say 5-7 minutes, to achieve the caramel colour. Pour over the shortbread and spread evenly. When caramel has cooled, melt chocolate with Copha or butter, pour over and spread evenly. If liked sprinkle with salt. Cut into squares when cold.

Makes about 20

Figgy Biscuits

As kids we all loved figgy biscuits. These little pillows of fig paste encased in a delicious cakey-biscuity dough were invented in Philadelphia in the late 1800s and are sold in the USA under the Newton brand. In England we bought a version made by McVities.

Anything home-made always tastes better than the shop-bought variety and these scrumptious biscuits are no exception. Buy dried figs which are plump and sticky and not too hard. If you don’t have quite enough throw in a few sultanas, raisins or dates to make up the two cups. The addition of ginger is my own suggestion for ginger fans. This is a good recipe for using up that last bit of jam or marmalade from the bottom of the jar.

Commercial figgy biscuits don’t have a sprinkling of icing sugar, but I always think it enhances the appearance of baked goods. Mine were a bit overcooked, as you can see in the photo. They should have been whipped out of the oven a few minutes earlier.

Serve as a biscuit or warm with vanilla ice-cream as a delicious dessert.

Dough:
140g butter (at room temperature)
1/3 cup brown sugar
1 level tsp bicarbonate of soda
¼ tsp salt
¼ tsp ground cinnamon
2 Tbs honey
1 Tbs orange or lemon juice
1 egg
2 cups plain flour
Filling:
2 cups chopped dried figs, stems removed
1/3 cup jam or marmalade
2 Tbs orange or lemon juice
1 Tbs grated fresh ginger or glacé/crystallized ginger (optional)
To finish:
1 egg white, beaten
Icing sugar (optional)

Place butter, brown sugar, bicarbonate of soda, salt, cinnamon and honey in food processor. Process for a minute or two, stopping to scrape down the sides and gradually adding the orange, egg and flour. When thorough mixed use a spatula to scrape the dough onto a piece of plastic wrap. Pat it into a thick square, wrap with the plastic, then refrigerate for an hour or so.

There’s no need to wash the food processor before you make the filling. Place all ingredients in food processor and process till smooth, stopping to scrape down the sides.

Preheat oven to 170°C. Cut dough in half and roll out one half on a floured surface to a rectangle approximately 30cm by 10cm. Spread half the filling thickly down the middle as shown in photo. Bring in one side over the filling, then the other side, overlapping with the first side. You may need to use a metal spatula to lift the dough which will be quite soft with a tendency to stick and break. You will then have a long sausage with a seam along the top as shown in the photo. Turn it over and cut into 8 to 10 even pillows. Arrange on a shallow baking tray lined with baking paper, with a space between each biscuit. Repeat with the other half of the dough and filling. Brush with beaten egg white then bake for 15 mins or until light golden brown.

Cool biscuits then store in an airtight tin.

Makes 16-18


Little Edna’s Eccles Cakes

My mother’s best friend Edna was affectionately known as Little Edna because she was so tiny.

She loved to bake and watching friends and family eat what she had made gave her a great deal of pleasure. You rarely saw Little Edna eat anything herself, which is one of the reasons she was so tiny. My mother was always trying to shed a few kilos so we would avoid calling in at afternoon tea time. This wasn’t easy, as time-wise afternoon tea was a movable feast. Any time visitors popped in was an excuse to put the kettle on and get the cakes out. Edna was what is known as a “feeder” and saying no thank you wasn’t an option.

Edna and Stan kept a caravan on one of the beaches in northern France. They went there for a month each summer, often taking their grandchildren with them. One year Edna was on the beach, holding hands with two of her grandchildren as they ran in and out of the waves, laughing and splashing. Suddenly Edna’s false teeth shot out and into the sea. Despite a long search, they were nowhere to be found.

Driving back to England to get a new set wasn’t an option – they had only just arrived. So poor Edna spent a miserable two weeks feeling embarrassed and avoiding conversation. One day as she was strolling along the beach feeling glum she looked down and lo and behold “There they were, laffing up at me” she explained, with her broad Yorkshire accent “so I picked them up and put them straight back in again”.

Eccles cakes are traditional British pastries named after the town of Eccles and they were one of Little Edna’s specialities. I always thought her method of cutting the pastry into squares rather than circles (which is quicker and avoids any off-cuts) but still ending up with round cakes was pretty neat.

2 sheets ready-rolled puff pastry, approx 25x25cm
Filling:
1 cup mixed dried fruit or half sultanas and half currants (see note below)
25g butter, melted
2 Tbs brown sugar
2 Tbs jam or marmalade
Pinch of nutmeg
Grated rind of 1 lemon
To finish:
1 egg white, beaten with a fork
Sugar

Preheat oven to 180°C. Cut each square of pastry into six even pieces – down the middle, then into three cross-wise. Mix filling ingredients and put a heaped teaspoonful or so in the middle of each square. Draw up the sides of each square into the middle and pinch the ends together firmly, to form a little round purse.

Turn each one over and press firmly with the palm of your hand, so you have a neat round cake, or roll over each one lightly with a rolling pin. Cut two or three slashes with a sharp knife on the top of each cake. Brush each one with egg white, then dip in some sugar and shake off the excess. Arrange cakes on a baking sheet and bake for 15 minutes, or until golden brown. Serve warm or cold. Best eaten the same day.

Makes 12

Note: if preferred, make the cakes smaller by cutting each sheet of pastry into 9 instead of 6 – as shown in this photo.

Currants are dried small grapes not dried blackcurrants. If unavailable use more sultanas or some chopped raisins.


Latte Panna Cottas with Chocolate Hazelnut Chews

The recipe for these little coffee desserts was given to me by the wife of a British diplomat. By the time we met, Mary and her husband had had several postings, including one to a remote African country where entertaining was something of a challenge. Finding the ingredients for a Western-style dinner party and explaining to the local staff exactly what she wanted had not been easy for Mary. Sometimes things were simply lost in translation.

Every time they entertained the food was inevitably served cold or at best lukewarm. Mary’s house boy Robert said that the cook was not to blame. The distance to the dining room was the problem. By the time the food had made that long journey along the hall from the kitchen, of course it was cold.

Mary persuaded the Embassy to fund the installation of a serving hatch, so the food could be passed directly from the kitchen to the dining room and hopefully arrive on everyone’s plates before it got cold.

In due course the hatch was installed. When the next dinner party was arranged Mary instructed Robert that from now on everything was to come through the new hatch. He seemed somewhat reluctant, but Mary said that it had cost a lot of money and her husband would be very cross if he didn’t use it. Robert was a likeable fellow in his twenties who tried hard to please.

When the guests sat down the cold starters were already on the table. Mary sat with her back to the serving hatch, while her husband sat at the other end of the long table. In due course the plates from the starter were cleared away. Polite diplomatic conversation continued as they waited for the main course.

Some of the guests began to giggle. Mary wondered if there was some joke that she had missed. People seemed to be looking at something behind her. She turned around to see Robert climbing through the hatch, a large serving dish balanced precariously in his free hand.

Mary wanted everything to come through the hatch and so it did.
unnamed (9)

Panna Cottas:
250ml milk
300ml cream
¼ to ½ cup sugar (to taste)
2 shots Espresso coffee (see note below)
1 Tbs gelatine
4 Tbs water
Chocolate Hazelnut Chews:
4 large egg whites
3 pinches salt
1½ cups icing sugar
1 cup cocoa powder
150g blanched hazelnuts, roughly chopped in food processor
Extra whole blanched hazelnuts
To serve:
Grated dark chocolate
Pouring cream (optional)

Place milk, cream, sugar and coffee in a saucepan and bring to the boil, then remove from the heat. Meanwhile place gelatine and water in a small bowl then zap in the microwave briefly to dissolve. Mix gelatine mixture into coffee mixture then divide among 6 small ramekins, coffee cups or glasses. Chill for several hours or overnight.

For the Hazelnut Chews, preheat oven to 180°C. With electric beaters whip egg whites and salt until soft peaks, then gradually beat in the sugar until you have a thick, glossy meringue. Beat in the cocoa then fold in the chopped nuts. Line a biscuit tray with baking paper and place tablespoons of mixture onto the tray with a little space for spreading, though they won’t spread much. Top each biscuit with a whole hazelnut then bake for 15-20 mins. Mine were done in 15 mins and to be chewy you don’t want them overcooked. Makes about 15.

Serve panna cottas sprinkled with a little grated chocolate, with the hazelnut chews and pouring cream in a jug.

Serves 6

Note: if preferred use 125ml hot water and 1 Tbs instant coffee granules

Florentines

Florentines are a delicious treat to serve with coffee after dinner.

Actually they’re delicious any time of day. I swear they talk to me from the tin, sending out “Eat me” messages. They’re quite big, so if it makes you feel better cut them in half, or make smaller ones. But you’ve seen Florentines in cake shops – they’re always big!

Use any combination of dried fruit and nuts you have on hand. I used some dried sour cherries from Costco and craisins (dried cranberries). I left out the candied peel because I’m the only one in our family who likes it.

Woolworths sell non-stick egg rings in two packs for about two dollars, so I bought five packs. I could have made the Florentines slightly thinner and got 12 from the recipe, but I had only bought 10 egg rings, so that was that! If preferred make them free-form by placing heaped tablespoonsful onto the paper – they will spread as they cook.

½ cup creamFlorentines
½ cup sugar
1 Tbs honey
½ cup dried cherries (glacé or sour cherries)
½ cup dried fruit (I used cranberries)
½ cup candied peel (or more dried fruit)
1 cup flaked or slivered almonds (I used almonds & cashews)
½ cup flour
100g dark chocolate, melted
1 tsp vegetable oil, coconut oil or Copha

Preheat oven to 180°C. Line a baking tray with non-stick paper and arrange the egg rings on top. In a medium sized saucepan heat cream, sugar and honey till boiling. Remove from the heat and add fruit, nuts and flour. Cool for a few minutes so it thickens up.

Divide among the rings spreading evenly then bake for 10-15 mins or until light caramel coloured. Don’t overcook as the fruit easily burns. Leave to cool on the tray.

Melt chocolate and oil or Copha in microwave or in a bowl over boiling water. Dip each Florentine into chocolate on the flat side, shake off excess then cool on non-stick paper, chocolate side up. If you’re in a hurry stick them in the fridge or freezer. And if you have any chocolate left, drizzle a bit on the bumpy side, but let the chocolate set on the first side before you do this. They actually look better on the drizzly/bumpy side.

Makes 10-12

Pom’s Crunchy Biscuits

My Thai friend Pom makes these delicious crunchy biscuits. She gave me some as a gift recently, but they were so good I ate them all as I was driving home, so Matthew didn’t get any. I asked her for the recipe and decided to double the quantities because I knew that 16 biscuits wouldn’t last long.

They’re like muesli in a biscuit – healthy, satisfying, good for lunch boxes or to go with a cuppa. An Australian cup measure is 250ml or a quarter of a litre.

Pom's Crunch Biscuits4 cups cornflakes
2/3 cup sugar or honey
250g butter at room temp
2 eggs
1 tsp vanilla essence
1 cup sultanas
2 cups SR flour
½ cup sesame seeds (white or black or a mixture)
½ cup shredded or dessicated coconut
½ cup sunflower or pumpkin kernels
1 cup chocolate chips or chopped chocolate

Preheat oven to 180ºC. Place cornflakes in food processor and process briefly to break them up a bit, but not much. If you need to chop the chocolate do it now and add it to the cornflakes. Place sugar or honey and butter in food processor and mix until smooth and creamy. Add eggs and mix well, then flour and vanilla. When smooth, scrape into the bowl with the cornflakes, add remaining ingredients and mix well. Line two or three baking trays with baking paper. Form mixture into 3cm balls and arrange on trays with spaces in between. Bake for 12-15 minutes or until golden – don’t overcook or they will be dry. Cool then store in a tin with a lid.

Makes about 32

Note: the recipe is easy to halve and you can vary the ingredients to suit you taste. Add more coconut and less sultanas, use chopped nuts instead of the kernels, or leave out the chocolate and substitute something else