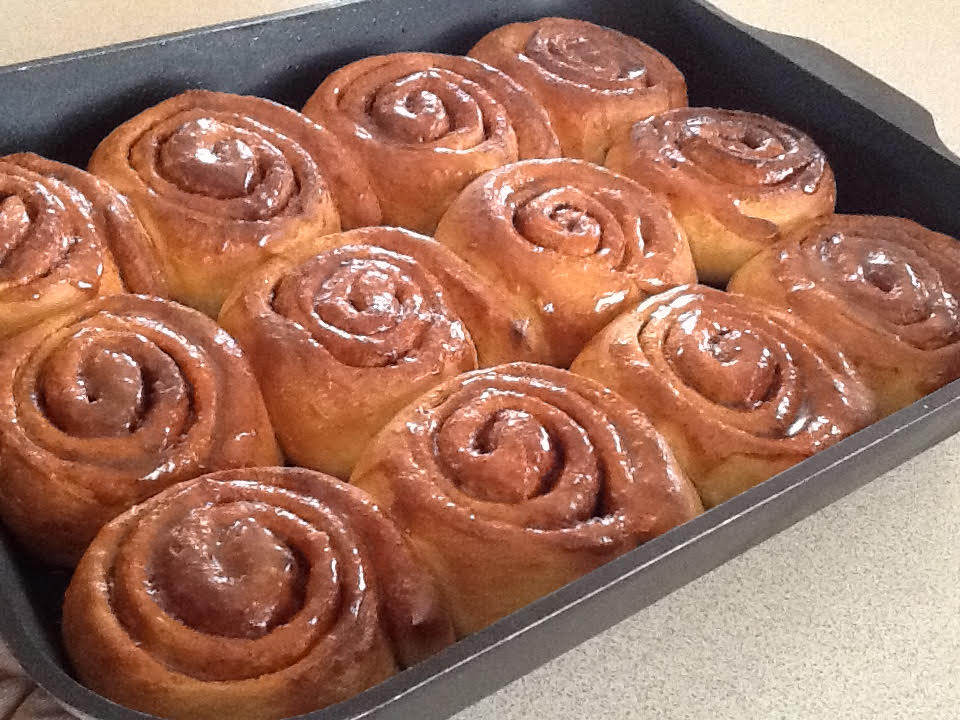
Glazed Cinnamon Rolls

This delicious recipe is adapted from one which appeared recently on the New York Times Cooking site.

The original version used two cups of brown sugar and one cup of icing sugar which seemed an awful lot, so I’ve cut it down to one cup of brown sugar and a quarter of a cup of icing sugar. The result is sweet enough for most people’s tastes, but if you have a sweet tooth make double the amount of glaze.

I left the bourbon whisky out of the glaze and made 12 slightly larger rolls instead of 18. If you like, add a tablespoonful of any whisky to the glaze. I made the dough in a food processor rather than a mixmaster because I do pretty much everything in my Magimix.

Glazed Cinnamon Rolls

1 cup milk
75g butter
3 cus plain flour
¼ cup brown sugar
2 tsp dry yeast
1 tsp salt
¾ tsp ground cardamom (or cinnamon)
1 egg
Filling:
50g butter
½ cup brown sugar
1½ tsp ground cinnamon
½ tsp ground nutmeg
Glaze:
¼ cup brown sugar
2 Tbs water
25g butter
1 tsp vanilla essence
¼ cup icing sugar, sifted

Heat milk for a minute in the microwave then add the butter and allow to melt. Place flour, sugar, yeast, salt and cardamom or cinnamon in a food processor. Process for a minute then gradually add the warm milk and butter and the egg through the feed chute with the motor running. When mixture forms a sticky ball stop the motor and tip dough onto a floured surface and knead for 3-4 minutes until smooth. Form into a ball and place in an oiled bowl. Cover with a tea towel and leave to rise in a warm place for 2-3 hours.

Meanwhile for the filling, heat butter in a small saucepan, swirling the pan from time to time, until it turns nut brown. Watch carefully as it won’t take long. Cool. Mix the brown sugar with the spices.

When dough has doubled in size tip onto a floured surface and roll into a 30×40 cm rectangle with a rolling pin. Brush with the brown butter leaving about a centimetre all round. Drizzle with any remaining butter, so you use it all. Sprinkle sugar and spice mixture all over then roll up from the long side. Cut into 12 even slices. Arrange slices evenly in a buttered 20x30cm rectangular roasting pan or baking tray – 3 one way and 4 the other – they will expand to fill the gaps. Leave to stand for 45 mins or until doubled in size.

Pre-heat oven to 180°C. Bake rolls for 20-25 mins then remove from the oven and allow to cool for 10 mins. Meanwhile for the glaze heat brown sugar, water and butter in a small saucepan for 2-3 mins, or until thickening. Add vanilla and icing sugar and continue to cook, stirring, until you have a nice thickish icing. Leave to cool until rolls are ready.

Drizzle glaze all over the rolls, then cool a bit so the icing firms up. Serve warm. Any leftover buns can be frozen or refrigerated for up to 3 days. Reheat in the oven before serving.

Makes 12 rolls

Fried Egg in a Bagel

This recipe from a website called Food52 is so simple you hardly need a recipe. But it’s such a novel idea and so delicious I had to tell you about it.

You simply fry an egg in the hole in half a bagel.  Serve for breakfast or lunch, accompanied by bacon, ham, smoked salmon or on its own. The recipe makes two servings, but you may decide to eat them both! They go very well with leftover ham from Christmas.

Fried Egg in a Bagel

1 bagel split in two horizontally
1 Tbs butter
2 eggs
Salt and freshly ground black pepper

Make the holes in the two halves a bit bigger using a serrated knife or a small scone cutter. Heat butter in a non-stick frying pan and swirl around. Place bagel  halves in the pan, cut side down, break an egg into each and season with salt and pepper. It doesn’t matter if it spills out a bit.

Cover and cook until the eggs are just set. Serve alone or with crispy bacon, ham or smoked salmon. If serving with bacon cook it in the pan first, then remove and cook the bagel so it gets a nice bacon flavour.

Serves 2

Quick Chicken Satay

Everyone loves chicken satay and this recipe can be made in no time with ingredients you probably have in the pantry. It’s easy to halve for two or three people.

The first time I made this the washer upper complained that the frying pan was very difficult to clean, because of the honey. A week or so later I was chatting to a friend about the virtues of using non-stick baking paper to line an oven tray when you’re baking salmon or chicken, so there’s nothing to wash up. My friend said this trick also works when you’re cooking something in a frying pan.

So I tried it and it works. Just cut a circle of non-stick baking paper to fit the base of the pan and cook the satays on top. It doesn’t affect how they brown and the pan is so much easier to clean. No complaints from the washer upper this time.

DSCF11481 kg lean chicken thigh meat
Marinade:
2 cloves garlic, crushed
2 Tbs oil
2 tsp turmeric
1 Tbs honey
½ tsp salt
Sauce:
¼ cup peanut butter
¼ cup Thai sweet chilli sauce
1 tsp fish sauce
2 tsp soy sauce
1/3 cup tinned coconut milk (shake can first)
To serve:
Steamed rice
Lime or lemon wedges
Sliced red or white onion and cucumber

Cut chicken thigh into cubes. Mix marinade ingredients and add chicken. Leave to marinate for at least half an hour. Meanwhile, soak 16-20 short wooden bamboo skewers in warm water.

Thread chicken cubes onto skewers. Heat a large non-stick frying pan or griddle pan and cook satays for a minute or two on all four sides, until cooked through and browned.

Meanwhile mix all ingredients for sauce. Serve satays with the sauce, steamed rice, sliced onion, cucumber and lemon wedges.

Serves 6

No-Bake Raspberry Cheesecake

We were staying with Catherine in Newcastle for a few days when she said “Oh by the way, we’re invited to a BBQ lunch tomorrow and we’re taking a dessert. What shall we make?”

We found cream cheese, cream and 2 punnets of raspberries in the fridge and a few other ingredients in the pantry. The result was this delicious no-bake cheesecake which was popular with the adults and kids alike.

Make this the day before serving.

IMG_0695300g white chocolate
500g Philadelphia-style cream cheese (at room temp)
300ml thick cream
3 Tbs caster sugar
1 cup fresh or frozen (thawed) raspberries
½ cup red jam (preferably raspberry)
About 12 sweet biscuits or sponge fingers
To serve:
1-2 cups fresh raspberries
Honey to drizzle

Melt chocolate in a bowl over simmering water. In another bowl, with electric beaters, beat cream cheese, cream and sugar until smooth. Add melted chocolate and mix well.

Line a loaf tin with plastic wrap, leaving a generous overhang. With a fork, mash 1 cup raspberries with the jam on a plate. Spread half the cream cheese mixture in the loaf tin. Spread the berry mixture over the top. Then spread the rest of the cream cheese mixture over the jam mixture. Arrange a single layer of biscuits or sponge fingers over the surface, pushing them in slightly – this will be the base. Rectangular or square ones are easier than round ones. Bring excess plastic wrap over the top to cover, then refrigerate overnight.

No-Bake Raspberry Cheesecake

To serve, tip cheesecake onto serving plate and remove plastic. Arrange raspberries over the top and drizzle with honey.

Serves 12

Variation: use strawberries instead of raspberries

Three Easy Chicken recipes made in a Slow Cooker

I found a recipe online for a really easy chicken recipe made in a slow cooker. Basically you cut up some boned and skinned chicken thighs, put them in the slow cooker with a few other ingredients, cover and cook on high for five hours. And that’s it.

So following this basic idea I developed three variations. Perfect for busy people – this one’s for you Fiona.

Three Easy Chicken recipes made in a Slow CookerSweet and Sour Chicken
1kg chicken thigh meat, trimmed and cut into 1 inch (2-3 cm) cubes
2 cups tomato passata or sauce for pasta
1 can pineapple cubes, drained
2 tsp sugar
1 onion, finely chopped
1 Tbs grated or finely chopped ginger
1 red capsicum (pepper) cut into 1 inch (2 cm) squares
1 Tbs soy sauce
1 Tbs tomato paste
Salt and pepper to taste

Satay Chicken
1kg chicken thigh meat, trimmed and cut into 1 inch (2-3 cm) cubes
½ cup peanut butter
1 Tbs brown sugar
1 Tbs soy sauce
1 clove garlic, crushed
1 can coconut milk
1 onion, finely chopped
1 chicken stock cube
Fresh chilli, finely chopped, to taste (optional)
Juice of half a lemon or one lime
Salt and pepper to taste

Mexican Chicken
1kg chicken thigh meat, trimmed and cut into 1 inch (2-3 cm) cubes
1 jar Mexican salsa
1 Tbs soy sauce
2 tsp sugar
1 clove garlic, crushed
Fresh chopped chilli, to taste (optional)
Juice of half a lemon or one lime
Salt and pepper to taste

Garnishes
Thinly sliced spring onions for the Sweet and Sour – serve with rice
Chopped peanuts and coriander for the Satay – serve with rice
Diced avocado & red onion, grated cheddar for the Mexican – serve with wraps or tortillas

To serve
Steamed rice, wraps or tacos

Place chicken and chosen sauce ingredients in slow cooker, stir. Cover and cook on High for about five hours, stirring once or twice during cooking time. Check seasoning.

Serve with steamed rice or tacos or wraps.

Serves 4-6

Lemon Drizzle Cake Salvation Creek

As we were heading off to Europe last year for an extended holiday my friend Karen lent me a few good books.

We thoroughly enjoyed The House at Salvation Creek, a delightful memoir by Susan Duncan, but soon realised that it’s actually a sequel to her first book. So when we got back I borrowed the first one, Salvation Creek, from the local library.

Pittwater, where the narrative takes place, is described by Wikipedia as “a tide-dominated drowned valley estuary 40 km north of Sydney.” Duncan’s descriptions of the native flora and fauna are exceptional. A friend in Denmark to whom I recommended the books said “Susan Duncan brought some warm Australian sunshine into the bleak, grey days of a Danish winter.”

Duncan’s relationship with her ageing mother is something many readers will relate to. And of course I loved all the references to what she was cooking. This is her recipe for Lemon Drizzle Cake. Very easy and a real crowd pleaser.

Zest of 1 large lemon
250g caster sugar
250g butter (at room temp)unnamed
4 large eggs
250g SR flour
Pinch salt
1 level tsp baking powder
Syrup:
Juice of 1 large lemon
150g sugar

Preheat oven to 160ºC and prepare a round or square cake pan. I used a 22cm (9″) square silicone pan, so there was no need to grease and line the bottom with baking paper, which you need to do with a metal pan.

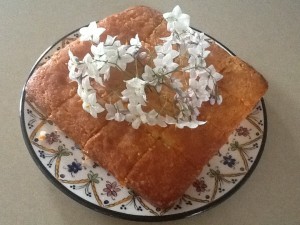
Place lemon zest and sugar in food processor and blitz for 1-2 mins. Add butter and mix for a minute then add the eggs, sifted flour, baking powder and salt. Mix for 1- 2 mins then stop to scrape down the sides and mix for another minute. Scrape into cake pan, spread out evenly and bake for 30-40 mins or until golden and well risen. Test cake with a toothpick inserted in the middle, which should come out clean, but don’t overcook the cake. Remove from oven and pour over the syrup while hot, using a knife to distribute it evenly. If liked serve garnished with flowers e.g. potato vine as in photo.

Syrup: heat lemon juice and sugar together in a small saucepan to form a syrup.

Serve for afternoon tea or as a dessert with whipped cream and some berries. Duncan suggests mixing some icing sugar and passionfruit pulp into the cream.

Serves 16

Notes: The original recipe says to cook the cake for 30-35 mins but mine took 40. The recipe can be doubled and it makes very good cupcakes. She says it freezes well.


Cauliflower Crust Pizza

Instead of the usual dough made with flour, this pizza crust is made with grated cauliflower. It’s enough to serve two and because it’s so low in carbohydrates it only has 300-350 calories per serving.  Try it – it’s really delicious!

Cauliflower Crust Pizza

Crust
½ head cauliflower
1 cup grated Mozzarella cheese
2 Tbs grated Parmesan cheese
1 egg
Salt and freshly ground black pepper
Topping
¼ cup tomato sauce or pesto
8-10 cherry tomatoes, halves
4 spears asparagus cut into 3 and steamed
Some buffalo Mozzarella balls sliced (optional)
1-2 cloves garlic, thinly sliced
¼-½ cup grated Mozzarella cheese
Dried chilli flakes (optional)
To garnish
Fresh basil or parsley

Coarsely grate cauliflower. I used a coarse 5mm grating disc on my Magimix. Place in a bowl, cover and microwave on High for 7-8 mins or until soft. Cool then mix in remaining ingredients. Pre-heat oven to 220°C. Line a baking tray with baking paper. Tip cauliflower mixture onto the paper and pat it into a round pizza crust. Bake for 15 mins or until golden brown.

Spread tomato sauce or pesto over the pizza base. Arrange tomatoes, asparagus, garlic, sliced Mozzarella balls and chilli flakes (if using) on top. Sprinkle with grated cheese then bake for 10 mins or until bubbly. Garnish with fresh herbs and serve with a mixed salad.

Serves 2

Variations: instead of asparagus use some ham, salami, pepperoni or peeled prawns.

Chicken and Zucchini Burgers with Creamy Sauce

This recipe is adapted from one by Israeli-born Yotam Ottolenghi. He uses turkey mince. I used chicken mince, but you could also use pork or pork and veal mince. He pan fries them, then finishes them off in the oven. I just pan fried them. I also increased the cumin and added the pine nuts for a bit of crunch.

This is a good way to get reluctant kids to eat some green vegetables. Any leftover burgers are delicious cold for lunch.

Chicken and Zucchini Burgers with Creamy Sauce500g minced chicken, turkey, pork or pork and veal
2 small or one large zucchini (courgette), coarsely grated
2 spring onions, finely sliced
1 egg
2 Tbs finely chopped mint
2 Tbs finely chopped coriander
2 cloves garlic, crushed
2 tsp ground cumin
2 Tbs pine nuts
1 tsp salt and freshly ground black pepper to taste
½ tsp cayenne pepper (optional)
Oil for frying
Sauce:
½ cup sour cream
½ cup thick Greek yoghurt
1 tsp grated lemon rind
1 Tbs lemon juice
1 clove garlic, crushed
1½ Tbs vegetable or olive oil
1 Tbs Sumac (see note below)
Salt and freshly ground black pepper to taste

Mix all ingredients for sauce in a small bowl and refrigerate until serving time. Mix all ingredients for burgers (not the oil) in a large bowl. Form into about 8 burgers or 16-18 large meatballs.

Heat some vegetable oil in a large frying pan and cook the burgers in two batches for 5-6 minutes each side, or until nicely browned and cooked through.

Serve burgers hot or cold with the sauce.

Serves 4

Note: Sumac is a Middle Eastern spice mix. If you don’t have any use 2 tsp dried cumin and 2 tsp dried coriander instead. If preferred use 1 cup yoghurt for the sauce and leave out the sour cream.

No-Knead No-Cross Buns

There’s nothing quite like home-made Hot Cross Buns for breakfast over the Easter weekend. Serve them warm straight from the oven. Or make them ahead and reheat them in a moderate oven. Or split and toast them.

In an attempt to save time I thought I would see if the No-Knead Bread recipe could be adapted to make Hot Cross Buns. You always need more yeast when you’re adding fruit, sugar, butter and eggs to a basic bread dough, so I doubled the amount used in the No Knead Bread recipe.

Putting crosses on the buns is a bit fiddly so I didn’t bother and can assure you they taste just as good without! Technically this recipe is not quick because you leave the dough to prove overnight. But the actual work involved takes no more than five or ten minutes.

Basic yeast mixture:
4 cups plain flour
½ tsp dry yeast unnamed
1½ cups warm water
1 tsp salt
Additions:
60g butter at room temp (I used spreadable butter)
1/3 cup sugar
1 tsp each ground cinnamon, mixed spice and ground ginger
1 egg, lightly beaten
½ cup sultanas
¼ cup dried mixed peel (optional) or use more sultanas
Extra flour as needed
Glaze:
1 Tbs cold water
1 Tbs sugar
1 tsp powdered gelatine

In a large mixing bowl mix all ingredients for yeast mixture with a spoon until well combined. Cover bowl with plastic wrap and leave overnight. Next day – whenever you are ready – mix butter, sugar, spices and egg into the yeast mixture, using electric beaters. Lastly mix in the fruit then tip mixture onto a well-floured surface.

Knead just enough to incorporate a bit more flour and get rid of excessive stickiness, then cut the dough into 12 even pieces. Form into balls and arrange in a greased 10-12″ (25+cm) round tin or use a rectangular one. Leave to rise for an hour or two, then bake in a pre-heated oven at 220ºC for 20 mins. Remove from the oven and brush with hot glaze while hot. Serve warm or toasted split in two and spread with butter.

Glaze: place cold water and sugar in a small bowl and sprinkle with gelatine. Zap in the microwave for 20 secs on High.

Makes 12 buns

Note: can be frozen, but best frozen without glaze then thawed, reheated in a moderate oven and brushed with glaze while hot. Made in this way the buns all stick together and need to be broken apart. If preferred bake them on a larger biscuit tray, leaving more space between each one, so they don’t stick together.

Florentines

Florentines are a delicious treat to serve with coffee after dinner.

Actually they’re delicious any time of day. I swear they talk to me from the tin, sending out “Eat me” messages. They’re quite big, so if it makes you feel better cut them in half, or make smaller ones. But you’ve seen Florentines in cake shops – they’re always big!

Use any combination of dried fruit and nuts you have on hand. I used some dried sour cherries from Costco and craisins (dried cranberries). I left out the candied peel because I’m the only one in our family who likes it.

Woolworths sell non-stick egg rings in two packs for about two dollars, so I bought five packs. I could have made the Florentines slightly thinner and got 12 from the recipe, but I had only bought 10 egg rings, so that was that! If preferred make them free-form by placing heaped tablespoonsful onto the paper – they will spread as they cook.

½ cup creamFlorentines
½ cup sugar
1 Tbs honey
½ cup dried cherries (glacé or sour cherries)
½ cup dried fruit (I used cranberries)
½ cup candied peel (or more dried fruit)
1 cup flaked or slivered almonds (I used almonds & cashews)
½ cup flour
100g dark chocolate, melted
1 tsp vegetable oil, coconut oil or Copha

Preheat oven to 180°C. Line a baking tray with non-stick paper and arrange the egg rings on top. In a medium sized saucepan heat cream, sugar and honey till boiling. Remove from the heat and add fruit, nuts and flour. Cool for a few minutes so it thickens up.

Divide among the rings spreading evenly then bake for 10-15 mins or until light caramel coloured. Don’t overcook as the fruit easily burns. Leave to cool on the tray.

Melt chocolate and oil or Copha in microwave or in a bowl over boiling water. Dip each Florentine into chocolate on the flat side, shake off excess then cool on non-stick paper, chocolate side up. If you’re in a hurry stick them in the fridge or freezer. And if you have any chocolate left, drizzle a bit on the bumpy side, but let the chocolate set on the first side before you do this. They actually look better on the drizzly/bumpy side.

Makes 10-12