Crispy Pork Dumpling Pancake

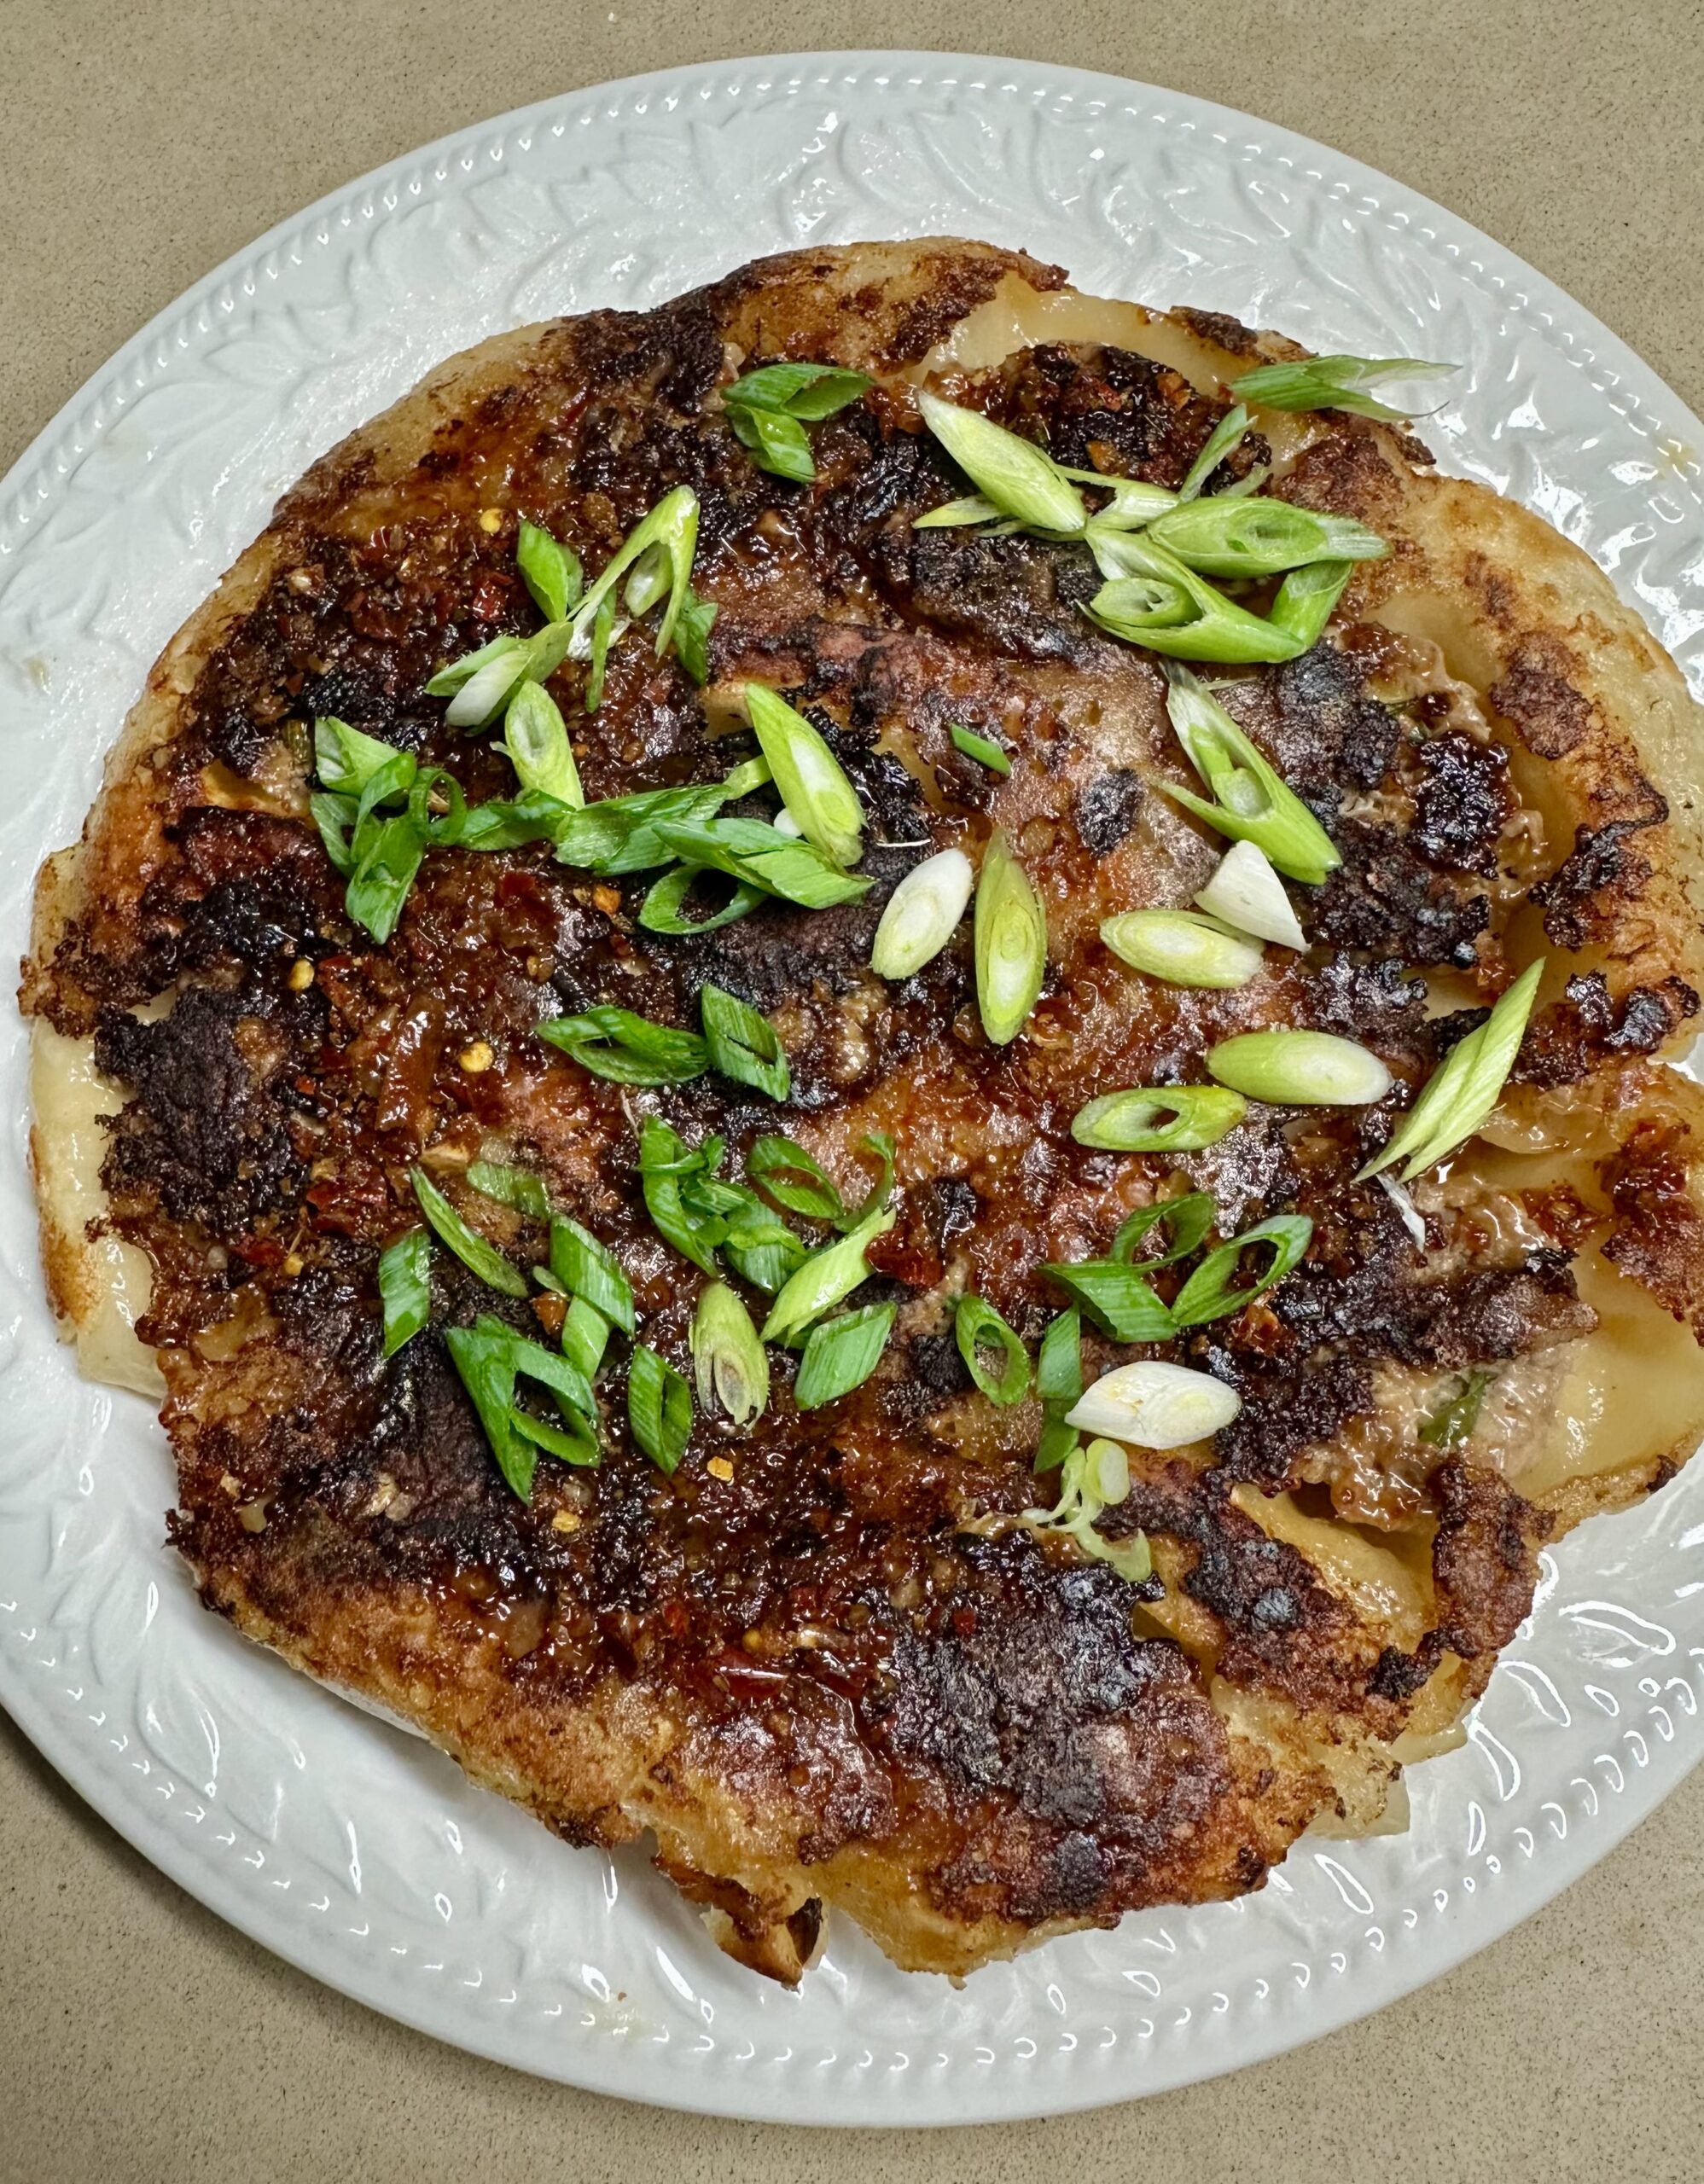
If you like crispy pork dumplings – called Gyoza or Pot Stickers – you will like this recipe for one big one. Variations have been going viral on social media, so I decided to give it a try and it was indeed delicious.

Instead of folding and sealing the pork filling into wonton or gyoza wrappers, everything just goes into the pan in layers, so it’s very quick. The flour and water mixture is a clever trick to make everything stick together.

This pancake was enough for two adults with a side salad, but I’m sure one of our hungry teenaged grandkids would have no trouble polishing off a whole pancake.

Can be served as a pull-apart finger food with the dipping sauce in a bowl on the side.

250g pork mince
2 Tbs soy sauce
1 tsp sesame oil
½ tsp salt
2 spring onions, finely chopped
1 Tbs grated fresh ginger
1 clove garlic, crushed
1 Tbs vegetable oil
12-16 gyoza or wonton wrappers
2 Tbs cornflour
1 Tbs plain flour
¾ cup water
Dipping sauce:
2-3 Tbs soy sauce
1 Tbs rice wine vinegar
2-3 tsp Crispy Chilli oil, to taste
To serve:
1 spring onion, finely sliced on the diagonal

Mix pork mince, soy sauce, sesame oil, salt, spring onions, ginger and garlic. Heat vegetable oil in a medium sized non-stick frying pan which has a lid. Using a small ice cream scoop or a spoon, arrange scoops of the pork filling over the pan – using about a tablespoonful for each and leaving a little space between each one. You should have 12-16 little meatballs.

Cook for a couple of minutes until they are starting to brown underneath then lay the gyoza wrappers, one on each meatball, pressing down around the edges so they stick in place. The wrappers will overlap at the edges.

In a small bowl mix the cornflour, flour and water with a fork. Pour this mixture all over the dumplings, then cover with the lid and leave to cook for 5-7 minutes or until most of the liquid has gone.

Mix dipping sauce in a small bowl.

Remove the lid and continue cooking for 2-3 minutes or until the edges of the pancake are golden and crispy. Lift the edge with a spatula to check.

Turn off the heat, run a spatula around the edge, then invert the pancake onto a serving plate. Drizzle dipping sauce over the top or serve separately. Garnish with the spring onion and serve immediately.

Serves 2

Eggplant with Soy-Garlic Mince

I’ll definitely be making this eggplant dish again. It’s delicious and very quick to make.

I used pork but you can use any minced meat, such as chicken, turkey or beef. While it’s surprisingly filling on its own, for hungry people serve it with steamed rice and a side salad.

1 medium to large eggplant (aubergine)
2 Tbs olive oil
Salt and freshly ground black pepper
For the filling:
1 Tbs olive oil
1 small onion, halved and thinly sliced
250g pork or chicken mince
1 clove garlic, crushed
1 Tbs soy sauce
2 tsp honey
2 tsp rice wine vinegar
A pinch of chilli flakes (optional)
To serve:
Extra virgin olive oil
1 Tbs snipped chives
2 heaped Tbs thick Greek-style yoghurt

Preheat oven to 200°C and line a baking tray with baking paper. Cut eggplant in two lengthwise. Make parallel cuts through the flesh, about 1cm apart, almost down to the skin. Make parallel cuts in the other direction so you have a diamond pattern. Brush both sides of the eggplant with olive oil and season lightly with salt and pepper. Bake for 35-40 minutes, turning halfway, until eggplant is soft and light golden.

Heat the 1 Tbs olive oil for the filling in a medium sized non-stick frying pan and cook the onion, stirring for 4-5 minutes or until soft. Add a pinch of salt and the chicken mince and continue to cook, breaking up the mince as you go. Add remaining ingredients and continue to cook, stirring, until the liquid has been absorbed.

Place eggplant halves on two serving plates. Spoon over the mince, then garnish with a drizzle of olive oil, some snipped chives and a dollop of Greek yoghurt.

Serves 2


Crispy Chicken Wings in the Air Fryer

Chicken wings are popular with all ages.

The secret ingredient in this recipe is a little baking powder, which makes them go nice and crispy. If you don’t have an air fryer you can of course make them in the oven, but I highly recommend investing in an air fryer. It’s really more like a mini fan-forced oven than a fryer. It doesn’t heat up the kitchen on a hot day, the way an oven does, and it’s quick and easy to clean. Ours gets a lot of use and I’m a big fan.

Chicken wings are much easier to eat with your fingers, so don’t forget the paper serviettes. I served them with coleslaw made from finely shredded white cabbage, grated carrot, a handful of sultanas and a dressing made with mayonnaise, a little sour cream and the juice of half a lemon.

1 kg chicken wings (about 10 wings)
1 tsp baking powder
1 tsp garlic salt or chicken salt
Freshly ground black pepper, to taste
Sauce:
1 Tbs BBQ sauce
1 Tbs tomato ketchup
2 tsp honey or maple syrup
1 tsp brown sugar
2 tsp olive oil
2 tsp hot sauce or chilli sauce (eg Sriracha – optional)

Remove ends of the wings and discard. Cut the wings into two and place in a bowl. Add the baking powder, garlic or chicken salt and pepper and mix well with your hands.

Cook the wings in a single layer on high in an air fryer for 10 minutes or until golden brown. Turn them over and cook for another 8-10 minutes.

Place ingredients for the sauce in a bowl and mix well. Add the chicken wings and turn to coat thoroughly. Tip them back into the air fryer and spread them out in one layer. They can be fairly crowded so long as they’re not on top of each other. Cook on high for 10 minutes or until nicely glazed.

Makes about 20 pieces.

Lamb and Fennel Ragu

This recipe uses two lamb shanks to make a delicious dinner to feed a family of six. Any leftovers freeze well. The crunchy topping is optional but it adds a lot to the dish.

This is a one-pot dish which doesn’t really need any sides, but you could always serve some steamed green beans or broccoli.

1 brown onion, peeled, halved and sliced
1 bulb fennel, trimmed, halved and sliced
4 cloves garlic, crushed
1x400g can chopped tomatoes, or whole ones and cut them up
¼ cup brown sugar
1½ cups water
1 beef stock cube
2 tsp chilli sauce or paste (optional)
2 bay leaves
2 lamb shanks
1 can baked beans in tomato sauce
2 or 3 sheets of fresh lasagne, torn into 3cm pieces
Topping:
1 slice bread
1 Tbs butter or oil
2 Tbs fresh rosemary leaves, finely chopped
50g Parmesan cheese, grated
Extra virgin olive oil to serve

Preheat oven to 160°C. Place onion, fennel, garlic, tomatoes, brown sugar, water, stock cube, chilli paste and bay leaves in a heavy casserole dish with a lid. Mix then arrange the lamb shanks on top. Cover and cook for 3 hours or until the meat is falling off the bones. Stir from time to time during cooking time.

Remove lamb from the casserole, cut off the meat and put it back. Remove and discard bay leaves. Stir in the baked beans and add a little water if it’s looking too dry.

Cook lasagne in boiling salted water for 4 minutes or until al dente. Drain and mix into the casserole. Can be made to this stage and reheated later at serving time.

For the topping, make breadcrumbs with the bread by blitzing it in a food processor. Fry in the oil or butter in a small frying pan, stirring, until crisp and golden. Cool then mix with the rosemary and parmesan.

Serve casserole topped with the crunchy bread mixture. Drizzle a little EVOO around each serving, if liked.

Serves 6

Coconut Pudding

Serve this easy dessert, hot or cold, for a real coconut hit. Matthew doesn’t like coconut so I made it to take to my monthly lunch where we all speak French.

4 eggs
1 can condensed milk
1 can coconut cream
1 cup milk
250g desiccated or more coarsely shredded coconut
To serve:
Fresh berries
Cream

Preheat oven to 170C. Place eggs in a large mixing bowl and thoroughly break up with a hand whisk. Slowly add the other ingredients. Lastly mix in the coconut. Grease a baking dish. Mine is a square 9″ (22cm) lasagne-type dish. Scrape the mixture into the baking dish and smooth the top.

Bake for 25 mins or until evenly risen and golden and a skewer inserted in the middle comes out clean. I cooked mine for 35 minutes and I think it was about 5 minutes too long. You want it to be set but nice and moist. I got 16 portions out of mine, but as you can see, they are quite small.

Serve hot or cold with cream and berries.

Serves 12-16

Deux Baguettes S’il Vous Plaît

When he was eleven I asked our eldest son James to go into a bakery in a ski resort in France and buy “Deux baguettes s’il vous plaît” while I was double parked outside. I had been round the block twice and there was absolutely nowhere to park.

We sat outside the bakery for what seemed like a very long time with me saying come on you can do it and James saying he really didn’t want to. His more outgoing younger sister wanted him to hand over the money so she could go. But she didn’t need a confidence booster and I wanted him to do it. Eventually James went into the bakery and came out, beaming from ear to ear, one baguette under each arm.

I had completely forgotten this incident until James (now married with kids of his own) reminded me. He said he remembers it whenever he has to do something challenging, like public speaking.

A couple of weeks ago I decided to use the No Knead Bread recipe to make deux baguettes instead of the usual round loaf you make in a Le Creuset pot. I wasn’t sure if it would work, but decided to give it a go. Well the baguettes were amazing and I’ve made them three times since. Crisp and crunchy on the outside, soft and tender on the inside, the recipe makes two small baguettes or one very large one, which probably wouldn’t fit in my oven.

3 cups plain flour
1 heaped tsp salt
1 Tbs olive oil (optional)
¼ tsp dried yeast
1½ cups hot (not boiling) water from the tap
Extra flour
Sesame seeds (optional)

Place all ingredients in a large bowl and mix thoroughly with the blade of a knife. Cover bowl with plastic wrap or a tea towel and leave for a few hours. The amount of time you can leave it is flexible and varies a bit according to the weather. In the middle of summer it will be ready to go to the next stage in about three hours, but it’s okay if you leave it longer. When ready the dough will have doubled in size.

Sprinkle extra flour on work surface and scrape out the dough. Using a little extra flour as necessary, form dough into a non-sticky round, then cut in two and form each into a sausage shape about 30cm or 12″ long. Place side by side on a lightly greased oven tray, sprinkle with sesame seeds if liked, then leave aside while the oven heats up.

Heat the oven to 220°C. Bake bread for 15-20 minutes or until golden brown and crisp all over. Cool on a cake rack. It freezes well.

Makes 2 small loaves or 1 large

Ferne’s Orange Cake

Late last year I lost my dear friend Ferne after a short struggle with a very aggressive cancer.

We met in Canberra through a mutual friend when we all had three year old daughters. We spent many happy hours in each others houses, sipping tea – or more often wine – and swapping dress patterns, recipes and general chit chat. Meanwhile our families grew and we both ended up with three kids. They are now all grown up with families of their own. Fortunately our friendship stood the test of time. We went on overseas postings, but stayed in touch. On our return we picked up where we had left off.

Ferne was vibrant, with a wicked sense of humour. She was a dear friend and I can’t believe she’s no longer with us. Her three beautiful daughters remind me of her, each in different ways.

Several recipes on this blog came from Ferne. If you search her name you will find at least half a dozen and they are all favourites. She loved recipes which were super quick and easy, such as this orange cake. When I made it last week for the photo I realised I hadn’t made in quite a few years. I had forgotten just how quick, easy and delicious it is!

I like to make it in a fluted bundt pan and serve it with strawberries and cream for afternoon tea or as a dessert. If you need to whip up a quick dessert for unexpected guests, this is the answer.

1 large orange or 1½ if smaller
250g butter, at room temperature, cut into cubes
1 cup sugar
3 eggs
2 cups self-raising flour, sifted
pinch of salt

Preheat oven to 180°C.

Place quartered, seeded orange, skin and all, in the food processor and process till pulpy. Add butter and sugar, process 20 seconds. Add eggs, salt and flour and process till smooth, but don’t over-process.  Stop halfway to scrape down the sides. Don’t add any extra liquid even if it seems stiff.  Bake in a buttered and floured 20cm cake pan or bundt ring for 30-40 mins at 180°C, or until evenly golden brown and a skewer inserted in the middle comes out clean. Cool then turn out, dust with icing sugar and serve with whipped cream and berries. Best eaten the day it is made and not refrigerated.

Serves 10-12

Fish with Rice & Tomatoes

If you like paella you will like this easy recipe. It’s basically fish and rice, with baby tomatoes adding a touch of sweetness. I used Basa fillets, but any firm white fish will do. A handful of prawns or mussels would be a nice addition.

I had a jar of green pimento-stuffed olives which had been opened but not finished sitting in the fridge, so I used them to make the tapenade. After making this recipe I mixed the leftover tapenade with a few heaped tablespoons of hummus and served it as a tasty dip. Waste not want not as my mother, who grew up during WW2, used to say.

2¼ cups (250g) basmati rice
2 cups (500ml) water
6 Tbs green olive tapenade (see recipe below)
250g cocktail tomatoes, halved
1 Tbs olive oil
1 Tbs red wine vinegar
Salt and freshly ground black pepper
500g white fish fillets (or 250g fish and 250g peeled green prawns)
Fresh basil to garnish
1 Tbs olive oil to garnish

Make the tapenade.

In a large deep frying pan with a lid, place the rice, water and 3 Tbs tapenade. Mix then bring to the boil. Mix the tomatoes with the olive oil and vinegar. Cut the fish into pieces about 2-3cm square and lay them (and prawns if using) on top of the rice. Carefully spoon some of the rice mixture over each fish piece, then put the lid on and simmer for 10 minutes, or until rice is cooked. Add a bit more water if the rice is not cooked and the liquid has all gone.

When rice is al dente, remove the lid and scatter the tomatoes over the top. Spoon 3 Tbs tapenade over the top. Continue to cook for a few minutes, without the lid, or until all the liquid has been absorbed.

Serve garnished with torn fresh basil leaves and a drizzle of olive oil.

Tapenade: place 1 or 2 cups pitted green olives (quantity is flexible), or pitted and pimento stuffed green olives, in food processor with a peeled clove of garlic. Start the machine and chop finely, adding olive oil through the top chute while the machine is running to achieve a chunky paste similar to pesto. Use any leftover tapenade as a dip or in sandwiches.

Serves 4

Chicken with Garlic, Capers and Anchovies

Compared with Mediterranean countries, where they feature regularly on the menu, anchovies are somewhat underrated in Australia.

Incorporated into a dish they become almost undetectable. Even people who say they hate them can be converted. I think you will be sold on this easy dressing for Caesar Salad.

Variations of today’s chicken recipe kept popping up on my phone, so I thought it was time to give it a try. It makes a very tasty and quick mid-week dinner.

800g – 1 kg boneless, skinless chicken thighs (6-8 pieces)
Salt and freshly ground black pepper, to taste
6 cloves garlic, peeled
¼ cup olive oil
5-6 anchovy fillets, chopped
2 Tbs drained capers
¼ tsp chilli flakes
Juice of 1 lemon
Chopped parsley to garnish

Trim chicken of any excess fat then season on both sides with salt and pepper. If liked you can cut each thigh in half – I didn’t. Go easy on the salt as the anchovies are salty. Heat olive oil in a large deep frying pan with a lid.. Add chicken pieces and cook for 5-7 minutes each side, or until nicely browned. Remove from the pan.

To the pan add 5 of the garlic cloves, crushed or smashed and chopped, the anchovies, capers and chilli flakes. Cook, stirring, for 3-5 minutes then return the chicken to the pan. Cover with a lid and cook for a further 10 minutes or until the chicken is cooked through, turning them over to coat them with the sauce halfway through.

Remove chicken from the pan. Add lemon juice and remaining clove of garlic, smashed and chopped, to the pan. Cook, stirring, over high heat until thickened and starting to get sticky around the edges. Return chicken to the pan, spoon some sauce over each piece, garnish with parsley and serve.

Serves 6

Queen Elizabeth’s Favourite Chocolate Biscuit Cake

According to Royal chef Darren McGrady, this was the late Queen Elizabeth’s favourite cake.

McGrady cooked for the royal family for fifteen years and said that the Queen liked to have a slice of this cake with a cup of tea every afternoon. “If there was any left when we moved from Buckingham Palace to Windsor Castle we took it with us, so she could finish it there”, he explained.  “I use to travel on the train from London to Windsor Castle with the half-eaten cake in a tin on my knees.”

Make it in a six inch (15 cm) cake tin if you have one, so it’s nice and deep. For a larger tin you could double the recipe. If preferred you could use a loaf tin.

A cake that’s good enough for a Queen is definitely worth trying. We thought it was delicious.

Cake:
1 packet plain sweet biscuits such as Rich Tea or Marie (about 250g)
150g dark chocolate
150g butter at room temp
150g caster sugar
1 egg
Chocolate Icing:
250g dark chocolate

Spray cake pan with oil and line with baking paper. A small six inch (15cm) pan will result in a deeper cake but you can use an eight inch (20cm) pan if you like. A tin with removable sides or a cake ring makes it easier to remove the cake.

Break the biscuits with your hands into pieces a bit larger than almonds and place them in a large mixing bowl. Don’t crush them completely. See photo for how big. Melt chocolate in a bowl over simmering water. In another bowl, beat butter and sugar with electric beaters until light and fluffy, then mix in the egg and lastly the melted chocolate. Scrape the chocolate mixture into the bowl containing the broken biscuits and mix well so that all the biscuit pieces are covered in chocolate.

Scrape into the cake tin, pressing down so that you have a flat top and there are no air pockets. A flat-bottomed glass is useful for pushing the mixture down. Cover with plastic wrap and refrigerate overnight.

Next day, remove the cake from the pan and remove the paper. Place it on a rack over a sheet of baking paper. For the icing, melt the chocolate in a bowl over simmering water. Slowly pour the the icing  over the top and sides of the cake, using a spatula to smooth it out. Use most of the icing but leave a small amount. Allow the cake to set at room temperature.

Reheat the remaining chocolate icing (and any you can scrape up from below the cake rack) and put it into a piping bag. Pipe this over the cake, back and forth in a zig-zag pattern. When set, carefully remove the cake from the rack and place it onto a serving plate. Serve with a cup of tea and some whipped or thick pouring cream, if you’re feeling really decadent!

Serves 12

Note: if preferred, use a small amount (25g) of white or milk chocolate to do the zig-zag pattern on the cake, so you get more of a contrast.