I began collecting recipes when I was at school. Some of the recipes in my large collection have been in my family for generations, others were passed on by friends and chefs around the world. Many have been adapted over the years to make them lighter or update their presentation. I’ve served them to royalty, PMs and other VIPs and there have been no complaints. I hope you are inspired to make some of them.
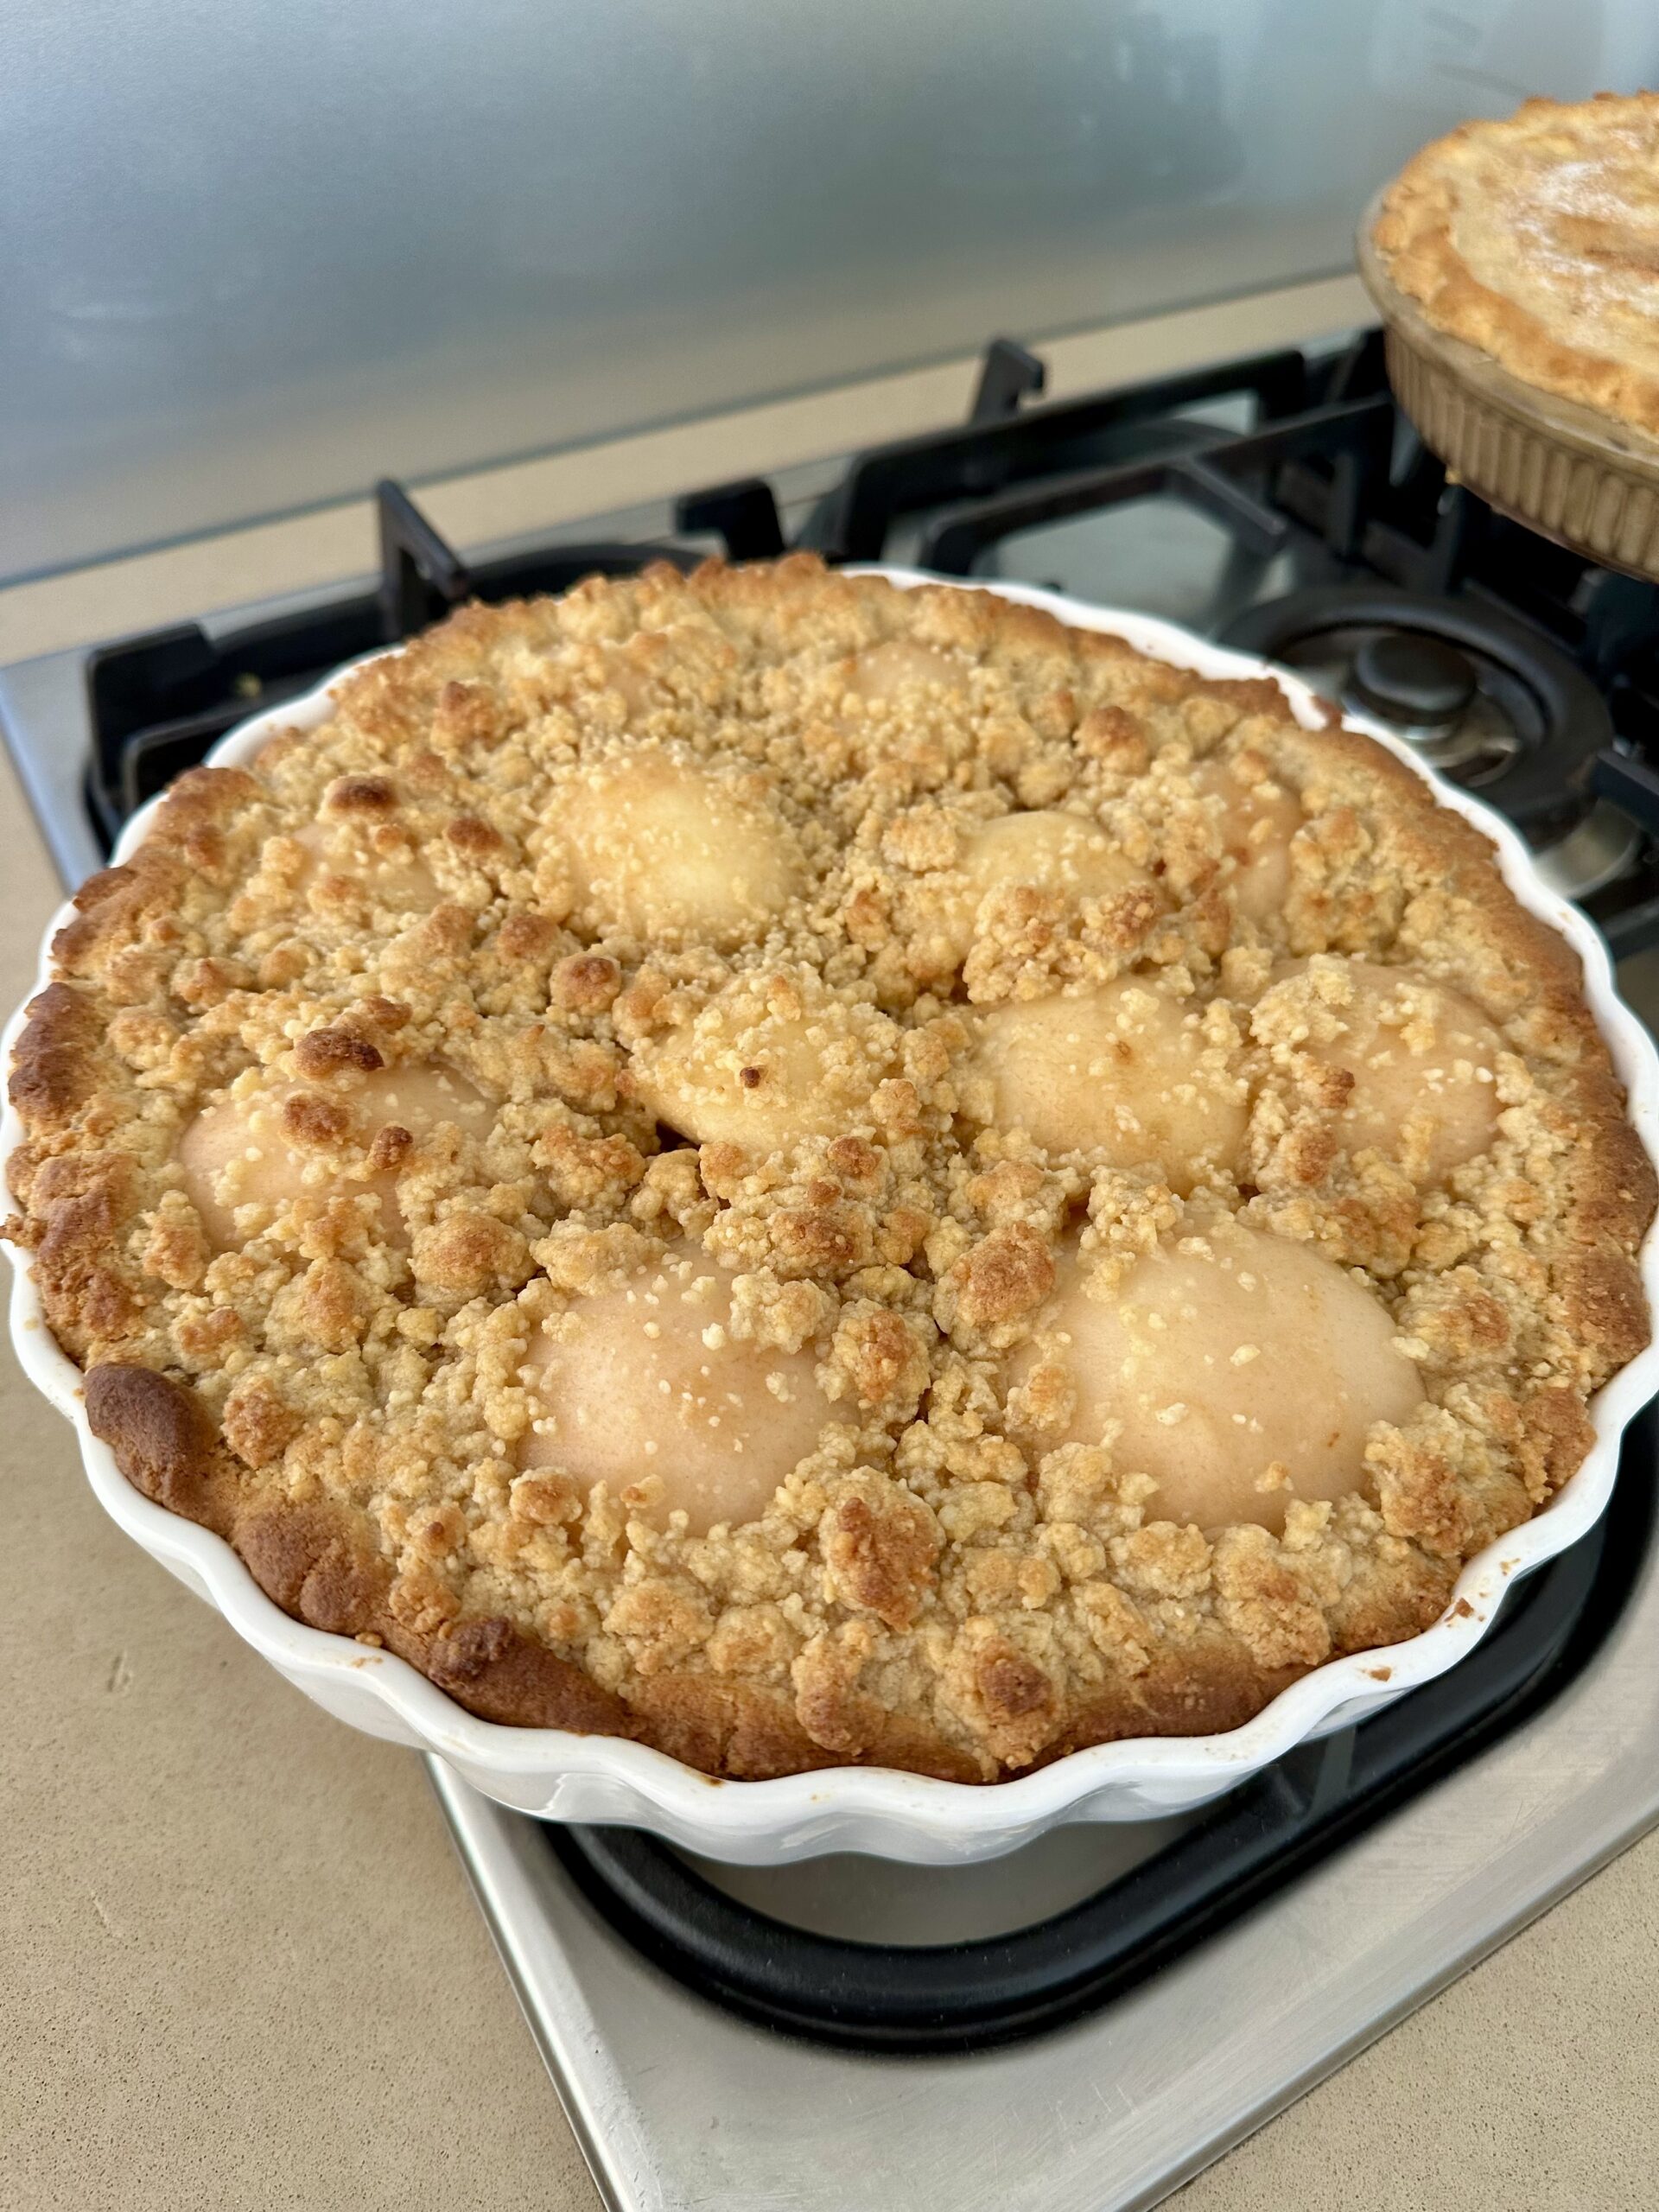
Using a food processor, this delicious cake is ready to go in the oven in the time it takes for the oven to heat up. I cooked it in a ceramic quiche dish, but you could use any cake pan, either springform or paper-lined. You want the pears to be ripe but not overripe.
Served with a cuppa, or as a dessert, with a dollop of creme fraiche or whipped cream, this recipe is a winner. Pears and ginger go very well together.
5 or 6 large ripe pears, peeled and cored
2½ cups self raising flour (300g)
180g butter, cut into cubes
1/3 cup sugar
1 large egg
2 or 3 tsp ground ginger (to taste)
½ tsp salt
½ cup chopped preserved (glacé) ginger To serve:
Creme fraiche or whipped cream
Preheat oven to 170°C and prepare the cake pan or dish.
Place flour, butter, sugar, ground ginger and salt in food processor. Process until mixture starts to stick together into clumps. Add the egg and chopped ginger and process just enough to form a soft dough. Scrape out onto the counter and divide into two balls – one of one third and the other of two thirds.
Using your fingers, break pieces off the two thirds ball and press them over the base and about 3cm up the sides of the cake pan. Cut the peeled pears into halves or quarters and arrange them over the pastry base. I cut four into halves and one into quarters, which I used to fill in the hole in the middle, but you might prefer to cut them all into quarters. I used 5 large pears altogether.
Crumble remaining dough over the pears so it looks like an apple crumble. Bake for 50-60 mins or until golden brown and cooked in the middle.
Serve warm or at room temperature with crème fraiche or whipped cream.
Late last year I lost my dear friend Ferne after a short struggle with a very aggressive cancer.
We met in Canberra through a mutual friend when we all had three year old daughters. We spent many happy hours in each others houses, sipping tea – or more often wine – and swapping dress patterns, recipes and general chit chat. Meanwhile our families grew and we both ended up with three kids. They are now all grown up with families of their own. Fortunately our friendship stood the test of time. We went on overseas postings, but stayed in touch. On our return we picked up where we had left off.
Ferne was vibrant, with a wicked sense of humour. She was a dear friend and I can’t believe she’s no longer with us. Her three beautiful daughters remind me of her, each in different ways.
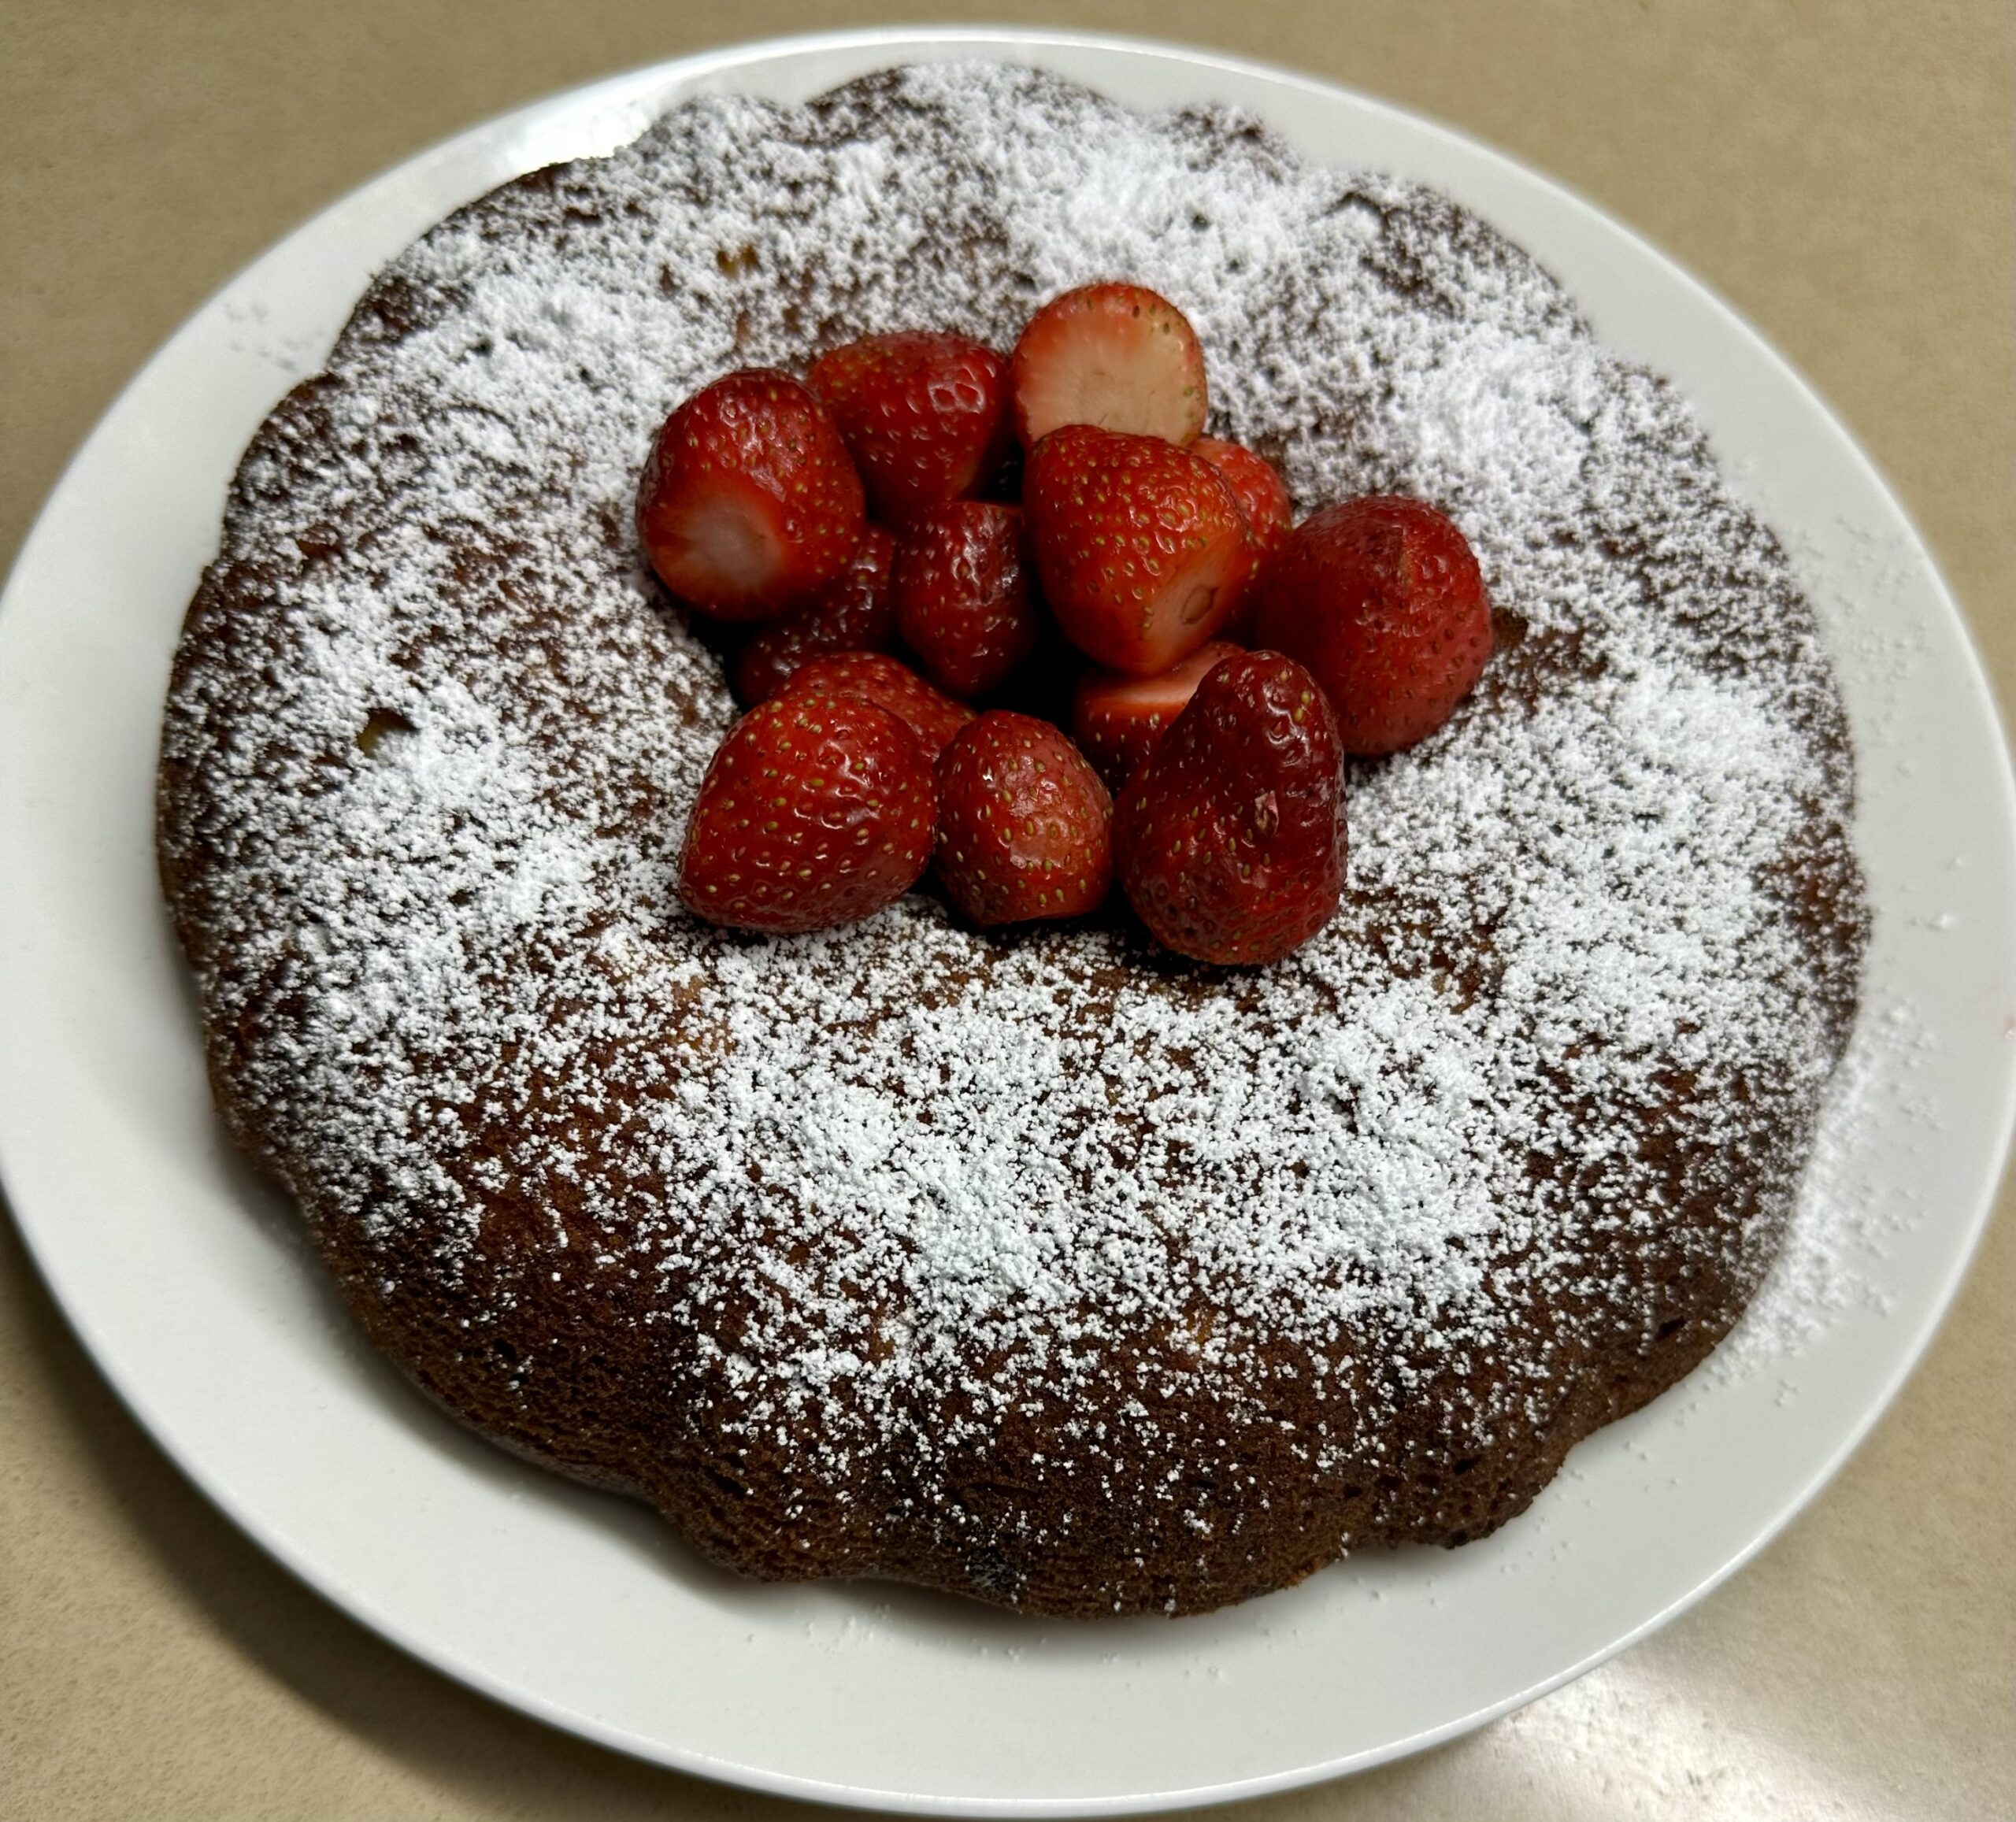
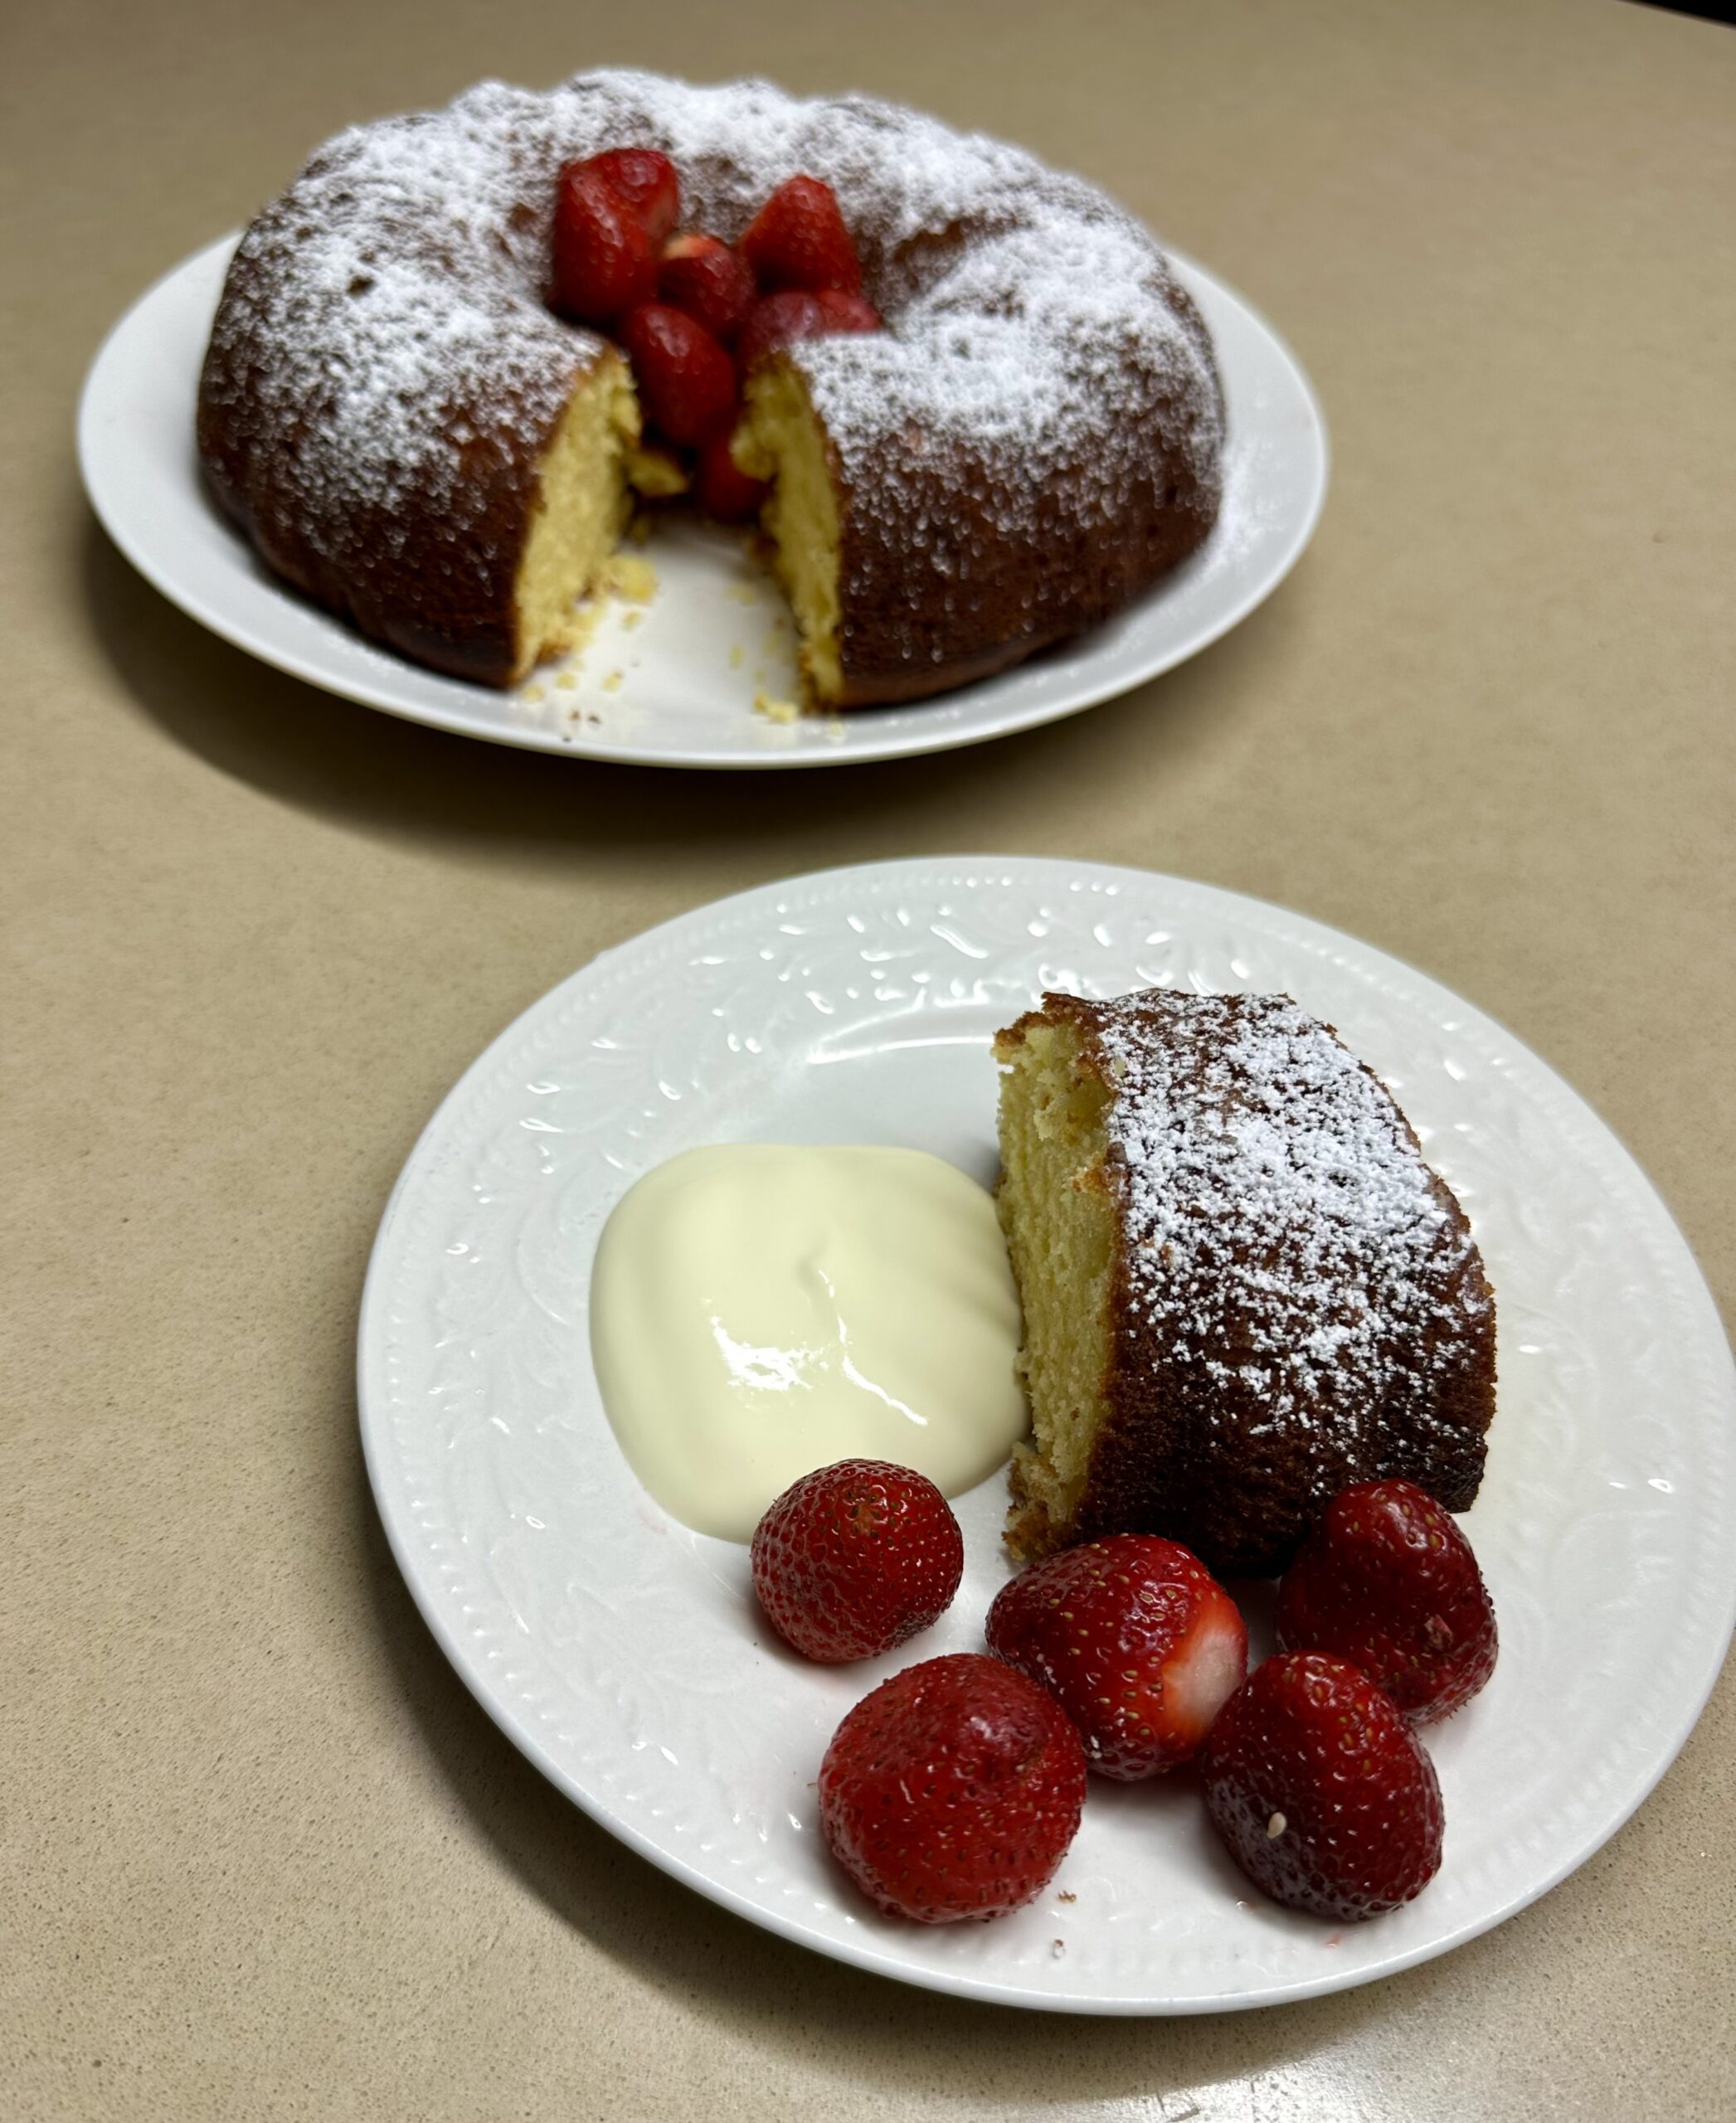
Several recipes on this blog came from Ferne. If you search her name you will find at least half a dozen and they are all favourites. She loved recipes which were super quick and easy, such as this orange cake. When I made it last week for the photo I realised I hadn’t made in quite a few years. I had forgotten just how quick, easy and delicious it is!
I like to make it in a fluted bundt pan and serve it with strawberries and cream for afternoon tea or as a dessert. If you need to whip up a quick dessert for unexpected guests, this is the answer.
1 large orange or 1½ if smaller
250g butter, at room temperature, cut into cubes
1 cup sugar
3 eggs
2 cups self-raising flour, sifted
pinch of salt
Preheat oven to 180°C.
Place quartered, seeded orange, skin and all, in the food processor and process till pulpy. Add butter and sugar, process 20 seconds. Add eggs, salt and flour and process till smooth, but don’t over-process. Stop halfway to scrape down the sides. Don’t add any extra liquid even if it seems stiff. Bake in a buttered and floured 20cm cake pan or bundt ring for 30-40 mins at 180°C, or until evenly golden brown and a skewer inserted in the middle comes out clean. Cool then turn out, dust with icing sugar and serve with whipped cream and berries. Best eaten the day it is made and not refrigerated.
McGrady cooked for the royal family for fifteen years and said that the Queen liked to have a slice of this cake with a cup of tea every afternoon. “If there was any left when we moved from Buckingham Palace to Windsor Castle we took it with us, so she could finish it there”, he explained. “I use to travel on the train from London to Windsor Castle with the half-eaten cake in a tin on my knees.”
Make it in a six inch (15 cm) cake tin if you have one, so it’s nice and deep. For a larger tin you could double the recipe. If preferred you could use a loaf tin.
A cake that’s good enough for a Queen is definitely worth trying. We thought it was delicious.
Cake:
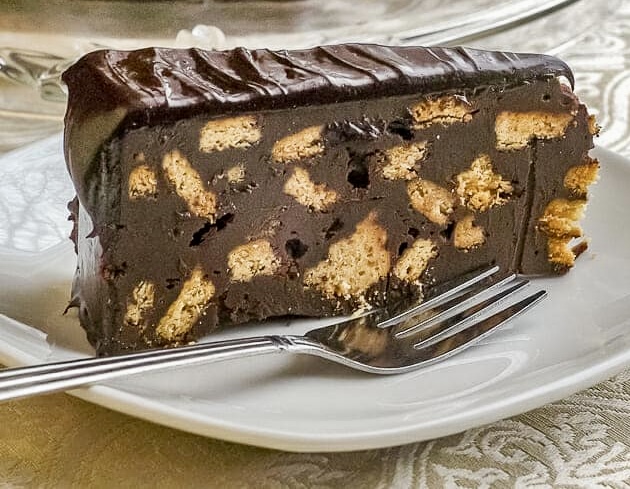
1 packet plain sweet biscuits such as Rich Tea or Marie (about 250g)
150g dark chocolate
150g butter at room temp
150g caster sugar
1 egg Chocolate Icing:
250g dark chocolate
Spray cake pan with oil and line with baking paper. A small six inch (15cm) pan will result in a deeper cake but you can use an eight inch (20cm) pan if you like. A tin with removable sides or a cake ring makes it easier to remove the cake.
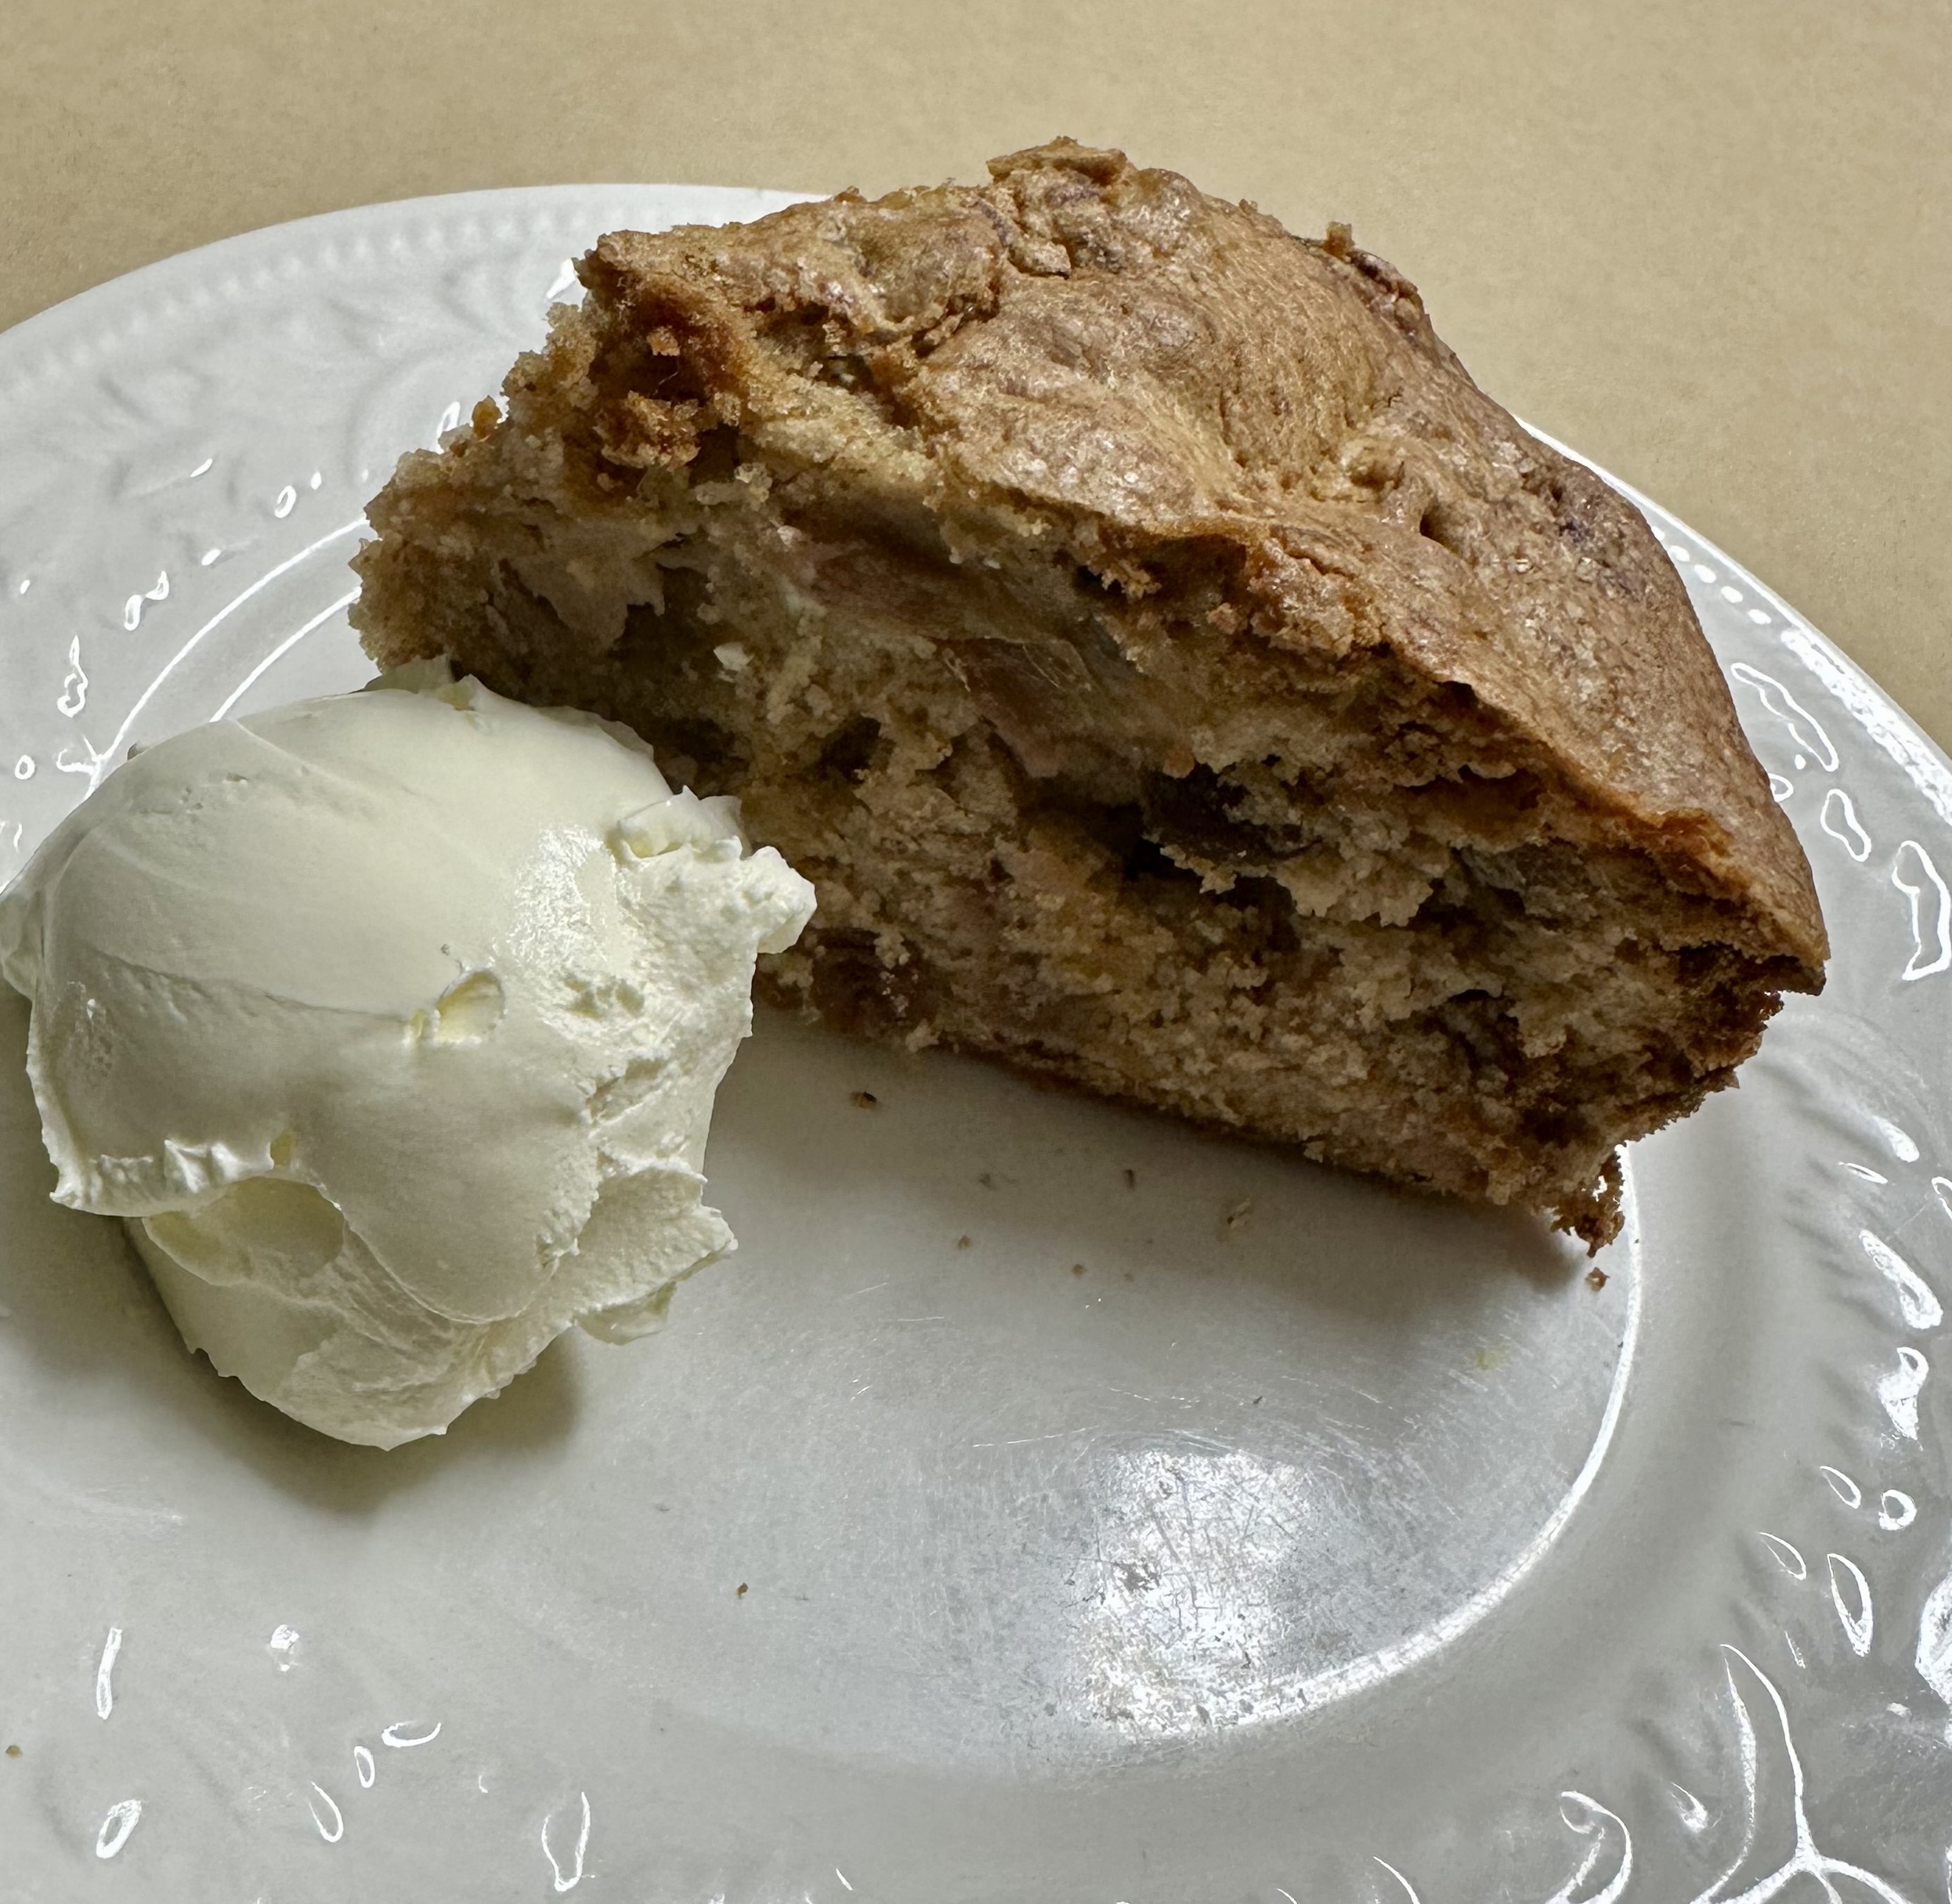
Break the biscuits with your hands into pieces a bit larger than almonds and place them in a large mixing bowl. Don’t crush them completely. See photo for how big. Melt chocolate in a bowl over simmering water. In another bowl, beat butter and sugar with electric beaters until light and fluffy, then mix in the egg and lastly the melted chocolate. Scrape the chocolate mixture into the bowl containing the broken biscuits and mix well so that all the biscuit pieces are covered in chocolate.
Scrape into the cake tin, pressing down so that you have a flat top and there are no air pockets. A flat-bottomed glass is useful for pushing the mixture down. Cover with plastic wrap and refrigerate overnight.
Next day, remove the cake from the pan and remove the paper. Place it on a rack over a sheet of baking paper. For the icing, melt the chocolate in a bowl over simmering water. Slowly pour the the icing over the top and sides of the cake, using a spatula to smooth it out. Use most of the icing but leave a small amount. Allow the cake to set at room temperature.
Reheat the remaining chocolate icing (and any you can scrape up from below the cake rack) and put it into a piping bag. Pipe this over the cake, back and forth in a zig-zag pattern. When set, carefully remove the cake from the rack and place it onto a serving plate. Serve with a cup of tea and some whipped or thick pouring cream, if you’re feeling really decadent!
Serves 12
Note: if preferred, use a small amount (25g) of white or milk chocolate to do the zig-zag pattern on the cake, so you get more of a contrast.
Those of you who have been following my blog for years will have seen this post before. For new readers here are my tried and tested Christmas cake and pudding recipes.
They are best made in November or even earlier, so they have time to mature. But don’t worry if you haven’t made yours yet, there’s still time. Anything home-made always tastes so much better than the bought variety. Better late than never.
I usually make them on the same day, so I can weigh out the fruit and nuts into two big bowls, one for each recipe, which saves time. After the initial steaming, the puddings will keep in the fridge for a year or more.
Christmas cakes and puddings make wonderful gifts, especially for elderly people living on their own. The pudding recipe makes 3 or 4, depending on the size, so if you just want to make one large pudding, halve the ingredients. I have several Christmas pudding bowls in various sizes, which I have collected in Op shops.
I’ve been making these old family recipes since I was at school. The original versions came from my paternal grandmother, Nana Hutchinson who was born in Falkirk, Scotland. They’ve evolved over the years with slight modifications. I now use melted butter instead of the traditional suet in the pudding mixture, but you can use suet if you prefer. Covering the cake with marzipan and then white royal icing to look like snow was all part of the tradition when I was growing up in England. Most of my family don’t like marzipan and we’re all trying to cut down on sugar, so nowadays I cover the top with nuts instead.
I’ve also started using the “all in one” method for the cake which uses melted butter. When we made Christmas cakes at school, in my Home Economics classes, creaming the butter and sugar with a wooden spoon took forever. The teacher whose name was Mrs Wood came round to inspect and decide whether or not it was time to start adding the eggs. No electric mixers back then, so by the time you got the tick of approval you felt as if your arm was about to drop off. The “all in one” method is so much quicker and works well.
Feel free to substitute – dried apricots instead of the cherries or mixed peel; walnuts, macadamias (shown in the photo) or pecans instead of almonds; whisky instead of rum or brandy. Making little changes will allow you to make the recipe your own, to hand down to your grandchildren. I don’t use glacé cherries any more. Instead I buy dried cherries from a Middle Eastern grocer. They work well and make a delicious snack or addition to salads.
Christmas Cake
250g butter, melted
250g brown sugar
6 large eggs, beaten with a fork
300g plain flour
2 Tbs black treacle
450g currants
300g sultanas
175g raisins
125g dried cherries
125g slivered almonds
125g mixed peel (optional)
1 orange (zest and juice)
4 Tbs Brandy or dark Rum
2 tsp mixed spice
1 tsp ground nutmeg
75g ground almonds To decorate the top:
200g whole almonds (blanched) or hazelnuts, shelled, roasted and
skins rubbed off, pecans or macadamias (shown in the photo)
Soak fruit and nuts in brandy or rum overnight, or if you’re in a hurry, for at least an hour. Line a 25cm round or square cake tin with a double layer of baking paper. Place the tin on a baking sheet on which you have placed 4 thicknesses of newspaper. Wrap a band of newspaper or brown paper of the same thickness around the outside of the tin, using a stapler to join the ends. Preheat oven to 150°C. If you have the option to use your oven in conventional mode, without the fan, the results will be better. If you have to use the fan the cake will cook more quickly than without.
Place all the ingredients in a large mixing bowl and mix thoroughly, then spoon into tin and smooth the top. Cover the surface evenly with whole blanched almonds, hazelnuts or macadamias, pressing them in a bit with your hand. Bake for between 1¾ and 2¼ hours on the middle shelf of the oven. Test with a toothpick after an hour and a half.
If the top gets too brown before the middle is ready, place some foil loosely over the top of the cake to stop the nuts from burning. When it’s ready the top of the cake will have an even colour, feel firm to the touch and a toothpick inserted in the middle will come out clean.
Cool thoroughly then store in an airtight tin in a cool, dark place. If liked, halfway through storage time pierce all over the top with a skewer and drizzle with a little extra brandy or rum which will soak in.
Keeps for several months in a sealed tin. If you live in a warm humid climate keep it in the fridge.
To serve, tie a wide red ribbon around the outside of the cake and decorate the top with some holly leaves and berries – real or plastic!
Christmas Pudding
125g currants
200g dried figs (remove stalks) or pitted dates
400g sultanas or raisins or a mixture
60g mixed peel (or substitute dried apricots)
60g almonds, blanched or unblanched (or substitute walnuts or macadamias)
60g glacé cherries or dried cherries
2 apples, unpeeled and cored
125g plain flour
1 tsp salt
1 rounded tsp each ground cinnamon, nutmeg & cloves
200g brown sugar
400g brown breadcrumbs
4 eggs
1 orange
4 Tbs Brandy or dark Rum
2 Tbs black treacle
250g melted butter or grated suet
¾ cup beer
1 tsp bicarbonate of soda
Weigh out the fruit and nuts into a large bowl. Make the breadcrumbs in the food processor. Use the food processor to grate or finely chop the apples. Cut orange into four, remove any seeds then process till finely chopped and pulpy. Chop figs or dates and apricots (if using) in the food processor. Roughly chop the nuts.
Add remaining ingredients to the bowl and mix well. Place mixture in lightly greased pudding bowls, filling them to about 2cm below the top. The mixture is enough to make 3 or 4 puddings, depending on size of the bowls, so you might prefer to make half the recipe. Cover with buttered baking paper, butter side down and tie with string. Or cover with foil.
Steam for 4 hours, or until puddings are evenly dark brown all over the top. I use a very large saucepan, place a metal trivet in the bottom to lift the pudding off the bottom, then place one pudding, then an upturned plate on top of that, then the second pudding, then the lid. If you don’t have a pan large enough to do this (needs to be high enough to put the lid on) you will have to use two pans. Add enough water to come about a quarter to half way up the bottom pudding bowl and keep it simmering. Be careful to keep topping up the water, so it doesn’t boil dry. (I speak from experience!)
When cooked allow to cool then cover snugly with aluminium foil and store in a cool, dark cupboard or in warmer climates, in the fridge. To serve, steam again for 2-3 hours. Tip the pudding onto a serving dish. Heat some brandy then set it alight and pour over and bring to the table while still burning. Serve the pudding with thick cream or brandy butter.
Makes 3 or 4 puddings
Brandy Butter
125g unsalted butter, at room temperature
125g icing sugar
½ tsp vanilla essence
2-3 Tbs Brandy
Grated nutmeg
In a small bowl with a wooden spoon, beat butter with the sugar until light and fluffy. Gradually beat in vanilla and brandy. Pile into a small dish and sprinkle with grated nutmeg. Chill well and serve with Christmas pudding or Sago Plum Pudding.
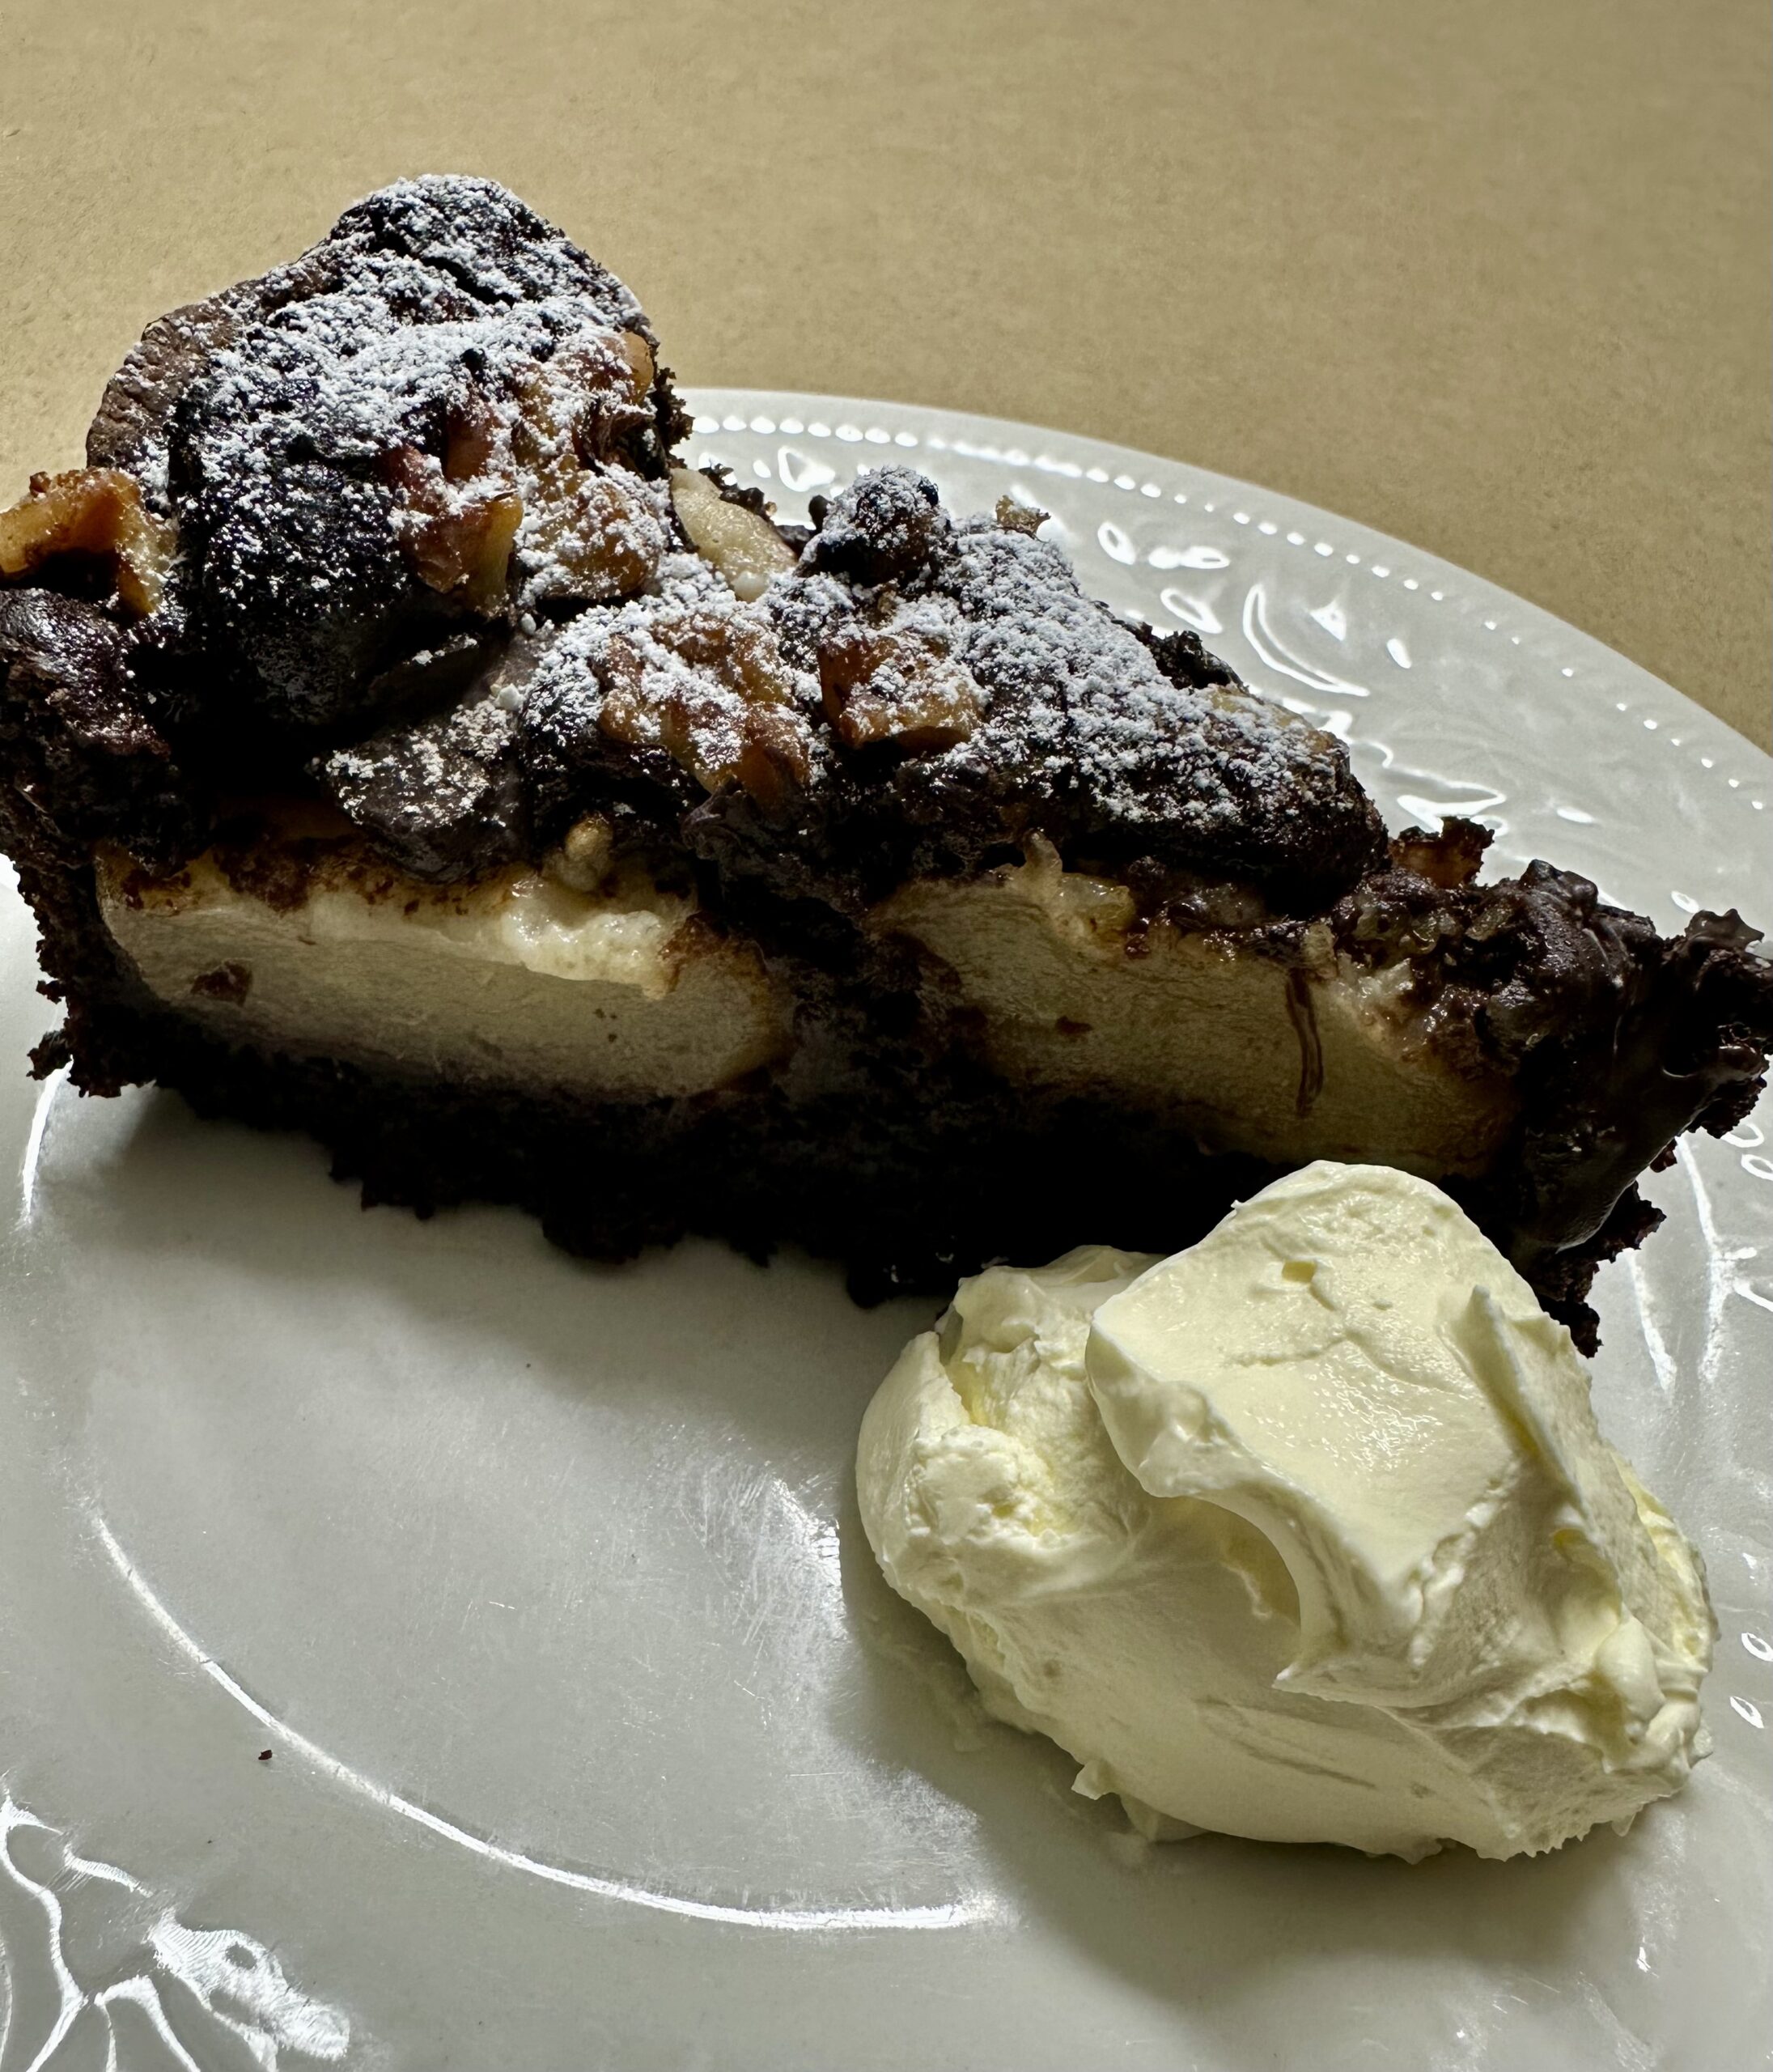
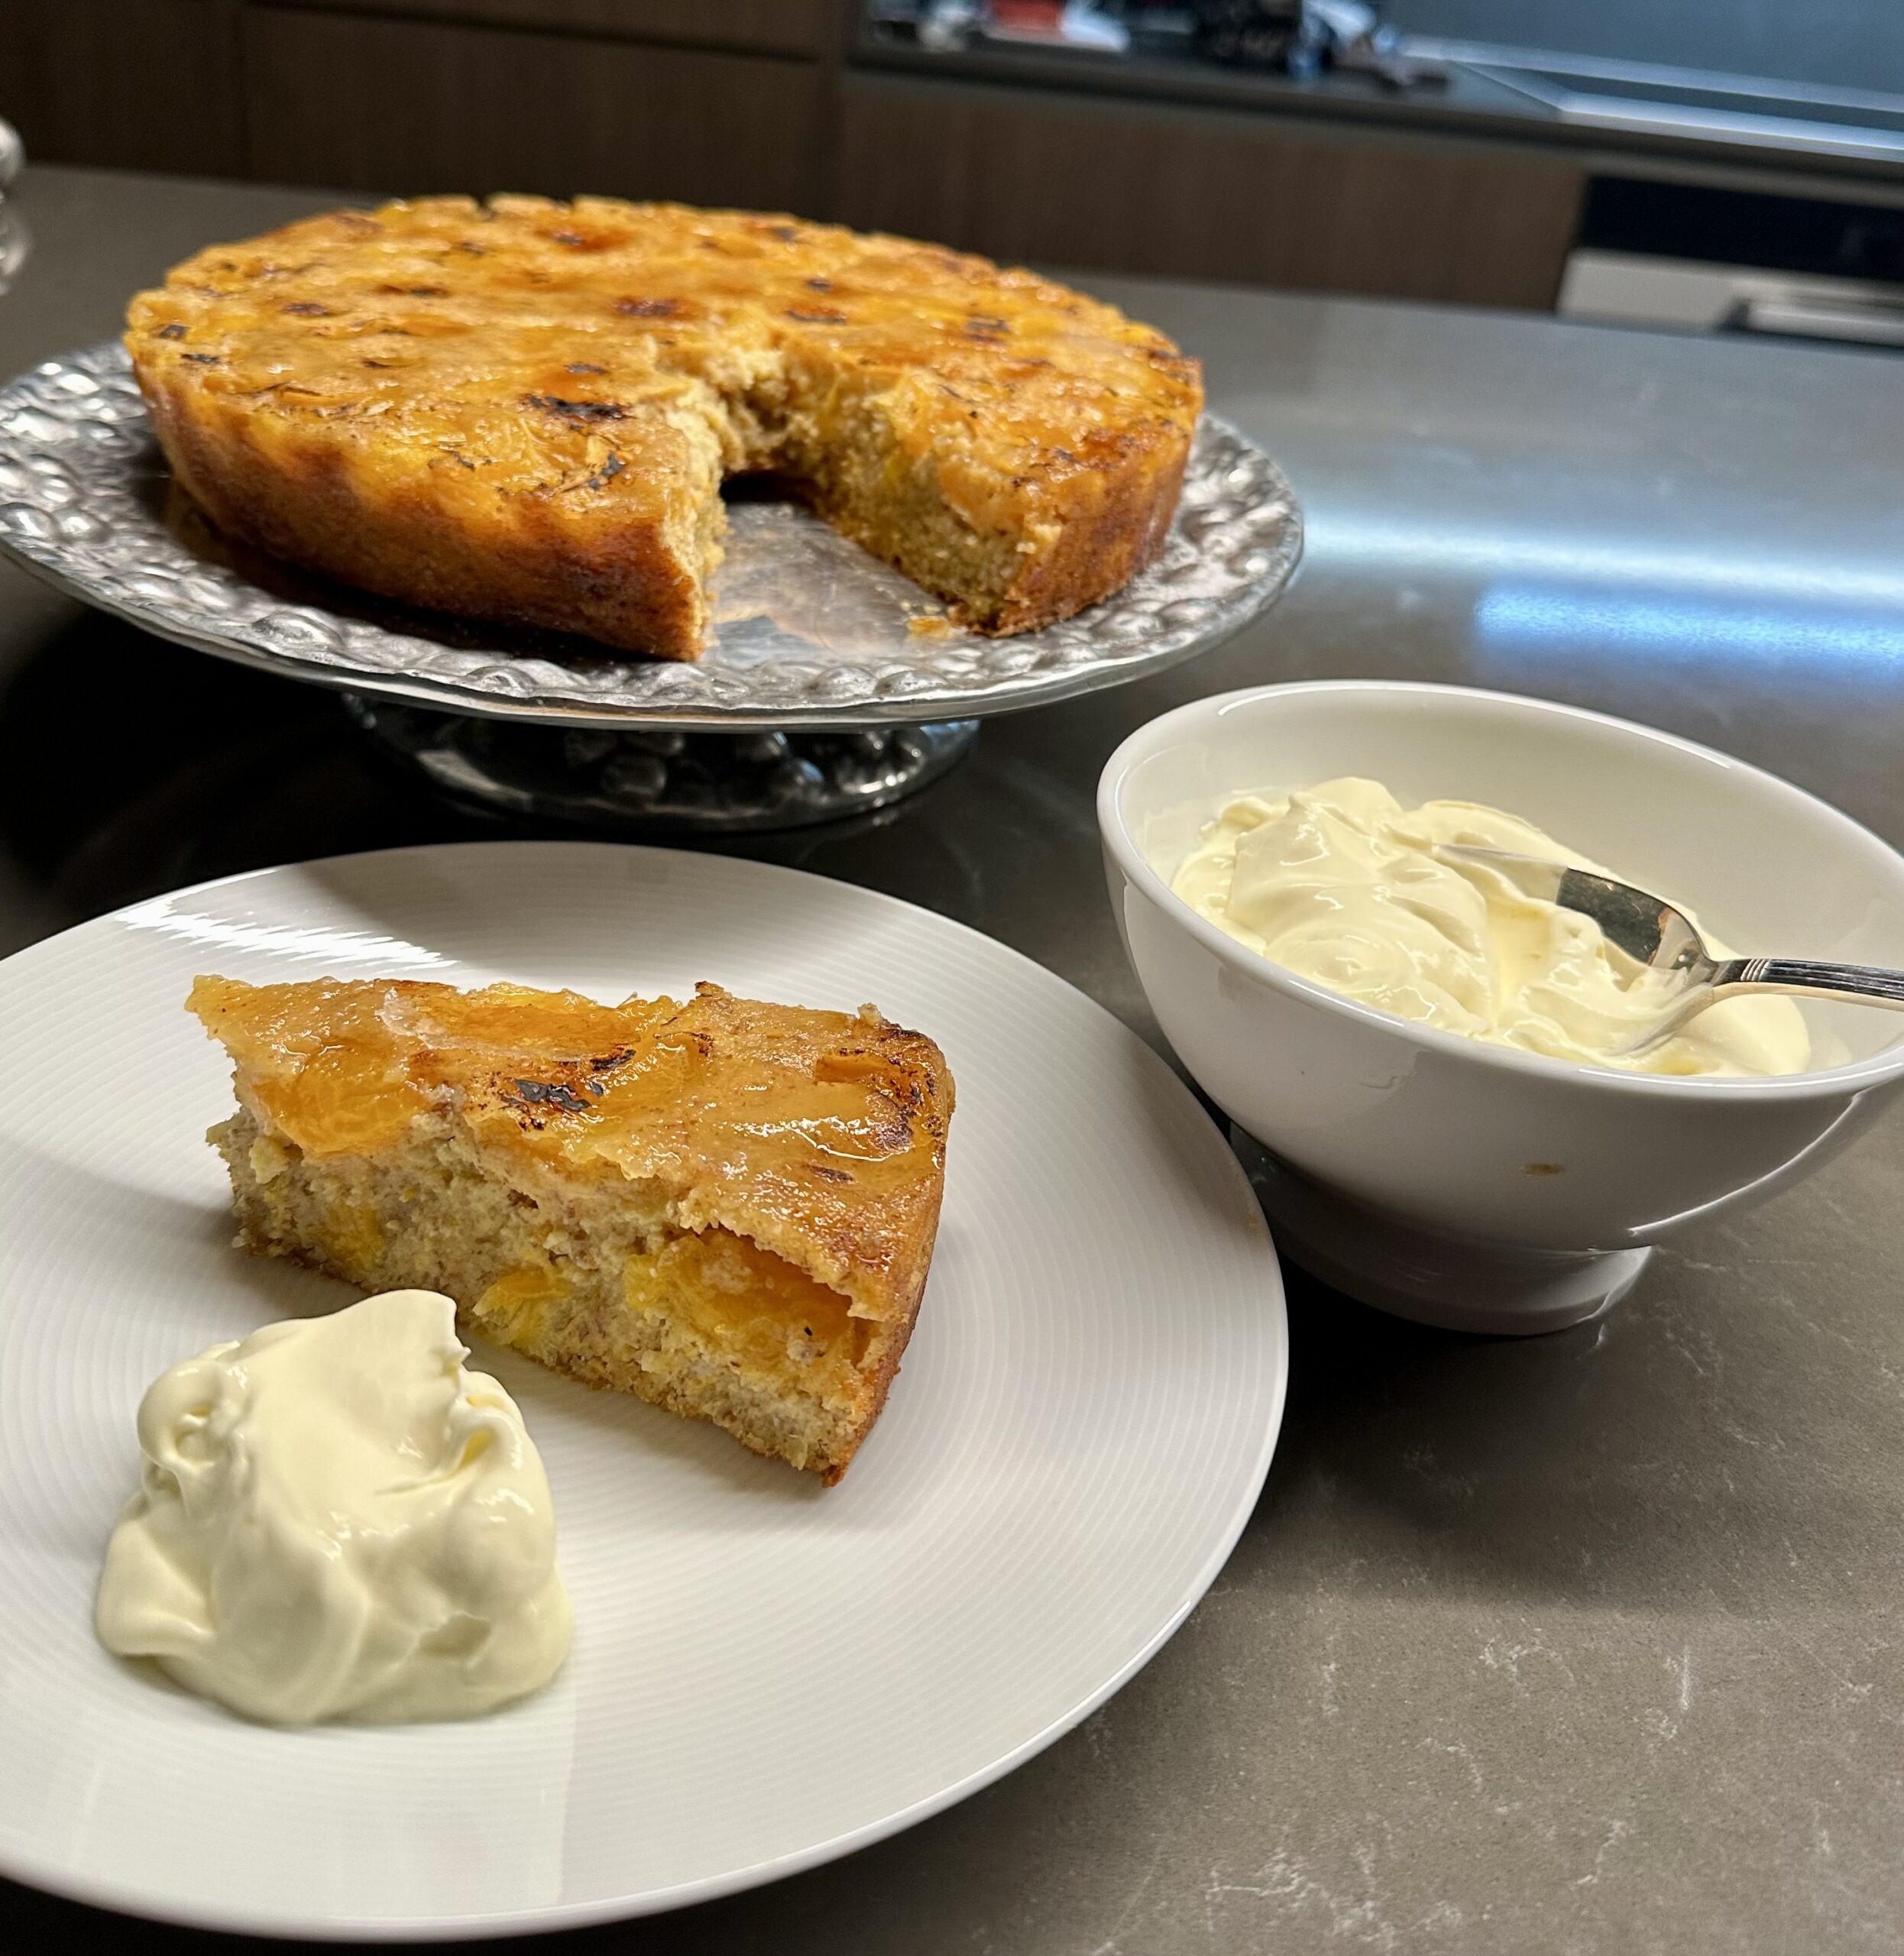
This egg-free, dairy-free recipe caught my eye as I’ve always liked the combination of pears and chocolate. I didn’t have any fresh pears, but a tin of pears in the pantry from goodness knows when worked well.
If you’re not dairy intolerant you can of course use ordinary milk and yoghurt.
Served with a blob of cream (I prefer sour cream shown in the photo below the recipe) with a cup of coffee or as a dessert, this recipe is definitely a keeper. You could leave out the pears and add a few more nuts. Maybe try blueberries instead of pears? Let me know if you try something different.
Cake:
1½ cups plain flour, sifted
¾ cup raw sugar (see substitutes)
1 tsp baking powder
1 tsp bicarbonate of soda
½ cup cocoa powder
½ cup almond or oat milk (see substitutes)
½ cup coconut yoghurt (see substitues)
½ cup warm strong coffee
¼ cup vegetable oil (I used canola)
2 tsp vanilla essence Topping:
2 firm pears, peeled, cored and sliced into thick wedges (or one can pears, drained)
2 Tbs plain flour
1 Tbs raw sugar
100g dark chocolate, coarsely chopped
100g walnuts or pecans, coarsely chopped
Preheat oven to 180°C. Grease a 22cm round cake pan and line the bottom with baking paper. Place all ingredients for cake in food processor and mix well, stopping to scrape down the sides. Scrape into the cake pan and smooth the top.
Dry the pear slices on paper towel then mix with the 2 Tbs of flour and 1 Tbs sugar. Arrange over the top of the cake, discarding any flour mixture left in the bowl. Sprinkle the chocolate and nuts over the top.
Bake for 45-55 minutes or until well-risen and a toothpick inserted into the middle of the cake mixture comes out clean. Cool for an hour then run a knife around the edges and remove from the tin. If liked top with a little icing sugar through a sieve.
Serve with sour cream, whipped cream or pouring cream.
Serves 12-16
Substitutes: you can use any kind of milk, any kind of plain thick yoghurt and any kind of sugar in this recipe.
This is a variation on a carrot cake which uses a mixture of grated apple, carrot and beetroot. I didn’t have any beetroot so I used a couple of turnips! One apple, one carrot and two turnips. Sounds weird but it was delicious.
A coarse grating blade on a food processor makes easy work of the grating. Don’t be tempted to add any liquid to the mixture as the vegetables will provide enough moisture as they cook.
About 3 cups grated veg (apple, carrot, beetroot, turnip) firmly packed
3 eggs
2/3 cup vegetable oil
1 tsp vanilla essence
2¼ cups plain flour, sifted
1 tsp bicarbonate of soda
2 tsp baking powder
½ tsp salt
1 cup sugar
1 tsp cinnamon
1 tsp mixed spice
½ tsp grated nutmeg
1 cup nuts (see note below) Icing:
250g cream cheese at room temperature
1 cup icing sugar, sifted To decorate:
Extra nuts
Preheat oven to 180°C.
Grate vegetables and place in a large mixing bowl. I use the Magimix for grating vegetables which makes short work of it. Place eggs and remaining ingredients except nuts in food processor and mix well, stopping to scrape down the sides. Add the nuts and mix to incorporate and chop them a bit. Scrape into the bowl with the grated vegetables and mix well.
Grease and line a 22cm (9″) square cake pan and line the bottom with baking paper. You can use a round cake tin if preferred or make muffins. Bake for 35-45 minutes or until evenly browned and a toothpick inserted in the middle comes out clean. Muffins will take less time.
Cool then remove from cake tin and spread with the icing. Decorate with extra nuts. Keep in the fridge.
Icing: in a bowl with a wooden spoon, mix the cream cheese until smooth then gradually mix in the icing sugar.
Note: you can use walnuts, pecans or pine nuts. I bought a pack of what was described as Granulated Nuts from Woolworths and they worked perfectly in the cake mixture, then I used walnut halves to decorate.
We’ve just spent our first holiday in Portugal, sandwiched between a week in the UK and ten days in France.
On arrival in Porto, Portugal’s second largest city, we picked up a car and headed north to mozey around the Douro River Valley. Picturesque terraced vineyards flank both sides of the river and the area became a UNESCO World Heritage site in 2001. These man-made terraces carved into the steep banks of the river have been producing world-famous wines, particularly fortified port wine, since the 17th century.
Many of the most influential and well-known port wine houses, such as Taylor’s and Sandeman, were founded by British families. Today a significant number of the major port brands are still British in origin, but ownership and production are mostly Portuguese or international.
Porto Tónico quickly became my favourite tipple to sip while watching the sun go down. It’s made like a gin and tonic, using white port instead of gin. I had never heard of white port but on return to Australia found that it’s available in most large bottle shops. Add tonic or soda water, or a combination, depending how sweet you like things. Garnish with a slice of orange – or some orange peel removed with a vegetable peeler – a sprig of fresh mint if available and lots of ice.
The vineyard estates are called quintas. Most do wine tastings and some have restaurants. The highlight of a delicious lunch at the Quinta de Bomfin was Crème Brulée (my favourite dessert) served with carrot and ginger ice cream which was flavoured with grated tonka beans. Yes I had to look them up too!
A river trip from Pinhão is the best way to experience the Douro Valley, with views of the historic quintas and tranquil river landscapes. Some of these river boat cruises last several hours and include lunch, but we went on a one hour trip.
We returned the car when we got back to Porto, where we then spent two nights. There’s plenty to do in this vibrant city, from climbing 225 steps of the Torre dos Clérigos to get a panoramic view of the city, to walking along the top level of the Dom Luis Bridge, designed by a disciple of Gustave Eiffel, to watch the sun go down.
A good find in Porto was Mistu, a restaurant serving modernised international and Mediterranean dishes and great cocktails. We had a selection of cold starters and the stand out was the Seared Butterfish with Foie Gras, Wakame and Ponzu Sauce.
From Porto we caught the train to Lisbon, a scenic journey which takes about three hours. We were there for three nights – enough time to catch up with Portuguese friends for dinner in their house and to discover a couple of delightful eateries. Cervejaria Ramiro is famous for fresh seafood, cooked simply and served at long tables where everyone sits together. We were told we had to book online and found that the only time slot available for lunch or dinner was 3pm. We turned up at 2.15pm and asked the girl at the door (with our saddest famished faces) if we might come in earlier than our reservation. “Sem problemas” she said and took us to join some Americans at a long table which had several spare seats.
I don’t know why it was so hard to get a booking online as there were several empty tables in this bustling establishment. This is not somewhere you go for a burger or steak and there’s a minimum charge of 25 Euros a head which you pay when you book. Huge tiger prawns cooked on a bed of salt were to die for. Conversation with our new American friends, who were from Washington DC, was lively.
The extensive tram system is a good way to see the city. There’s also an underground system as well as buses and little motorised tourist buggies, plus of course lots of walking. On our last evening we enjoyed a delicious selection of starters and side dishes at a little bistro in Praca das Flores called O’ Bistro – toasted brioche with foie gras and poached pear, French fries with truffle mayonnaise, devilled eggs and, to finish, we shared a decadent dark chocolate mousse garnished with a few flakes of sea salt and a drizzle of extra virgin olive oil.
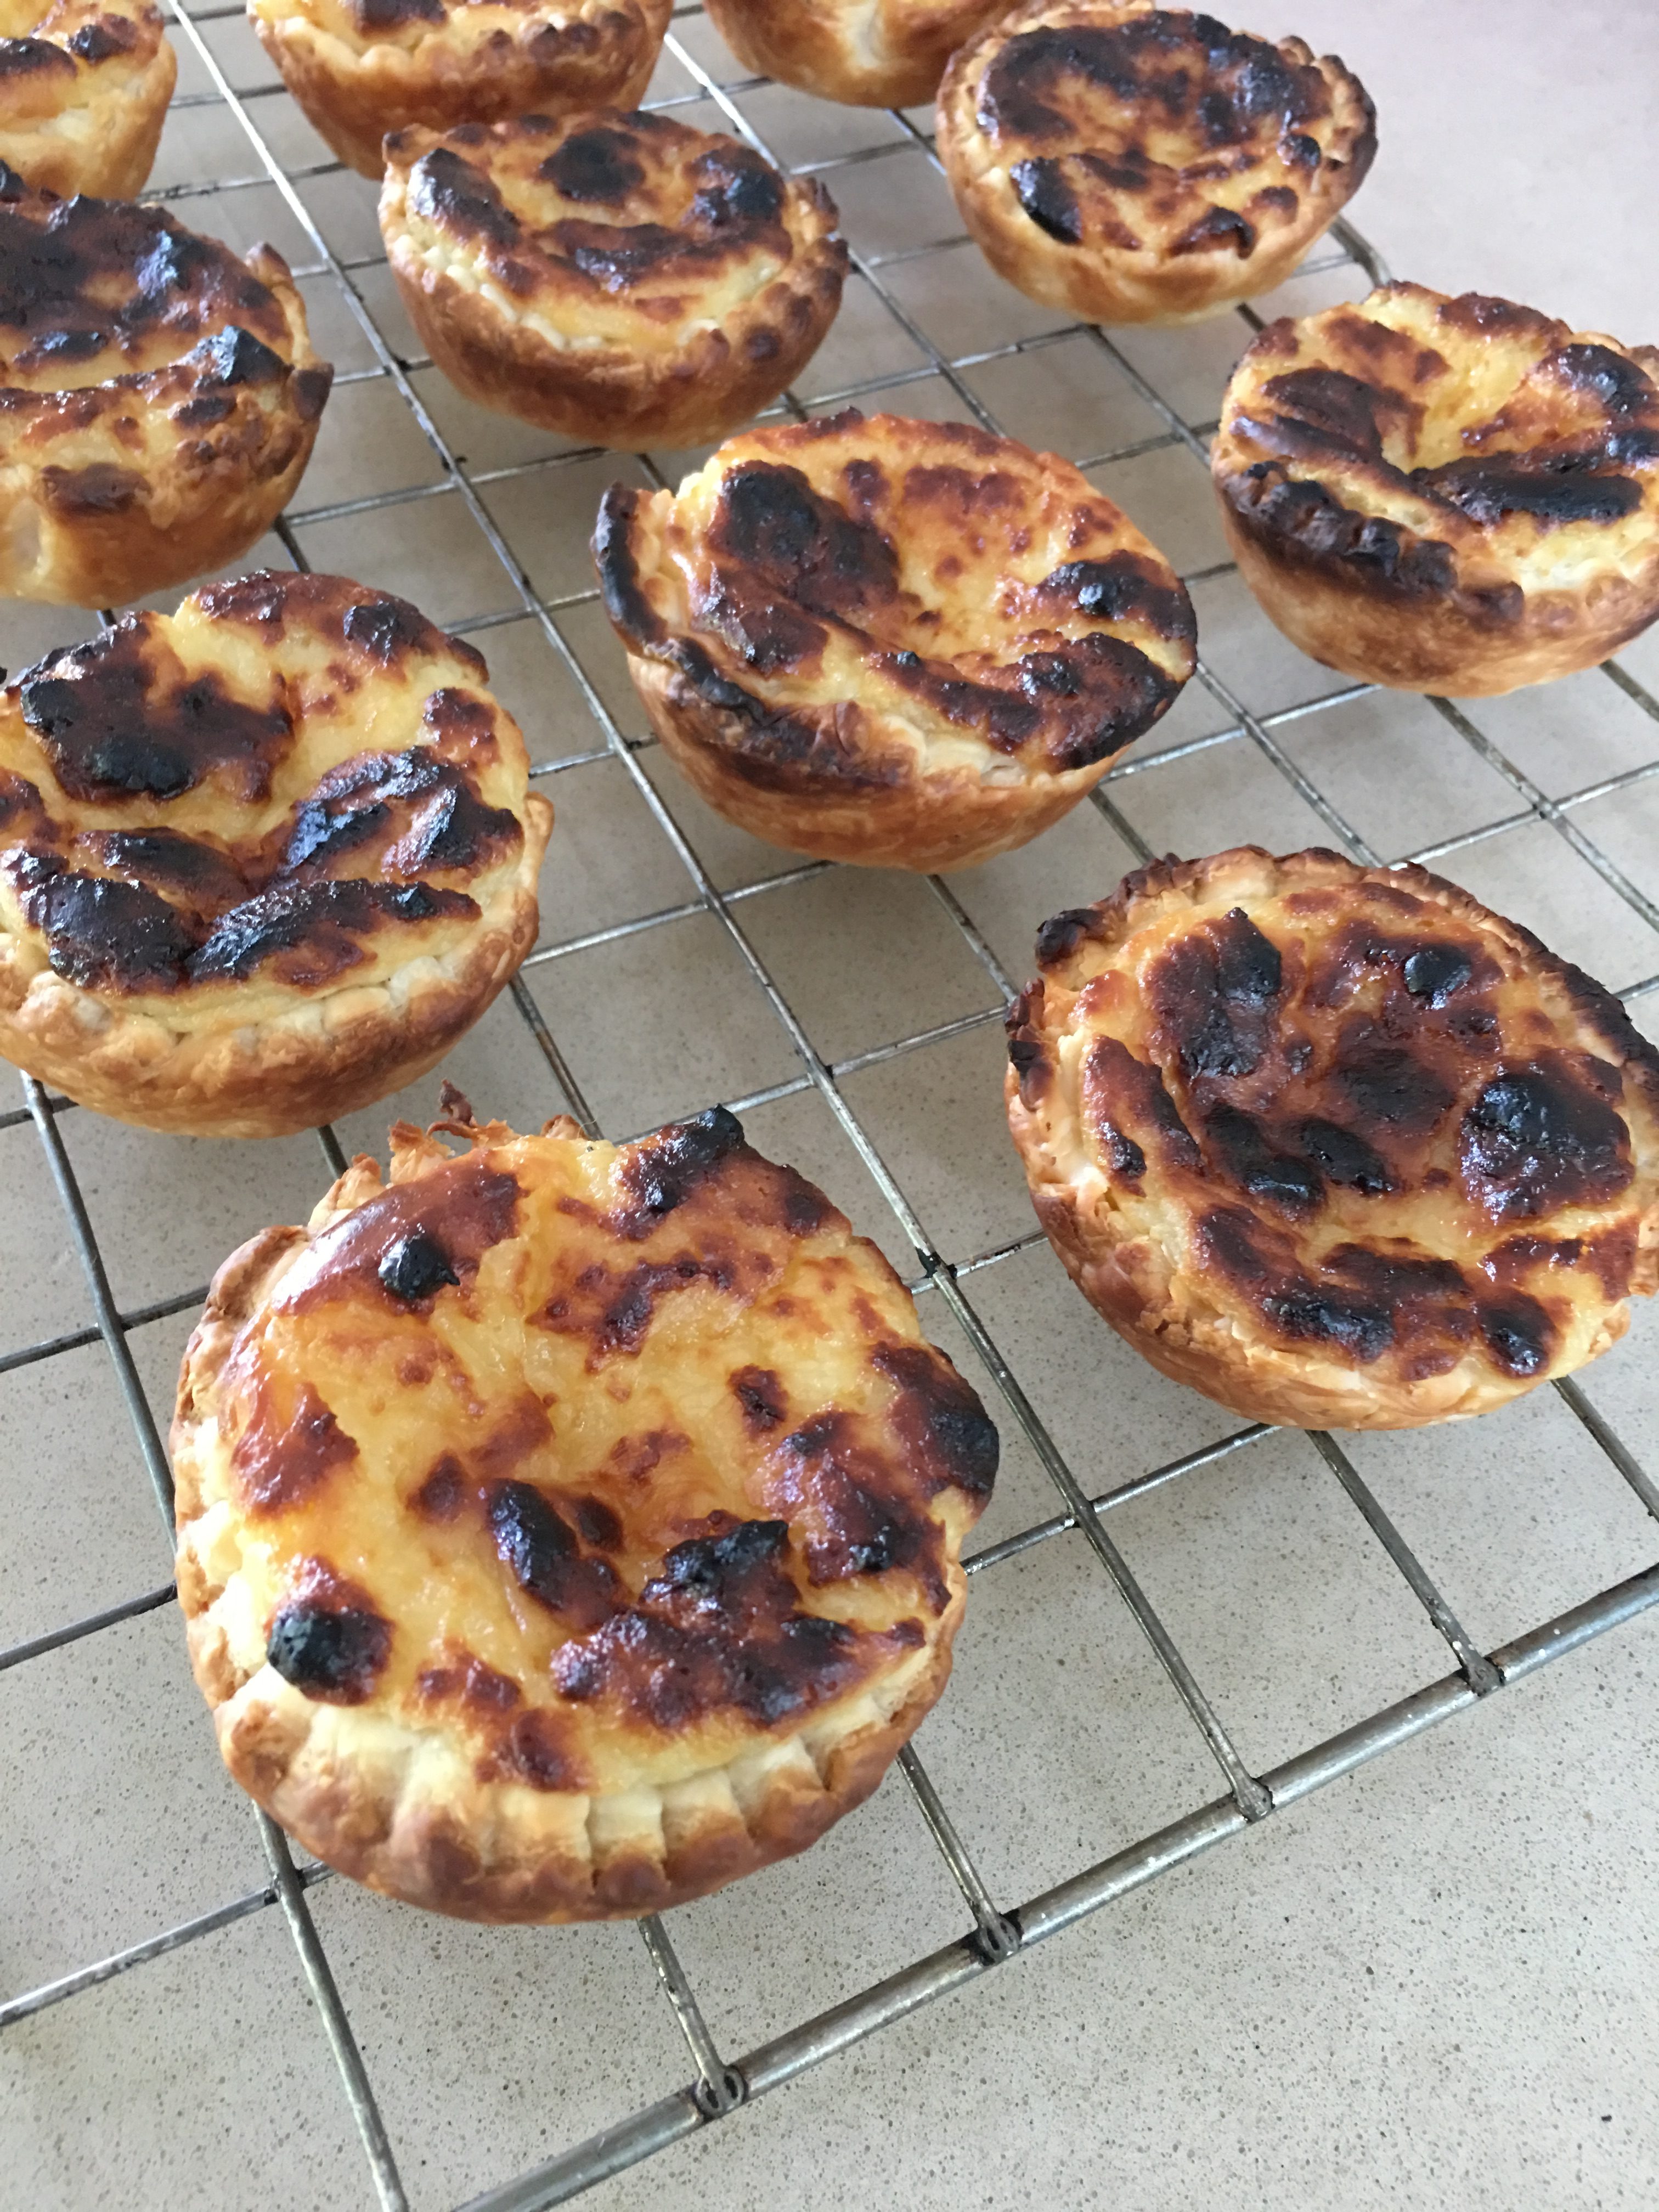
Portuguese tarts are there to tempt you on every street corner. My recipe may not be as authentic as some Portuguese tart recipes, but they’re delicious and very quick to make using bought puff pastry. Click on the link for the recipe, photo above.
She has made it many times and had success with several variations, such as using pears poached in red wine – drained and cut into chunks – instead of the apples. When she made it for our French group lunch she used poached quinces instead of apples and it was delicious. So as I had some poached quinces in the freezer which needed using up that’s what I did. Feel free to try other combinations.
1 tea bag (English breakfast or similar)
3 Tbs boiling water
A generous half cup of raisins or sultanas
2 cups caster sugar
3 eggs
1 cup vegetable oil
2 tsp vanilla essence
300g plain flour (2 and 2/3 cups)
1½ tsp baking powder
½ tsp salt
1 tsp cinnamon
¼ tsp each cloves, nutmeg and mace
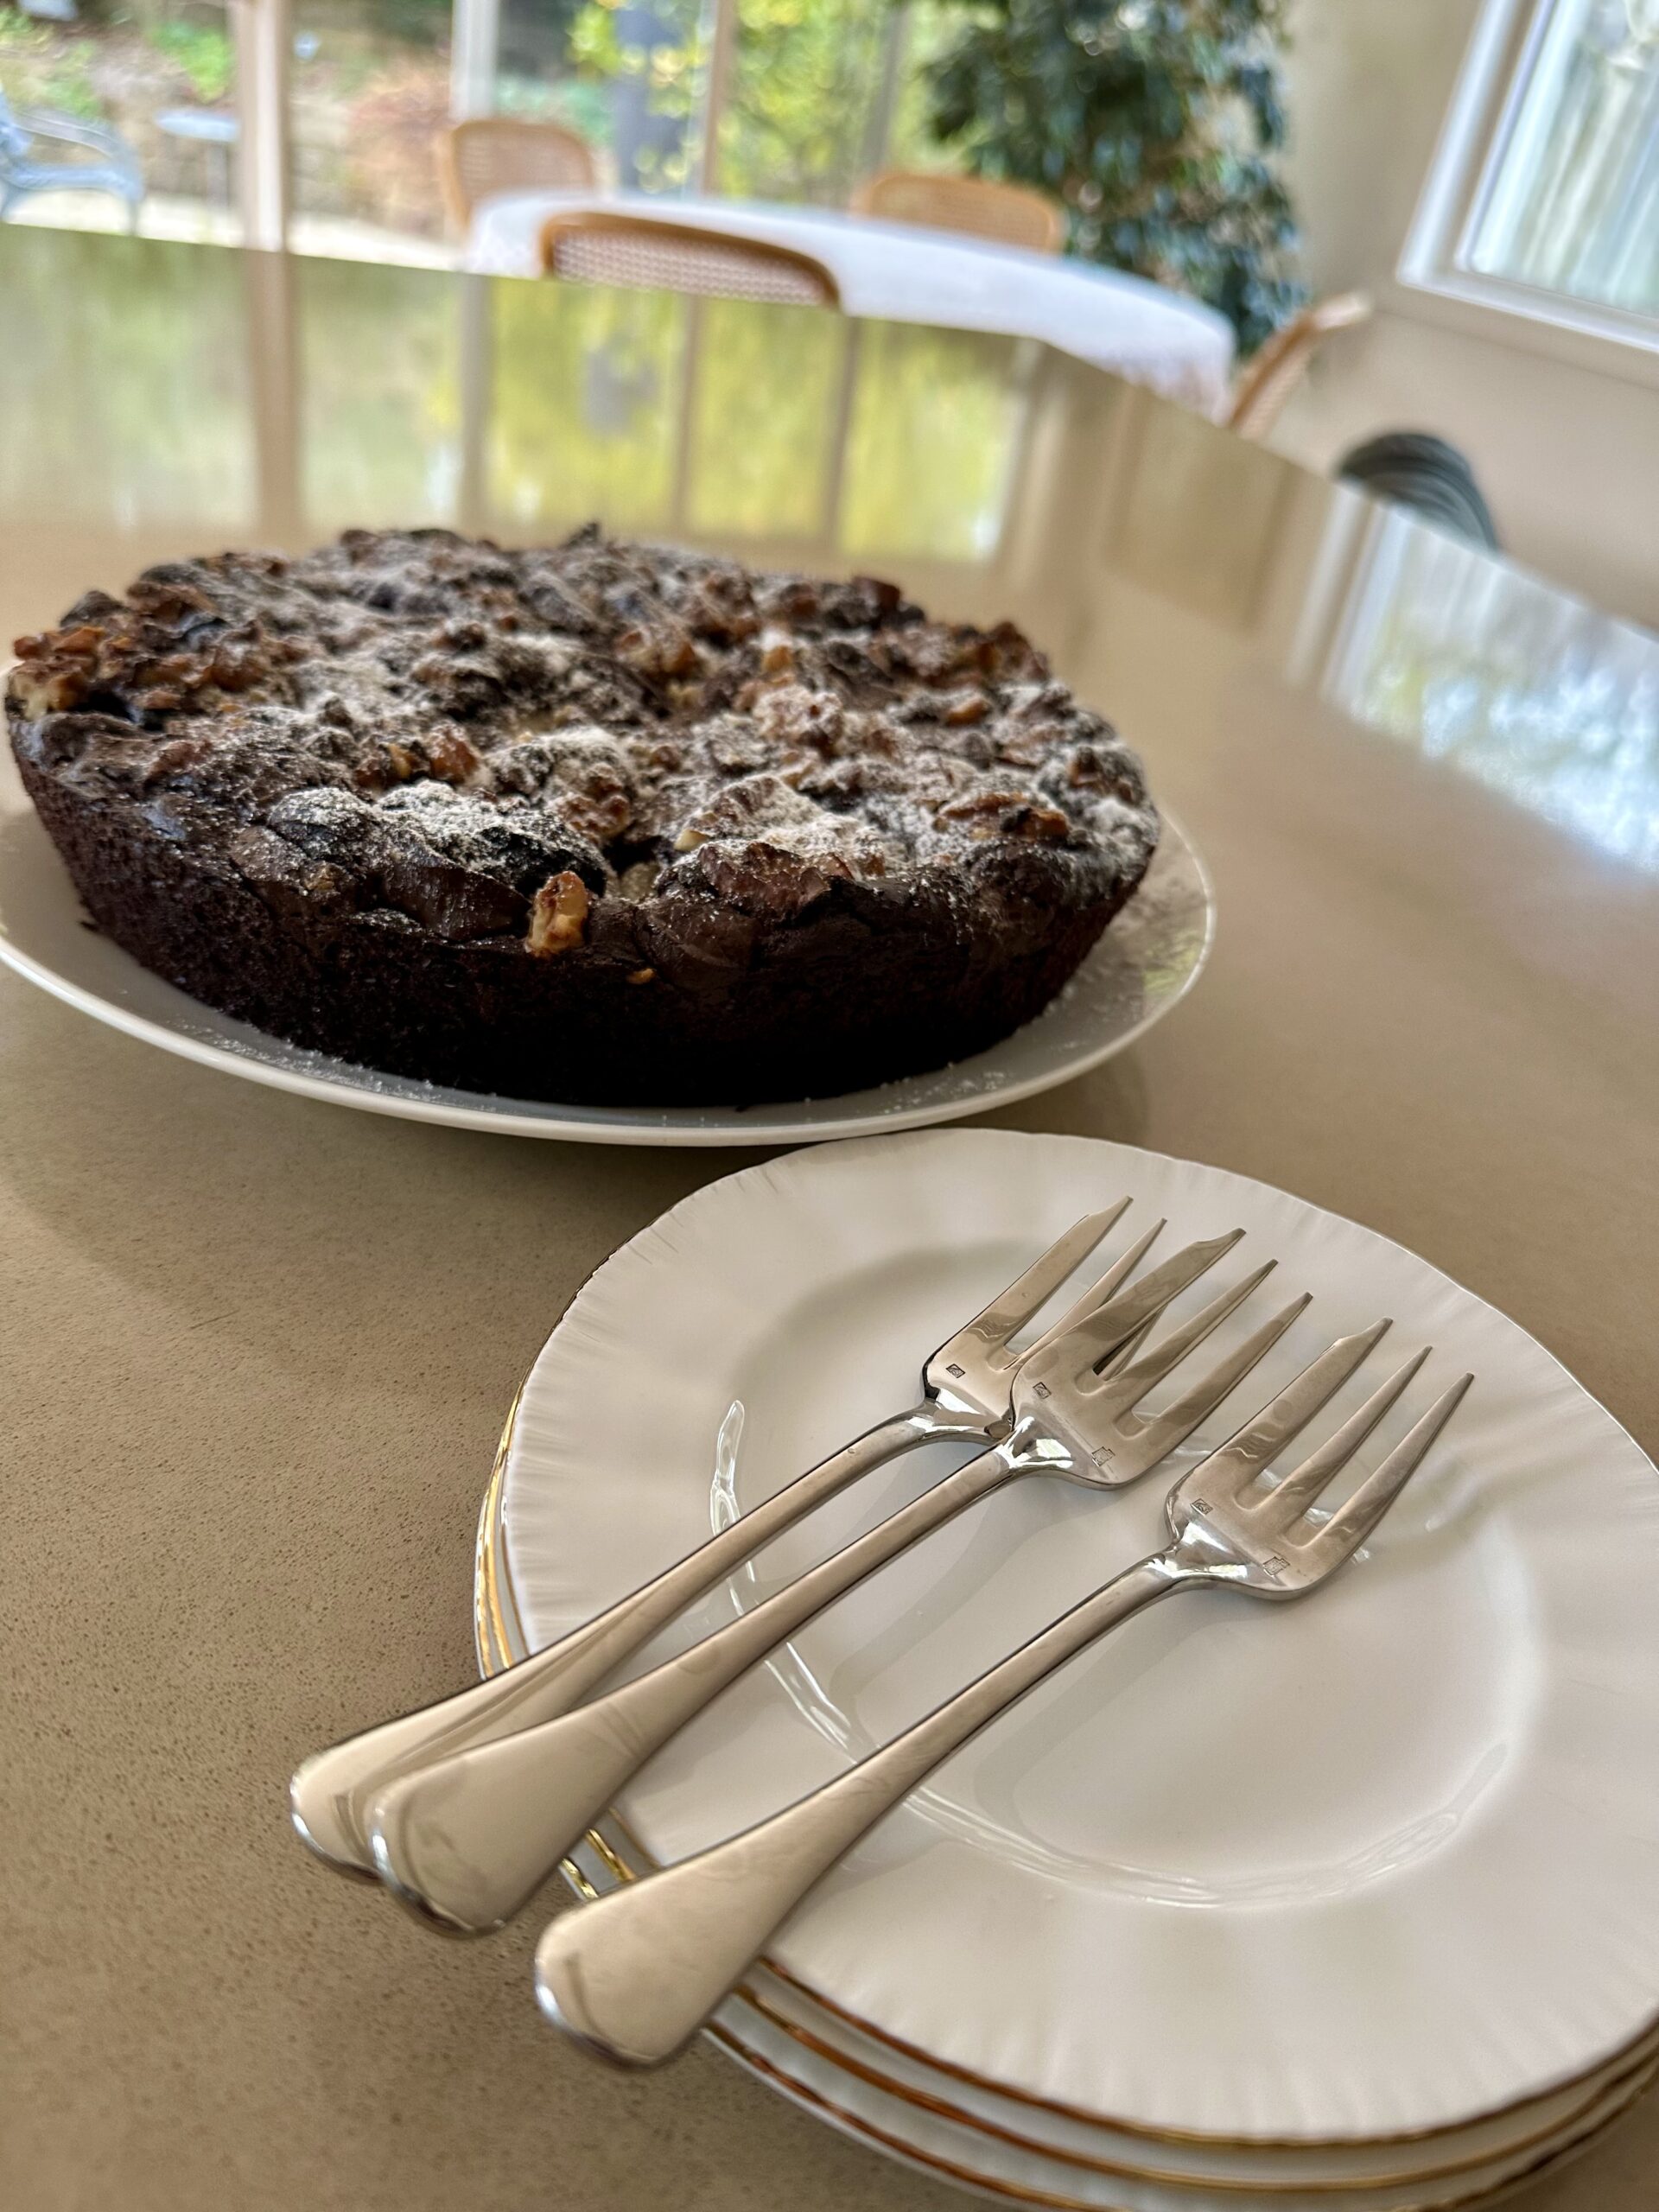
4-5 stalks of fresh rhubarb, cut into 2cm lengths
2 large apples, peeled, cored and sliced
1 cup walnuts or pecans, coarsely chopped To serve:
Rhubarb compote (optional)
Whipped cream, thick pouring cream or sour cream (shown in photo)
In a small bowl, pour boiling water over tea bag, press to release the flavour, then remove the tea bag. Add the raisins, mix to cover, then leave for half an hour. Drain raisins, discarding the liquid.
Meanwhile preheat oven to 160°C. Grease a 25cm springform pan and line with baking paper. Place eggs and sugar in an electric mixer and whisk until thick and pale. Add the oil and vanilla essence and mix well for a minute or two. Place a sieve over the bowl then measure the flour, salt and spices and add them to the mixture through the sieve. Fold in the rhubarb, apple and nuts. Make sure there are no pockets of flour. The mixture will be quite stiff.
Bake for an hour and 3/4 or until golden brown and firm on top. Ovens vary so start checking after an hour and a half. Cool in the tin for half an hour then remove. Store in an airtight tin when cold.
The cake should have a crunchy top and a chewy centre and improves after a day or two of storage.
Serve with rhubarb compote and cream as a dessert.
Serves 12
Variations: I didn’t have any mace so I added more cinnamon. Use poached pears or quinces in red wine instead of the apples.
This week’s recipe for a gluten-free, dairy-free cake using mandarin oranges which are now in season makes a sumptuous crowd-pleasing dessert.
The upside-down mandarin idea came from a recipe on a website I subscribe to called Delicious. However, the cake mixture in that recipe included flour and I needed to make a gluten-free, dairy-free dessert to take to a dinner party.
So I used a different recipe for an orange cake which uses almond meal instead of flour, used mandarins instead of oranges and combined the two recipes into one. Best served on the day it’s made, this cake is delicious.
Topping:
8 mandarin oranges
2 Tbs runny honey Cake:
3 mandarin oranges
6 large eggs at room temp
1¼ cups sugar
1½ tsp baking powder
4 cups almond meal (bought or made in a food processor) To serve:
2 Tbs sugar
250ml mascarpone
½ cup thick cream
Topping: Grease and line a 22cm (9 inch) cake pan with baking paper. Drizzle the honey evenly over the bottom. Finely grate the peel from 4-5 of the mandarin oranges and keep for the cake. Peel the 8 mandarin oranges, discard the peel and arrange the segments in circles in one layer over the base of the cake tin.
Cake: Preheat oven to 160° C. Place the 4 mandarins in a saucepan, cover with water then bring to the boil and simmer for 20 minutes. Drain and cool.
Make almond meal in a food processor by processing shelled almonds until very fine. They can be blanched almonds or not. Measure 4 cups and keep any excess for another use. Place the cooled mandarins in food processor (no need to wash it after processing the almonds) and process for a minute or two. Add remaining ingredients, including the almond meal and the grated rind you reserved earlier.
Scrape into the cake pan. Bake for 60 minutes or until well-risen, golden brown, firm to the touch and a skewer inserted in the middle comes out clean. Cool thoroughly in the tin.
To serve: Carefully tip cake out of pan and remove paper. If liked, sprinkle 2 tablespoons of sugar over the mandarin segments which are now on the top of the cake and use a blowtorch to brown the top. Not essential but looks nice.
Mix mascarpone with cream and serve with the cake.
This is Matthew’s favourite cake and he complained that I didn’t make it very often. The reason is that it’s rather a big cake so I only made it when we had guests, then he would finish it off over the following week.
To keep him happy I now make half the recipe in a large loaf tin which takes about 45 minutes to cook rather than an hour. The quantities for half the recipe are in brackets.
The carrots and cream cheese make this a moist cake which will keep in a tin with a lid for up to a week, refrigerated in warm weather.
4 eggs (2) 1¾ cups sugar (just over ¾) 1½ cups vegetable oil (¾) 2 cups self-raising flour (1) 2 tsp bicarbonate of soda (1) 2 tsp cinnamon (1) 1 tsp salt (½) ½ tsp ground cloves (optional) (¼) 1 cup chopped walnuts (or ½ cup walnuts and ½ cup raisins) (½ total)
400g coarsely grated carrots (about 4-5 big carrots) (200g) Icing: 250g cream cheese at room temperature (not the spreadable kind) (125g) 1-2 cups icing sugar, sifted (¾ to 1 cup) 1 tsp vanilla essence (½) 25 walnut or pecan nut halves
Preheat oven to 180ºC. Peel carrots then grate in food processor if you have a grating attachment or by hand. With electric beaters, beat eggs and sugar until thick and creamy and tripled in volume. Gradually beat in oil, fold in sifted dry ingredients, then walnuts (raisins) and carrots. Pour into a 25 cm (9”) square tin, greased and bottom-lined with greaseproof paper, and smooth the top. You can use a round tin if preferred, but I like the way a square cake can be cut into lots of small servings.
Bake for an hour in the middle of the oven, or till a skewer inserted in the middle comes out clean. Cool 10-15 minutes in the tin then turn out, cool thoroughly and remove paper. Ice the top only and decorate with 25 walnut halves, 5 down one side and 5 down the other, then fill in the gaps like a chess board. Cut cake into 25 squares. Keeps for several days in a tin.
Icing: Place cream cheese, icing sugar and vanilla in food processor and mix until light and fluffy, stopping once to scrape down the sides. Don’t over-mix or it will go thin and runny. If preferred mix the icing by hand. If using a softer, spreadable cream cheese definitely mix by hand.

 250g butter, melted