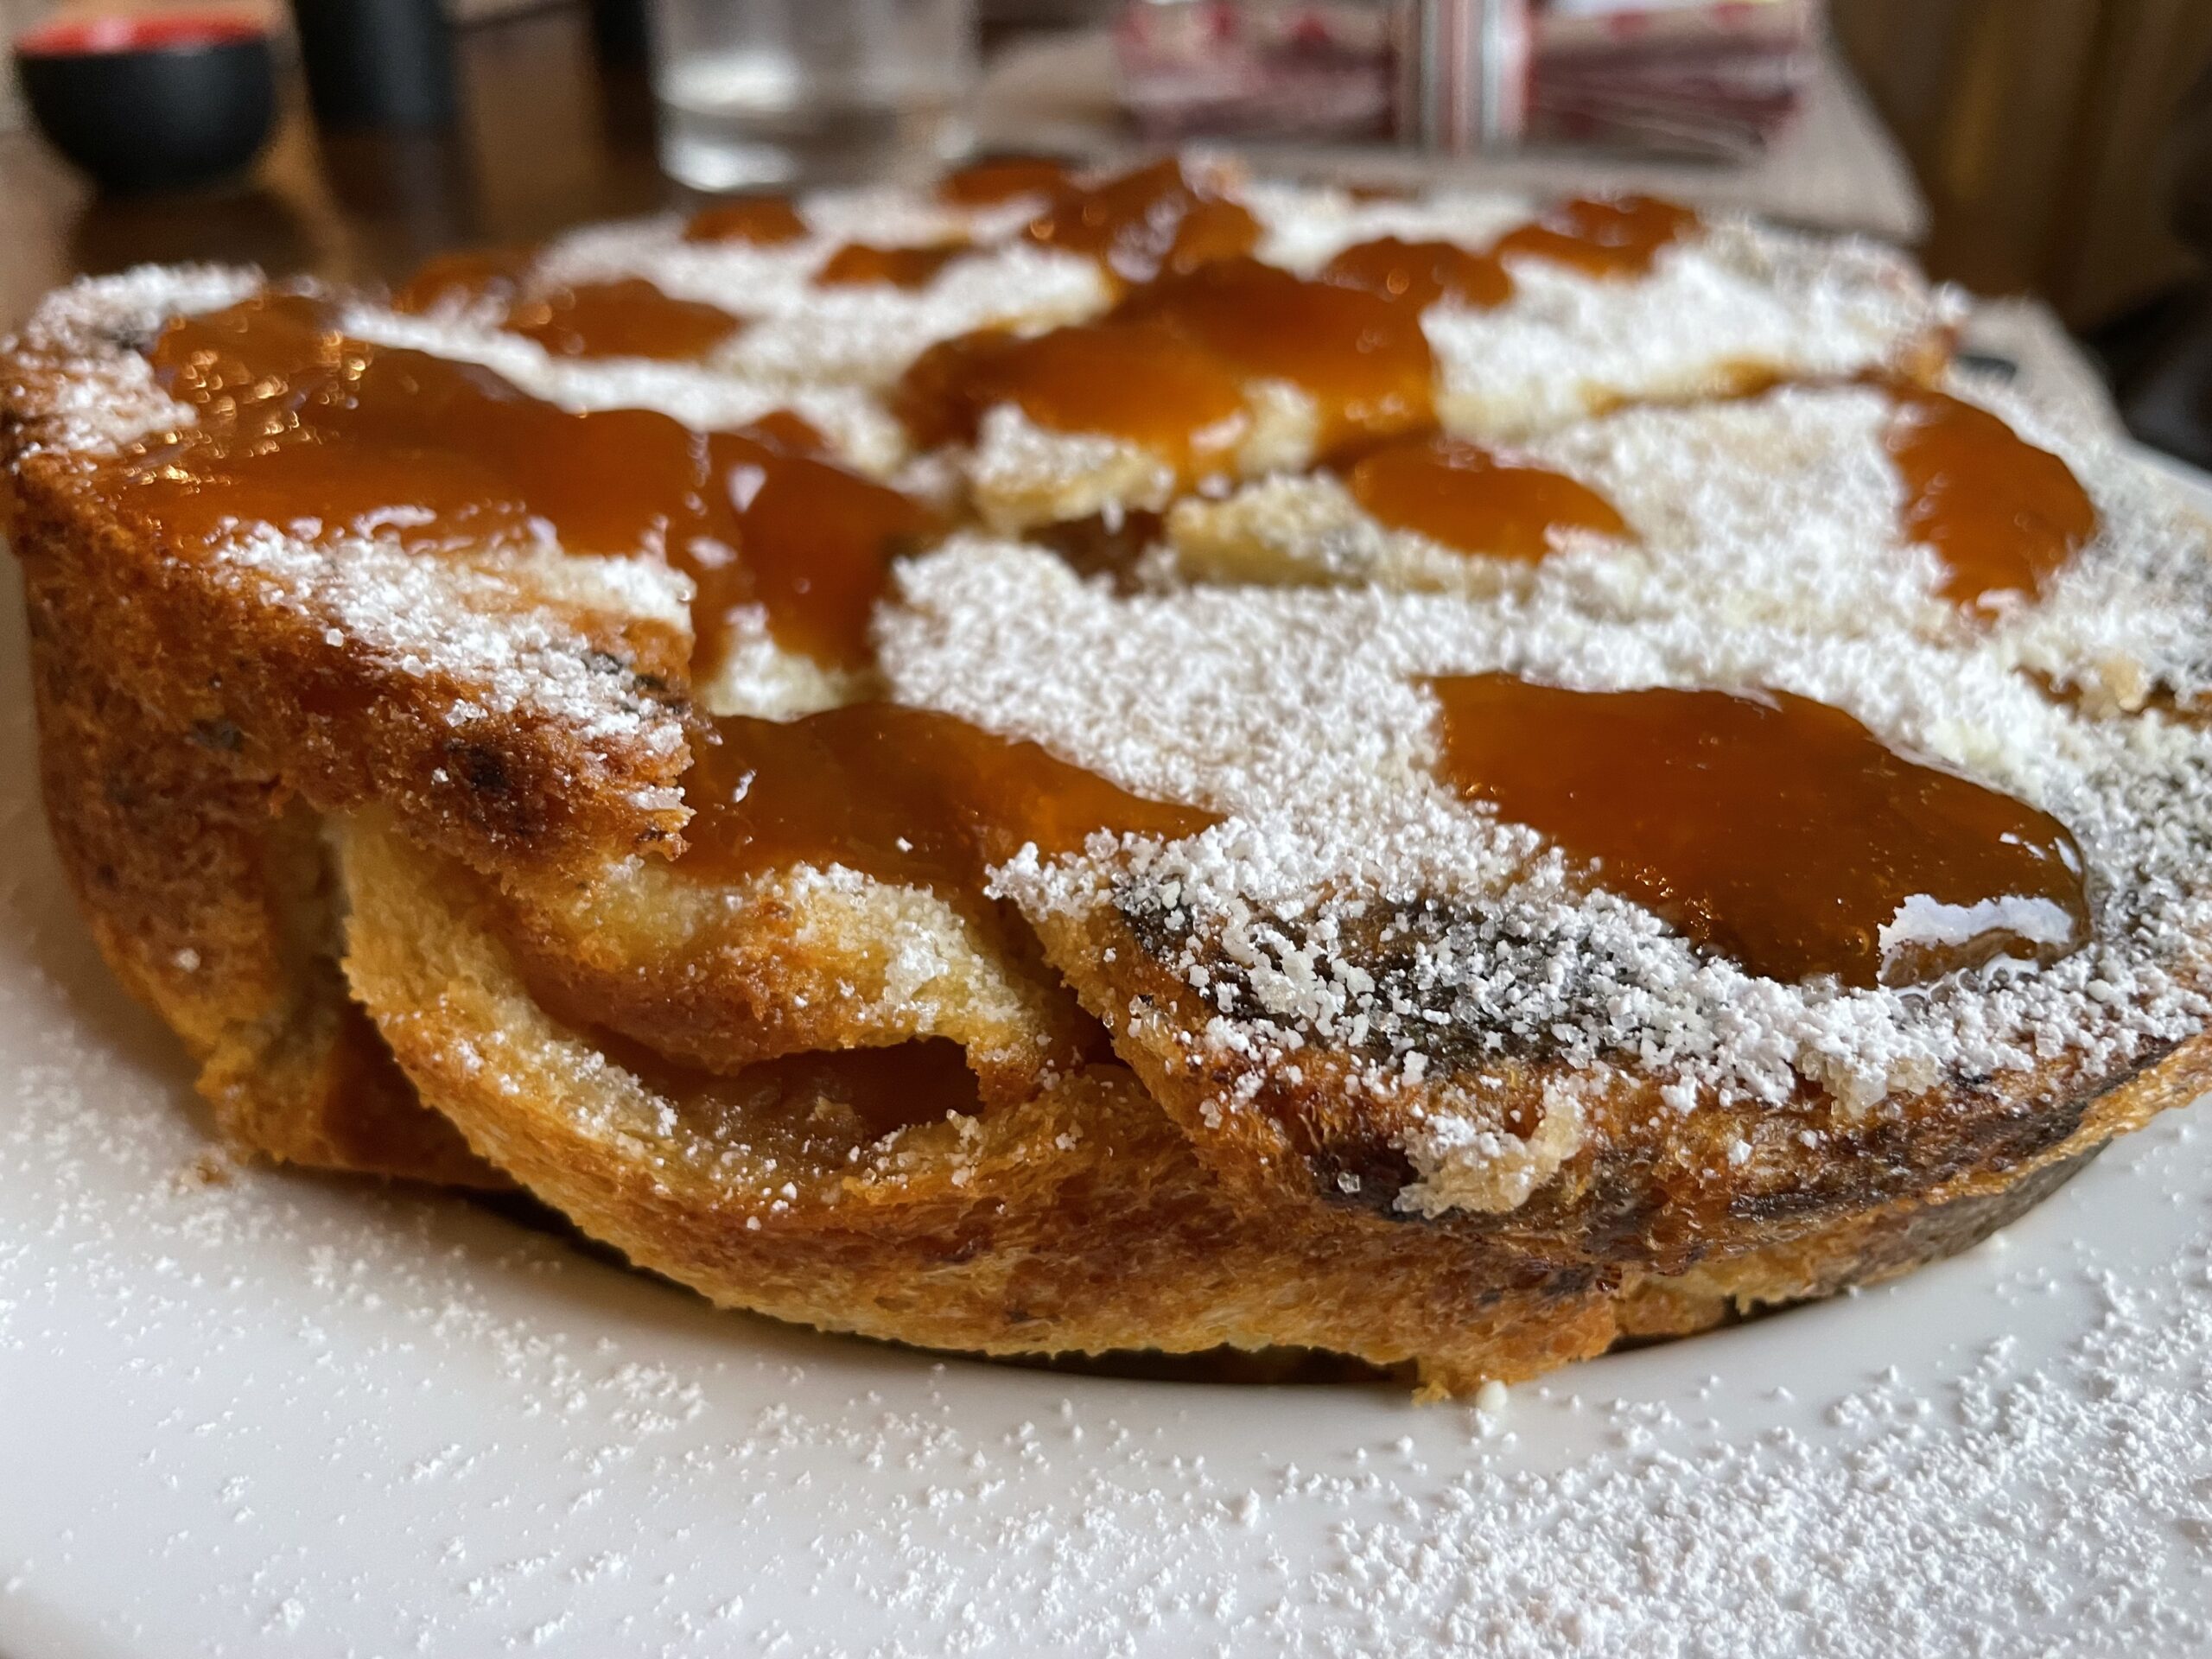
Dulce de Leche Ice Cream

Nigella Lawson made this ice cream on her TV series some months ago and I made a mental note to give it a try. She says it’s the ice cream she makes (and eats) the most.

It’s very quick and easy, using roughly equal quantities of Dulce de Leche or Nestlé’s Caramel Top ‘n Fill and cream. A splosh of bourbon, rum or brandy is optional – and best left out if you’re serving this to kids. There’s no churning required and when ready to serve the ice cream is not rock hard, so you don’t need to take it out of the freezer ahead of serving time, the way you do with most home made ice creams.

Dulce de Leche (known as Manjar in Chile) is basically condensed milk cooked until it turns into a thick brown caramel. It’s not difficult to make from condensed milk in a pressure cooker and this is what you had to do in Australia before Nestlé’s Caramel Top ‘n Fill came on the market.

Nigella says this ice cream goes well with Sticky Toffee Pudding. She also suggests adding brandy instead of whisky and serving it with Christmas Pudding. I have served it with Sago Plum Pudding.

1 can Nestlé’s Caramel Top n Fill (380g) or equivalent in Dulce de Leche*
300ml whipping cream
1-2 Tbs Bourbon, rum or brandy (optional)
½ tsp Maldon sea salt flakes, or to taste
To serve (optional):
½ cup pecan nuts or walnuts
Maple syrup or golden syrup or honey

Place dulce de leche or Top ‘n fill in a bowl and mix with electric beaters until smooth. Add the cream and continue whipping until thick and smooth. Gradually mix in the alcohol, if using and salt to taste. Scrape into a container with a lid, then freeze for 8 hours or overnight.

Optional topping: Place pecans or walnuts in a small frying pan and stir over moderate heat until lightly toasted, then chop roughly.

Serve ice cream topped with the nuts and a drizzle of maple syrup, golden syrup or honey.

Serves 8

*or Bonne Maman Caramel Spread

Plum Cake

I’ve been making this cake for nearly 30 years from a recipe published by Stephanie Alexander, which she calls Mieze’s Plum Cake after the friend who gave it to her. I have slightly adapted the method but the end result is the same.

The best plums to use are blood plums which have dark purple skins and flesh, but unfortunately they’re only in season for a very brief period. The recipe works well with any plums you can get, or peaches, apricots or, as you can see in the photo, with nectarines.  You could also try making it with canned fruit if you’re housebound and that’s all you have.

I make this cake in a 22 cm (9 inch) square tin, so each serving has half a piece of fruit on top. This involves increasing all the ingredients in the original cake mix (but not the topping) to make a bigger cake which serves 16. For a smaller cake use the original recipe (see above link). I like to grind the nuts in a food processor and leave them slightly chunky, rather than buying ground nuts which are more like flour.

Serve with a cup of tea or as a dessert with a dollop of cream.

250g butter at room temp
250g sugar
200g plain flour
200g self-raising flour
pinch salt
3 eggs
½ cup milk
1 cup ground almonds or walnuts
8 blood plums, halved and stoned (or use apricots, peaches or nectarines)
Topping:
½ cup sugar
2 tsp cinnamon
60g butter
2 eggs

Preheat oven to 170°C. Process nuts coarsely in food processor then tip out. Process butter and sugar till fluffy, add eggs one at a time, sifted flours, salt, the nuts and then the milk, stopping to scrape down the mixture halfway through.

Spread into 9″ (22cm) square cake pan, greased and lined with paper. Arrange the plums, cut side up, over the cake and push them in a bit. The 16 halves should fit exactly. No need to wash the food processor before using it to mix all the topping ingredients. Pour topping evenly over the fruit. Bake in the centre of the oven for an hour, or until a skewer inserted in the middle (cake not fruit) comes out clean. If outsides are getting too brown, turn oven down a bit, but don’t overcook or the cake will be dry.

Variation: Use peeled and halved juicy pears instead of plums and add a tablespoon of fresh ginger to the topping.

Serves 12-16

Stir Crazy Chocolate Cake

Since the start of the coronavirus lockdown I participated in an online recipe exchange from which you are supposed to receive lots of recipes. I only received two and this is one of them, from another Linda who lives in Chile. Appropriately named for when you’re going stir crazy while in isolation.

This quick and easy chocolate cake surprisingly doesn’t contain any eggs. Delicious on its own or with a dollop of sour cream, as shown in the photo.

3 cups plain flour
2 cups sugar
2 tsp bicarbonate of soda
1 tsp salt
½ cup cocoa powder
¾ cup vegetable oil
2 tsp vanilla essence
2 Tbs vinegar
2 cups cold water
Chocolate Icing:
250g cream cheese at room temp
¼ cup cocoa powder
1½ cups icing sugar
Chocolate buttons to decorate (optional)

Preheat oven to 175°C. You can either mix this cake in a bowl or in a food processor. Sift the dry ingredients into a bowl or food processor and mix. Add remaining ingredients and mix till smooth, stopping to scrape down any mixture stuck to the sides. Spread into a cake pan. I used a 22 cm (9 inch) square silicone pan so I didn’t need to grease and line it with baking paper. You know your pan and whether or not cakes stick. Bake for 30-40 mins or until firm to touch in the middle.

Ice with your favourite icing or this one which uses cream cheese. Place cream cheese in a bowl and mix till smooth, gradually adding the sifted cocoa and then the sifted icing sugar.  You might find one cup of icing sugar is enough. If liked decorate with chocolate buttons. Cut into 16 squares.

Serves 16

Rhubarb Tart

With everyone in coronavirus lockdown, some of us are finding more time to cook. And eat.

I highly recommend you find a sunny corner in the garden to plant some rhubarb. It doesn’t take up much room and keeps on fruiting for most of the year. Ours only dies down a bit for 2-3 months in the coldest part of winter. When there’s virtually nothing else in the veggie garden, there’s usually some rhubarb.

This pastry recipe from chez Panisse via Rick Stein is deliciously buttery, reminiscent of a Parisian croissant, fresh from the oven. The oven needs to be nice and hot to get that lovely French glaze. Serve the tart as it is or with some whipped cream or sour cream, which is my preference.

Pastry:
225g plain flour
Good pinch of salt
170g butter, cold from the fridge
About 4 Tbs cold water
Filling:
500-600g rhubarb
½ cup sugar, or more, to taste
2 Tbs fortified wine such as port, but any will do
Grated rind of an orange or lemon
To finish:
Extra sugar
About 2 Tbs butter
Apricot Jam (optional)
To serve:
Whipped cream, sour cream or creme fraiche

To make the pastry, place flour and salt in food processor. Add butter cut into large chunks. Process carefully, preferably using the pulse button, until the butter is in small pieces. You don’t want it to be completely fine like breadcrumbs. Slowly add the water through the feed chute, processing briefly with the pulse button, until just combined. You don’t want it to be too wet, but it needs to start sticking together. Tip out, form into a flat disc using floured hands, wrap in plastic wrap and refrigerate for half an  hour or up to 2 days. It can also be frozen.

Preheat oven to 220°C. On a floured surface with a floured rolling pin, roll out the pastry thinly and line a lightly greased tart tin, preferably metal. Mine is rectangular, but any will do. Wash and trim the rhubarb. I had plenty, so used only the red ends. All the trimmings and greener ends were made into a compote which is great for breakfast with yoghurt or as the base of a fruit crumble. I cut the rhubarb into the exact width of the tin and lined them up in the uncooked pastry case, so I knew exactly how many I needed. If you want more fruit in the tart you could cut up all the green bits and put them in first, then arrange the bigger pieces on top.

Place rhubarb in a bowl and mix with the sugar, port and citrus zest, then arrange in the tart shell. Drizzle over any remaining sugary juice. Sprinkle with the extra sugar, then dot all over with small pieces of butter.

Bake for 30-40 minutes, or until pastry is golden and rhubarb is starting to blacken in places – see photo. If liked, brush the surface of the tart with some apricot jam (just the non-chunky part) when it comes out of the oven.

Serve warm or at room temperature with cream, sour cream or creme fraiche.

Serves 10

Variations: use peaches, plums, nectarines or apricots instead of rhubarb.

Black Rice Pudding with Jaggery and Toasted Nuts

On a recent trip to India we dined at a fantastic restaurant in Mumbai called Burma Burma. It serves only vegetarian food and no alcohol – a formula which is really taking off. The Maitre D said they were about to open their sixth restaurant in Calcutta. I assured him they would do well in Australia too. Vegetarianism is a growing trend worldwide.

The black rice pudding garnished with Jaggery and Toasted Almonds was superb, so I decided to try and recreate it, using macadamias. Jaggery (also known as Gur) is made from sugar cane and is a popular sweetener throughout Asia.  Dark brown in colour, it’s sold in solid blocks. Most Asian grocery stores sell Jaggery, but if you can’t find it substitute a drizzle of treacle, which will provide the sweetness and colour, without the crunch.

2 cups black rice, rinsed
4 cups water
pinch salt
2-4 Tbs sugar, to taste
1 can coconut cream
To serve:
Lightly toasted slivered almonds or coarsely chopped macadamias
2-3 Tbs Jaggery, chopped
Fresh mango (optional)
Extra coconut cream or thick cream or sour cream (see note below)

Place all ingredients in a heavy-bottomed pan. Bring to the boil, then simmer, covered for 45 minutes or until tender, adding more water as necessary and stirring often to prevent sticking, especially towards the end. The rice pudding should be thick and the grains should be tender, but with a slight bite. Cool then chill.

Serve the rice pudding chilled, garnished with the toasted nuts and the Jaggery, in one large dish or individual dishes. If liked, serve with a bowl of fresh cubed mango and some cream.

Note: traditionally served with extra coconut cream. I prefer it with a dollop of thick fresh or sour cream. It’s also perfectly nice on its own.

Coconut Meringue Tart

I love anything with coconut in it. Unfortunately Matthew doesn’t so I only make coconut desserts for events he’s not attending. I served this scrumptious tart at one of my Spanish conversation lunches. Guess who ate the leftovers.

1 22cm (9″) sweet pastry case, cooked till golden
Coconut Filling:
1 can coconut milk plus enough milk to make 2¼ cups
½-¾ cup sugar (depending on how sweet a tooth you have)
3 egg yolks, beaten
1/3 cup cornflour
1 cup desiccated or shredded coconut
Meringue:
3 egg whites
6 Tbs sugar
1 tsp vinegar
1-2 Tbs extra desiccated or shredded coconut
To Serve:
Thick pouring cream

Mix about 2 Tbs of the milk mixture with the cornflour to make a smooth paste. Place coconut milk, milk and sugar in a non-stick pan and heat to boiling point. Add the egg yolks and the cornflour mixture, stirring constantly until the mixture thickens. Add coconut, then tip into the pastry case.

Preheat oven to 170°C. Whip egg whites until stiff then gradually add the sugar, beating until you have a thick, glossy meringue. Beat in the vinegar then dollop all over the coconut filling. Use a knife to spread meringue evenly all over, then sprinkle with the extra coconut. Bake for 8-10 mins or until golden brown. Watch the coconut doesn’t burn. Chill in the fridge. Serve with cream.

Serves 8

Layered Fruit Jelly

This dessert can be made with fresh or frozen fruit, or a mixture of the two and is popular with all ages. Quantities will depend on the size of your mould. Mine holds 1½ litres and I used raspberries, mangoes, blueberries and kiwi fruit.

1-2 cups green fruit, such as seedless grapes or cubed kiwi
1-2 cups purple fruit, such as seedless purple grapes or blueberries
1-2 cups cubed orange fruit, just as mango or peaches
1-2 cups red fruit, such as raspberries, stoned cherries or strawberries
2 packets of jelly mix (I used yellow but you could use red or orange)
1 rounded tsp gelatine powder

Layer the fruit in the jelly mould, starting with a layer of green fruit, then purple and so on until the mould is completely full of fruit. My jelly mould holds 1½ litres or 6 cups. The jelly will fill in the gaps.

Make up both jelly mixes, using slightly less than the packet says and mixing in the powdered gelatine. My jellies each called for 450 mls of water (half boiling and half cold) which makes a total of 900 mls of liquid. I mixed the two packets with a total of 750 ml boiling water and mixed in the gelatine.

Pour jelly carefully into the mould, filling to the top. Refrigerate overnight. To serve, dip the mould briefly in very hold water then invert onto a large serving platter.

Serves 8-10

Labneh with Summer Berries

I made this delicious Ottolenghi dessert when we were in Vancouver for my brother’s wedding in August, when the Canadian berry season was in full swing. Friends who saw the photo on Facebook thought it was a pavlova. In fact the base is strained yoghurt, known as labneh in the Middle East. Much healthier.

For subscribers in the southern hemisphere this could become your go-to dessert for the holiday season. For those living in the north, you’ll have to wait until summer or perhaps try using frozen berries. Ottolenghi doesn’t use the orange juice in this recipe, but I’ve made the recipe twice, once with and once without the juice. Much more orangey with.

1 kg thick Greek-style yoghurt
A good pinch of salt
1-2 Tbs icing sugar
1 tsp vanilla essence
100ml Extra Virgin Olive oil
1 orange
A few sprigs of thyme or lemon thyme
800g to 1 kg fresh berries (raspberries, strawberries, blueberries, blackberries, stoned cherries)
1-2 Tbs caster sugar

The day before serving make the labneh and the orange oil. Place a sieve over a bowl and line it with muslin or similar fabric. I use a man’s handkerchief which I keep especially for this purpose. Scrape yoghurt into the sieve, cover and refrigerate overnight. Next day discard the liquid – my dog loves it. Mix icing sugar and vanilla into the yoghurt.

Remove the peel from the orange with a vegetable peeler, then remove the juice and heat it in a saucepan for a few minutes, or until reduced by half. Add the olive oil, the thyme and leave to infuse overnight.

At serving time spread labneh onto a large serving platter. Place about half the berries in a food processor with the caster sugar and pulse a few times to chop roughly. Spoon on top of the labneh. Top with the remaining whole berries, slicing the strawberries if large. Drizzle with some of the orange oil and garnish with the orange zest and some fresh thyme sprigs – the original ones will have gone a bit brown.

Serves 8-10

Variations: use other fruit combinations, such as bananas and passionfruit; kiwi fruit and strawberries

Den Bosch Lemon Pudding

Den Bosch is one of the oldest cities in the Netherlands. We spent a couple of days there recently and one night had tapas for dinner at a wine bar.

The food was very good and the waitress was kind enough to give me the recipe for the dessert. I have a cheesecake recipe which is very similar to this, but the addition of a little vinegar really makes a difference. The method is also slightly different.

1½ cups (375 ml) whipping cream
1 can condensed milk
Grated rind and juice 2 large lemons
2-3 tsp white wine or cider vinegar, to taste
4-5 plain or ginger biscuits
slivers of lemon rind to garnish

Whip cream with electric beaters until thick then continue whipping while you add the condensed milk, lemon rind and juice and vinegar. I used a Kenwood standing mixer, but you can use hand held beaters.

Spoon into 8-10 small glasses. Chill several hours or overnight. Garnish with crushed biscuits and lemon rind.

Serves 8-10

Variation: Fold through the pulp of 3-4 passionfruit before spooning into glasses.

Fiona’s Gluten Free Chocolate Cake

My friend Fiona follows a gluten-free diet. I love the nutty texture of her Gluten Free Chocolate Cake which keeps her sane when she’s studying for law exams.

Today’s recipe is adapted from Fiona’s. I’ve adjusted the quantities slightly, adding less sugar and a bit more chocolate and nuts. I’ve also added a topping of unsweetened cocoa powder, an idea from one of Yotam Ottolenghi’s chocolate cake recipes.

I served the cake as a dessert, with whipped cream and some cumquats I preserved a year ago, but it’s perfectly delicious just as it is, with a cuppa. As a dessert you could also serve it with berries or a ball of coffee ice cream.


250g dark chocolate
250g butter
250g almond meal*
4 eggs, separated
1 cup sugar
½ tsp baking powder
Pinch of salt
To serve:
About 2 Tbs unsweetened cocoa powder
Candied oranges or cumquats or fresh berries
Whipped cream

Preheat oven to 180°C. Heat butter in a saucepan and when melted add the chocolate, broken into squares and turn off the heat. As chocolate melts, stir to combine. Mix in egg yolks, then sugar, almond meal, salt and baking powder. In a large bowl whip egg whites with electric beaters until soft peaks form. Scrape in the chocolate mixture, in two lots, gently using a spatula to thoroughly combine.

Scrape mixture into a greased and bottom-lined 22cm round cake tin and smooth the top. Bake for 35-45 minutes. Check after 35 minutes. When ready cake will feel firm on top and a skewer inserted in the middle will come out clean. If you have a fan-forced oven you may find the cake is ready in just over half an hour, as mine was. Chocolate cakes are best under-cooked rather than over-cooked.

When cool, remove cake from tin and cover the top with cocoa powder, using a sieve. Serve cake with berries and whipped cream or just as it is.

Serves 12-16

* buy almond meal or make your own by blitzing nuts in food processor until they resemble breadcrumbs. I used half bought and half I made using unskinned almonds. If you don’t have any almonds substitute walnuts, pecans, pine nuts or even a mixture.