I began collecting recipes when I was at school. Some of the recipes in my large collection have been in my family for generations, others were passed on by friends and chefs around the world. Many have been adapted over the years to make them lighter or update their presentation. I’ve served them to royalty, PMs and other VIPs and there have been no complaints. I hope you are inspired to make some of them.
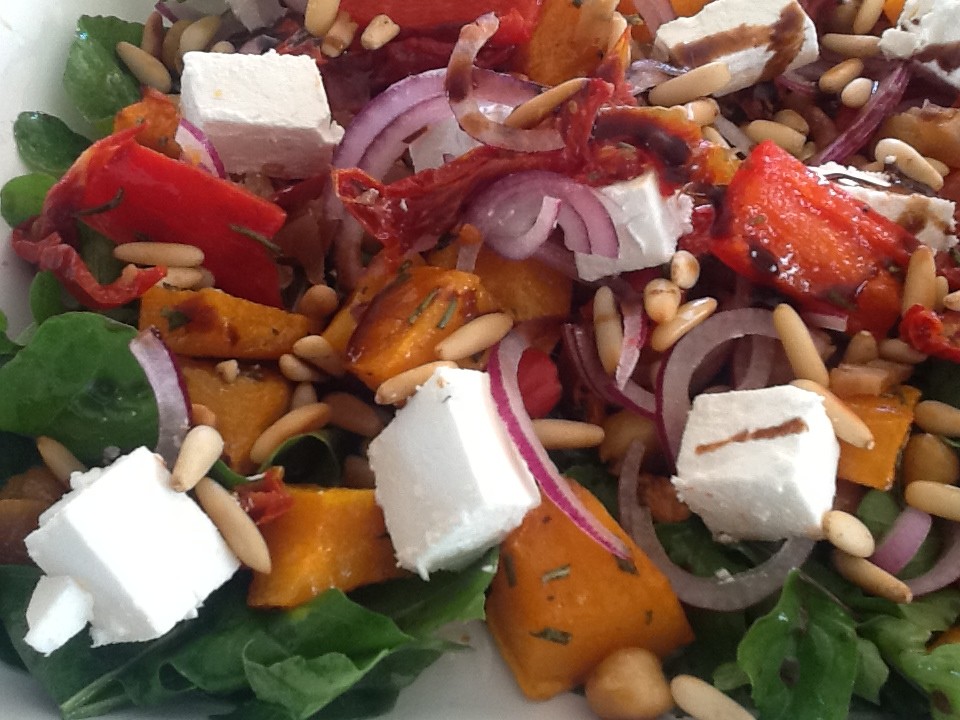
My daughter-in-law Amy created this tasty salad. I’ve added the rosemary and semi-dried or sun-dried tomatoes, which are both optional additions. It makes a perfect weekend lunch with some crusty bread and maybe a glass of Sauvignon Blanc.
Preserved lemons are a Middle Eastern ingredient which you can buy in specialty shops. They are quite easy to make and I will post the recipe in due course.
About 4 cups 2cm square pumpkin cubes
1 red capsicum (pepper) cut into 2-3cm cubes
1 can chick peas, rinsed and well-drained
Extra virgin olive oil
1 Tbs fresh rosemary, finely chopped
Salt and freshly ground black pepper
4-6 cups rocket, washed and dried
Balsamic vinegar
½ small red onion, finely sliced
1-2 Tbs preserved lemon, rinsed, pulp discarded, finely chopped
200g feta cheese, cut into 1.5cm cubes
½ cup semi-dried or sun-dried tomatoes thinly sliced (optional)
3 Tbs pine nuts, lightly toasted
Preheat oven to 200°C. In a bowl mix pumpkin, capsicum and rosemary. Drizzle generously with olive oil and season to taste. Spread out on an oven tray lined with baking paper (to save on washing up!) and bake for 15-20 mins or until vegetables are tender and starting to blacken a bit at the edges. Add chick peas to oven tray for the last few minutes of cooking and stir to coat with oil.
Remove from the oven and allow to cool a bit. Dress rocket with oil and vinegar and arrange on a serving platter or 4 individual plates. Top with the roasted pumpkin mixture, red onion, preserved lemon, feta, dried tomatoes and pine nuts. Drizzle with a little more oil and serve.
When we were growing up my brother, sister and I spent many happy summer holidays on a dairy farm on the moors of County Durham in the far north of England, not far from Barnard Castle. Hill House was run by my Dad’s Uncle Hector and Auntie Vina, their youngest son Ian and his wife Mary. Sometimes we went with my parents, other times we travelled the 300 miles on our own by train and Mary would meet us in Darlington. Ian’s brothers and sisters all had farms and we spent time with all of the rellies. Dent Gate farm had a stream with trout in it. If we were patient we could catch them by tickling them. Don’t believe me? Well neither does Matthew, but it’s true!
Cakes were a staple part of a farmer’s diet back then. They were served with morning tea at eleven and afternoon tea was a proper sit down affair back then. On Sundays they really went to town. The first time I saw the table groaning under the weight of a huge selection of cakes, sweet pastries, cold meats, chutneys, jellies, trifles and fruit salad, I couldn’t believe my eyes. Down south where I came from we were lucky if we had one home-made cake to choose from!
One day a week was set aside for baking in the temperamental wood-fired Aga stove. You couldn’t adjust the temperature and had to cook according to how hot the oven was that day. On windy days the oven would be hot and we would make blackberry and apple pies, using wild blackberries we had collected ourselves. If there was no wind the oven would be cooler and we made fruit cakes.
When I won first prize for a two egg sponge in the Butterknowle annual show I was tickled pink – but it was all thanks to Auntie Vina’s foolproof recipe. She had a huge influence on my love of cooking, teaching me all the basic skills and recipes for cakes and pastries. This Rum and Raisin cake is adapted from one of her recipes. I’ve added the cottage cheese and a bit more rum.
I never let the lack of an ingredient stop me making something, so you will see I’ve listed some substitutions below.
Ian and Mary have retired and in the family tradition Hill House is now being run by their son Jonathon and his wife Fay. It’s no longer a dairy farm as they lost all their cattle in the Foot and Mouth outbreak of 2001 and had to start over again.
1½ cups raisins
½ cup dark rum
125g butter, at room temp
1 cup brown sugar, firmly packed
3 eggs
1/3 cup milk
300g cottage cheese or ricotta
¾ cup ground almonds
1¼ cups self-raising flour, sifted
Icing sugar
Soak raisins in rum several hours or overnight. Preheat oven to 170°C. Line a cake tin with baking paper. I used a 22cm (9″) square tin, but a round one will do. In food processor or in a bowl with electric beaters mix butter and sugar until creamy. Add eggs, milk and cottage cheese and mix well, stopping to scrape down the sides halfway. Add ground almonds and self-raising flour. Stop and scrape down, add raisins and rum and mix just enough to incorporate as you don’t want to chop the raisins. Scrape into tin and smooth the top. Bake for 40-60 mins or until evenly browned, firm to touch and a skewer inserted in the middle comes out clean. Cool then tip out, remove paper, dust with icing sugar and cut into squares or rectangles to serve.
Makes about 20 pieces
Note: you can make your own ground nuts in the food processor.
Substitutions: brandy instead of rum, sultanas or other dried fruit instead of raisins, white sugar instead of brown, ground hazelnuts or walnuts instead of almonds.
We were staying with our daughter and son-in-law in Newcastle last year when they hosted an Australia Day party for about 30 friends plus kids. We ran out of time to make the desserts and bought a couple of pavlovas from Woolworths supermarket. I always make my own and was quite impressed with these bought ones which were moist and marshmallowy in the middle and crunchy on the outside. Not as good as a home-made one, which has more crunchy bits, but not bad. Once you’ve added the whipped cream and fresh berries they’re pretty good as an instant dessert.
When I was shopping for the Easter weekend Woolies had their large pavlovas, which they say serve 20, for half the normal price. So I bought one. Then I started to wonder how to make it look more home-made.
The answer is to use a stacking ring and cut circles from the pavlova. Top with the cream and fruit and voilà – an elegant dessert in no time at all. If you don’t use it all, the rest of the pavlova will keep for several days, so you can cut more circles and serve it again. If you think the pavlova circles are too big, cut them in half horizontally, then you will get twice as many smaller servings.
If you don’t have stacking rings you can make one by cutting the top and bottom off an empty metal can with a suitable diameter. If it’s deep enough top the pavlova with the cream and fruit before removing the ring, as I did for this photo, which results in a neater finish.
I doubt if anywhere other than Australia and New Zealand sells pavlovas in their supermarkets, so I’m afraid this blog post won’t help people living in other parts of the world!
1 bought pavlova
Cream, whipped until thick
Fresh berries or passion fruit pulp
Spray the inside of a stacking ring lightly with some vegetable oil, to make removal easier, then cut circles from the pavlova. If the ring is deep enough, top with cream and fruit, if not do it afterwards. If liked drizzle some raspberry coulis around the plate.
When we go to Europe to visit friends and family we usually spend a week in Thailand on the way home. All that galloping around seeing people and having a good time, not to mention all that eating, is exhausting. Breaking the journey allows us to adjust to most of the time difference and arrive feeling refreshed. We love the Thai people, the food and the wonderfully therapeutic massages.
This soup is quite filling, so it’s a main-course or lunch time kind of soup rather than a starter. On the table in less than half an hour, it’s full of delicious contrasting flavours and textures.
1 large onion, finely chopped
2 Tbs vegetable oil
1 Tbs curry paste (preferably Thai Green or Red, but any will do)
About 400g raw chicken meat (breasts or thighs) finely sliced
1 tin coconut milk (400ml)
1 litre water and 1 chicken stock cube (or use homemade chicken stock)
2-3 heaped tsp grated ginger
2 stalks lemon grass, finely sliced (optional)
1 small red chilli, seeded and finely chopped
1 Tbs palm sugar or brown sugar
2 Tbs Fish Sauce
Juice one lime or ½ large lemon
200g quick cooking Chinese noodles (see note)
2-3 thinly sliced spring onions – white and some of the green part
1 cup beansprouts
½ cup fresh, roughly chopped, coriander
Salt to taste
Heat oil in a large heavy-based saucepan and cook onion until soft but not brown, stirring often. Add curry paste and chicken and cook, stirring for 2 minutes. Add remaining ingredients down as far as the lime or lemon juice. Simmer for a few minutes until chicken is cooked. Add salt to taste, then turn off the heat and add the noodles and spring onions. Cover and leave to stand 2-3 minutes. Place a small handful of beansprouts in 4 large soup bowls. Ladle soup on top and garnish with coriander.
Serves 4
Note: any quick-cook noodles will do, including individual packs of instant noodles.
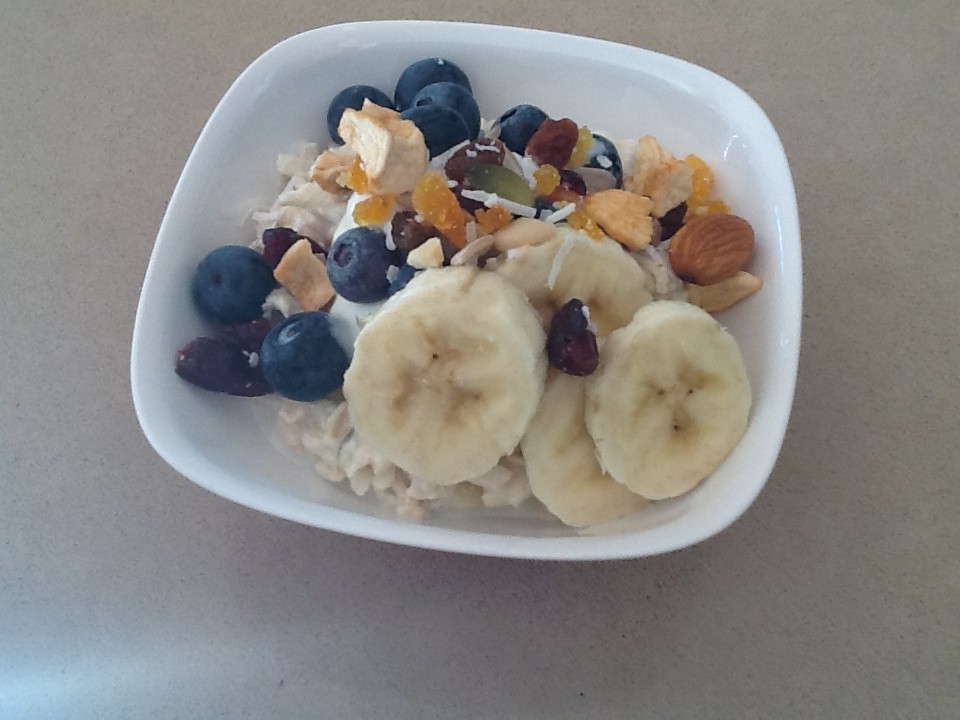
In about 1900 a Swiss doctor named Maximilian Bircher-Benner developed a healthy, easily-digested dish for the patients in his hospital.
Bircher Muesli soon became a light evening meal or breakfast dish throughout Switzerland and northern Germany. In the latter half of the 20th century muesli spread to the rest of the Western world and became a commercial product.
Bircher Muesli makes a nice change from the toasted granola-style ones you buy or make yourself. You can always add some crunch via the toppings.
1 cup porridge oats (not the quick-cook variety)
1 cup plain yoghurt
½ cup milk
2 eating apples, cored and grated, including skin Toppings:
Extra milk
Sliced banana
Fresh berries
Plain yoghurt
Honey to drizzle
Dried fruit, nuts, coconut
Mix oats with yoghurt, milk and grated apples. Cover and refrigerate overnight. Serve with extra milk and a selection of toppings. Keeps in the fridge for two days.
Note: I like the fact that this muesli is all ready to serve in the morning, when I have less time to spare for things like grating. However, if preferred, soak oats with yoghurt and milk and add grated apple when serving. Some recipes use fruit juice instead of milk, but I prefer milk.
I often make a salad using avocado and orange or grapefruit segments, which go well together. A recipe with the addition of oven-roasted carrots appeared recently in the Canberra Times and came from a cookbook called A Girl and Her Pig by April Bloomfield. I read through the method and found it unnecessarily complicated, so I made a few changes. I also added some honey to the dressing. Here is my tweaked version.
1 bunch baby carrots (about 750g)
2-3 cloves garlic
1 rounded tsp cumin seeds
1 rounded tsp coriander seeds
1 tsp dried crushed chilli (or use some fresh)
Salt and freshly ground black pepper
6 Tbs extra virgin olive oil
2 large oranges
2 large avocados
Juice of ½ a lemon
2 tsp honey
Coarsely chopped fresh coriander
Preheat oven to 200°C. Toast cumin and coriander seeds in a dry pan over moderate heat for a minute or two, or until fragrant. Place in a mortar with garlic, chilli, a tsp of salt, some pepper, 4 Tbs of the oil and crush to a paste. Scrub and trim carrots but don’t peel. Leave a small bit of the greenery at the end. Place carrots in a large baking dish which holds them in one layer. Add paste, mix well to coat. Add ¼ cup water then place in the oven to roast for about half an hour, stirring halfway, until tender and starting to brown a bit. Remove from the oven and cool.
Meanwhile remove peel and pith from the oranges with a serrated knife, then remove each segment by cutting each side of the membrane. Place segments in a small dish and squeeze what’s left of the oranges over the top to remove all the juice. Peel and slice avocados lengthwise.
Arrange carrots, drained orange segments (keep juice) and avocado slices decoratively in a serving dish. Place cooking juices from the carrots in a jam jar. Add orange juice, lemon juice, remaining 2 Tbs oil, honey and salt and pepper to taste. Shake well and drizzle over the salad. Top with the fresh coriander and serve.
Matthew and I met in Geneva in the 70s when I was working for the British Mission to the UN and he was working for the Aussies. We were each there for 3 years and did lots of skiing and eating, but we didn’t meet until he was just about to leave. Somehow we worked things out and here we are decades later!
In Switzerland baked ham is served in many restaurants, invariably accompanied by gratin de pommes de terre dauphinois – or spuds dauphin style in English! Indeed, there’s one place we used to frequent in Geneva which serves nothing else. Ham and potatoes baked with cream, cheese and garlic go so well together – it’s a marriage made in heaven.
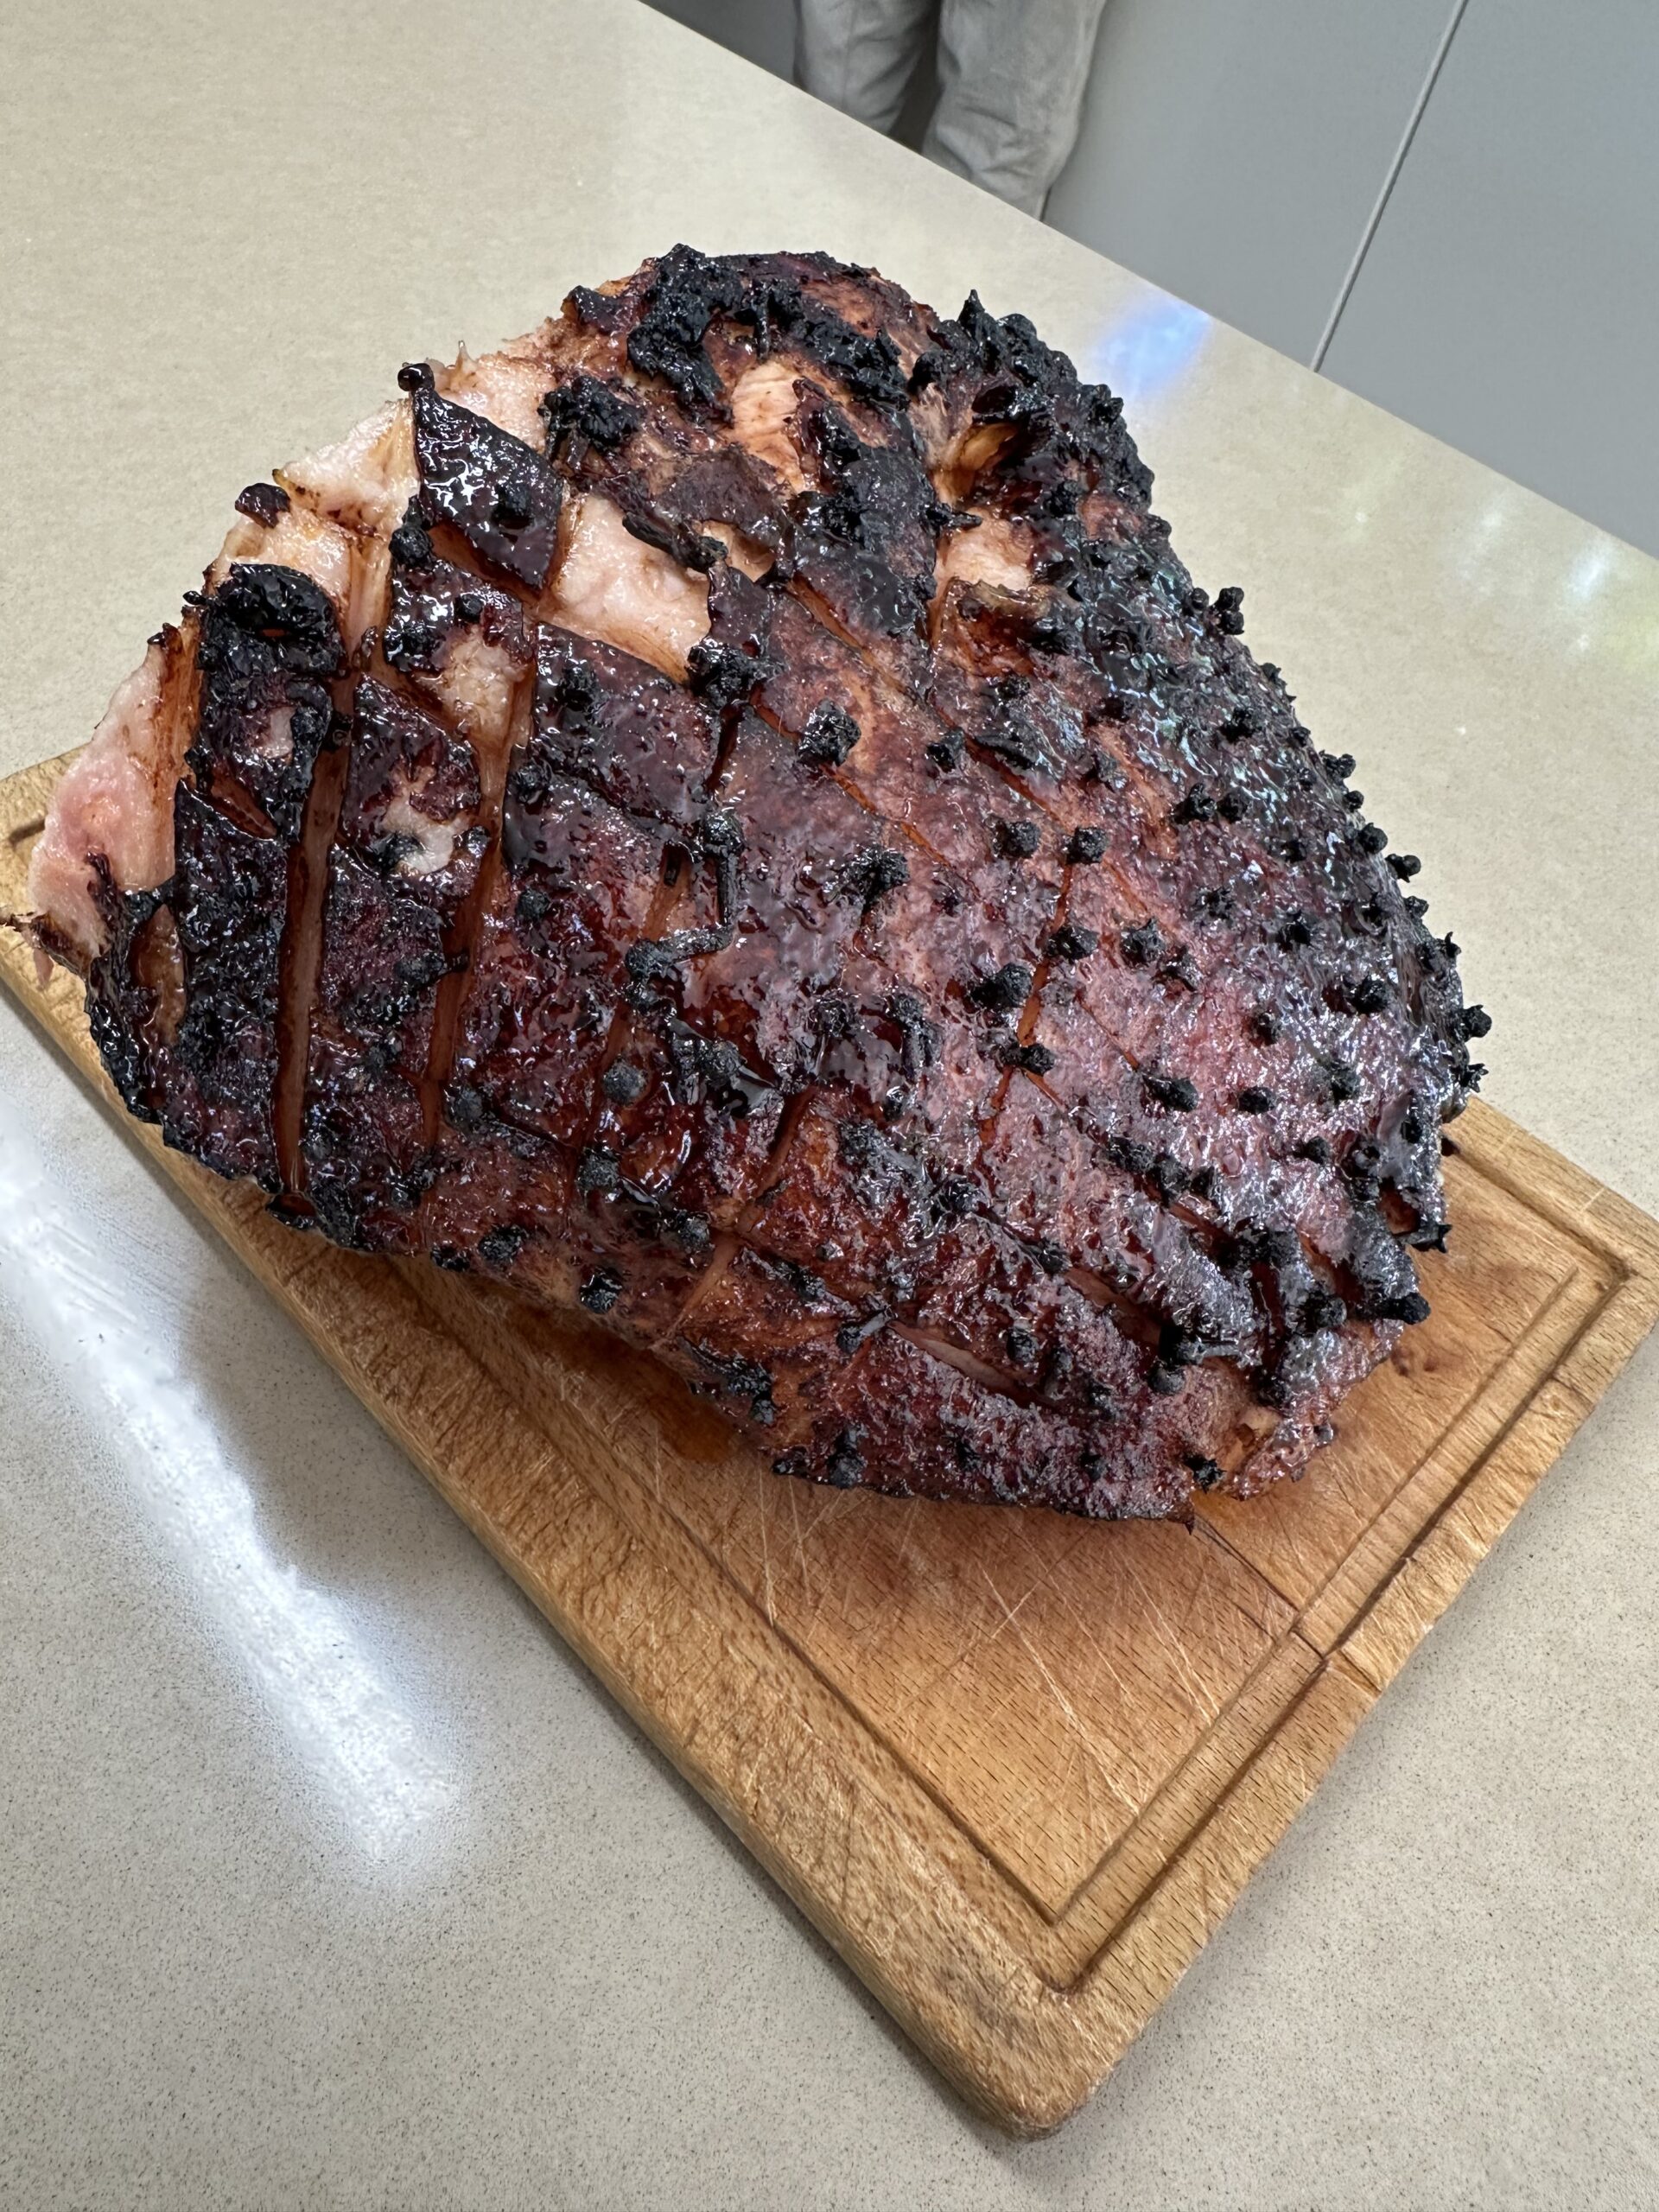
A chest freezer in the garage allows me to take advantage of special offers and freeze excess produce from the garden, such as tomatoes and cumquats. Early in the New Year our local supermarket was selling off legs of smoked ham with a good discount, so I bought one and stuck it in the freezer.
We had friends coming to Woodlands for lunch and as we’ve all had time to get over the festive season I decided it was time to get the ham out of the freezer. There are lots of different recipes for glazes and below are three of my favourites. Basically anything sweet and sticky will do. The gratin recipe is one I picked up on a card in a supermarket while living in Geneva, so it’s very authentic. Gruyère is the traditional cheese for this dish. Other hard cheeses such as Emmenthal or Cheddar will work but the flavour will be different. Forgot to take a photo, so you’ll just have to use your imagination!
Glazes for Ham
Brandied Apricot Glaze:
1 cup apricot jam
2 tsp soy sauce
2 Tbs vinegar
1 tsp hot English mustard
¼ cup brandy
Balsamic Mustard Glaze:
1/3 cup balsamic vinegar
½ cup brown sugar
1 Tbs Dijon mustard
Pineapple-Orange Glaze:
¼ cup pineapple juice
2 tsp soy sauce
2 Tbs orange marmalade
1 Tbs honey
¼ cup brown sugar
1 Tbs brandy
Heat all ingredients for glaze in a saucepan, stirring until dissolved. Simmer for 3-4 minutes until thick. If chunky, push through a sieve, then cool.
To Glaze the Ham:
Remove rind from ham by running your thumb around edge just under skin, loosening and pulling as you go. When you have pulled it to within 15 cm of the shank end, take a sharp pointed knife and cut through rind around shank end in a zigzag pattern, then pull off the rest of the skin up to this edge.
Make parallel cuts through fat at 2-3 cm intervals, just through the surface, not deeply, first one way and then the other to achieve a diamond effect. If liked stick cloves into each diamond space.
Place ham in a large baking dish. Add a cup of water to the pan. Brush generously with chosen glaze and bake at 180°C for about an hour, brushing with more glaze every 10 minutes or so. It’s ready when it’s an even amber colour all over. Serve hot or cold.
Store the ham on a large plate or chopping board in the fridge. Place the plate inside a cotton ham bag or substitute an old pillowcase. Every time you use the ham rinse the bag in cold water and wring it out tightly. This will help to keep the ham fresh and moist for up to 4 weeks.
Gratin de Pommes de Terre Dauphinois
1 kg potatoes
200ml milk
100ml cream
50g butter
50g grated Gruyere cheese
2 cloves garlic, crushed
salt, pepper and nutmeg to taste
Preheat oven to 180°C. Peel potatoes and slice thinly. Place in overlapping rows in a greased shallow, oven-proof dish, seasoning as you go with salt, pepper and half the garlic. Mix milk, cream, the rest of the garlic and nutmeg and pour over. Cover with foil and bake for 50 minutes or until potatoes are tender – test with a knife. Turn oven up to 220°C and remove foil. Sprinkle with the grated cheese, dot with butter, cut into small pieces and bake for 20 mins or until golden brown.
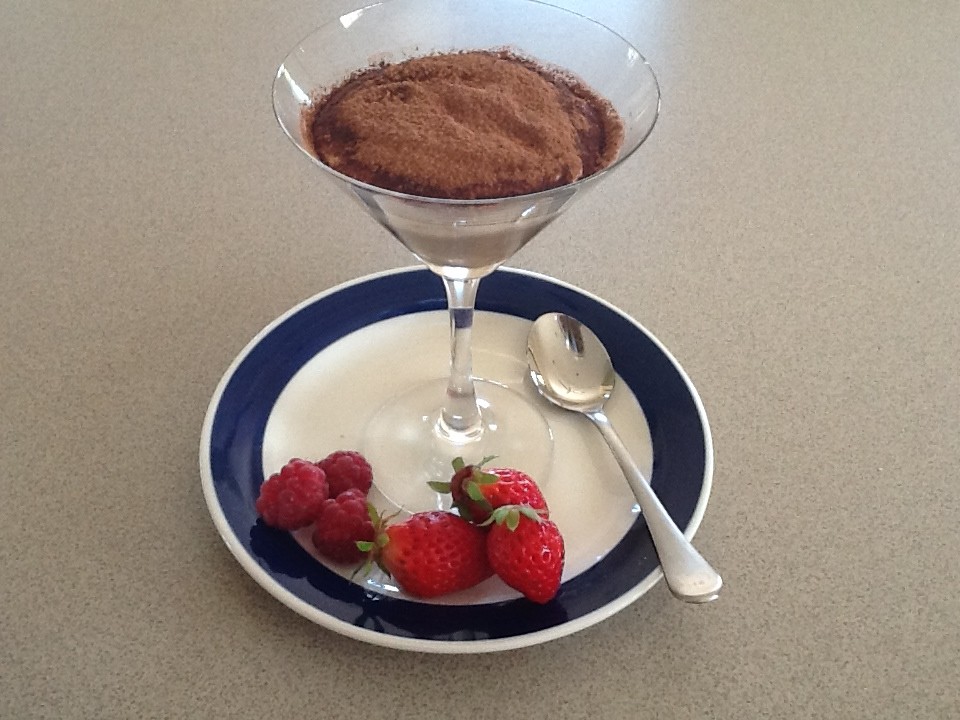
Tiramisu is an Italian dessert consisting of sponge fingers (lady fingers or Savoiardi), egg yolks, mascarpone and a liqueur or fortified wine, traditionally Marsala. There are countless variations on this theme. This version uses egg whites instead of yolks, honey instead of sugar and Bailey’s Irish Cream instead of Marsala.
2 Tbs instant coffee powder & ½ cup boiling water
Or ½ cup strong espresso coffee
2 Tbs Bailey’s Irish cream liqueur
8 Savoiardi sponge fingers
250g mascarpone, at room temp
1 Tbs runny honey
2 Tbs Bailey’s Irish cream liqueur, extra
2 egg whites
Cocoa powder for dusting
Fresh berries to serve
Mix coffee with boiling water and stir to dissolve. Add Baileys. Break each sponge finger into three and add to coffee mixture, stirring to coat. Place 4 pieces of sponge finger in each of six Martini glasses. Divide any remaining coffee mixture among the glasses, pushing down to squash the sponge fingers a bit. Place mascarpone in a mixing bowl. Add honey then Baileys and mix well. In another bowl whip egg whites till soft peaks with electric beaters. Mix into mascarpone, then divide mixture among the six glasses. Chill several hours. Dust with cocoa through a sieve. Serve with berries on the side.
A dip or pâté is nice to serve when friends come round for a drink or as a prelude to an informal lunch.
Most supermarkets carry a wide range of options, but something home-made is tastier, cheaper and you know exactly what’s in it. I was looking at a commercial crab dip in the supermarket the other day and was amazed to see that the crab content was only 17%. This recipe came from my mother-in-law and contains at least 50% smoked trout. It’s a real winner.
Last winter we planted a native Australian citrus shrub from Queensland called a Finger Lime. When Matthew reads this he will say “get your pronouns right”, so okay he planted the Finger Lime. The fruit is made up of tiny balls of lime juice, a bit like a pomegranate only smaller. Ours hasn’t produced any fruit yet but when it does I am looking forward to folding some little citrus balls into this pâté.
1 whole smoked trout (about 350g)
250g Philadelphia-style cream cheese (at room temp)
¼-½ cup cream or sour cream
Grated rind and juice of one small lemon or half a large one (see note)
salt, freshly ground black pepper and cayenne pepper to taste
Remove meat from trout, discarding skin and bones. Flake into chunks with fingers checking carefully for bones. With electric beaters or by hand beat cream cheese until smooth then gradually beat in enough cream to make it light and fluffy. Add lemon juice, rind, salt, pepper and a little cayenne pepper. Gently but thoroughly mix in the smoked trout. Pile roughly into serving dish, sprinkle with a little cayenne pepper and chill. Serve with crusty bread, toast or crackers as an appetizer. Can be refrigerated for up to a week and frozen for up to a month. For a low-carb option serve with vegetable sticks.
For a cocktail party: make toast triangles (four per slice of bread, crusts removed), and put some paté on each. Garnish with a tiny triangle cut from a thin slice of fresh lime with the skin left on. One slice will cut into many pieces. Top with a piece of dill.
Note: you can grate the rind or remove it with a vegetable peeler, then chop finely – this results in chunkier bits of rind which I prefer.
Variation: Smoked Salmon Pâté: use smoked salmon instead of trout.
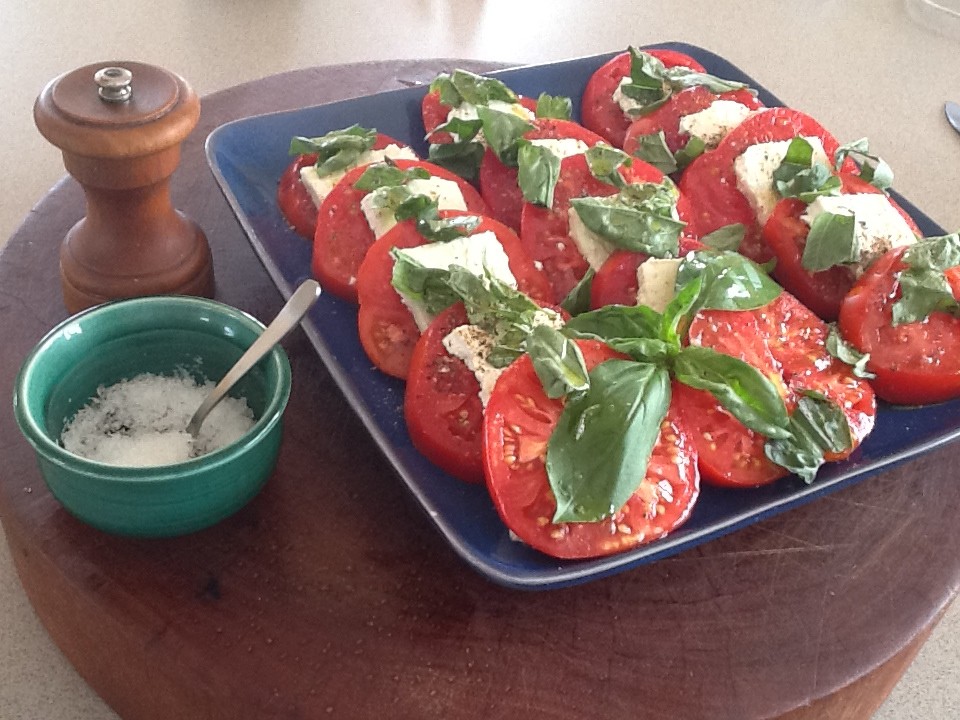
Caprese Salad is a very simple dish consisting of sliced tomatoes and fresh buffalo mozarella with fresh basil, olive oil and seasonings. It’s one of the best ways to enjoy perfect tomatoes in summer. In the photo I used Farmhouse-style cottage cheese from Costco instead of mozarella. But you could substitute any soft, mild-flavoured, sliceable cheese such as “queso fresco” (widely available in South America), goat’s cheese or a creamy feta. It won’t be an authentic Caprese Salad without the mozarella, but it will still taste good.
Drizzle with your best extra-virgin olive oil, then season with crunchy Maldon-style sea salt and freshly ground black pepper. A little balsamic vinegar or balsamic glaze (which is thicker) is a good addition. A loaf of fresh bread – preferably Italian – a bottle of wine and lunch is ready.
1 kg vine-ripened tomatoes
About 250g fresh buffalo mozarella (or substitute – see above)
Fresh basil
Extra-virgin olive oil
Maldon style salt flakes
Freshly ground black pepper
Balsamic vinegar or glaze (optional)
Cut tomatoes horizontally into thick slices, discarding both ends. Slice cheese. Arrange tomatoes and cheese on a shallow serving dish, as shown in photo. Sprinkle with torn up basil leaves, drizzle with oil and season with salt and pepper. Drizzle with some balsamic vinegar or glaze, or let people add this if they like at the table. Serve with crusty bread.

 About 4 cups 2cm square pumpkin cubes