I began collecting recipes when I was at school. Some of the recipes in my large collection have been in my family for generations, others were passed on by friends and chefs around the world. Many have been adapted over the years to make them lighter or update their presentation. I’ve served them to royalty, PMs and other VIPs and there have been no complaints. I hope you are inspired to make some of them.
This delicious dinner for two is easy to double and quick to make.
1 Tbs vegetable oil
250g peeled and deveined raw prawns (500g unpeeled)
1-2 cloves garlic, finely chopped
1 tsp sesame oil
2 tsp grated or finely chopped fresh ginger
½ tsp dried chilli flakes
¼ cup water
1½ Tbs sriracha chilli sauce
1 tsp soy sauce
1 Tbs brown sugar To serve:
Steamed rice
Steamed green beans
1 small red chilli, deseeded and finely sliced
1 spring onion, finely sliced
1 Tbs sesame seeds, lightly toasted
Heat oil in a large nonstick frying pan and add the prawns in a single layer. Cook for about 45 seconds each side, or until light golden. Add the sesame oil, garlic, ginger and chilli flakes and cook, stirring for about 30 seconds. or until the prawns are coated. Add the water, sriracha, soy sauce and brown sugar. Continue to cook on medium high heat, stirring and turning the prawns, until the sauce has thickened and looks sticky, as in the photo.
Spoon some steamed rice onto two serving plates. Arrange a few steamed green beans on top, then the prawns. Garnish with the chilli, sesame seeds and spring onion.
Every two or three months we meet up with three other couples for dinner. We take it in turns to host the dinner and cook the main course. The other three couples bring nibbles, the starter and dessert.
It was my turn to bring the starter so I decided to adapt a favourite recipe which uses fresh salmon, by using smoked salmon instead and adding a touch of sweetness with some julienne apple. This recipe serves 8, but it’s easy to halve.
8 slices smoked salmon or trout
6 small Lebanese cucumbers
¾ cup each fresh mint leaves, basil leaves and coriander leaves
1 apple, skin on, cut into thin slices then thin julienne sticks Dressing:
½ cup olive oil
4 Tbs rice wine vinegar
2 tsp sugar
2 Tbs finely grated ginger
1½ Tbs soy sauce
4 Tbs Thai sweet chilli sauce To garnish:
½ cup fried Asian shallots (from Asian shops)
A few pink peppercorns (optional)
Using a vegetable peeled, cut the cucumbers into long ribbons, discarding the first one which is all skin. When you get to the seedy centre of the cucumber switch to the other side. Discard the centres or add them to a salad for lunch as I did.
Place all ingredients for dressing in a jar and shake well.
Arrange smoked salmon in the centre of 9 serving plates, two slices per person. Mix the cucumber ribbons with some of the dressing, then arrange around the edge of each plate. Mix the herbs with some of the dressing and pile on top of the smoked salmon. Top with a few pieces of apple. Scatter some Asian shallots and pink peppercorns (if using) around each plate. You will have some dressing leftover.
Most stir-fry recipes use strips of meat. This one is different because it uses minced or ground meat. If you don’t want to use pork, substitute ground chicken, turkey, beef or lamb.
A quick and easy mid-week dinner which is very tasty. It’s also a good way to use up any veggies you have sitting in your fridge.
1 Tbs olive oil
500g lean pork mince
200-400g ready to heat noodles (Hokkien, udon or whatever: I used 200g)
1 large onion, diced
2 cloves garlic, crushed
3 cups mixed shredded vegetables (carrot, broccoli, cabbage, cauliflower, zucchini, capsicum)
3 Tbs soy sauce
2 Tbs oyster sauce
1 Tbs brown sugar
1 tsp sesame oil
1 tsp rice wine vinegar To garnish:
2 spring onions, finely sliced on the diagonal
1 Tbs sesame seeds, preferably black
Crispy Chilli oil or Sweet Chilli sauce (optional)
Prepare noodles according to packet instructions, drain and set aside. The ones I bought were ready to heat and just needed to be covered with boiling water for 2-3 mins then drained.
Heat oil in a large frying pan or work over high heat. Add mince and cook, breaking it up and stirring, until browned. Add the onion and garlic and continue to stir-fry for 2 minutes, then add the mixed vegetables and stir-fry for 3-4 minutes or they’re al dente.
Add soy sauce, oyster sauce, sugar, sesame oil and rice wine vinegar and cook for a minute or two, stirring. Lastly add the cooked noodles and mix until well-coated and sauce has reduced a bit and become a bit sticky.
Garnish with the spring onions and sesame seeds. If liked, serve with some Crispy Chilli Oil on top. This is available from Asian Grocery stores or in the Asian section of your supermarket.
Whole smoked trout are sold in supermarkets in Australia in vacuum packs. The use by date allows you to keep them for a week or two in the fridge before they need to be eaten. Handy for those occasions when you peer into the fridge thinking “What can I make for dinner with what I’ve got?” One smoked trout is enough to make a light meal for two or three people.
Carefully remove the flesh in large chunks, discarding the skin and bones. Mix with freshly cooked pasta, adding a splash of cream and a few capers or chopped dill. Some halved baby tomatoes or rocket leaves are optional additions. Or try this delicious risotto.
Or make this Asian salad which is perfect as a starter for four or a light main dish for two.
Tamarind Dressing:
3 spring onions or small shallots
1 clove garlic
½ small red chilli, seeded and chopped
2 Tbs roasted peanuts or cashews
1 Tbs fish sauce
1 Tbs tamarind paste (sold in jars)
3 Tbs water
3 Tbs palm sugar, chopped, or substitute brown sugar
1 Tbs grated fresh ginger Salad:
1 smoked trout, flesh removed, bones and skin discarded
2-3 cups small salad leaves or rocket
1 Tbs finely diced fresh lime (skin and flesh) (optional)
2 Tbs roasted peanuts or cashews, coarsely chopped
½ cup coriander leaves
Extra virgin olive oil
Dressing: Place spring onions or shallots, garlic, chilli and peanuts in food processor and process until you have a paste. Add remaining dressing ingredients and process, stopping to scrape down the sides halfway. Place paste in a saucepan and simmer for 3-4 minutes. It should be thick and a bit sticky. You may need to add a bit more water to get the right consistency. Cool.
Meanwhile arrange salad leaves on two plates. Top with the trout pieces, lime, peanuts and coriander leaves. Top each piece of smoked trout with some of the sauce, then drizzle a little olive oil around the edge of the plate.
Any leftover dressing is delicious served with cold roast meats.
Serves 2 as a main or 4 as a starter
Note: some supermarkets sell smoked trout fillets without skin or bones.
Variation: to serve as finger food, separate the leaves of 2 heads of chicory (witloof or witlof) and top each with a piece of smoked trout, the remaining toppings and some of the dressing.
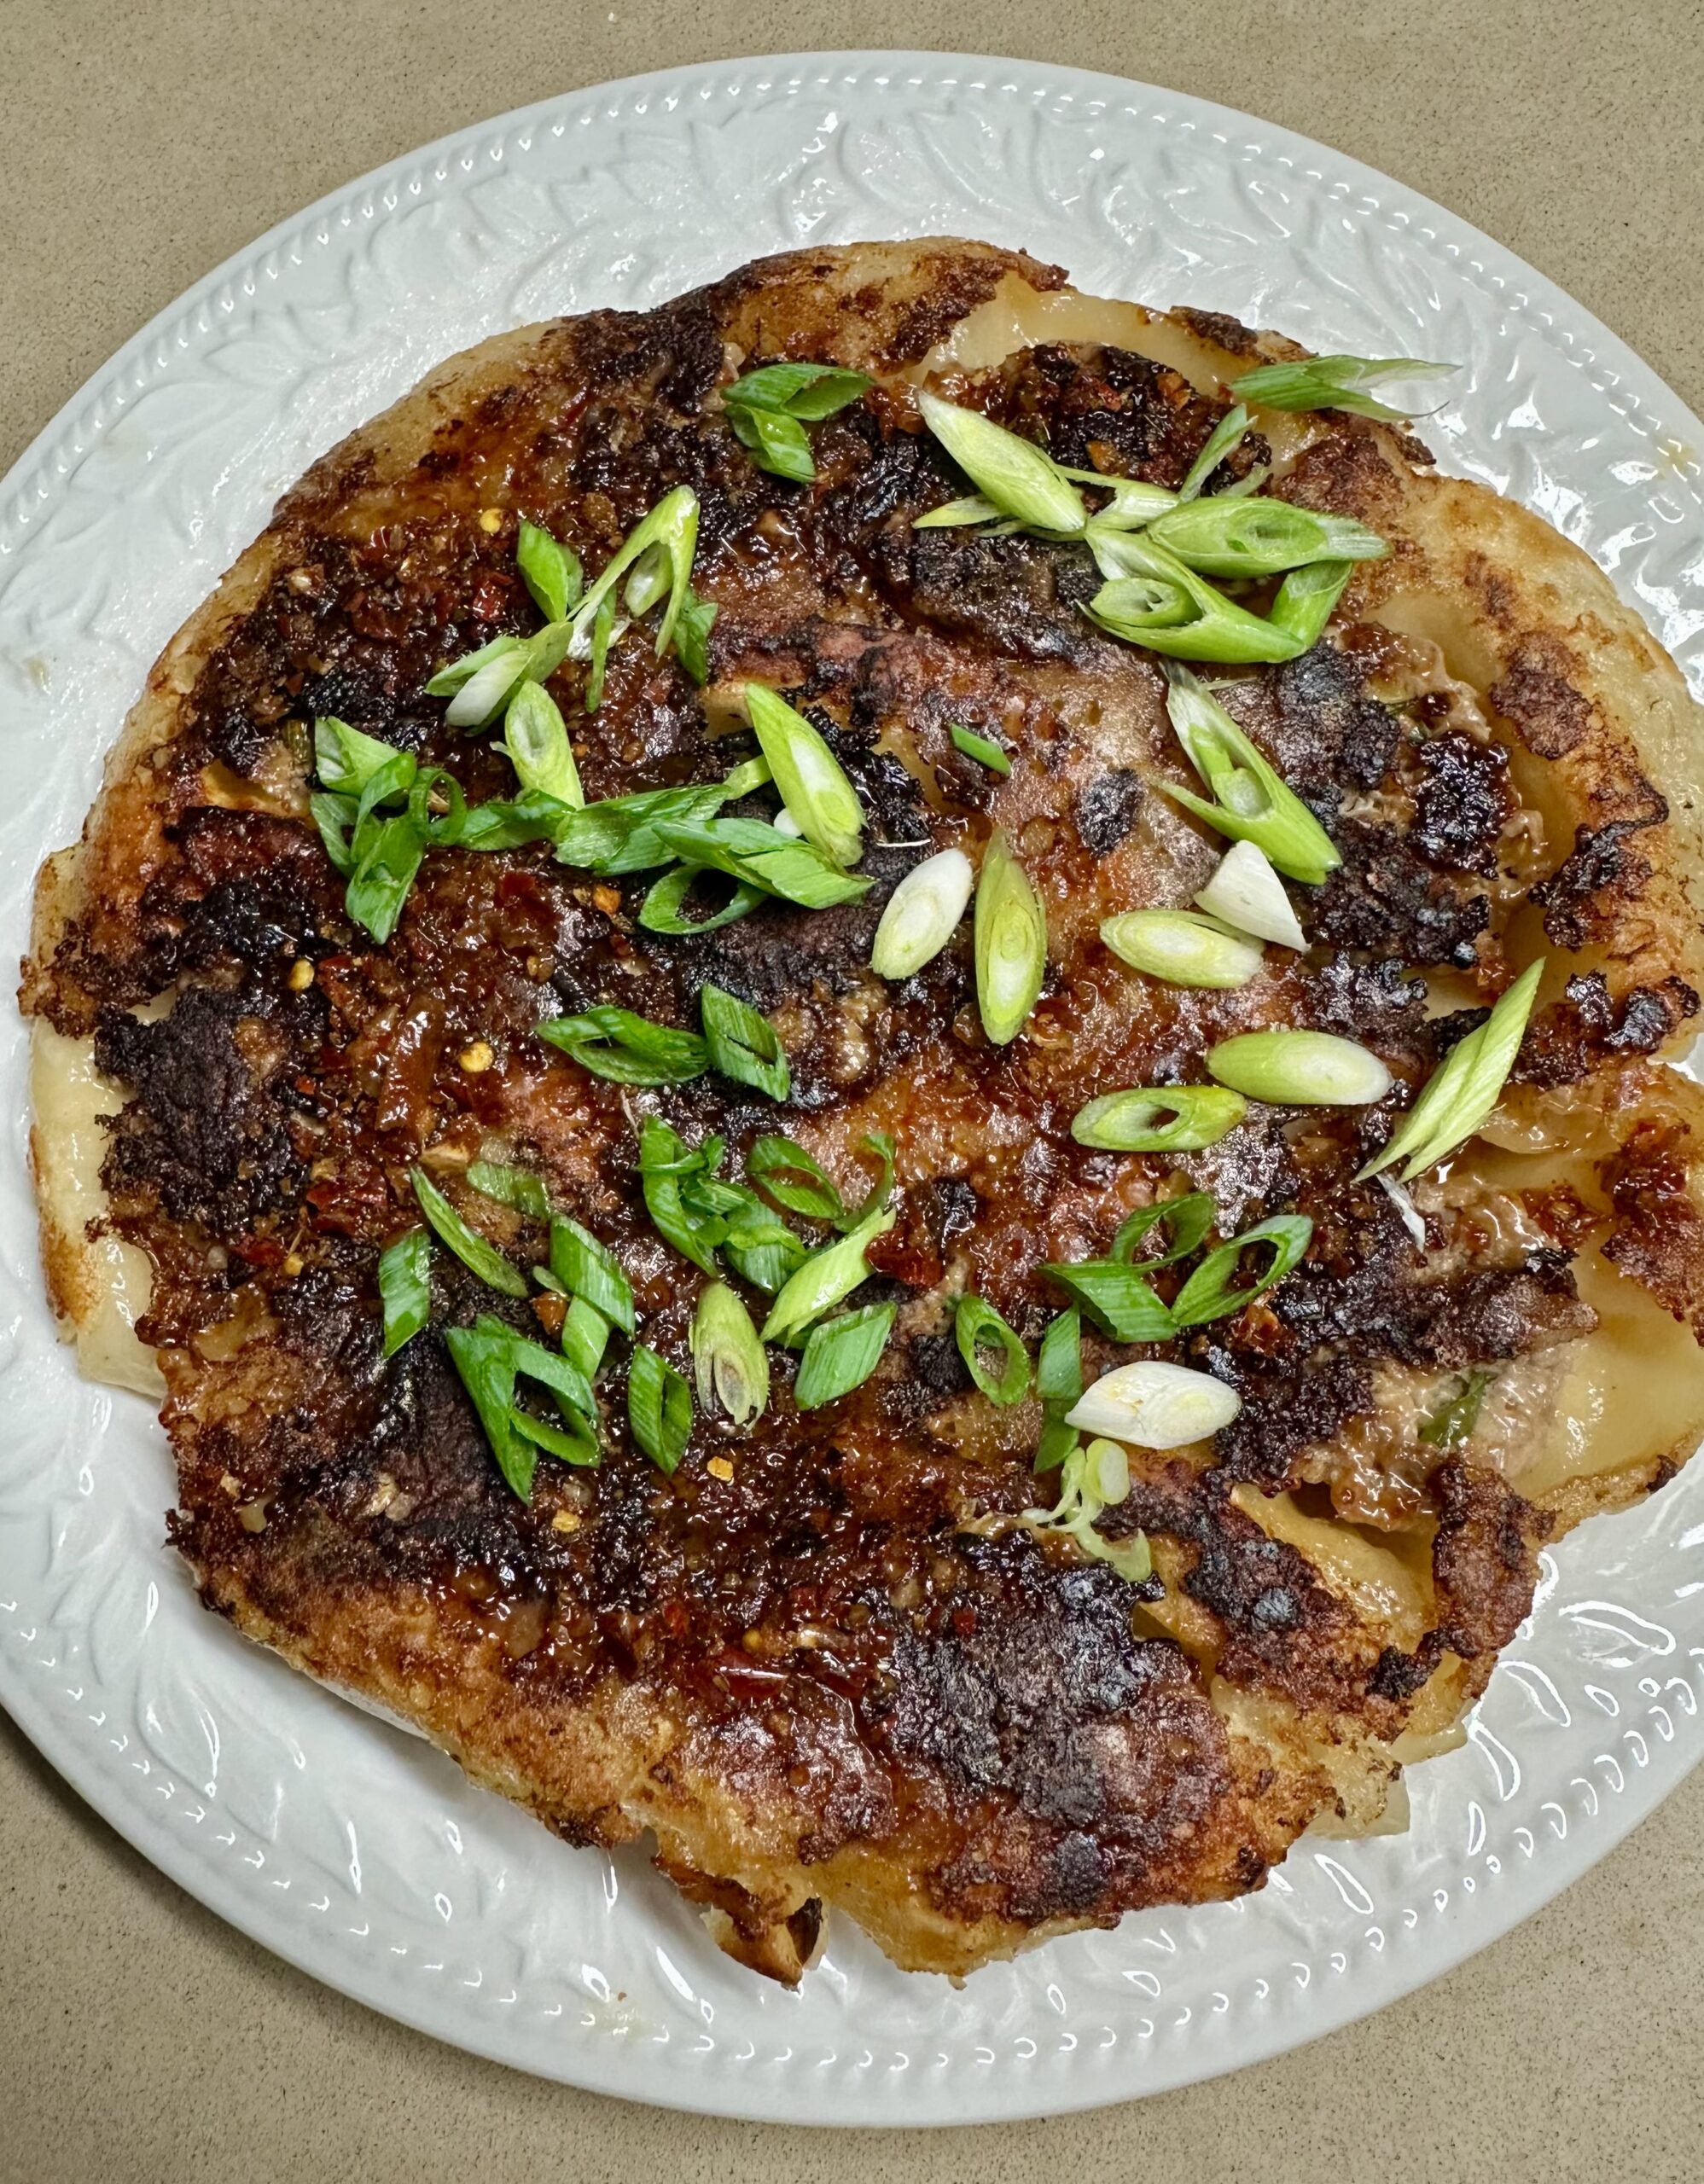
If you like crispy pork dumplings – called Gyoza or Pot Stickers – you will like this recipe for one big one. Variations have been going viral on social media, so I decided to give it a try and it was indeed delicious.
Instead of folding and sealing the pork filling into wonton or gyoza wrappers, everything just goes into the pan in layers, so it’s very quick. The flour and water mixture is a clever trick to make everything stick together.
This pancake was enough for two adults with a side salad, but I’m sure one of our hungry teenaged grandkids would have no trouble polishing off a whole pancake.
Can be served as a pull-apart finger food with the dipping sauce in a bowl on the side.
250g pork mince
2 Tbs soy sauce
1 tsp sesame oil
½ tsp salt
2 spring onions, finely chopped
1 Tbs grated fresh ginger
1 clove garlic, crushed
1 Tbs vegetable oil
12-16 gyoza or wonton wrappers
2 Tbs cornflour
1 Tbs plain flour
¾ cup water Dipping sauce:
2-3 Tbs soy sauce
1 Tbs rice wine vinegar
2-3 tsp Crispy Chilli oil, to taste To serve:
1 spring onion, finely sliced on the diagonal
Mix pork mince, soy sauce, sesame oil, salt, spring onions, ginger and garlic. Heat vegetable oil in a medium sized non-stick frying pan which has a lid. Using a small ice cream scoop or a spoon, arrange scoops of the pork filling over the pan – using about a tablespoonful for each and leaving a little space between each one. You should have 12-16 little meatballs.
Cook for a couple of minutes until they are starting to brown underneath then lay the gyoza wrappers, one on each meatball, pressing down around the edges so they stick in place. The wrappers will overlap at the edges.
In a small bowl mix the cornflour, flour and water with a fork. Pour this mixture all over the dumplings, then cover with the lid and leave to cook for 5-7 minutes or until most of the liquid has gone.
Mix dipping sauce in a small bowl.
Remove the lid and continue cooking for 2-3 minutes or until the edges of the pancake are golden and crispy. Lift the edge with a spatula to check.
Turn off the heat, run a spatula around the edge, then invert the pancake onto a serving plate. Drizzle dipping sauce over the top or serve separately. Garnish with the spring onion and serve immediately.
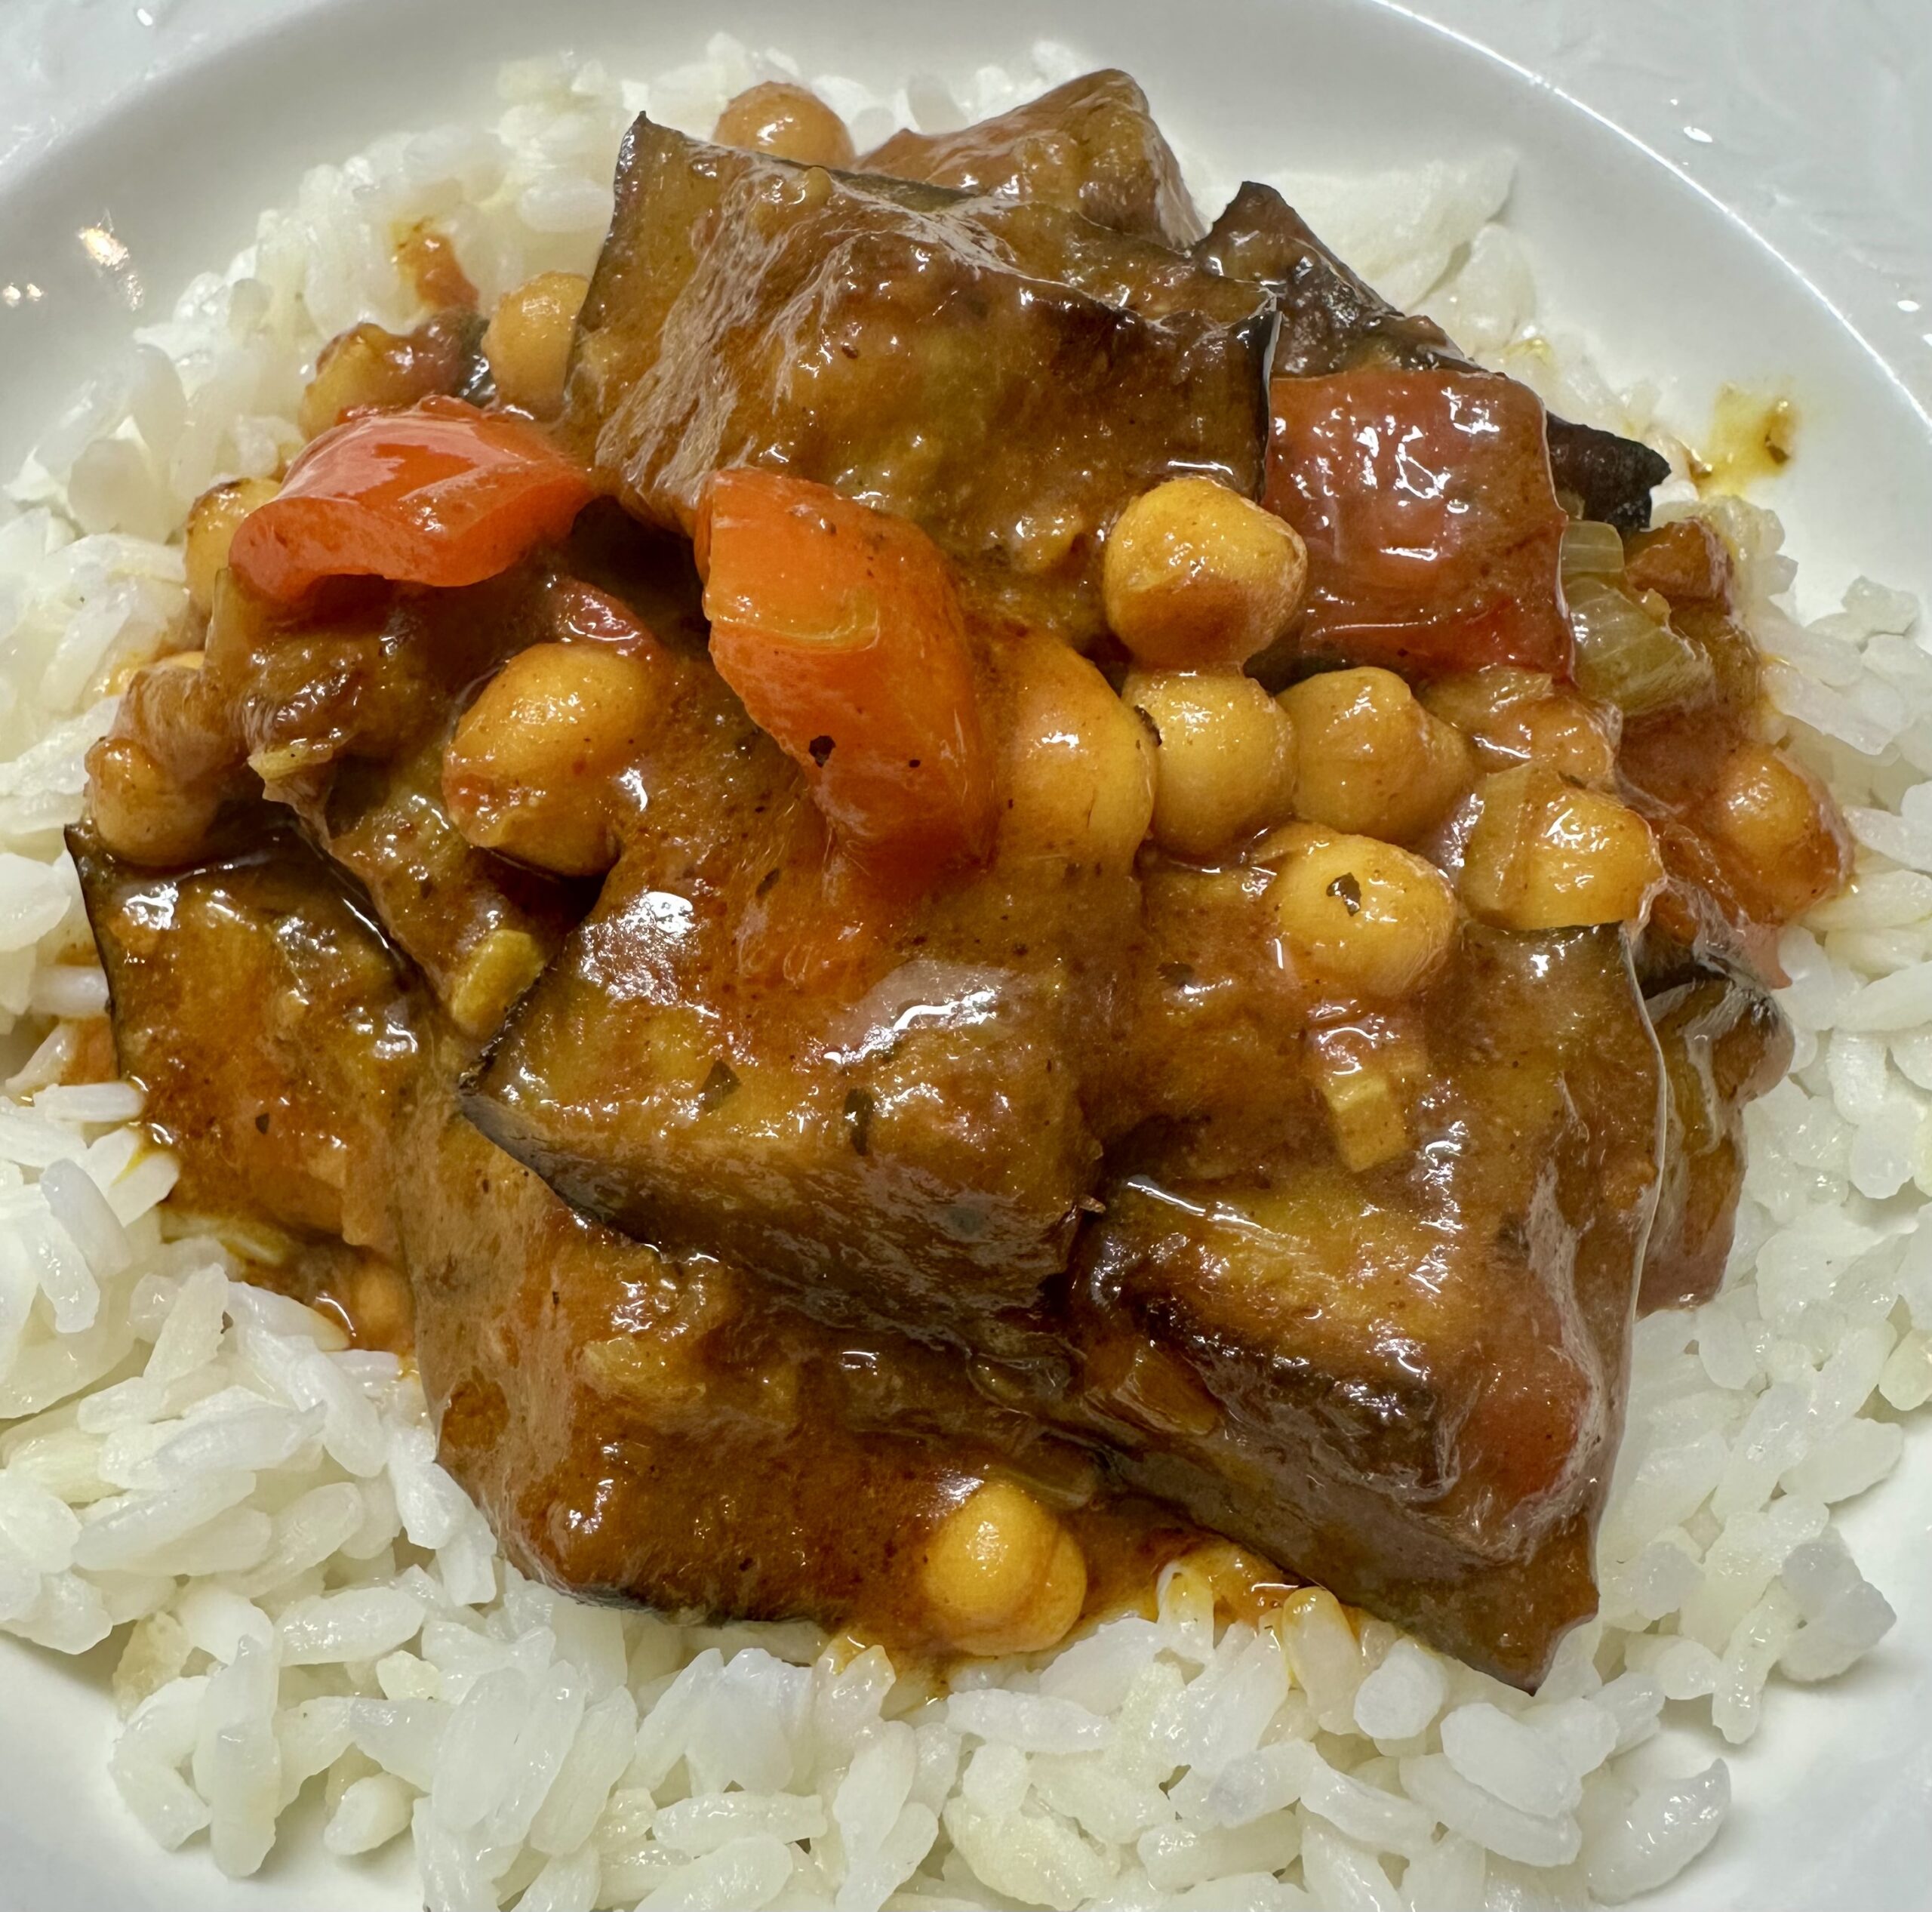
This winter has been particularly cold so I’ve been trying different recipes for eggplant curries. Eggplant is one of the “meatiest” of vegetables, resulting in a very filling and satisfying meal. This curry has become one of our favourites.
For a less rich sauce, use water instead of the can of coconut milk.
2 medium to large eggplants cut into 2cm cubes, skin left on
4 Tbs olive oil
1 large onion , chopped
1 red capsicum, seeded and cut into cubes
3 cloves garlic, finely chopped or crushed
1 Tbs fresh ginger, grated or finely chopped
2 tsp each ground coriander, smoked paprika and turmeric
1 Tbs curry paste (whatever you have on hand)
1 can diced tomatoes
1 can coconut milk (or 1 cup water)
1 can chickpeas, drained
Salt to taste
Fresh coriander, chopped
Preheat oven to 180°C. Place eggplant in a bowl, add 2 Tbs of the olive oil and a little salt. Mix well, then spread out on a large shallow oven tray lined with baking paper. Bake for 25-30 minutes or until tender and starting to brown.
Meanwhile in a large frying pan cook the onion, red capsicum and garlic in the remaining 2 Tbs of oil for 5 minutes, stirring often, or until soft. Add the ginger, spices and curry paste and cook, stirring, over moderate heat for 1-2 minutes.
Add the tomatoes, coconut milk and chickpeas, plus a dash of water if it seems a bit too thick. Simmer for 15 minutes. Add the roasted eggplant to the sauce with salt to taste. Garnish with coriander (I didn’t have any for the photo) and serve with steamed rice and a fruit chutney.
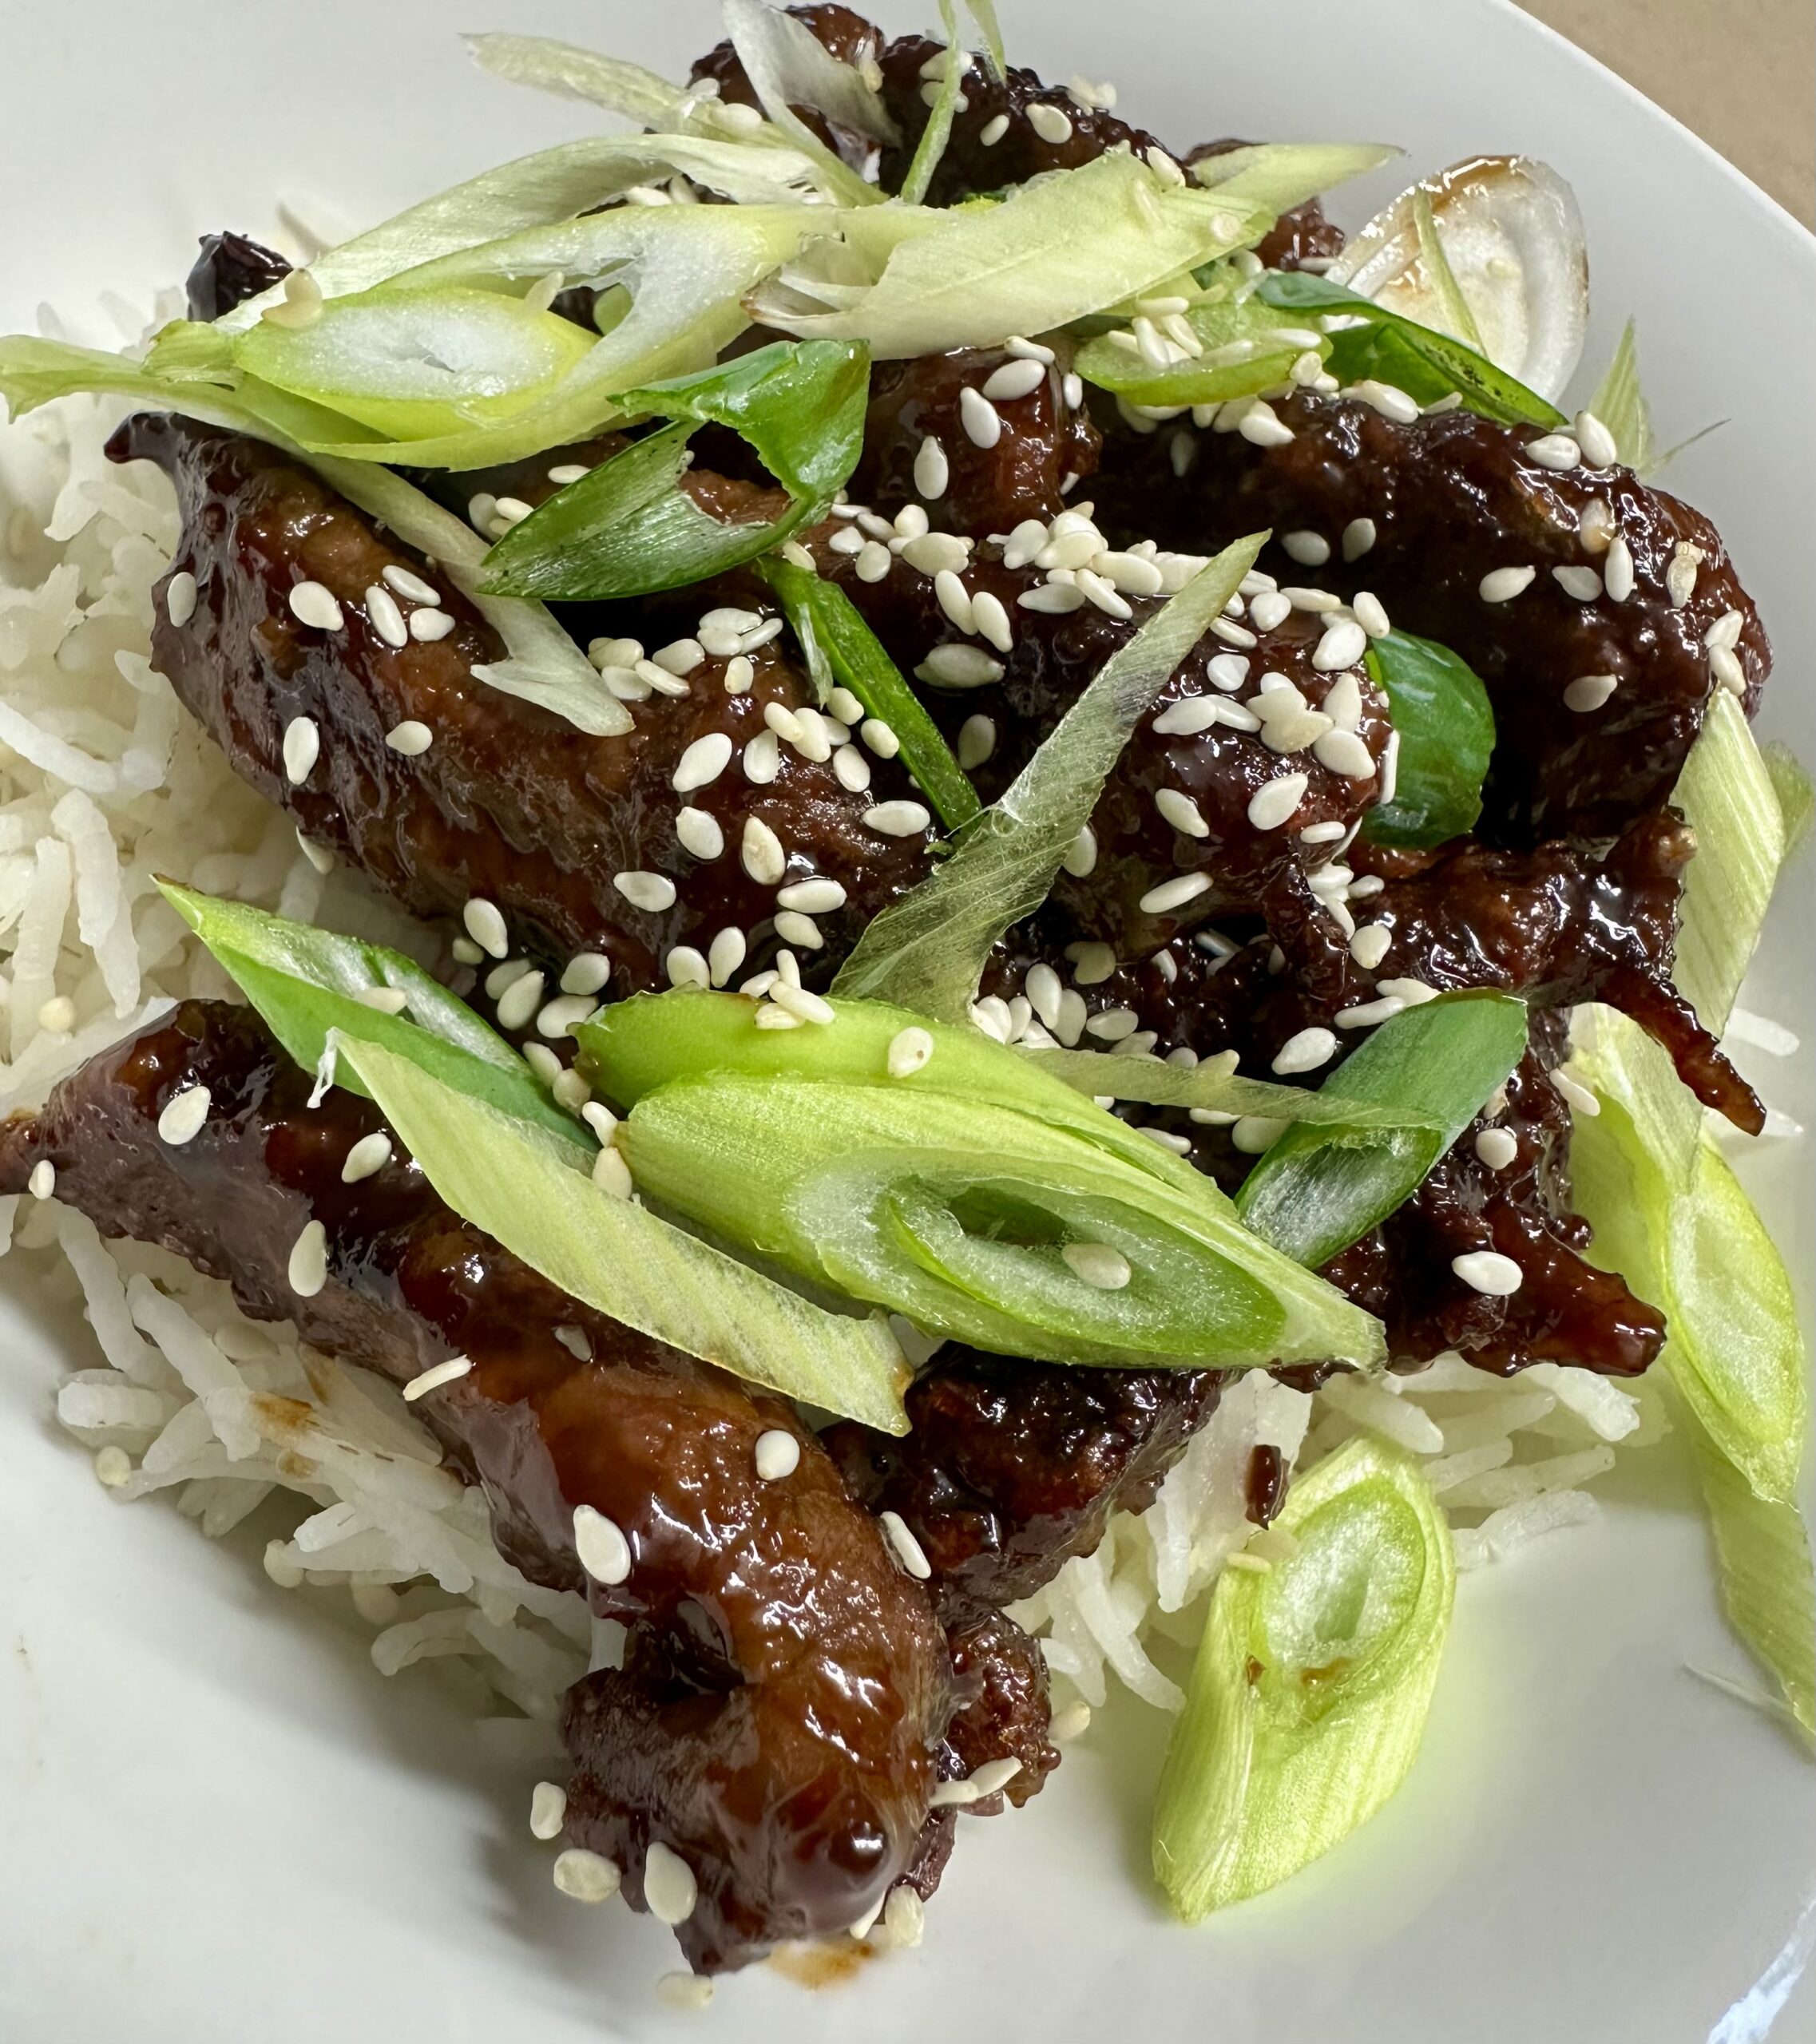
Korean Beef, or Bulgogi, is a tasty, quick and easy alternative to your usual Chinese stir fry. Serve it with steamed rice for a delicious mid-week dinner.
Making this recipe in an air fryer results in crispy meat without the need for deep frying.
300g lean beef (flank, rump, topside, sirloin)
2 tsp oil
2 Tbs cornflour
2 Tbs soy sauce
1-2 Tbs brown sugar, to taste
2 Tbs hoisin sauce
1 clove garlic, crushed
½ cup water To serve:
Steamed rice
2 spring onions, finely sliced on the diagonal
Sesame seeds
Cut meat into thin strips as you would for a stir fry. Add the oil and mix well, then mix in the cornflour. Spray the tray of an air fryer with oil, then arrange the meat strips over it, in one layer. If doubling the recipe, you will probably need to cook the beef in two lots. If you don’t have an air fryer, deep fry the beef in oil.
Cook beef on high for 5-8 minutes, turning once halfway through cooking time. Meanwhile place soy sauce, brown sugar, hoisin sauce, garlic and water in a frying pan. Bring to the boil, then simmer for a minute or two or until thickened a bit. Add the cooked beef and stir to coat well with the sauce.
Serve with steamed rice and garnish with spring onions and sesame seeds.
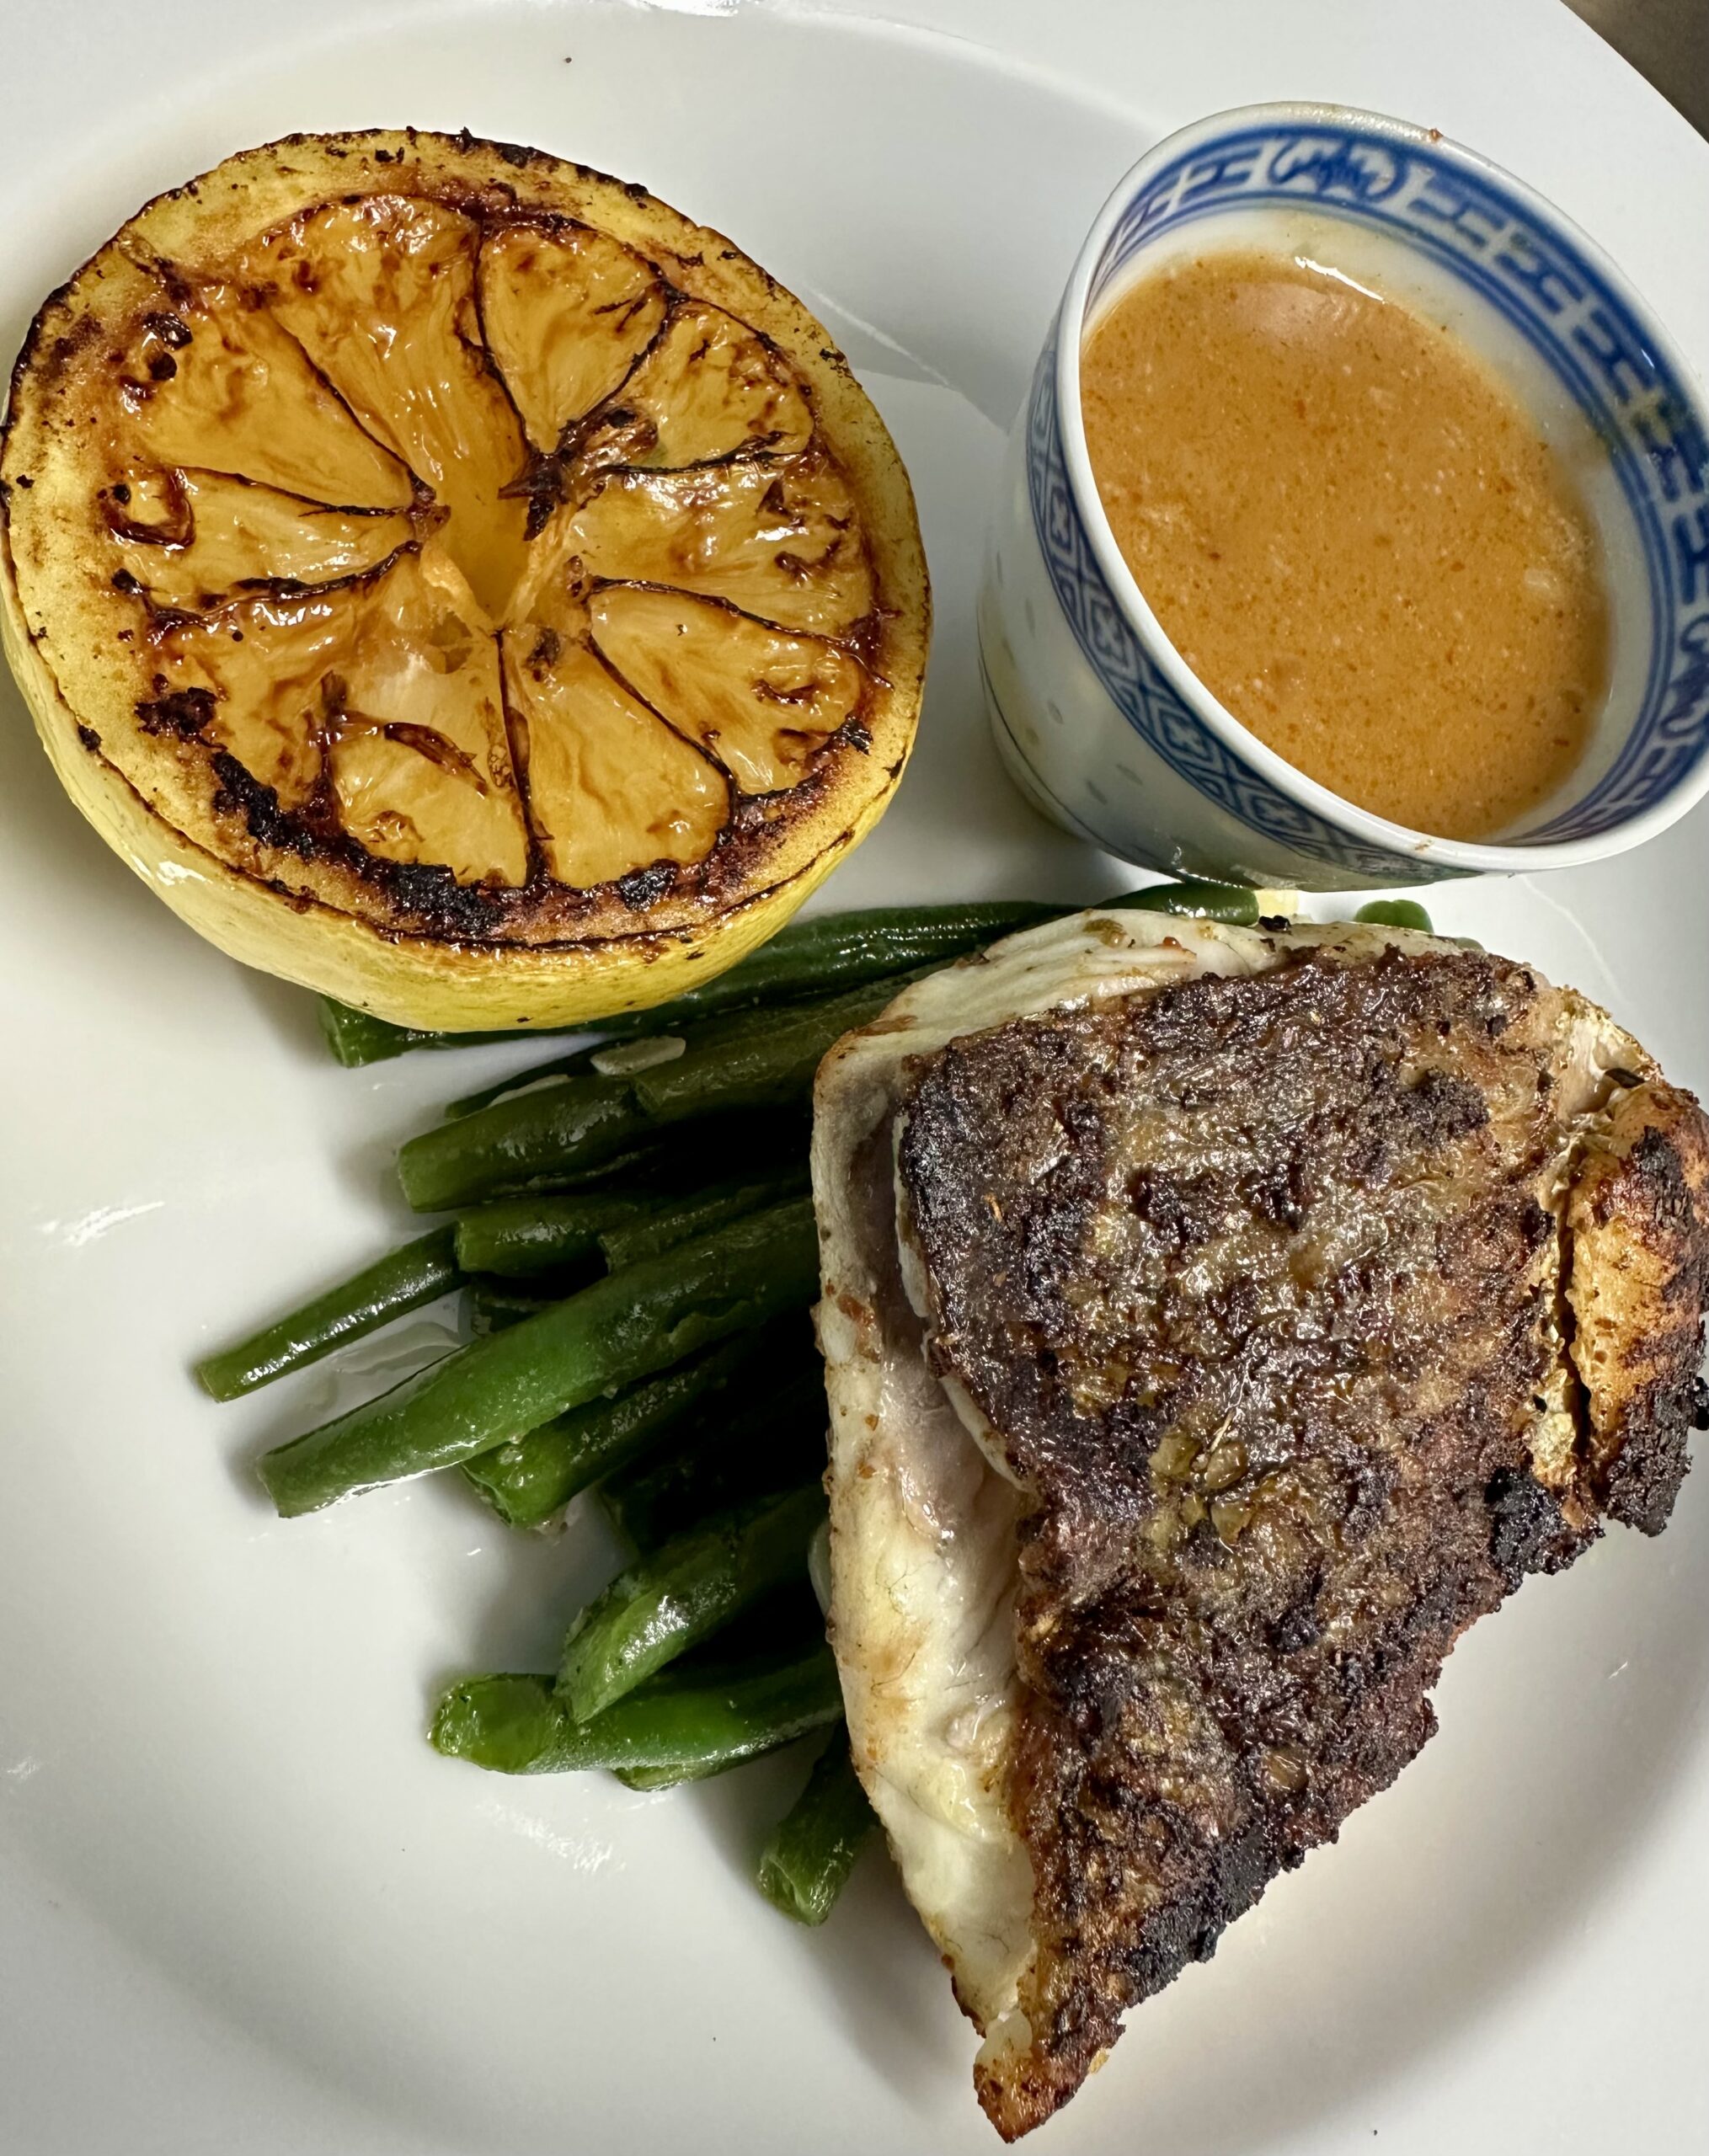
In January we spent a week on the island of Nusa Lembongan just off Bali.
Curry Traders Restaurant and Bar has excellent, reasonably-priced food and was definitely the best restaurant we found during our stay on the island.
This is my adaptation of a dish we enjoyed when we dined there to celebrate our daughter Catherine’s birthday. I used barramundi and my recipe for a creamy red curry sauce, which goes with everything.
The first photo shows the dish in the restaurant, surrounded by some of the other dishes we ordered, including rice and Indian bread. The second photo is my version. Sorry I forgot to put a sprig of coriander on top of the fish!
4 fillets barramundi or another firm-fleshed white fish with the skin on
Salt and freshly ground black pepper
1 Tbs vegetable oil Red Curry Sauce
400g green beans, steamed until al dente
1 clove garlic, crushed
20g butter
2 lemons, halved
Coriander sprigs
Go to the link and make the Red Curry Sauce.
Season fish on both sides with salt and pepper, then place skin down in a cold, lightly-oiled frying pan, preferably non-stick. Turn on the heat and cook over moderate temperature for 5-6 minutes or until the skin is crisp, then turn and cook for 2-3 minutes on the other side, or until cooked through. Remove fish from pan, then add the lemon halves, cut side down, and cook until they are starting to blacken.
Meanwhile, heat butter and garlic in another pan. Add the steamed beans and seasoning and toss them to coat well.
Divide beans between 4 warmed serving plates. Serve fish on the beans. Heat the curry sauce and place some in four ramekins. Arrange the lemon and the curry sauce on the plates, garnish the fish with the coriander and serve immediately with steamed rice and/or Indian bread.
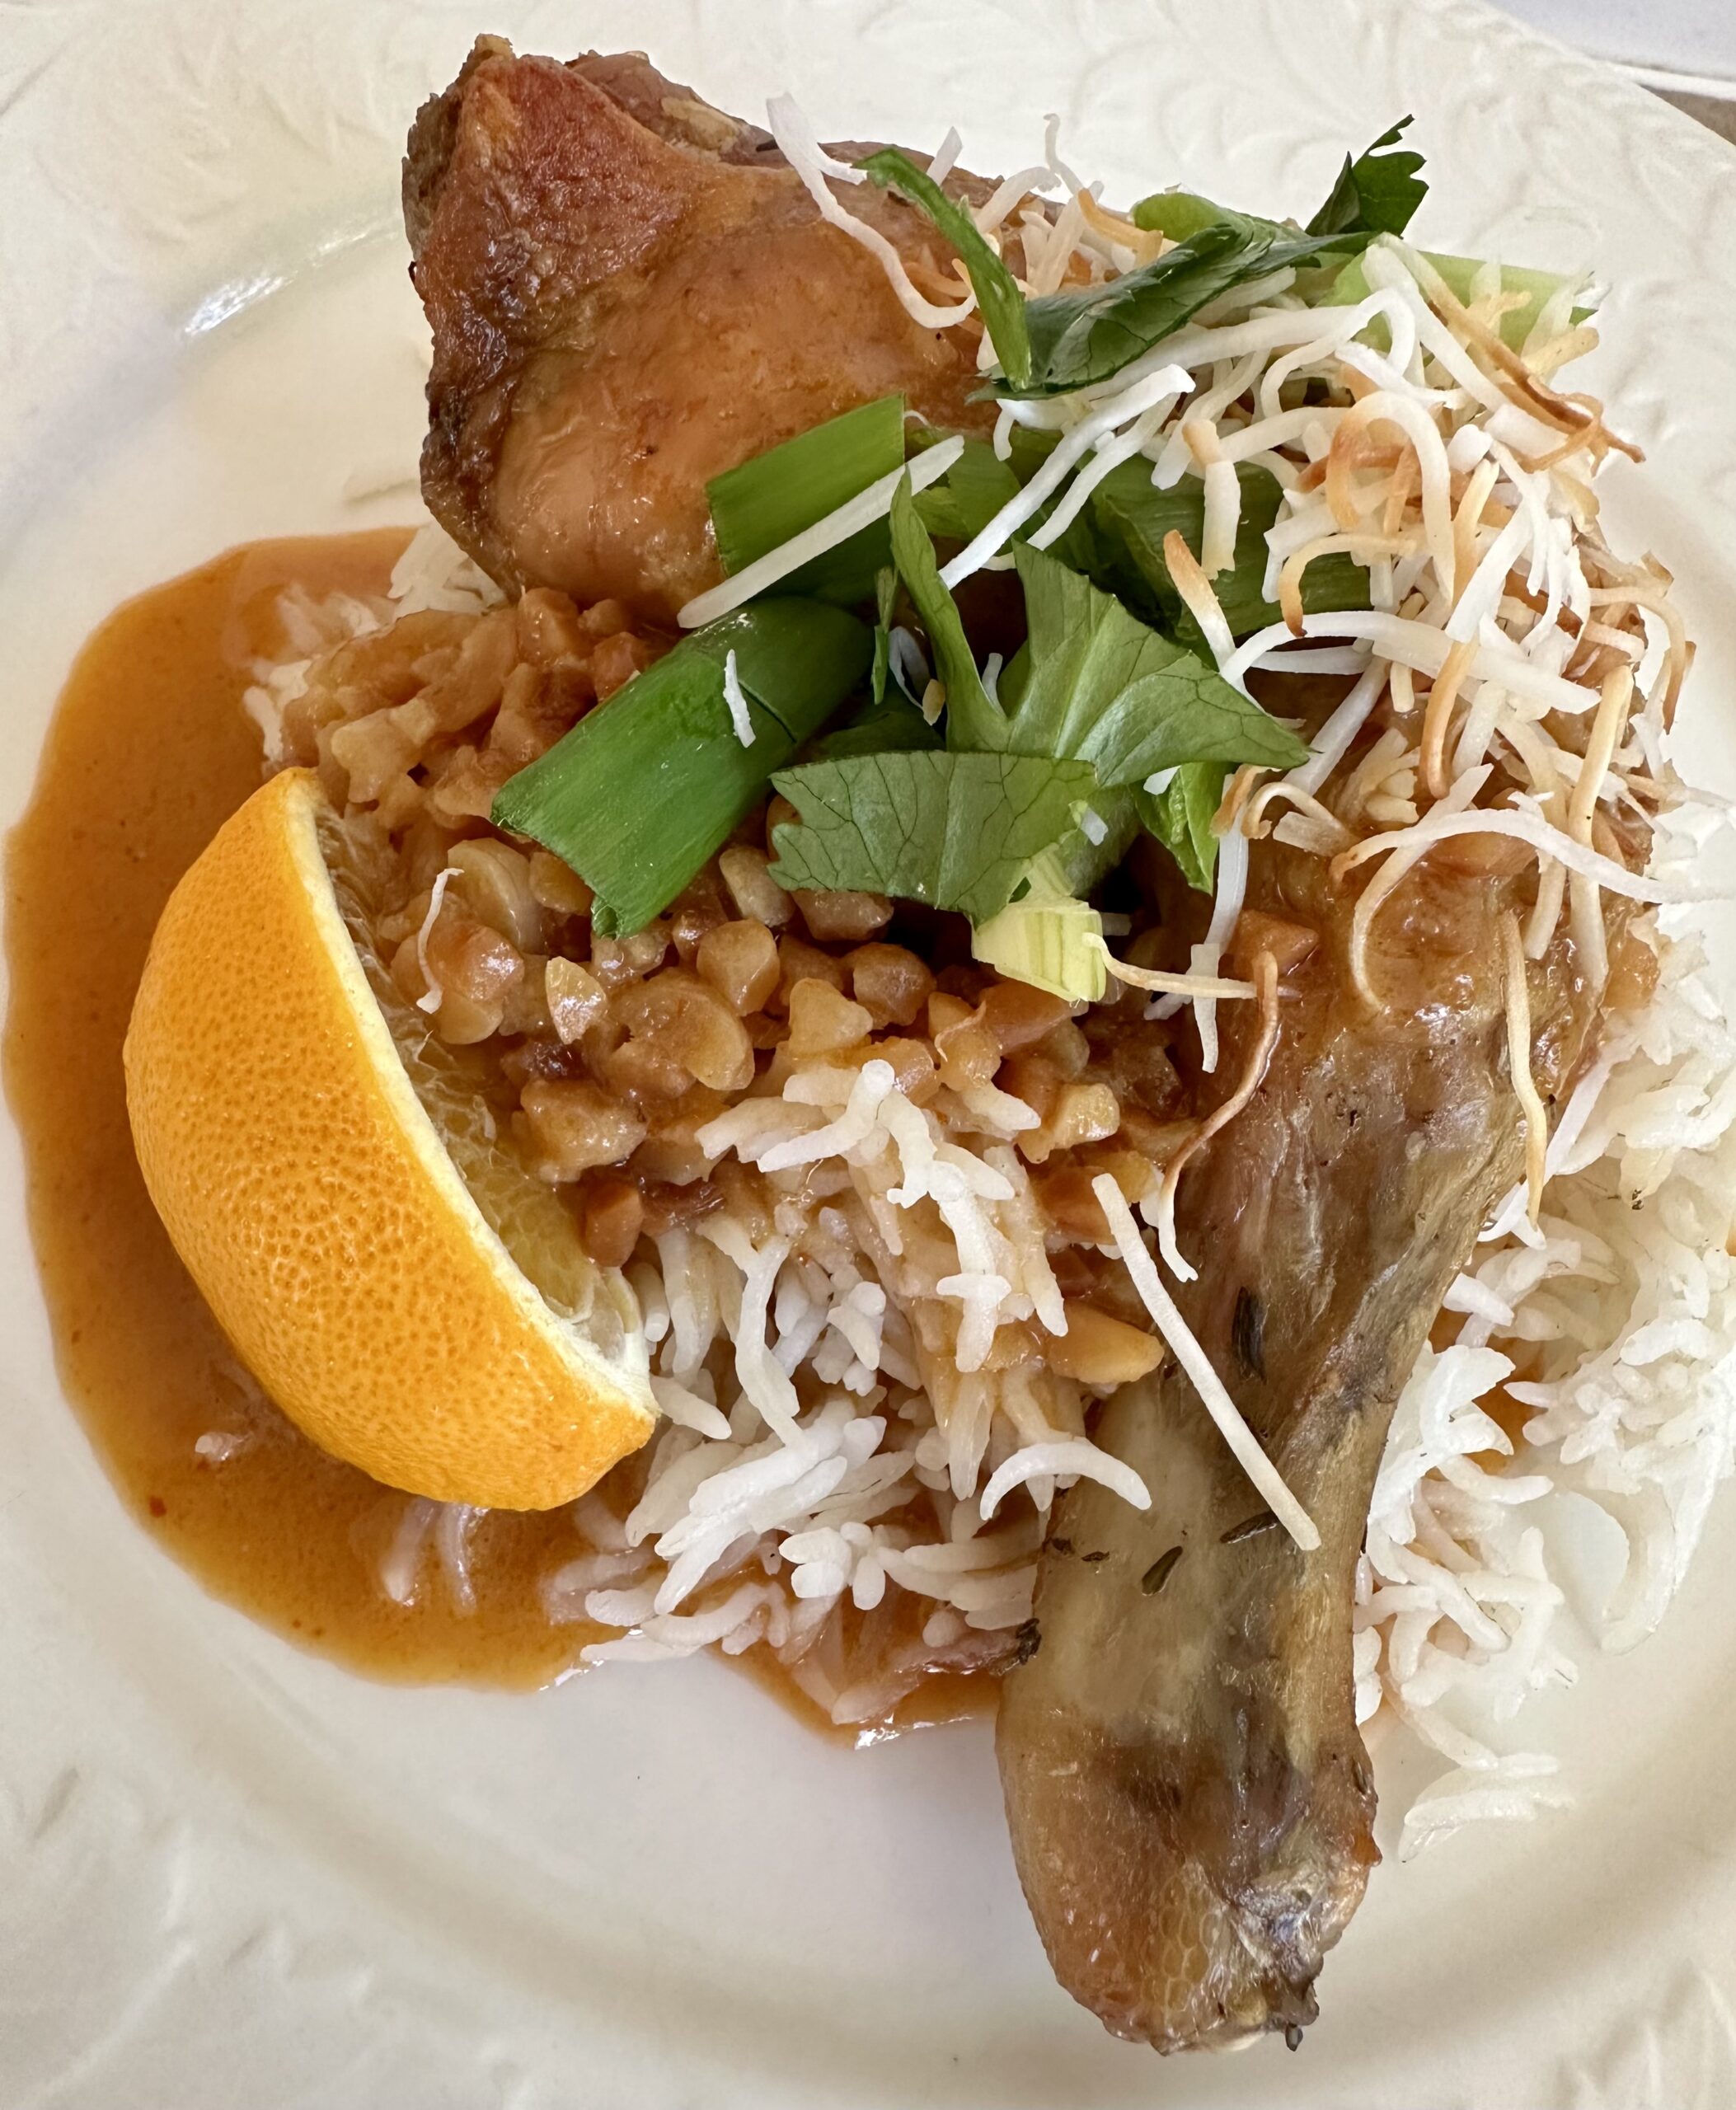
Living in Paris some 20 years ago I was introduced to confit, a cooking method where poultry is covered with duck fat or olive oil and cooked at a low temperature for a long time.
Confit comes from the French word confire which means to preserve and is used to describe any type of food that is cooked slowly over a long period as a method of preservation. It dates back to the days when people didn’t have refrigerators and this was a means of making things last longer.
The French mainly use this cooking method with duck, but chicken works just as well and I have also tried it with salmon. They say that confit duck or chicken pieces will keep in the fridge, submerged in the cooking fat, for up to a month, but I wouldn’t recommend leaving it for more than a week, just to be on the safe side. To serve, remove the chicken or duck pieces from the fat and pan fry them on both sides till crisp and golden brown.
The red curry sauce is a real winner. Quick to make and it can be frozen. If you don’t have time to confit the chicken, buy a cooked chicken at the supermarket, take off all the meat and mix it with this delicious sauce. The sauce goes with everything. Try it over steamed broccoli, green beans, noodles or fish.
The coconut rice recipe is also a winner because it requires no attention. It cooks in the oven and comes out beautifully fluffy and dry. This week’s recipe is perfect for entertaining because you can prepare all the elements beforehand.
There are two ways to serve this confit chicken. Either pan fried on top of the rice with the reheated curry sauce spooned over – as shown in the photo. Alternatively, remove and discard the chicken bones and mix the chicken meat (home-made confit or a cooked chicken from the supermarket) into the curry sauce, reheat and serve on top of the rice.
If you make the confit, don’t throw away the cooking oil once the chicken has been removed. Keep it to make the most delicious roast potatoes. Parboil them for 10 minutes, then drain, mix with some of the oil and roast in a hot oven or in an air fryer.
If you want to cut down on the calories in this recipe, use half a tin of coconut milk in the sauce and half in the rice. Add extra water to make up the difference.
Confit chicken pieces – see recipe
I used 6 chicken Marylands (drumstick and thigh) Red Curry Sauce:
1 can (400g) coconut milk
2 Tbs peanut butter
2 Tbs red curry paste
2 Tbs fish sauce
2 Tbs lemon or lime juice
3 Tbs brown sugar
1 clove garlic, crushed
1/3 cup finely chopped peanuts
½ cup chicken or vegetable stock Coconut Rice:
2 cups rice (Basmati or Jasmine)
1 Tbs olive or vegetable oil to grease the casserole
1 can (400g) coconut milk
1 cup water
4 tsp sugar
½ tsp salt To serve:
Thinly sliced spring onions
Chopped fresh coriander
Lightly toasted coarse coconut
Lemon or lime wedges
Make the confit chicken according to the recipe link or buy a cooked chicken and take all the meat off.
Red Curry Sauce: place all ingredients in a small saucepan and simmer, stirring often, for 10 minutes or until the sauce coats the back of a spoon and reaches the desired consistency. Can be made ahead and refrigerated or frozen until needed.
Coconut Rice: thoroughly rinse the rice with cold water, then cover with cold water and leave overnight or for at least an hour. Drain rice and place in a lightly-oiled heavy casserole with a lid. I used Le Creuset. Add remaining ingredients and mix well. Cover with the lid. Can be made ahead to this point. Bake for 40 minutes in an oven preheated to 180°C. Remove from the oven and stir well about 15 minutes into the cooking time. Fluff with a fork before serving.
To serve: remove the confit chicken pieces from the oil they were cooked in, then fry in a frying pan until crispy and golden brown on both sides. You don’t need to put any oil in the frying pan as the chicken pieces will all have a light coating. Toast the coconut by stirring it in a dry frying pan over moderate heat until lightly coloured.
Serve the chicken on a bed of coconut rice, with half to three quarters of a cup over reheated curry sauce spooned onto each serving. Garnish with the spring onions, coriander, coconut and lemon or lime wedges.
While holidaying in Chiang Mai in the north of Thailand for a few days recently we ate some delicious prawn appetisers called Miang Kham.
Betel leaves are sold in my local Asian grocery store, so I bought a packet and was able to whip up these tasty, healthy appetisers in no time flat.
You might want to make double the tamarind dressing recipe. It keeps in the fridge for weeks and is useful to serve with all sorts of things, such as grilled salmon or chicken.
8 large prawns, peeled (raw or cooked)
1 Tbs oil
2-3 Tbs tamarind dressing
8 fresh betel leaves (from Asian shops)
2 Tbs roasted peanuts or crispy fried shallots (from Asian shops), or both
Fresh coriander leaves
Make tamarind sauce. Arrange the betel leaves, shiny side up, on a serving tray. Heat oil in a frying pan and cook the prawns. If using raw prawns, cook for about 3 minutes each side or until cooked through. If using cooked prawns just cook them for a minute or so, to heat through. Add the tamarind sauce and stir to coat well.
Arrange a few peanuts and one prawn on each betel leaf. Divide any remaining tamarind sauce left in the pan between the prawns. Sprinkle with crispy fried shallots, if using I didn’t use them in the photo. Top each one with a coriander leaf or two.
To eat the Miang Kham just pick up a betel leaf, pull the sides together to enclose the filling then pop it into your mouth.
Makes 8
Variations: use cubes or strips of chicken or scallops instead of prawns. Use lettuce or radicchio leaves instead of betel leaves.


 250g pork mince