We have recently had several days in Canberra where the mercury hit 40 degrees Celsius, which is 104 Fahrenheit for the benefit of my British and American readers. Today is due to be another scorcher, our cooling system is kaput and they can’t come and fix it till tomorrow. So what do you eat when you hardly have the energy to read a book or watch the cricket on TV? You certainly don’t want to turn the oven on and make matters worse.
We all know the expression As Cool as a Cucumber, so as I was wondering what to make with the first Lebanese cucumbers we picked yesterday I remembered a recipe for Cucumber Mousse, given to me ages ago by a UK friend called Felicity. I had some cooked peeled prawns in the freezer and always keep some Philadelphia-style cream cheese in the fridge – unopened it keeps for ages and is handy for dips – so there was no need to go and buy anything. Perfect.
Felicity’s recipe says 1 sachet or half an ounce of powdered gelatine. After reading the instructions on my packet and looking on the internet I decided an Aussie tablespoon (20 ml) would work and it did.
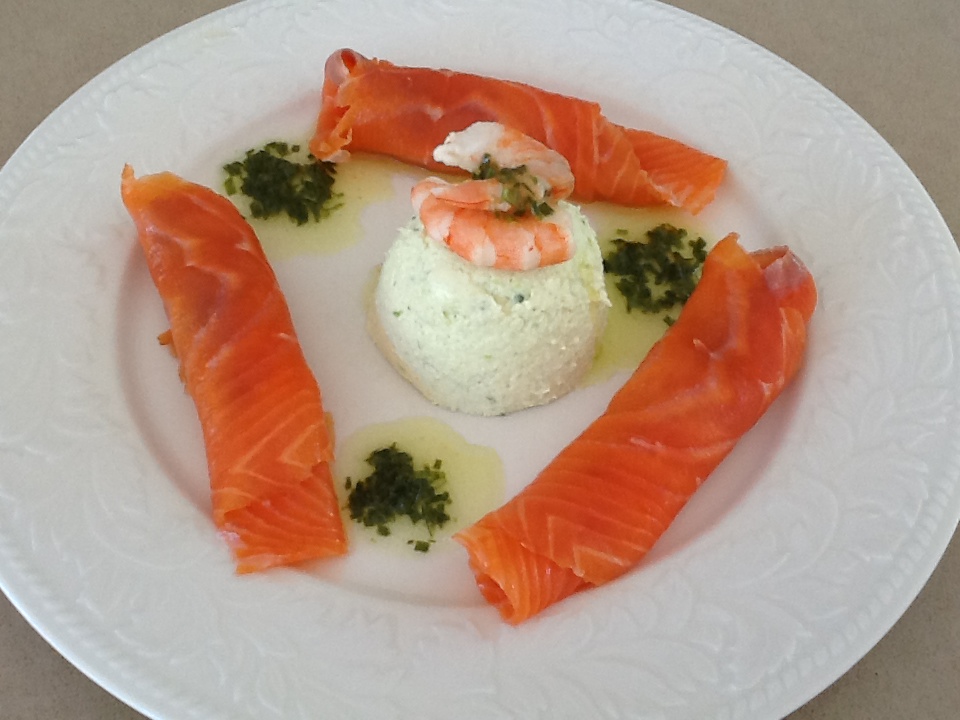
Back in the seventies recipes using gelatine were all the rage. I remember making salmon mousse, strawberry mousse, lemon mousse and a tart which had a biscuit base and a filling of evaporated milk – whipped furiously until thick – then set with gelatine and decorated with tinned apricots. Fortunately that recipe has well and truly died and been buried, but Cucumber Mousse is still a refreshing option for a hot day. This recipe makes a good starter or light lunch. The first day I served the mousses with two prawns and a drizzle of sauce round the plate, as a starter. The second day they became a more substantial dish for lunch, with the addition of some smoked salmon rolls – even nicer. If you wanted to be really snazzy you could arrange some very thin slices of cucumber in the moulds before tipping in the mousse.
1 Tbs powdered gelatine
5 Tbs white wine or cider vinegar
1 scant Tbs sugar
1 large telegraph cucumber or 3 small Lebanese ones
250g cream cheese (I used Woolies Home Brand) at room temp
150ml cream (generous half cup) sour cream, creme fraiche or thick Greek yoghurt
salt and freshly ground black pepper to taste
Peeled cooked prawns and/or smoked salmon to garnish
Green Shallot Dressing to serve
Place vinegar and sugar in a small bowl. Sprinkle gelatine over the top then zap in the microwave for about 30 secs to dissolve completely. Remove about 60% of peel from the cucumbers and trim the ends. Cut into chunks and place in food processor or blender and puree. Add cream cheese and puree, then cream and lastly gelatine mixture, stopping from time to time to scrape down the sides. Season to taste then tip into 8 half cup ramekins or one large mould and chill for a couple of hours or overnight. Dip moulds briefly in hot water, run a knife with a thin blade around the outsides, then tip out. Decorate with prawns, smoked salmon or both and chives. Drizzle some Green Shallot Dressing around the plate. If you don’t have any green shallots (spring onions) substitute chives or even basil.
Serves 8 as a starter