Fish ‘n Chips

I grew up in the UK in the 60s when there were almost as many fish and chip shops as there were pubs. As the fish and chips came out of the hot oil they were put into grease-proof paper bags, then wrapped in old newspapers. This created an unforgettable aroma as you ran home with the hot package and it didn’t detract at all from the flavour. They were delicious! Sixpenny worth of chips was an after school treat, doused with dark malt vinegar and sprinkled with salt. Now everything has to be wrapped in pristine white paper, prices have shot up, the batter on the fish seems thicker and many of the fish and chip shops I remember as a child have closed.

Everyone – well almost everyone – loves fish and chips. If you fall into that category then an electric deep fat fryer is a good investment. I keep mine in an old fridge in the garage, where we store wine and beer. I only use it for fish and chips so I leave the oil in the pan and use it 2-3 times over one or two months, before throwing it out and starting afresh.

This batter takes less than a minute to make and it’s very light and crunchy.

canola, sunflower oil or similar
3-4 medium potatoes (choose a variety suitable for chips)
400g thick, chunky white fish fillets, such as cod, hoki
1/3 cup self-raising flour
salt and pepper to taste
soda or sparkling mineral water
To serve:
Tartare sauce
lemon wedges
1-2 cups frozen peas, cooked

Heat oil in deep fat fryer. Peel and slice potatoes and cut into chips (fat or thin, as you like) then dry well with paper towels. Test oil and when a chip starts to sizzle as soon as you put it in, it’s hot enough. Cook chips until tender but pale, then lift the basket and let the oil get very hot again, before lowering for a final crisping. Tip chips into a dish lined with paper towel and sprinkle with salt. Cover loosely with foil so they stay hot.

While chips are cooking cut fish into long chunky sticks 2-3 cm wide. Mix flour with salt and pepper and enough soda water to make a very thick batter. Go slowly, you won’t need much. Add all the fish to the batter, then turn to coat thoroughly. When chips are done cook the fish for 3-4 minutes or until golden brown and crispy. Gently lower them into the oil one piece at a time. Drain on paper towels and serve with the chips, tartare sauce, lemon wedges and peas.

Serves 2-3

Note: if you don’t have a deep fat fryer a deep pan will do. The oil needs to be about 10cm deep.

Pasta with Smoked Salmon and Cucumber

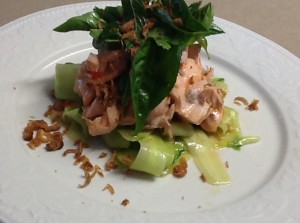
Smoked salmon is much cheaper than it used to be, especially if you buy it in half kilo packets, so I usually have some “on the go” in the fridge.  It’s handy for creating a quick salad or pasta dish such as this one, slightly adapted from a recipe in Delicious magazine.

Pink peppercorns, known as baies roses in French, are fragrant and only slightly peppery. According to Wikipedia, they are not real peppercorns but were so-called because they look like them. They go well with most recipes using smoked salmon or gravlax. You can probably tell from the photo that I only had chives and no dill, but it still tasted good!

400g spaghetti or fettuccine
1 Lebanese cucumber or half a telegraph cucumber, peeled, seeds removed and diced
1 Tbs olive oil
1 cup sour cream or creme fraiche
1 Tbs white wine or white Balsamic vinegar
1 clove garlic, crushed
1 Tbs capers, rinsed and drained
2 Tbs chopped dill
2 Tbs chopped chives
Finely grated rind of 1 lemon and juice of ½
200g smoked salmon, chopped
To garnish:
Extra chopped herbs
Pink peppercorns (the dry ones, see photo)
Or Salmon Roe

Sprinkle cucumber dice with salt and leave to drain in a colander for 30 mins then rinse and pat dry with paper towels. Cook pasta according to packet instructions, drain and mix with the oil.  Mix sour cream, vinegar, garlic, lemon juice and rind, capers and herbs in a bowl.  Then add pasta, cucumber and smoked salmon.  Divide among 4 bowls and garnish with extra herbs and pink peppercorns or salmon roe.  The dish will be warm rather than piping hot.

Serves 4

Veal Terrine with Cherry Sauce

If you’re a regular reader of my blog, you will know that I get a lot out of a subscription to Delicious magazine which was given to me as a gift. I am usually inspired to make several dishes each month and have yet to be disappointed.

This recipe for veal terrine is quick and easy to make. Cherries are in season and we had some sitting in a dish in the kitchen as I read this recipe. Their fate was thus sealed. I didn’t have any pistachios so substituted macadamia nuts. Pistachios being green would have looked more attractive, but the crunch of the macadamias was great. It’s one of the nicest terrines I have ever eaten and the sauce really makes it. As you can see from the photo, I didn’t quite get the chicken layer in the middle!

Enough pancetta, streaky bacon or proscuitto to line terrine
1 Tbs olive oil
1 onion, finely chopped
1 clove garlic, crushed
2 tsp thyme leaves
750g pork and veal mince (you could substitute chicken, pork or turkey mince)
1 egg
½ cup fresh breadcrumbs
½ cup pistachio kernels
1 cup pitted cherries
salt and freshly ground black pepper, to taste
1 chicken breast cut into slices

Cherry Sauce:
1 cup pitted cherries
1 cup dried cranberries
finely grated zest and juice 1 orange
⅓ cup sugar
1 cinnamon quill
¼ cup Marsala, port or other fortified wine

Preheat oven to 170°C. Line a 1.5L terrine or silicone loaf pan with pancetta or bacon, leaving enough overhang to fold over the top. The original recipe calls for 20 slices of pancetta. I used about 8 slices streaky bacon and didn’t bother with the overhang.

Heat oil in frying pan and cook onion, garlic and thyme for 3-4 mins, stirring, over medium-low heat until soft. Place mince, egg, pistachios and cherries in a bowl. Add onion, season well and mix thoroughly.

Press half the mixture into terrine and arrange chicken slices down the centre. Pack with remaining mixture and fold excess pancetta or bacon over the top. Cover with foil and place in a deep roasting pan. Add boiling water to come halfway up the sides of the terrine. Bake for our hour, cool to room temperature. Place terrine on a tray, cut a piece of cardboard to fit top, weigh down with cans and chill overnight.

Place all ingredients for sauce in a pan and simmer for 15 minutes or until thickened. Cool. Turn out terrine. Slice and serve with the cherry sauce.

Serves 8

Variation: when cherries are out of season use canned ones or leave them out, increase the veal mince to 850g and use 2 cups of dried cranberries in the sauce.

Oven-Roasted Vegetables

Whenever I make oven-roasted vegetables I always think there will be lots of leftovers. But they’re so delicious, not to mention healthy, so everyone comes back for seconds and there’s none left.

You can use any combination of vegetables and there are some important rules. Cook the vegetables in a hot oven i.e. 200C or 400F in a very shallow baking tray in one layer – otherwise they will stew in their own juices rather than roasting. Also it’s important to cut vegetables which cook quickly, such as zucchini, into larger pieces than the rest. When cooked the vegetables should be slightly charred on the edges, while still maintaining a bit of crunch. The first photo shows them just out of the oven. The second photo shows them served on a bed of rocket, garnished with some soft goat’s cheese and toasted pine nuts.

2-3 large carrots, peeled
2 red or yellow peppers (capsicum) or one of each, seeds and membranes removed
4-6 small yellow squash (if available)
3 onions – red or brown
4-6 zucchini (courgettes)
6-8 whole garlic cloves
Olive oil, salt and pepper
Balsamic glaze or vinegar
Chopped fresh parsley or coriander to serve
Optional additions:
1 eggplant (aubergine)
1 sweet potato
parsnips or pumpkin

Preheat oven to 200°C. Cut vegetables into sticks or chunks, onions into quarters or eighths depending on size. Leave garlic cloves whole. Place all the vegetables in a shallow baking tray in a single layer. You don’t want them all on top of each other, so use two if necessary. Drizzle generously with olive oil, season with salt and pepper and mix well with your hands. Roast vegetables for 30-40 mins, turning a couple of times during cooking time. Serve at room temperature, drizzled with balsamic glaze or balsamic vinegar and sprinkled with chopped herbs.

Serves 6-8

Lemon Drizzle Cake

Google has links to lots of recipes for Lemon Drizzle Cake. My version contains sour cream so it’s very moist and will keep in a tin for up to a week. If preferred omit the final lemon icing and serve instead dusted with sifted icing sugar. It’s really deliciously lemony and makes a nice dessert served with pouring cream and strawberries.

I found a long narrow loaf tin in a second-hand store recently and decided to use it for this cake.  It was a bit small for the amount of cake batter, so as it rose the cake tumbled over the edges and I had to trim some off in order to remove it from the tin. It also stuck to the sides of the pan – as you can see from the photo. Now I know why the previous owner got rid of it!

The lemon icing is optional.

Syrup:
Juice from 1½ large lemons
¾ cup icing sugar
Cake:
125g butter (preferably unsalted) at room temp
1 cup caster sugar
2 large eggs
Grated zest from 2 lemons
pinch salt (not needed if you use salted butter)
1½ cups self-raising flour, sifted
1 cup sour cream or crème fraîche
⅓ cup milk
Icing: (optional)
Juice from ½ large lemon
¾ cup icing sugar

Preheat oven to 170°C.  Grease a loaf tin or 20cm round cake tin and line the bottom with baking paper. Grate zest from the lemons then juice them. Syrup: Heat lemon juice and icing sugar in  a small saucepan, stirring until dissolved.

Cake: Place butter and caster sugar in a food processor or electric mixer and process until light and fluffy. Add eggs one at a time and when thoroughly incorporated add flour, sour cream, milk and the lemon zest.  Stop motor to scrape down the sides, then process for a few seconds more. Scrape batter into cake tin and smooth the top. Bake for 50-60 mins or until well-risen and golden brown and a skewer inserted into the middle comes out clean.

When cake comes out of the oven leave it in the tin.  While it’s hot gently make holes all over the cake right through to the bottom with a skewer.  Spoon the warm lemon syrup over slowly, allowing it to soak in.

When cake is completely cold remove from tin to a cake rack. Icing: Place lemon juice and icing sugar in a small bowl and mix until smooth. Spoon over the cake in a drizzly pattern.

Pineapple Chutney

This chutney is adapted from a recipe in this month’s Delicious magazine. It’s very quick to make and great to have around at Christmas or to give to friends as a gift. The original recipe didn’t have any chilli, so just leave it out if you’re not into spicy food.

1 x 825g can pineapple in natural juice or light syrup (or 2 smaller cans)
4 Tbs Hoisin sauce
3 Tbs honey
3 Tbs soy sauce
2 star anise
2 Tbs chopped fresh ginger
1 tsp Chinese five spice powder
1 Tbs crushed chilli (buy it in a jar or process some fresh ones)

In some countries you can buy crushed pineapple, but if yours is in slices or rings, place in food processor and chop finely.  Place in a large heavy-bottomed pan with remaining ingredients. Simmer for 15-20 minutes, stirring regularly, or until thickened and looking a bit sticky around the edges. Discard star anise. Place a few small jam jars without their lids in microwave and “cook” for a minute or two. This will heat and sterilize them. Fill with chutney and seal while hot. Serve with cold ham, pork, turkey, duck or chicken.  Will keep for several months. Refrigerate after opening.

Makes about 4 cups

Note: if you prefer the chutney to be yellow in colour use white soy sauce, sugar instead of  honey and omit the hoisin sauce.

Blueberry Pie

Fruit pies freeze well and are handy to whip out for dessert during the holiday season. Just bake for about half an hour, so it’s not quite thoroughly browned, cool and freeze, covered – a shower cap is ideal! When you want to serve the pie thaw (remove shower cap!) and reheat for 20-30 mins in a moderate oven to finish off the browning.

Pastry:
See recipe for Apple and Blackberry Pie
Filling:
About 450-500g frozen blueberries (pkt sizes vary)
grated zest 1 large lemon
juice ½ lemon
½ cup sugar
3 Tbs cornflour
1 punnet fresh blueberries (about 125g)
2 eating apples peeled, cored and diced
1 egg, beaten
Granulated sugar

Make pastry and chill wrapped in plastic wrap. Thaw frozen blueberries. Place in large saucepan with lemon zest and sugar. Heat to boiling point, then add cornflour mixed with lemon juice and cook, stirring until very thick. Add fresh blueberries and diced apple and cool.

Preheat oven to 180°C. Roll out half the pastry to line a large deep dinner plate or similar sized pie dish, trim off excess. Fill with blueberry filling. Roll out remaining pastry and cover pie. Trim off excess pastry, seal and crimp edges. Use any leftover pastry to make leaves to decorate the top. Brush with beaten egg, arrange “leaves” on top, brush those also. Bake for 35-45 mins or until well browned. Or bake for only 25 mins until light golden, remove from oven, cool then refrigerate or freeze until serving time.  To serve put back into a moderate oven for 20-30 mins. Serve with whipped cream or vanilla ice cream.

Serves 12

Mayonnaise

Home-made mayonnaise is delicious and you can whip up a batch in less time than it takes to go to the corner shop and buy some. Some recipes use egg yolks, but I prefer this lighter version using whole eggs – unless I happen to have some egg yolks left over from another recipe which need using up. Instead of two whole eggs you can use four egg yolks, or one egg and two yolks. Using more yolks makes the mayonnaise more yellow. From the basic recipe it’s easy to make tartare sauce to serve with fish or a pink dressing known as Salsa Golf in Spanish, to serve with seafood.

It’s important to “warm” the ingredients by mixing for a minute or so before adding the oil, to stop the mixture from curdling. Despite taking this precaution, occasionally you may find yourself with a batch of curdled mayonnaise.  Maybe it’s caused by the freshness of the eggs or the weather, who knows. To solve this dilemma start over again and make a fresh batch – maybe half the recipe if you don’t want to end up with too much! Once that’s made, gradually add the curdled batch to the good batch through the chute of the food processor, with the machine running. This usually does the trick.

I find a food processor much easier than an old-fashioned blender where the ingredients tend to get stuck down the bottom and there’s far more risk of curdling. Adding extra vinegar at the end allows you to adjust the mayonnaise and give it a bit more tang.  Using 100% olive oil results in a mayonnaise which is too rich for my taste and is much more likely to split. However, replacing a small amount of the canola oil with olive oil works well and gives a richer flavour.

An Australian tablespoon is 20mls compared with an American tablespoon which is only 15mls.  Refer to this page for more details on weights and measurements.


2 large eggs
2 Tbs cider or white wine vinegar or lemon juice
1 tsp salt
1 tsp sugar
1 heaped tsp hot English mustard
2 cups (500ml) vegetable oil such as Canola or Sunflower
About 1 Tbs vinegar or lemon juice, extra

Place eggs, vinegar, salt, sugar and mustard in a food processor and process for a good minute to thoroughly mix and warm the ingredients. Gradually add the oil through the chute with the motor running. Towards the end the mayonnaise will thicken up nicely. Add extra vinegar or lemon juice. Store in wide-mouthed jars with lids in the fridge. Keeps for up to 3 weeks.

Makes about 3 cups

Seafood Dressing

1 cup mayonnaise
½ cup cream or sour cream
1-2 Tbs tomato sauce (ketchup)
A few drops of Tabasco sauce to taste
lemon or lime juice to taste
2 tsp Cognac or brandy (optional)

Mix together and refrigerate before serving. Adding Cognac gives the sauce a different taste for a change.

Makes about 1½ cups

Tartare Sauce

1 cup mayonnaise
2 Tbs spring onions, finely chopped
2 Tbs drained capers, finely chopped
2 Tbs gherkins, finely chopped

Mix all together and serve with fish.

Makes about 1½ cups

Chilled Carrot and Orange Soup

On a very hot day you can’t beat a bowl of ice cold soup. Not everybody will agree with me on this – chilled soups are something you either like or you don’t.  My Dad didn’t like them, even though he was quite adventurous, loved Asian food and most of the things I put in front of him.

The best known cold soups are probably Spanish gazpacho and Russian Borscht, a soup made with beetroot which can be served hot or cold and which is popular in many Middle European countries. I have about three other favourite recipes including this one for Carrot and Orange. The soup is equally delicious served hot.

Chilled Carrot and Orange Soup

500-600g carrots, peeled and sliced
1 large onion, chopped
25g butter
3 cups chicken or vegetable stock
1½ – 2 cups orange juice (fresh or from a carton)
Salt and freshly ground black pepper to taste
Pinch of sugar
Finely chopped fresh dill and cream to garnish

Cook onion in butter till soft, add carrots, stock, sugar and simmer until tender. Blend till smooth in blender, add orange juice to reach desired consistency, check seasoning and chill.  Serve garnished with dill and a swirl of cream. Can be served hot.

Serves 6

Variation: for a creamier soup replace ½ cup of the orange juice with cream.

Pavlova

My friend Chris Wride in Paris has just requested my recipe for Pavlova via the Café Cat Facebook page.  He remembers I served it at a dinner when we were living there. Well his timing couldn’t have been better. We’ve just picked our first raspberries and one of the nicest ways to enjoy fresh berries, especially raspberries, is in a Pavlova.  Chris your wish is my command!  Here it is.

Australians and New Zealanders argue about where this dish originated and both claim it as their national dessert.  It doesn’t really matter who invented it – it’s a world class dish by any standards.  Sometimes I make individual ones but they’re a bit more fiddly.  One big one can be whipped up in no time at all.

Pavlova

4 large egg whites (approx 125g) at room temp
250g caster sugar
1 tsp white or cider vinegar
1 tsp cornflour
400ml fresh cream, whipped
2-3 cups fresh berries such as raspberries, blueberries, strawberries

Serves 10

Preheat oven to 170°C.  Place a sheet of non-stick baking paper or foil on a large baking tray and draw a 25cm circle on it using a dinner plate.  Place egg whites in a large bowl and whisk using electric beaters until soft peaks.  A Kenwood or Kitchen Aid mix-master is ideal for this, but hand held beaters will do, although it will take twice as long. Gradually add sugar and keep whipping until you have a stiff, glossy meringue with no crunchy bits of sugar left.  Halfway through stop the machine and scrape mixture down from sides of the bowl.  Add vinegar and cornflour then pile the meringue onto the baking paper circle.  Spread to an even thickness then remove some from the middle to the edges so you end up with a meringue which has a dip in the middle for the cream and fruit.  Bake for 10 mins then turn off the oven and leave there till cool.  Fill pavlova with unsweetened whipped cream and berries. Dust with sifted icing sugar (optional).

Notes:

  • leftover egg whites from a recipe which uses only yolks can be stored in a plastic container in the freezer, adding more on other occasions.  Thaw and weigh: one egg white weighs 30g (1 ounce) more or less
  • if there is any trace of egg yolk left in the whites they will not whip
  • all ovens differ so you may need to adjust the oven temperature and/or the cooking time till you get this right
  • the finished meringue should be crisp on the outside but soft like marshmellow on the inside
  • passionfruit pulp is also nice on pavlova and some people like to use slices of kiwi fruit