I began collecting recipes when I was at school. Some of the recipes in my large collection have been in my family for generations, others were passed on by friends and chefs around the world. Many have been adapted over the years to make them lighter or update their presentation. I’ve served them to royalty, PMs and other VIPs and there have been no complaints. I hope you are inspired to make some of them.
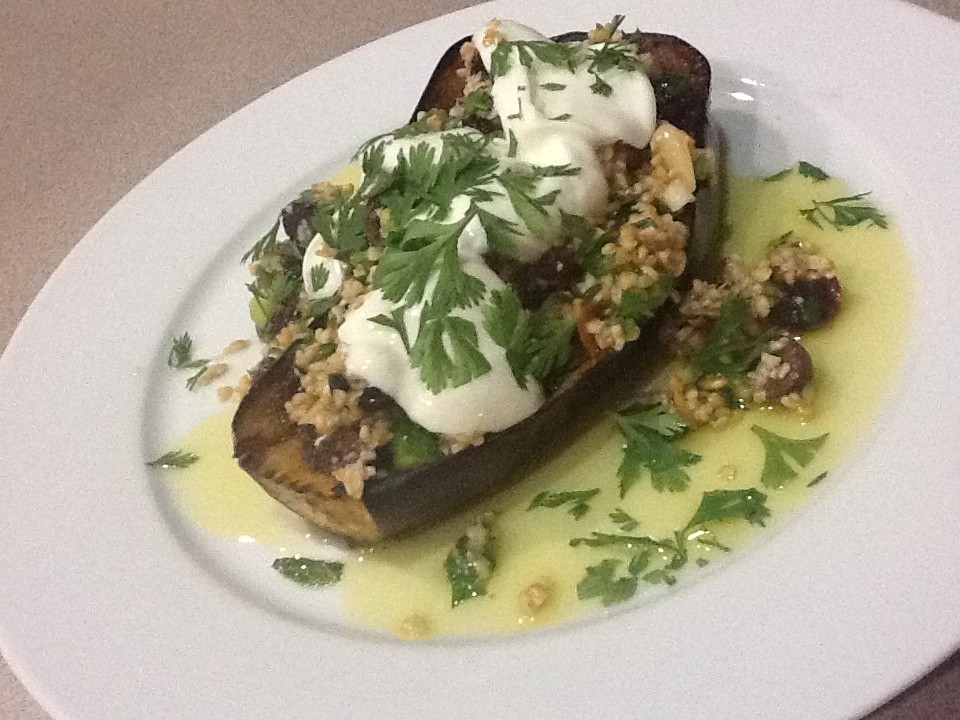
If I had to become a vegetarian I would eat a lot of eggplant as it’s definitely the “meatiest” of all the vegetables – very filling and satisfying. This recipe comes from Yotam Ottolenghi and is delicious served warm or at room temperature.
2 cloves garlic, crushed
2 tsp ground cumin
2 tsp ground coriander
1 tsp chilli flakes or powder
½ tsp salt
½ cup olive oil
2 medium eggplants
150g fine cracked wheat (bulgar)
50g sultanas
2 Tbs chopped fresh coriander
2 Tbs chopped fresh mint
2 Tbs pitted green or black olives, halved
2 Tbs flaked almonds or pine nuts
2 Tbs finely chopped preserved lemon skin (from specialty shops)
3 spring onions, chopped
1½ Tbs lemon juice To serve:
Greek yoghurt
Olive oil
Chopped coriander
Preheat oven to 200ºC. Mix garlic, cumin, coriander, chilli, paprika, salt and about two thirds of the oil. Cut eggplants in half lengthwise. Score flesh with deep diagonal criss-cross scores being careful not to cut through the skin. Spread spice mix evenly over the eggplants then bake 40 mins or until completely soft. Meanwhile cover cracked wheat with boiling water and leave for about 20 mins. Soak sultanas separately in some warm water for about 10 mins.
Drain sultanas and cracked wheat and place in a bowl with the remaining oil, herbs, olives, nuts, spring onion, lemon juice and preserved lemon. Season to taste..
Serve eggplants warm or at room temperature. Arrange on serving dish and spoon over the cracked wheat mixture, allowing some to fall over the sides. Garnish with a dollop of yoghurt, a drizzle of oil and some coriander.
Sunday’s a good day for a leisurely cooked breakfast and about 3 weeks ago I decided to make this sweet potato rosti which I had seen in the free brochure published monthly by Coles supermarket and available at the check out.
Sweet potato, bacon, onion and thyme – preferably fresh – is a winning flavour combination, but I had to make this four times before I got it right. The first time I made one large rosti, as per the recipe, but the outsides started to burn before the middle was properly cooked. Second time I made individual rostis, like fritters, but they had a tendency to fall apart. Third time I added an egg and a bit of flour to the mixture and again made small fritters, but the flavour wasn’t the same.
The original recipe said to microwave the whole sweet potato for five minutes before grating it, but this overcooked the outside while leaving the inside raw. So on my fourth and final attempt, instead of microwaving the sweet potato I stir fried the mixture and then made it into one large rosti. This worked well and here’s my version of the recipe!
To make a more substantial meal serve rosti on a slice of buttered toast, with a green salad on the side.
1 large sweet potato (about 800g) 100g bacon, diced 1 brown onion, finely diced 3 tsp finely chopped fresh thyme (or use dried) 1 tsp salt Freshly ground black pepper 4 eggs Olive oil
Peel and grate the sweet potato into a bowl. A food processor with a coarse grating disc makes this a breeze. Alternatively use the coarsest side of a hand grater. Mix in bacon, onion, thyme, salt and pepper.
Heat a little olive oil in a medium sized non-stick frying pan. Add sweet potato mixture and stir fry for 5-10 minutes, or until the mixture has softened. Heat a little oil in a smaller omelette pan about 20 cm in diameter. Pack sweet potato mixture into the pan and smooth the surface, pressing down with a spatula. Cook over medium heat for 5-10 minutes or until golden underneath. Loosen around the edges, then place a plate on top and invert the pan so the rosti ends up on the plate. Slide back into pan, adding a bit more oil if necessary. Cook for 5-10 minutes on the other side.
Meanwhile in another pan, fry the eggs sunny side up, or however you like them.
Cut rosti into 4 and arrange on individual serving plates. Top each serving with a fried egg.
One of my foodie friends Karen sent me the link to this recipe for Seductive Little Shrimp Cakes. It comes from a book called Tacolicious by Sara Deseran and was recently reposted by Ruth Reichl. American-style, it calls for shrimp, which you can’t buy in Australia, so I used prawns and made a couple of other small adjustments.
750g cooked prawns (about 375g peeled)
1 egg
Juice of half a lime
1 stick celery
3 spring onions
Handful of parsley
Salt and freshly ground black pepper, to taste
1 tsp paprika
½ tsp celery salt or garlic salt
3 Tbs mayonnaise
1 Tbs juice from a jar of jalapeño chillies
1 cup Panko crumbs + extra (see note below)
Oil for shallow frying Corn Salsa:
3 cobs corn
2 large tomatoes
1 Lebanese cucumber
½ red onion
1 jalapeño chilli from a jar
Juice half a lime
1 tsp salt
Place peeled prawns in food processor and pulse briefly to chop but still leave some chunky bits. Scrape into a large bowl and mix in the egg and lime juice. Place celery and spring onions – cut into 3cm lengths – in food processor Add parsley and pulse to chop finely. Scrape into the bowl with prawns. Mix in celery or garlic salt, mayonnaise, jalapeño juice and Panko crumbs. Season to taste with salt and pepper.
Place some extra Panko crumbs on a plate. Take about a heaped tablespoon of mixture and form into a small cake with your hands. Roll in the crumbs and place on a baking tray lined with baking paper. You should end up with 12-14 little cakes. Refrigerate for an hour or several hours. If only an hour, no need to cover, but if longer cover with plastic wrap.
Cut the kernels from the corn and place in a bowl. Quarter tomatoes, remove seeds and dice. Add to the bowl with the diced cucumber, red onion and chilli. Add lime juice and salt and leave to macerate. Taste before serving to see if it needs more salt.
Heat 1-2 tablespoons oil in a frying pan and cook the prawn cakes for about 3 minutes each side. Serve with the salsa.
Serves 4
Note: Panko crumbs are Japanese-style breadcrumbs. Very light and crunchy, they’re a good addition to your pantry. Sold in most supermarkets – ask if you can’t find them – or substitute ordinary dry breadcrumbs.
I’ve tried persimmons a few times and I have to say I wasn’t impressed. When firm and slightly underripe they were very astringent and by the time they tasted good they were so ripe as to be almost mushy.
The good news is that you can now buy a variety of persimmon called Fuyu which Woolworths are importing from New Zealand and which are non-astringent. I was inspired by my friend Franca to combine them with shaved fennel to make a delicious and unusual salad which goes particularly well with salmon.
Fuyu persimmons are ready to eat when they feel firm, like a tomato, not soft like a very ripe avocado.
2 firm Fuyu persimmons
1 bulb of fennel Dressing:
3 Tbs olive oil
1 Tbs lemon juice
Salt and freshly ground pepper to taste
Pinch of sugar
Wash persimmons, remove calyx then halve and thinly slice downwards. Wash fennel, trim off stalks (saving a few green fronds) halve then shave into very thin slices using a very sharp knife or a mandoline.
Arrange persimmon and fennel in a serving bowl. Place all ingredients for dressing in a small jar with a lid and shake well. Drizzle over the salad then decorate with a few green fennel fronds.
A carton of buttermilk will keep in the fridge, unopened, for at least a month, so I always have one on hand to make Irish soda bread. This bread doesn’t contain yeast, so it’s quick to make. Delicious eaten fresh or toasted next day.
The owner of a bed and breakfast near Cork many moons ago taught me to make soda bread. She used sour milk – something people often ended up with in the days before refrigeration, when the recipe originated. As far as the method goes, our lovely Irish hostess said “just mix it up wit yer two hands”. As it’s a bit sticky, I usually use a spoon. I replace the sour milk with buttermilk, but a mixture of half plain yoghurt and half fresh milk also works well. You can use self-raising flour or plain flour with the addition of baking powder and bicarbonate of soda.
This is a very flexible recipe. Use white flour or wholemeal as I have with these rolls, or half and half. Leave out the oats and use more flour. If you like, add a little honey. Grated cheese, herbs, chopped sun-dried tomatoes, dried fruit or nuts also help to ring the changes. Top with oats, sesame seeds or poppy seeds. The options are endless.
The recipe makes one large loaf or about a dozen small rolls. I recently bought a baking mold for 8 tiny loaf shapes and was dying to use it, so I ended up with eight loaves and four round rolls. As you can see in the photo, I sliced some of the loaves and topped them with cream cheese, smoked salmon, capers and red onion. Delicious.
3 cups wholemeal self-raising flour, sifted
Or 3 cups plain four + 1 tsp each baking powder and baking soda
1 cup porridge oats (see note)
1 Tbs honey (optional)
1 Tbs vegetable oil
600ml buttermilk
Extra oats
Preheat oven to 200ºC. Mix all the ingredients in a bowl. I usually add a dash of water to the buttermilk container, swish it round and add that too. The mixture should be soft and slightly sticky – not as dry as a normal bread dough. Don’t over mix or knead. Place heaped tablespoonfuls onto a tray lined with baking paper. Or spoon into greased muffin tins or mini-loaf tins. Sprinkle with extra oats.
Alternatively, to make one large loaf, tip dough onto a floured surface and use floured hands to form it into a flattened round shape, place on a baking sheet lined with baking paper or in a large greased loaf tin and sprinkle with extra oats. Bake for 20-25 minutes, then remove from oven and cool on baking racks. A large loaf will take longer than rolls – around 45 mins.
Makes one large loaf or 12 rolls
Notes: You can use quick cooking oats or ordinary stone-ground ones. If using the latter give them a quick whiz in the food processor, to break them up a bit.
As the weather in Canberra turned cold and wintry we discovered that our crop of carrots had got out of hand and become humongous. Their fate was sealed.
This is my basic creamy smooth soup recipe which can be adapted for any veggies – parsnip, asparagus (though you may have to sieve the strings out), pumpkin, sweet potato or a mix. The addition of ginger goes particularly well with root vegetables but leave it out if you prefer. Sometimes I add a clove or two of garlic when frying the onion.
If using spinach or broccoli, you might like to add a potato, to give the soup a bit more consistency. You can use leeks instead of onions and top with croutons instead of nuts, or just some chopped parsley. Try using a whole cauliflower (you can use most of the stalk) and serving the soup topped with grated cheese, or a hot slice of toasted cheese on toast, made from a French stick. Instead of ginger, with the green veggies try adding a bit of grated nutmeg, cinnamon or mixed spice. Vegetarians can just omit the pancetta.
Make a couple of batches of soup at the weekend, adding everything except the milk, to have ready in the fridge for the week ahead.
50g butter
2 large onions, peeled and chopped
1.2 kg carrots, peeled and chopped
Chicken or vegetable stock to cover (home-made or use cubes)
1 Tbs grated fresh ginger (or a bit more if you love ginger!)
Milk
Salt and freshly ground black pepper, to taste To serve:
4 slices pancetta, prosciutto or similar ham (I used Aldi’s black forest ham)
4 Tbs raw cashew nuts
Finely chopped parsley or coriander
Cream or sour cream
Heat butter in a large heavy-bottomed saucepan and cook onion gently till soft but not browned. Add carrots, ginger and enough stock to just cover the veggies. Simmer 25 mins or until carrots are cooked. Cool a bit then blend in a blender or food processor until smooth. Recipe can be made ahead to this point and kept in the fridge for several days.
Put soup back in the pan and add enough milk (or if preferred a mixture of milk and water) to make to desired consistency. Season to taste with S and P. Place pancetta on a tray lined with baking paper and cook in a very hot oven 220ºC for 5-10 mins or until crispy, remove, cool then break into chunks. Toast cashews in a dry frying pan over moderate heat.
Reheat soup and serve garnished with the pancetta, nuts, herbs and a swirl of cream.
The two most popular posts on Café Cat are both made in a slow cooker, so I thought it was time to post another recipe.
While I probably only use it four or five times a year, a slow cooker is great for winter, when we eat more casseroles. It’s also perfect when you want something which looks after itself as it cooks.
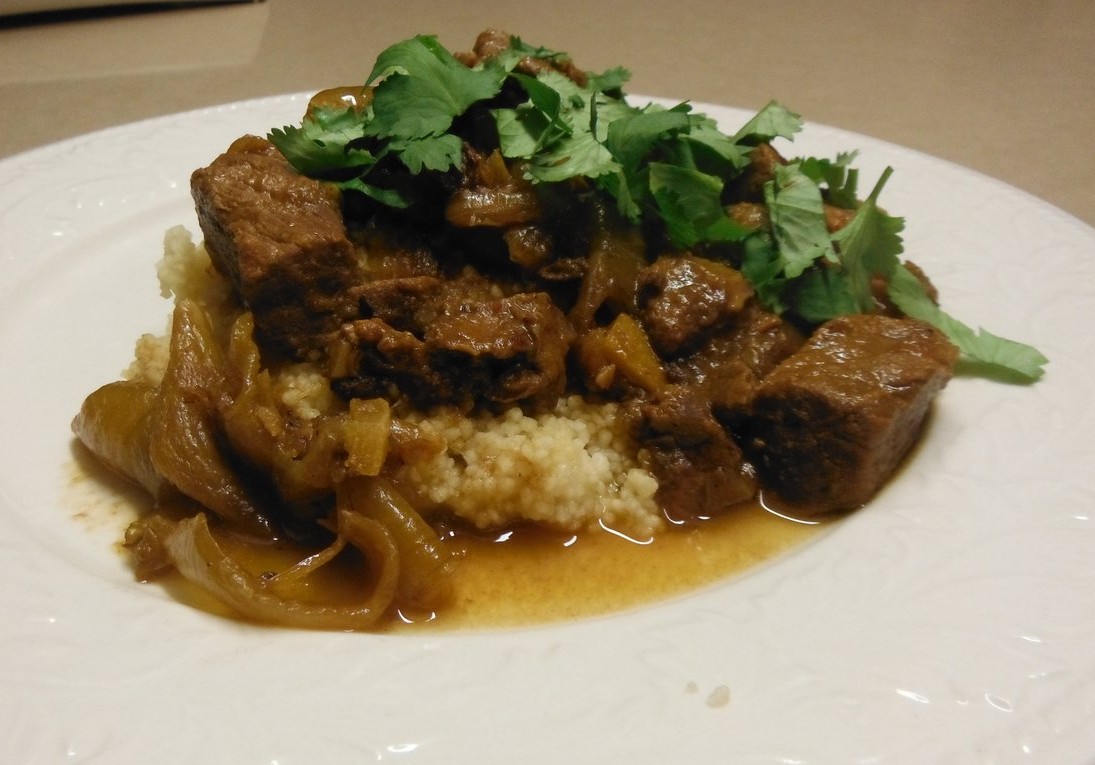
This Lamb and Date Tajine came from my friend Kien who lives in Amsterdam. I’ve cut down a bit on the liquid which is all you need to do to adapt any recipe for a slow cooker. I couldn’t find any really small onions so I used nine larger ones and cut them in half. As with all casseroles, the leftovers were even better when reheated two days later.
1kg lean lamb cut into 2cm cubes (shoulder, leg) 2 tsp ground coriander 2 tsp fresh ginger, coarsely grated
Pinch of saffron 1 Tbs olive oil + extra
18 whole small onions, peeled
4 cloves garlic, crushed
1 Tbs plain flour
1 Tbs tomato paste
1 cinnamon stick, broken in two
450ml lamb or beef stock
4 Tbs chopped fresh coriander
Rind of one preserved lemon, diced (see note below)
100g dates, sliced
1 Tbs honey
Salt and freshly ground black pepper to taste
Marinate meat with ground coriander, ginger, saffron and olive oil for 24 hours in the fridge. Brown lamb all over in 2-3 batches in a non-stick frying pan over moderately hot heat – there’s no need to add any oil as there’s oil in the marinade – then place in slow cooker.
Add a little oil to the pan with the whole baby onions and cook until lightly golden all over, then add to slow cooker. Add garlic to the pan and cook gently for a minute or so, adding a little more oil if necessary. When soft add flour and continue to cook for a minute or so, stirring. Add stock gradually, stirring until thickened, then add to slow cooker with the cinnamon stick and tomato paste. Cover and cook on High until it starts to bubble, then turn to Low and cook for 6-7 hours or leave it on high for 3-4 hours. It might suit you to cook it for longer if you have to go out. Cooking times vary from slow cooker to slow cooker.
When meat is tender add honey, dates and preserved lemon and season to taste with salt and pepper. Preserved lemons are salty so you probably won’t need any salt. Cook for another hour or so. Garnish with fresh coriander and serve with couscous.
Serves 4-6
Notes: While lamb is more authentic in a Moroccan tajine, cubed lean beef also works well in this recipe. Preserved lemons are sold in some gourmet shops. They give this recipe a distinctive flavour, so it’s worth keeping an eye out for them next time you’re in a gourmet shop. One jar is enough for several recipes. Or you can make your own as I do.
This is another great recipe from Delicious magazine, with a few slight changes and variations. A perfect mid-week dinner, with some leftovers for sandwiches.
The original recipe uses 2 Tbs of Ras el Hanout – a Moroccan spice blend available in some specialist shops. But it’s not difficult to make, so I have explained how to do this. Don’t worry if you’re missing one of the spices, just add something else.
In the salad the original recipe uses freekeh – an ancient, but now new and trendy grain. I used pearl barley instead. You could also substitute burghul (cracked wheat) or couscous. The second time I made this dish I served the chicken and onions on mashed sweet potato instead of the grain salad, which was also very tasty.
Costco sells two small punnets of fresh pomegranate seeds for about $10. Freeze them in ice cube trays, then you can whip a couple out to garnish dishes like this and add a splash of colour.
1.5kg whole chicken
2 Tbs Ras al Hanout (see below)
1 tsp salt and lots of freshly ground black pepper
2 Tbs olive oil
2-3 large onions, peeled and very thickly sliced Grain salad:
1 cup barley
1 can lentils (or cook some dried lentils)
1/3 cup pine nuts
1/3 cup pumpkin or sunflower seeds, or a mix
2 Tbs capers, rinsed and drained
½ cup dried cranberries, raisins or sultanas
1 cup coriander leaves, finely chopped
1 cup flat parsley leaves, finely chopped
½ cup mint leaves, finely chopped Dressing:
2-3 Tbs lemon juice
¼ cup olive oil
Salt and freshly ground black pepper to taste To serve:
2 Tbs pomegranate molasses (see below)
Thick Greek-style plain yoghurt
Seeds from 1 pomegranate (optional)
Rocket salad
Pre-heat oven to 180°C. Rinse and pat chicken dry with paper towels. Mix Ras el Hanout with the salt, pepper and the 2 Tbs oil and brush all over the chicken, both sides and inside. Place onion slices in a roasting pan and sit chicken on top. Roast for between an hour and a quarter and an hour and a half, or until juices run clear when thickest part of chicken thigh is pierced with a skewer. After about 40 mins of cooking, turn chicken over and about 20 mins before it’s ready, turn it back over again. When you turn the chicken, move the onions around a bit so they don’t burn. Add about ¼ cup of water if they’re starting to burn and stick.
Meanwhile cook barley in boiling salted water for about 30 mins or until al dente. When almost cooked add the drained lentils. When barley is cooked drain both and place in a bowl. Add remaining ingredients. Mix dressing ingredients and mix with grains.
When chicken is cooked brush all over with Pomegranate Molasses then cover loosely with foil, turn off the oven and leave it in there for 10-20 mins or until you are ready to serve. The chicken will continue to cook, resulting in meat that is almost falling off the bone, but we liked it that way.
Carve chicken into portions and serve with some of the onions on a bed of grain salad. Top with a dollop of yoghurt and some pomegranate seeds and serve a rocket salad, dressed simply with a little olive oil and lemon juice, on the side.
Serves 4-6
Notes:
Ras al Hanout: An Australian tablespoon = 20 mls and a teaspoon = 5 mls. So to make 2 Tbs of spice mix you need 8 tsp of ground spices. Mix together 1 tsp of each of the following: cumin, coriander, paprika, ginger, cardamom or fenugreek and turmeric. Then add ½ tsp each of cloves and nutmeg. And ½ to 1 tsp chilli powder, to taste. For kids you may prefer to leave the chilli out altogether.
Pomegranate Molasses: a sweet and sour sauce from Morocco available in some specialist shops. If you don’t have any either leave it out, or substitute 1 Tbs Thai Sweet Chilli sauce or honey mixed with 1 Tbs balsamic vinegar.
Variations: instead of serving chicken on grain salad, serve it on mashed sweet potato or pumpkin (add butter, S and P).
When I was sixteen I sailed from Southampton to Bilbao to spend the Easter school holidays with a Spanish family. I had been studying Spanish several times a week for six months, but most of it was stuck somewhere at the back of my head.
The Zubia family of five lived in an apartment in Bilbao. Nobody spoke a word of English, so I had to speak Spanish to survive. Needless to say, when I returned to the UK three weeks later I had made enormous progress and have never looked back. A month of language immersion in your teens is worth a year when you’re of a more mature age.
I was intrigued by a household which bought olive oil in 4 litre cans and used it to cook absolutely everything. My mother kept a very small bottle in the medicine cabinet and used it to treat earache.
Señora Zubia taught me to make several dishes, including Spanish omelette, which I still make according to her recipe below.
Bars in Spain serve a wide selection of tapas, mostly at room temperature and displayed along the top of the bar. When something takes your fancy you just point and the barman brings you as many servings as required for your group. On leaving patrons tell the barman what they’ve had and he adds up the bill. It’s all done on honesty.
Spanish omelette is usually served at room temperature, but have it hot if you prefer.
Spanish Omelette
1 large onion
4 large potatoes or 6 medium
6 eggs
Olive oil
Salt and pepper To serve:
Roasted red capsicums (peppers) and aioli (optional)
Peel and chop onion as finely as possible. Heat a good slug of olive oil in a medium-sized non-stick frying pan, add onion and cook gently until soft. Meanwhile peel potatoes and cut into 2cm dice. Remove onions from the pan, add more oil if necessary (there should be a generous amount), add potatoes and cook gently, turning often, until they are cooked through but not browned. Remove potatoes from the pan and put with the onions in a sieve, so excess oil drains off.
Tip off all but 2-3 Tbs of oil. If there’s not enough oil left in the pan add some that has drained from the potatoes and onion. Place eggs in a bowl and beat with a fork. Season with salt and pepper, then mix in the potatoes and onions. Tip mixture into frying pan and spread out evenly. Cook for 8-10 minutes over moderate heat, or until set and underneath is golden. Check by lifting slightly with a spatula. Run spatula around the edge to make sure the omelette hasn’t stuck to the pan.
Place a large dinner plate over the frying pan and quickly invert so you end up with the omelette on the plate, cooked side up. Carefully slide back into the frying pan and cook the other side, which will take about 5 minutes. Serve at room temperature with roasted red peppers and aioli – for which there are plenty of recipes online, or just add some crushed garlic to mayonnaise, for a quick version. Cut into 3-4 cm squares Spanish Omelette makes great finger food, or tapas, to use the Spanish word.
Serving hot soufflés is a sure way to impress your guests. But their reputation of being difficult makes many people nervous about making them.
In fact the only difficult part is making sure you get them from the oven to the table as quickly as possible, before they start to sink. Did you know that you can make them in the morning and leave them uncooked in the fridge all day? Don’t ask me why, but they don’t sink.
At serving time just stick them in a very hot oven and they will rise impressively above the rim of the dishes. Have your serving plates, icing sugar and sieve all ready and as soon as they come out of the oven it’s all hands on deck to get them to the table, as the guests say “Ooh aah” or words to that effect.
Butter and sugar for the dishes
1 cup milk
4 egg yolks
¼ cup sugar
2 tsp orange zest (I used mandarin)
2 Tbs flour
¼ cup Grand Marnier Meringue:
4 egg whites
pinch salt
¼ cup sugar To serve:
Icing sugar
Thick cream
Butter four one-cup soufflé dishes, then coat the buttery sides with sugar, tipping out the excess. If baking straight away pre-heat oven to 200ºC.
Heat milk in a non-stick milk pan. In a small bowl mix egg yolks, sugar, orange zest, flour and Grand Marnier with a hand whisk until thoroughly combined. Add the hot milk and whisk to combine, then tip back into pan and return to heat. Cook gently, stirring constantly with a flat bottomed wooden spatula. As soon as custard thickens remove from heat and continue to stir briskly for 30 secs to ensure there are no lumps. Don’t over-cook or you will have scrambled eggs.
With electric beaters, whip egg whites and salt until stiff peaks, then add sugar and continue to whip to a stiff meringue. With a rubber spatula fold meringue thoroughly into custard, then divide between the soufflé dishes. It should come almost to the top. Place dishes on a biscuit tray so they are easy to put in the oven or fridge in one go.
Recipe can be prepared ahead to this point. Soufflés can be kept in the fridge for several hours. Bake at 200ºC for 15-20 mins until well-risen and golden. Dust with icing sugar and serve immediately with a dollop of thick cream.
Serves 4
Variations: Use Cointreau or another liqueur instead of Grand Marnier. For vanilla soufflés leave out the liqueur and add 2 tsp vanilla essence or the seeds from one vanilla pod. Cut the vanilla pod into 2-3 pieces and put in the milk while you heat it up, then discard.

 2 cloves garlic, crushed
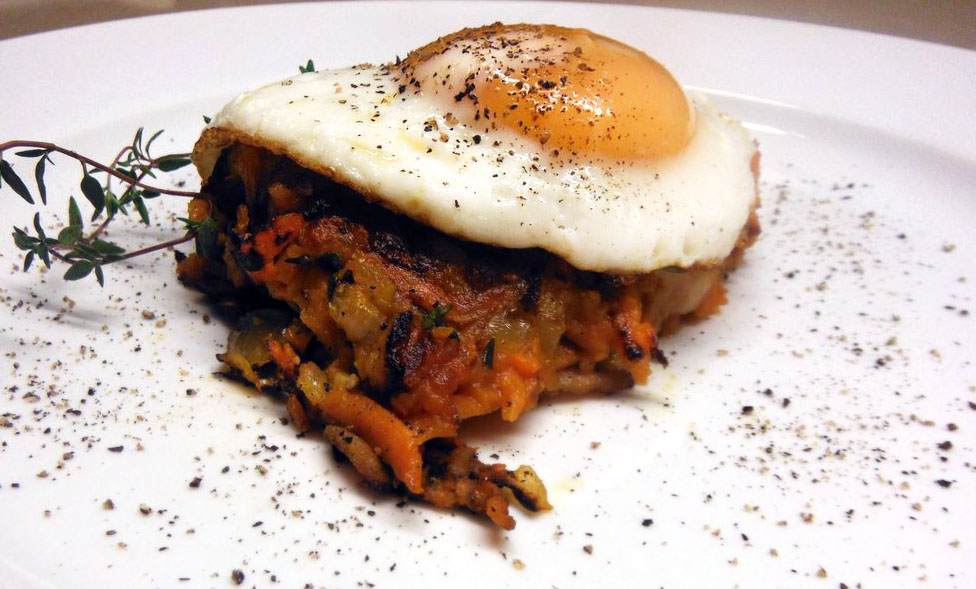

 2 firm Fuyu persimmons