I began collecting recipes when I was at school. Some of the recipes in my large collection have been in my family for generations, others were passed on by friends and chefs around the world. Many have been adapted over the years to make them lighter or update their presentation. I’ve served them to royalty, PMs and other VIPs and there have been no complaints. I hope you are inspired to make some of them.
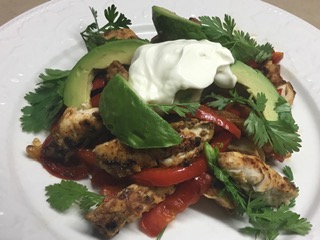
I’ve been writing this blog since 2011 and this is the first Mexican dish. Fajitas make a quick and easy mid-week dinner which even some fussy kids might enjoy.
It’s a good option for those trying to cut down on carbs, so I had mine without the tortilla, Serving with tortillas makes it go further, so double the recipe will serve a family of six.
2 boneless, skinless chicken breasts
1 onion, sliced or cut in wedges
1 red or yellow capsicum, or half of each, sliced
2 Tbs olive oil
½ lime, juiced Seasoning:
1 tsp each chilli powder, ground cumin and garlic powder
½ tsp each paprika, oregano and salt
Freshly ground black pepper, to taste To serve:
Tortillas, warmed
Sour cream
1 avocado, sliced
Coriander
Mix seasoning in a bowl. Trim chicken breasts and cut each into 3 or 4 thick lengthwise strips. Add to the bowl of seasoning and mix to coat well.
In a large frying pan, heat half the oil, add chicken and cook for 3-4 minutes on each side. Remove from pan and add the other tablespoonful of oil with the onion and pepper strips. Stir fry for 3-4 minutes until cooked and starting to brown. Slice chicken and return to the pan. Stir fry for a couple of minutes, then drizzle with the lime juice. Serve with tortillas, sour cream, avocado and coriander.
Just back from six weeks travelling in Europe. Spent time in the UK, France and Poland, with a week in Thailand on the way back, to recover. Caught up with 27 close friends and family, ate too much, drank too much, but had a great time. It was our first trip to Europe since September 2019, before the dreaded Coronavirus became a part of our lives.
Before we left we heard all sorts of dreadful stories about cancelled flights and lost suitcases. But considering we flew on a total of 11 flights – from Canberra to Sydney to Bangkok to Paris to Krakow to Toulouse via Amsterdam to Nice to London to Bangkok to Phuket to Sydney – I have to say we had a pretty good run, getting through all airports in less than an hour.
The only exception was our flight from Krakow to Toulouse with Easyjet, which was delayed when we transited through Amsterdam. A strike by French air traffic controllers meant they were limiting the number of planes which could land in France, so we sat in the plane on the tarmac in Schiphol airport for three hours. Our pilot told us we were lucky ours wasn’t one of 500 flights which had been cancelled that day. He sent us a bottle of water and a biscuit to keep us quiet.
There’s a terrible sinking feeling when you’re standing by the baggage carousel, there are no more suitcases going round and a sign appears saying “Baggage delivery completed” or words to that effect. Due to the strike there was literally nobody in arrivals to speak to, with all the help desks unattended. We went to the departure lounge where we found a member of staff who showed us how to complete a form online, on one of those machines you normally use to get a boarding pass, with details of the two lost bags. Twenty-four hours later they were delivered to our friends’ house in the French countryside, miles from anywhere, by a little man with a van full of suitcases. He said he had delivered 150 that day.
I’ve been too busy unpacking, washing and getting things organised to cook something new, so here are a few suggestions for anyone who feels like baking a chocolate cake.
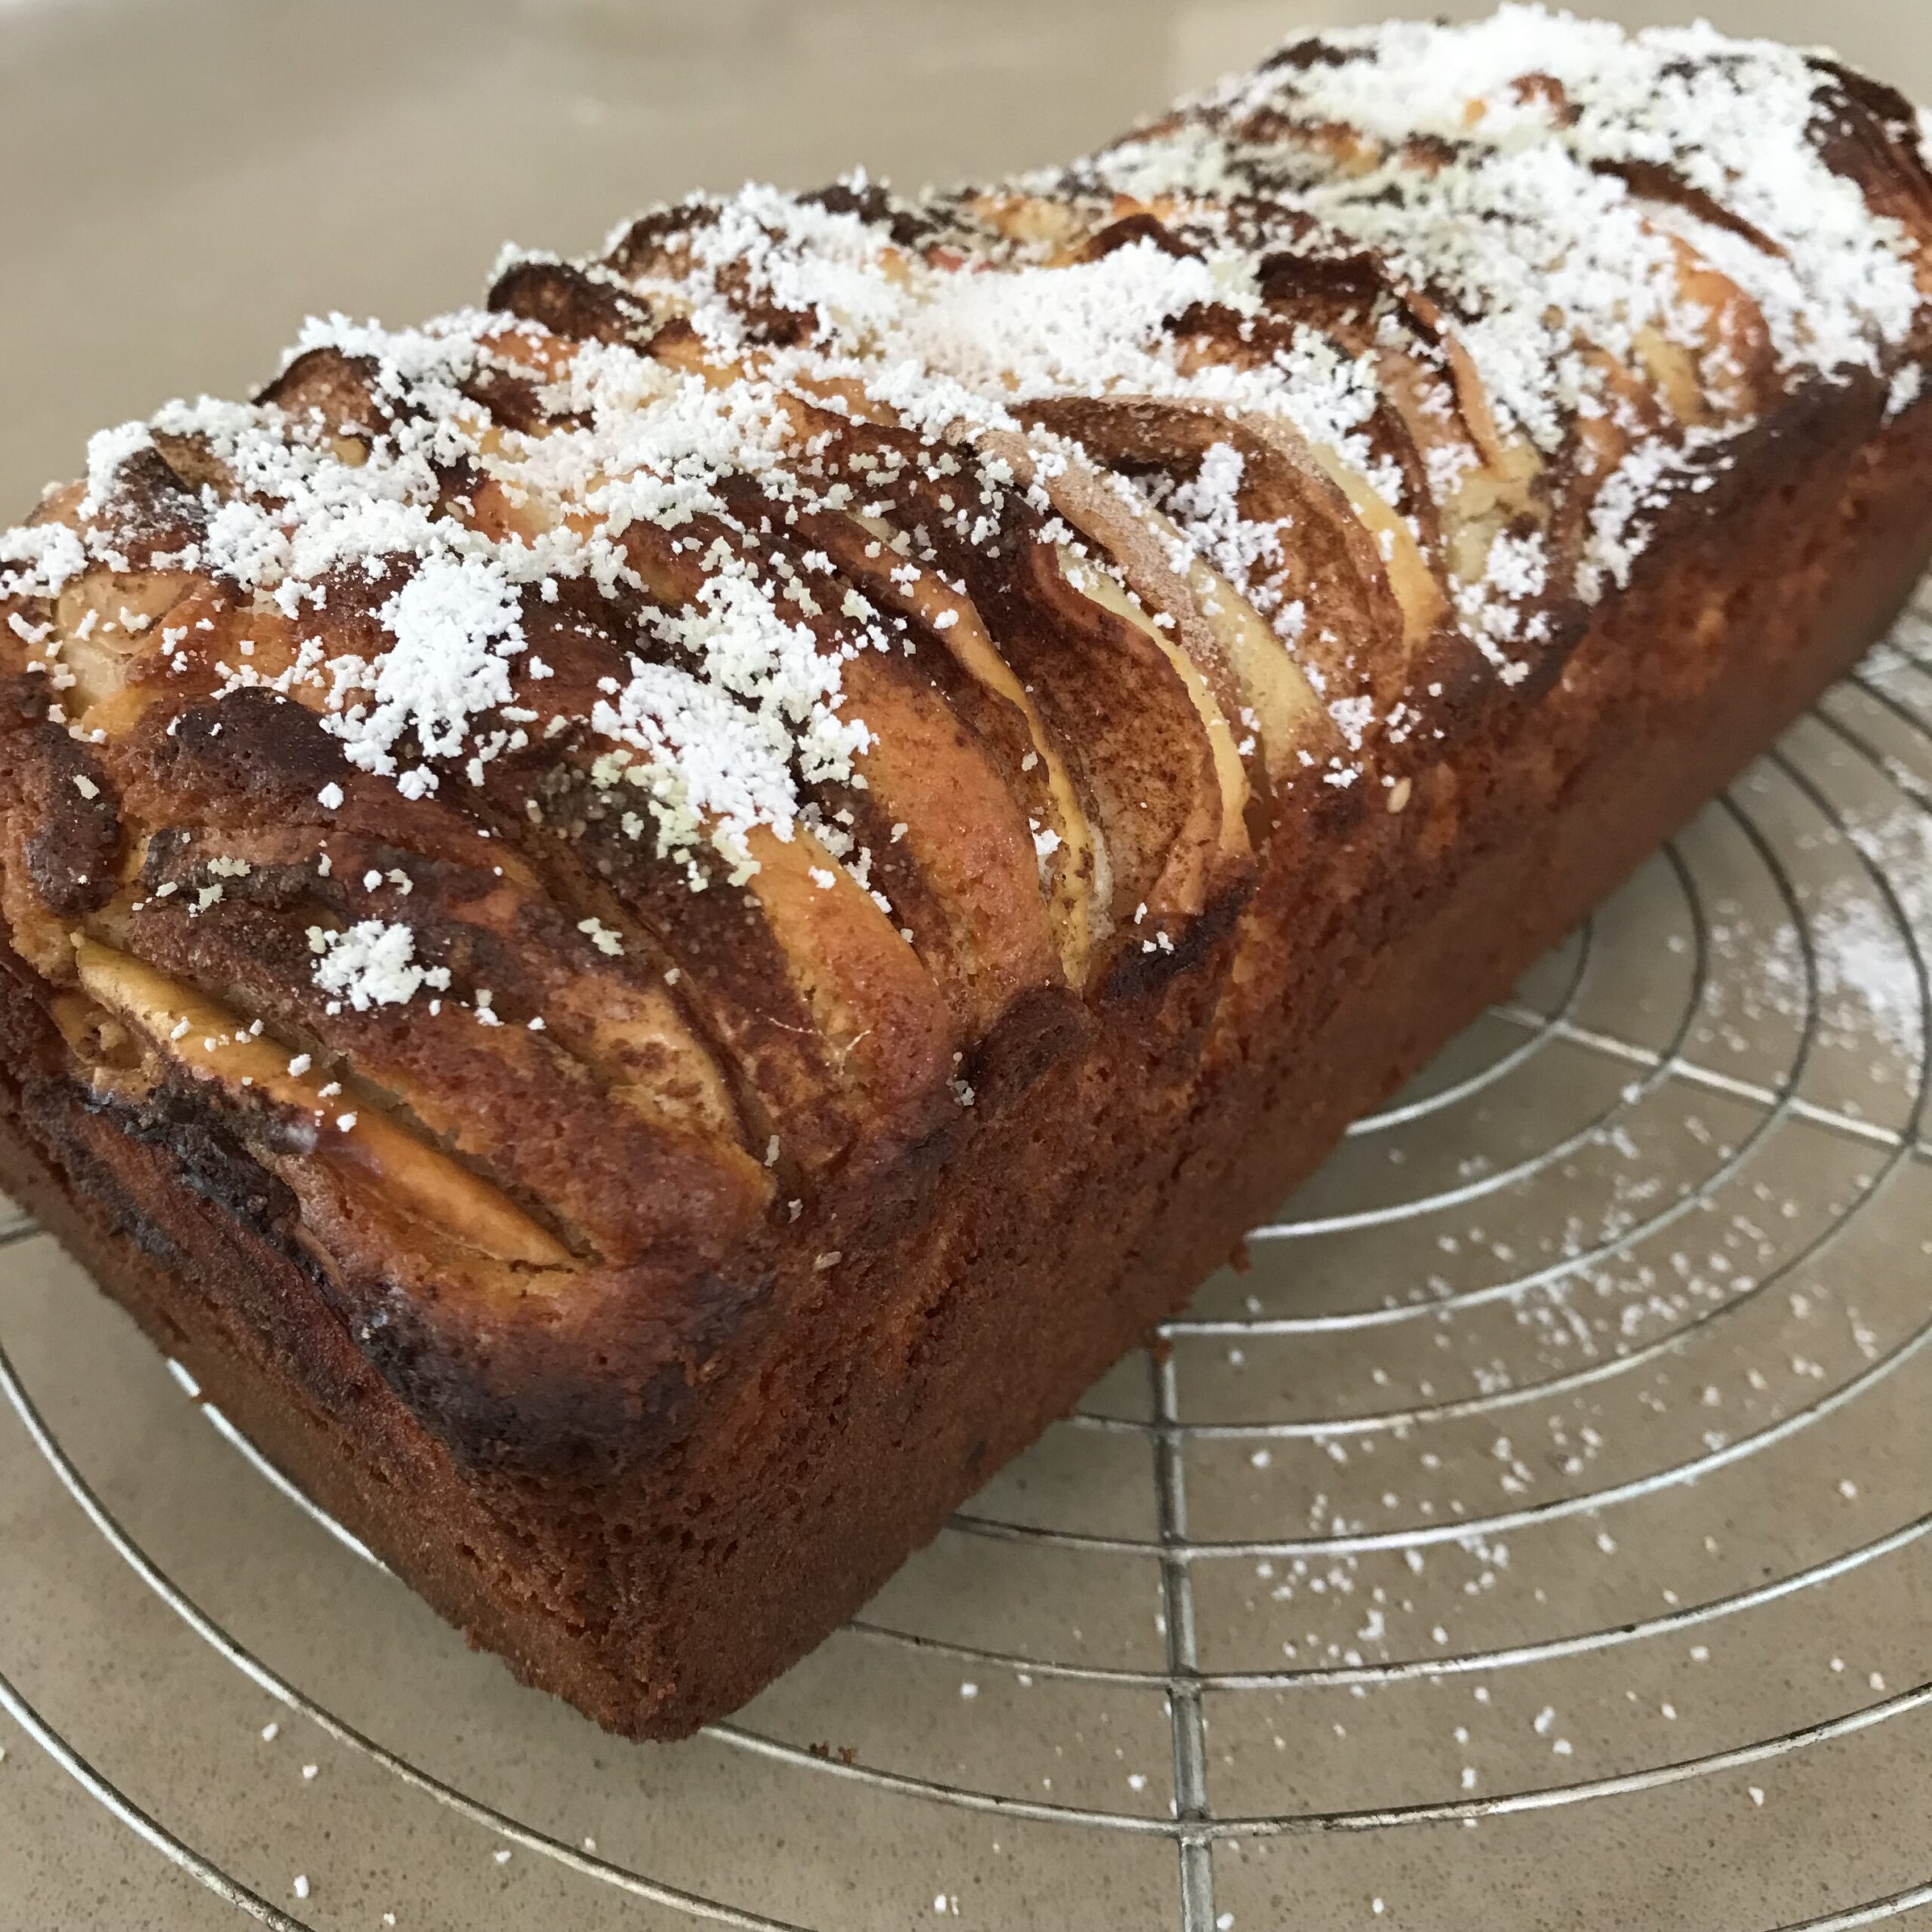
Chocolate Fudge Cake is the Rolls Royce of chocolate cakes and our family’s celebration cake. We make for birthdays, anniversaries and even weddings. Fiona’s Gluten Free Chocolate Cake is great for anyone who is gluten intolerant. And this Stir Crazy Chocolate Cake (photo above) contains no eggs and is quick and easy to whip up.
The last few posts have all been savoury, so I thought it was time for a cake.
Everyone loves apples and this recipe, which appears in various formats on Instagram, YouTube and Pinterest, is delicious, quick and easy. It’s raining cats and dogs as I write this – what could be better on a cold and miserable day than a warm slice of cake with my morning coffee?
This cake is also nice served warm as a dessert, with cream or ice cream.
3 eggs
¾ cup sugar (150g)
4 Tbs vegetable oil
Grated rind and juice of 1 small lemon or ½ large lemon
½ cup plain yoghurt or sour cream (125g)
1½ cups self raising flour (230g)
2 apples, cored, halved and sliced
1 tsp icing sugar and ½ tsp cinnamon
50g butter
Extra icing sugar
Preheat oven to 170°C. Place eggs and sugar in a bowl and whisk with electric beaters until thick and pale. Whisk in the oil, lemon rind and juice and yoghurt or sour cream and lastly fold in the sifted flour. Scrape into a greased and bottom lined loaf pan.
Push the apple slices (leave the peel on) into the top alternating from side to side. You may think you’re going to have too many, but they just fit in nicely. Mix cinnamon and icing sugar, then sprinkle over the top, using a small sieve. Dot with small pieces of butter. Bake for 35-45 minutes or until evenly puffed and golden and a tooth pick inserted in the middle comes out clean.
Cool, then sprinkle with a little more icing sugar using a sieve. Serve cold as a cake or warm as a dessert, with cream or ice cream.
I don’t eat pizza very often, but when I do I’m fussy about what goes on top.
This is my favourite combination, using home-made pesto instead of the usual tomato base and a gourmet topping of prawns, bocconcini balls, grated mozzarella and pine nuts. This combination elevates the humble pizza to a whole new level.
To speed things up you could use a bought pizza base and bought pesto, but the home made options are, as always, best. The dough recipe makes one very large pizza (or two smaller ones) and is easy to double for a crowd. Many teenagers have hollow legs and are capable of demolishing a whole pizza each! If you do make double the dough recipe, do it in two batches, otherwise your food processor might struggle. If you make two smaller pizzas you could do one with prawns for the adults and one with whatever the kids prefer.
When we fire up our pizza oven for a crowd, I make 3 double batches of this dough and end up with about eight medium-sized pizzas. For one pizza it’s not worth using the pizza oven, so I use the oven.
Dough:
250g plain flour (preferably “00”)
½ tsp salt
Half a packet of dried yeast (about one level teaspoon)
2 tsp sugar
2 Tbs olive oil
160 ml (about ¾ cup) lukewarm water Topping:
About 6 Tbs pesto
16-20 raw, peeled prawns, depending on size
100-150g bocconcini balls
2 cups grated mozzarella cheese
2-3 Tbs pine nuts
Place all ingredients for the dough in a food processor and process until it forms a ball. If the mixture is a too sticky to form a ball, stop the motor and add another tablespoonful of flour and mix again. Tip out into a lightly oiled bowl, cover with a tea towel or plastic wrap and leave for an hour or two, or until it has doubled in size.
Meanwhile make the pesto and assemble the topping ingredients. Preheat oven to 220°C or whatever is the hottest temperature your oven can reach. Knock down the dough and knead it for a minute or so, then press it out into a circle about 30-35 cm in diameter on a lightly oiled baking sheet or pizza stone. Spread with pesto, then arrange the prawns and bocconcini balls over the pizza. Top with grated mozzarella and pine nuts.
Bake for 10-15 minutes or until browned and bubbly. In a pizza oven it will take slightly less, probably 8-12 minutes.
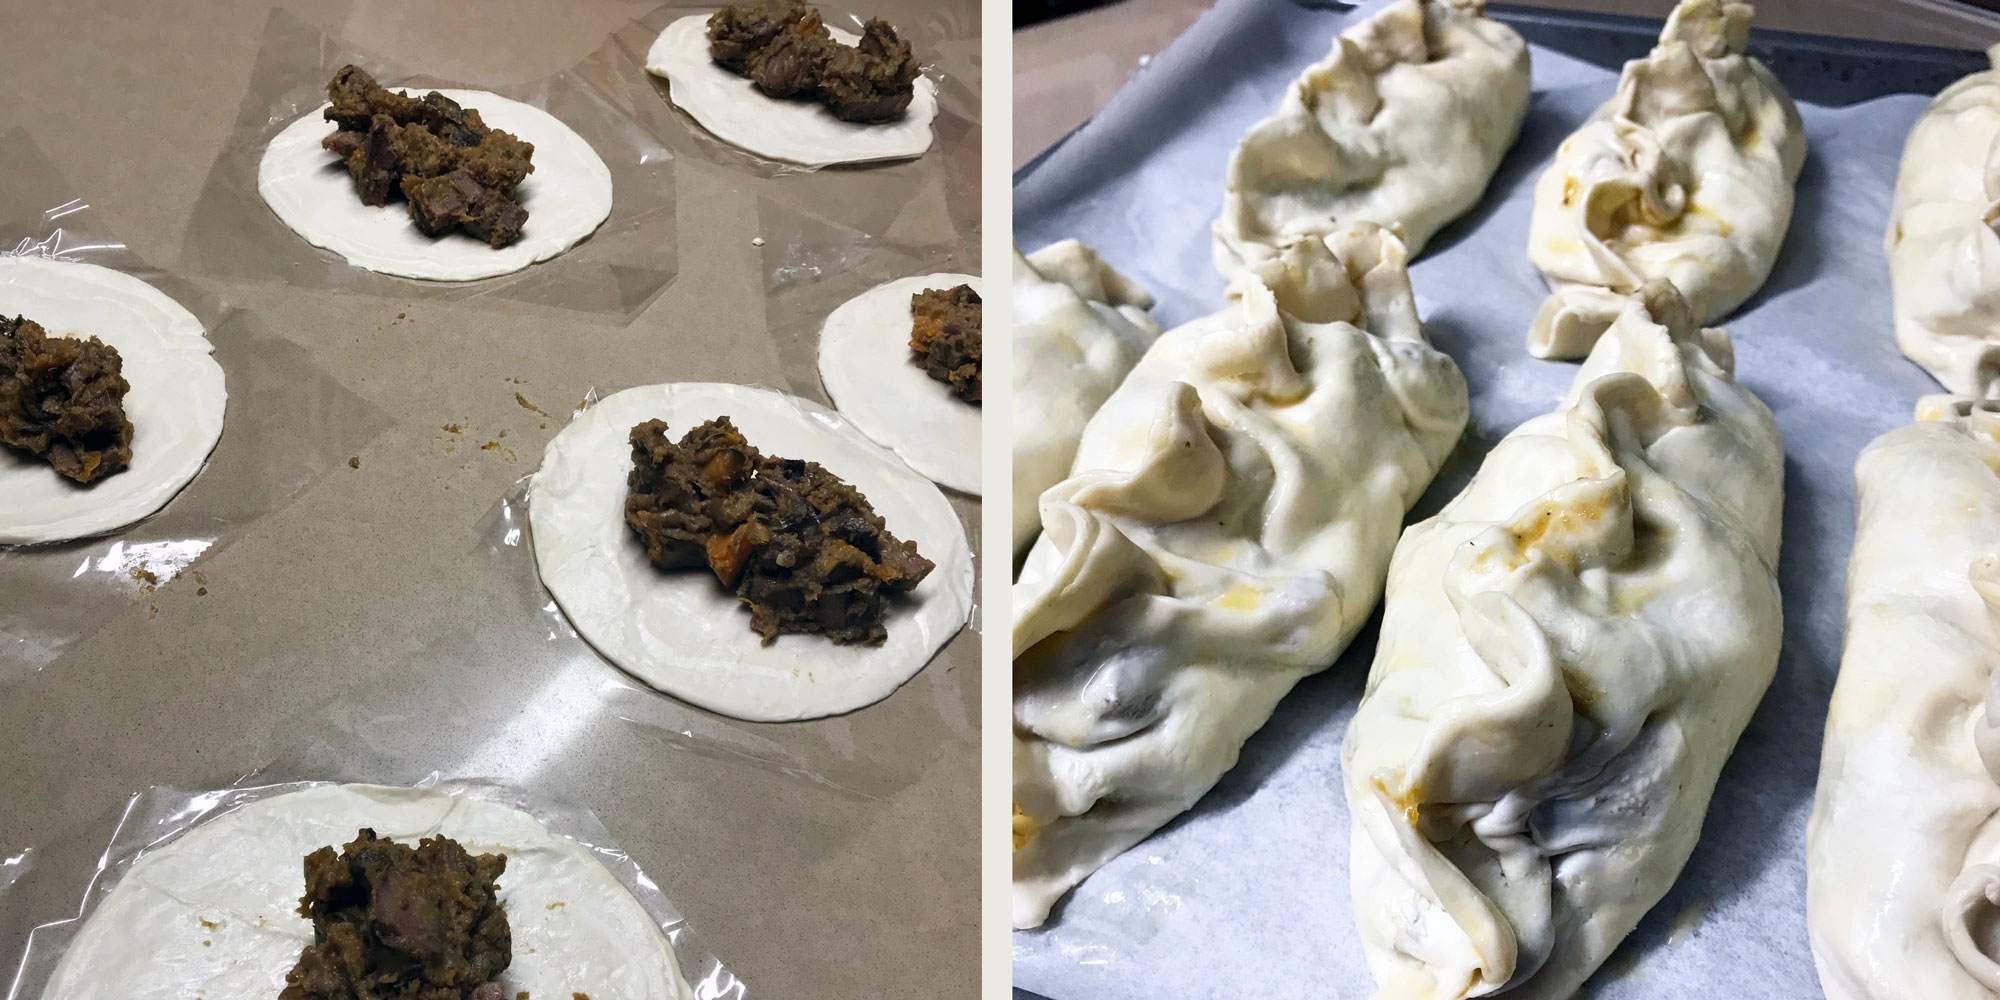
I bought a packed of 8 frozen roti paratha from an Indian grocery store and used them to make these meat pasties. They were amazing. The best meat pies I’ve ever made.
If you can’t find Indian roti paratha, buy puff pastry and cut out big circles about 15cm or 6 inches in diameter. I thawed the roti, filled them, pinched together the sides at the top, brushed them with beaten egg, then baked them at 200°C for just over half an hour.
As for the filling, you can use your imagination. I used some leftover roast lamb from a slow roasted shoulder, mixed with leftover gravy and leftover roast pumpkin, all cut into 2cm cubes. I served the pasties with hot English mustard and a mix of peas and asparagus.
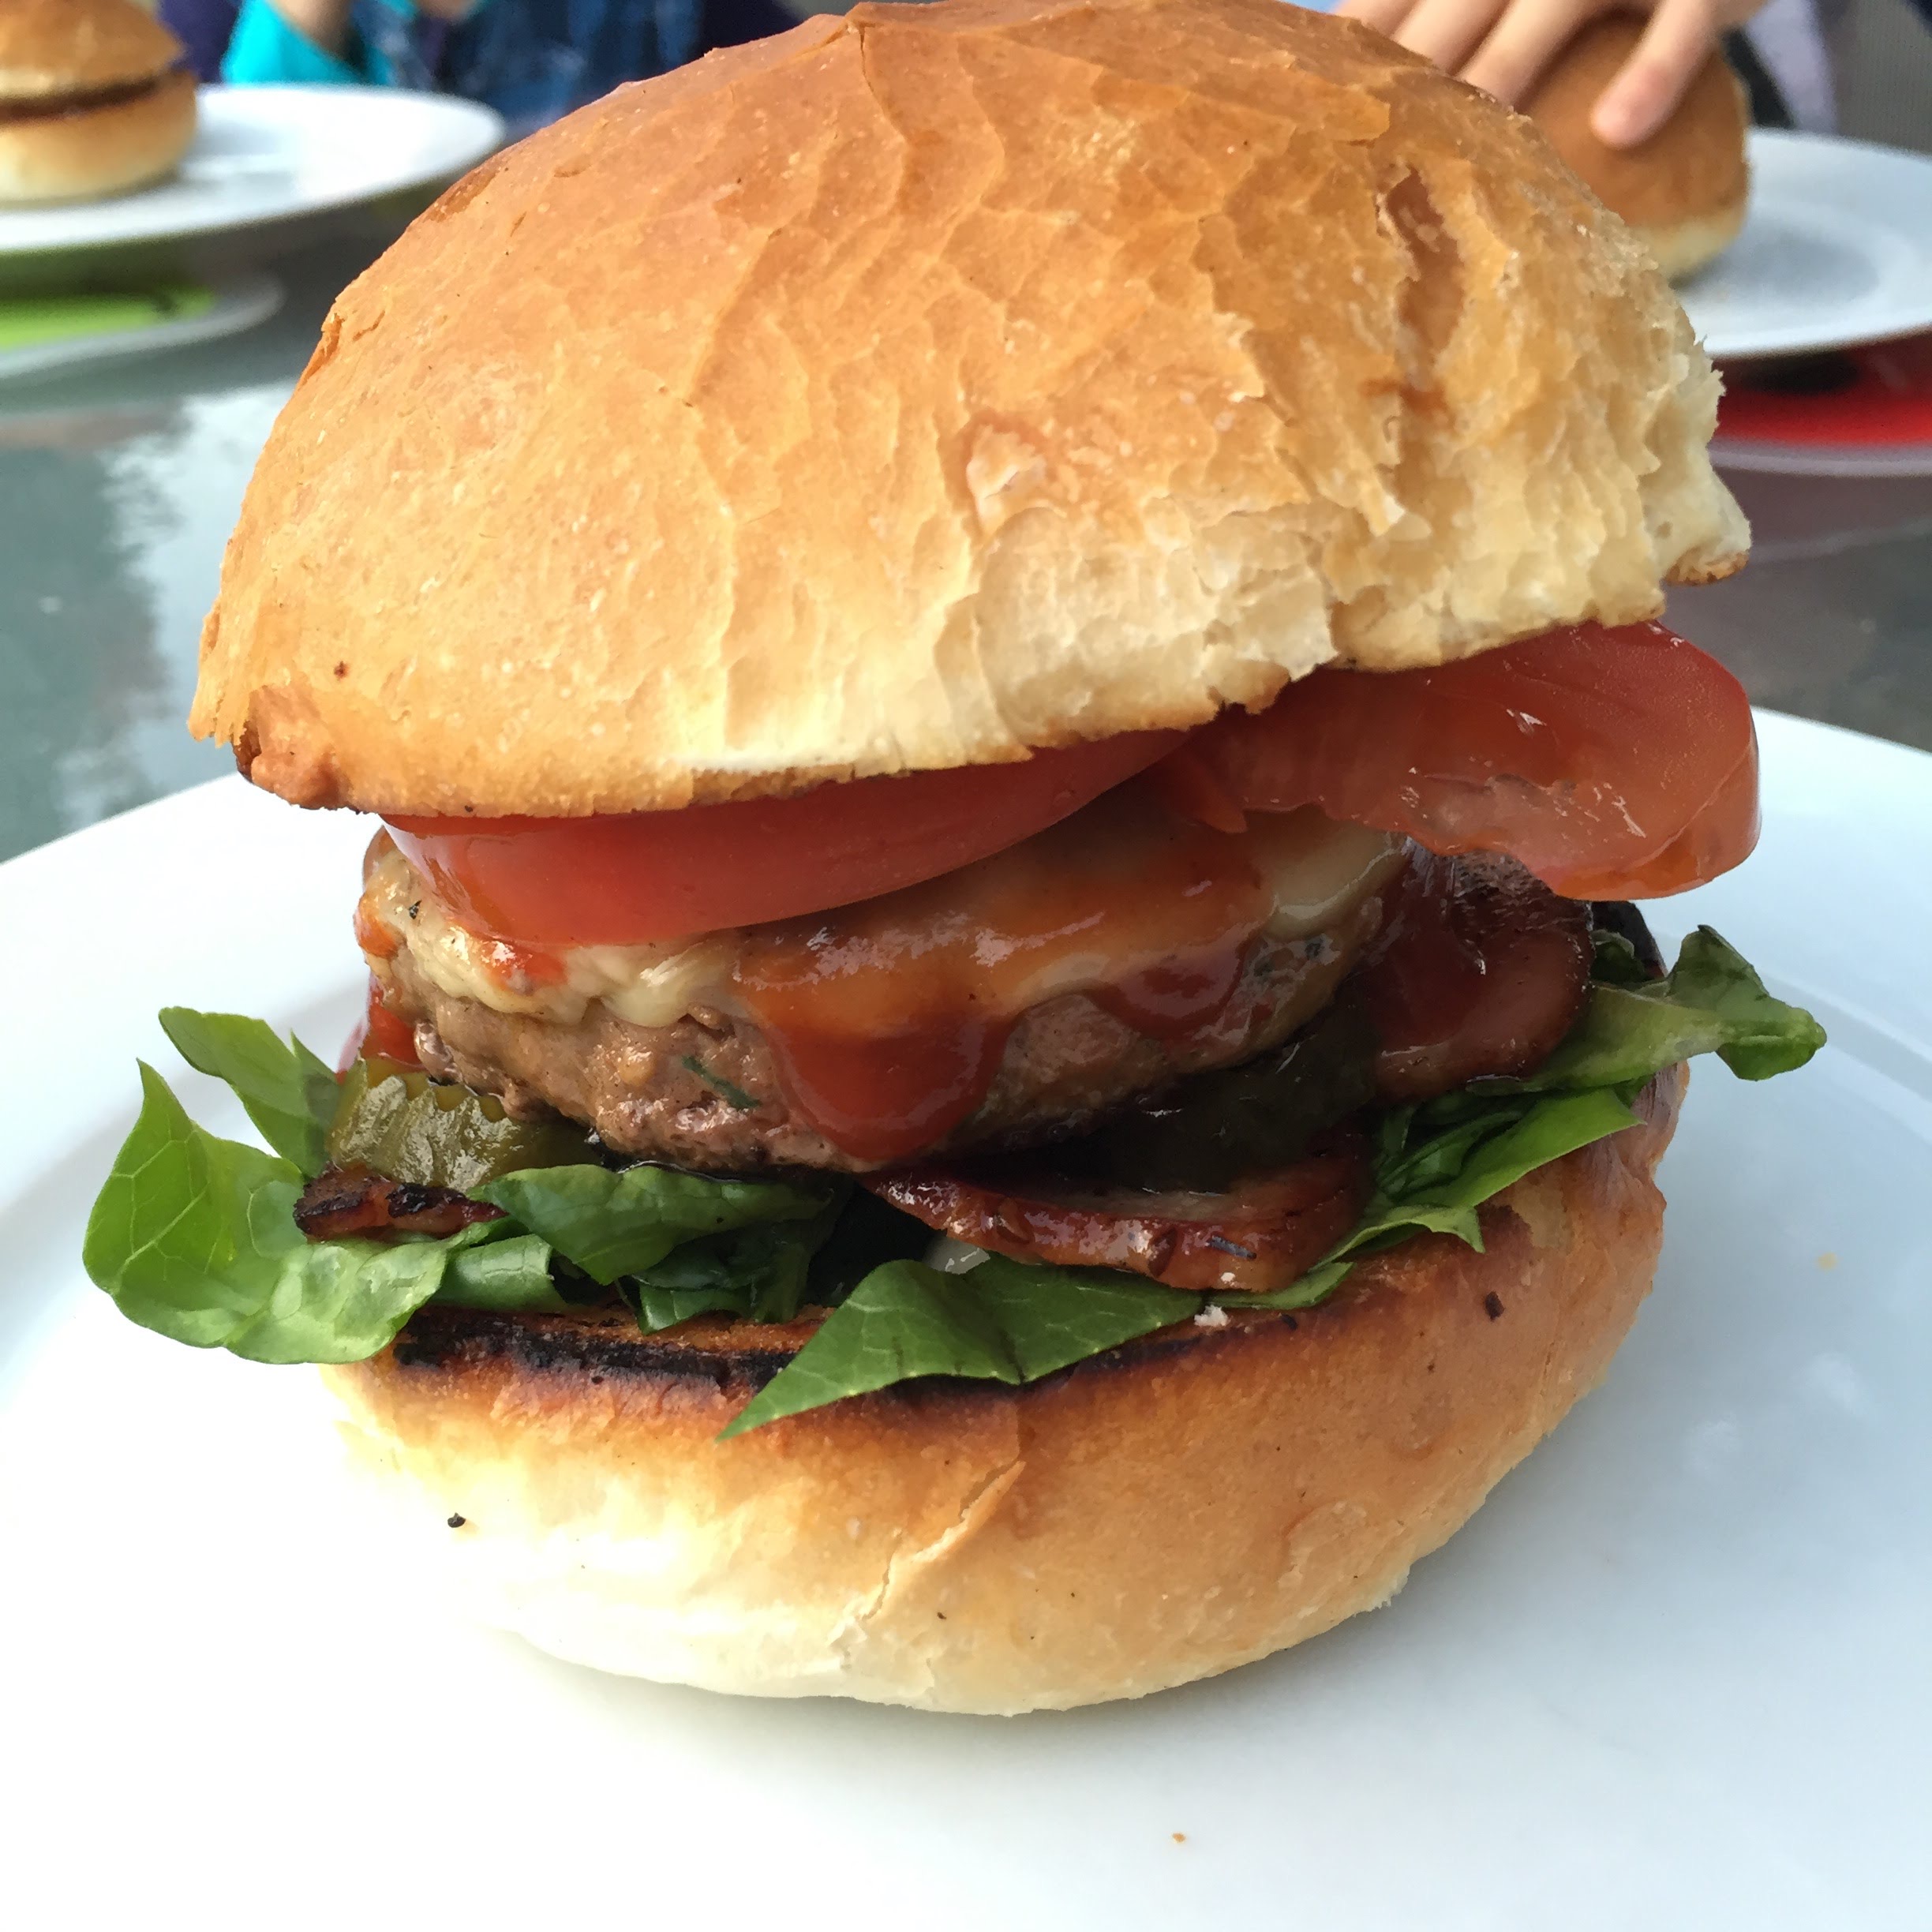
When we were a family of five, spaghetti bolognese and lasagne were regulars on the week-day menu. Now there’s just the two of us we don’t eat a lot of mince. Every now and then, however, I like to make burgers. Like everything else you make yourself, they are so much tastier than the ones you get in fast food outlets, especially if you use top quality, lean minced beef. And it’s the additions, such as mustard and grated Parmesan, which make all the difference to creating a great burger.
This mix is our favourite. If you end up with too many burgers, freeze them raw, or cook them and reheat the following day for lunch. Sometimes I have mine with just half a bun, or no bun at all and find I don’t miss the carbs. Feed a family by making some oven fries in the oven, or in an air fryer to go with the burgers.
500g top quality minced beef
1 small onion, or ½ a large onion, very finely chopped
½ tsp dried chilli flakes (optional)
1 egg
½ cup breadcrumbs (made from stale bread or use Panko crumbs)
1 tsp mustard (I use hot English)
2 Tbs grated parmesan cheese
Pinch grated nutmeg
Salt and freshly ground black pepper, to taste
1-2 Tbs olive oil, to fry the burgers To serve:
4 burger buns, split and toasted
Lettuce, rocket or baby spinach leaves
Sliced tomato
Sliced red onion (optional)
Sliced cucumber or avocado or both
Mayonnaise or aioli
Fruit chutney, tomato ketchup or barbecue sauce (optional)
Mix all ingredients except oil and use your hands to shape into 4 evenly-sized burgers, the diameter of your buns. Refrigerate until serving time.
Heat oil in a non-stick frying pan over medium to high heat and cook the burgers for 3-4 minutes each side, or until cooked to taste. Spread one side of the toasted buns with mayonnaise or aioli and the other with chutney, tomato ketchup or barbecue sauce. Serve the burgers in the buns with lettuce, rocket or spinach leaves, tomato and cucumber slices.
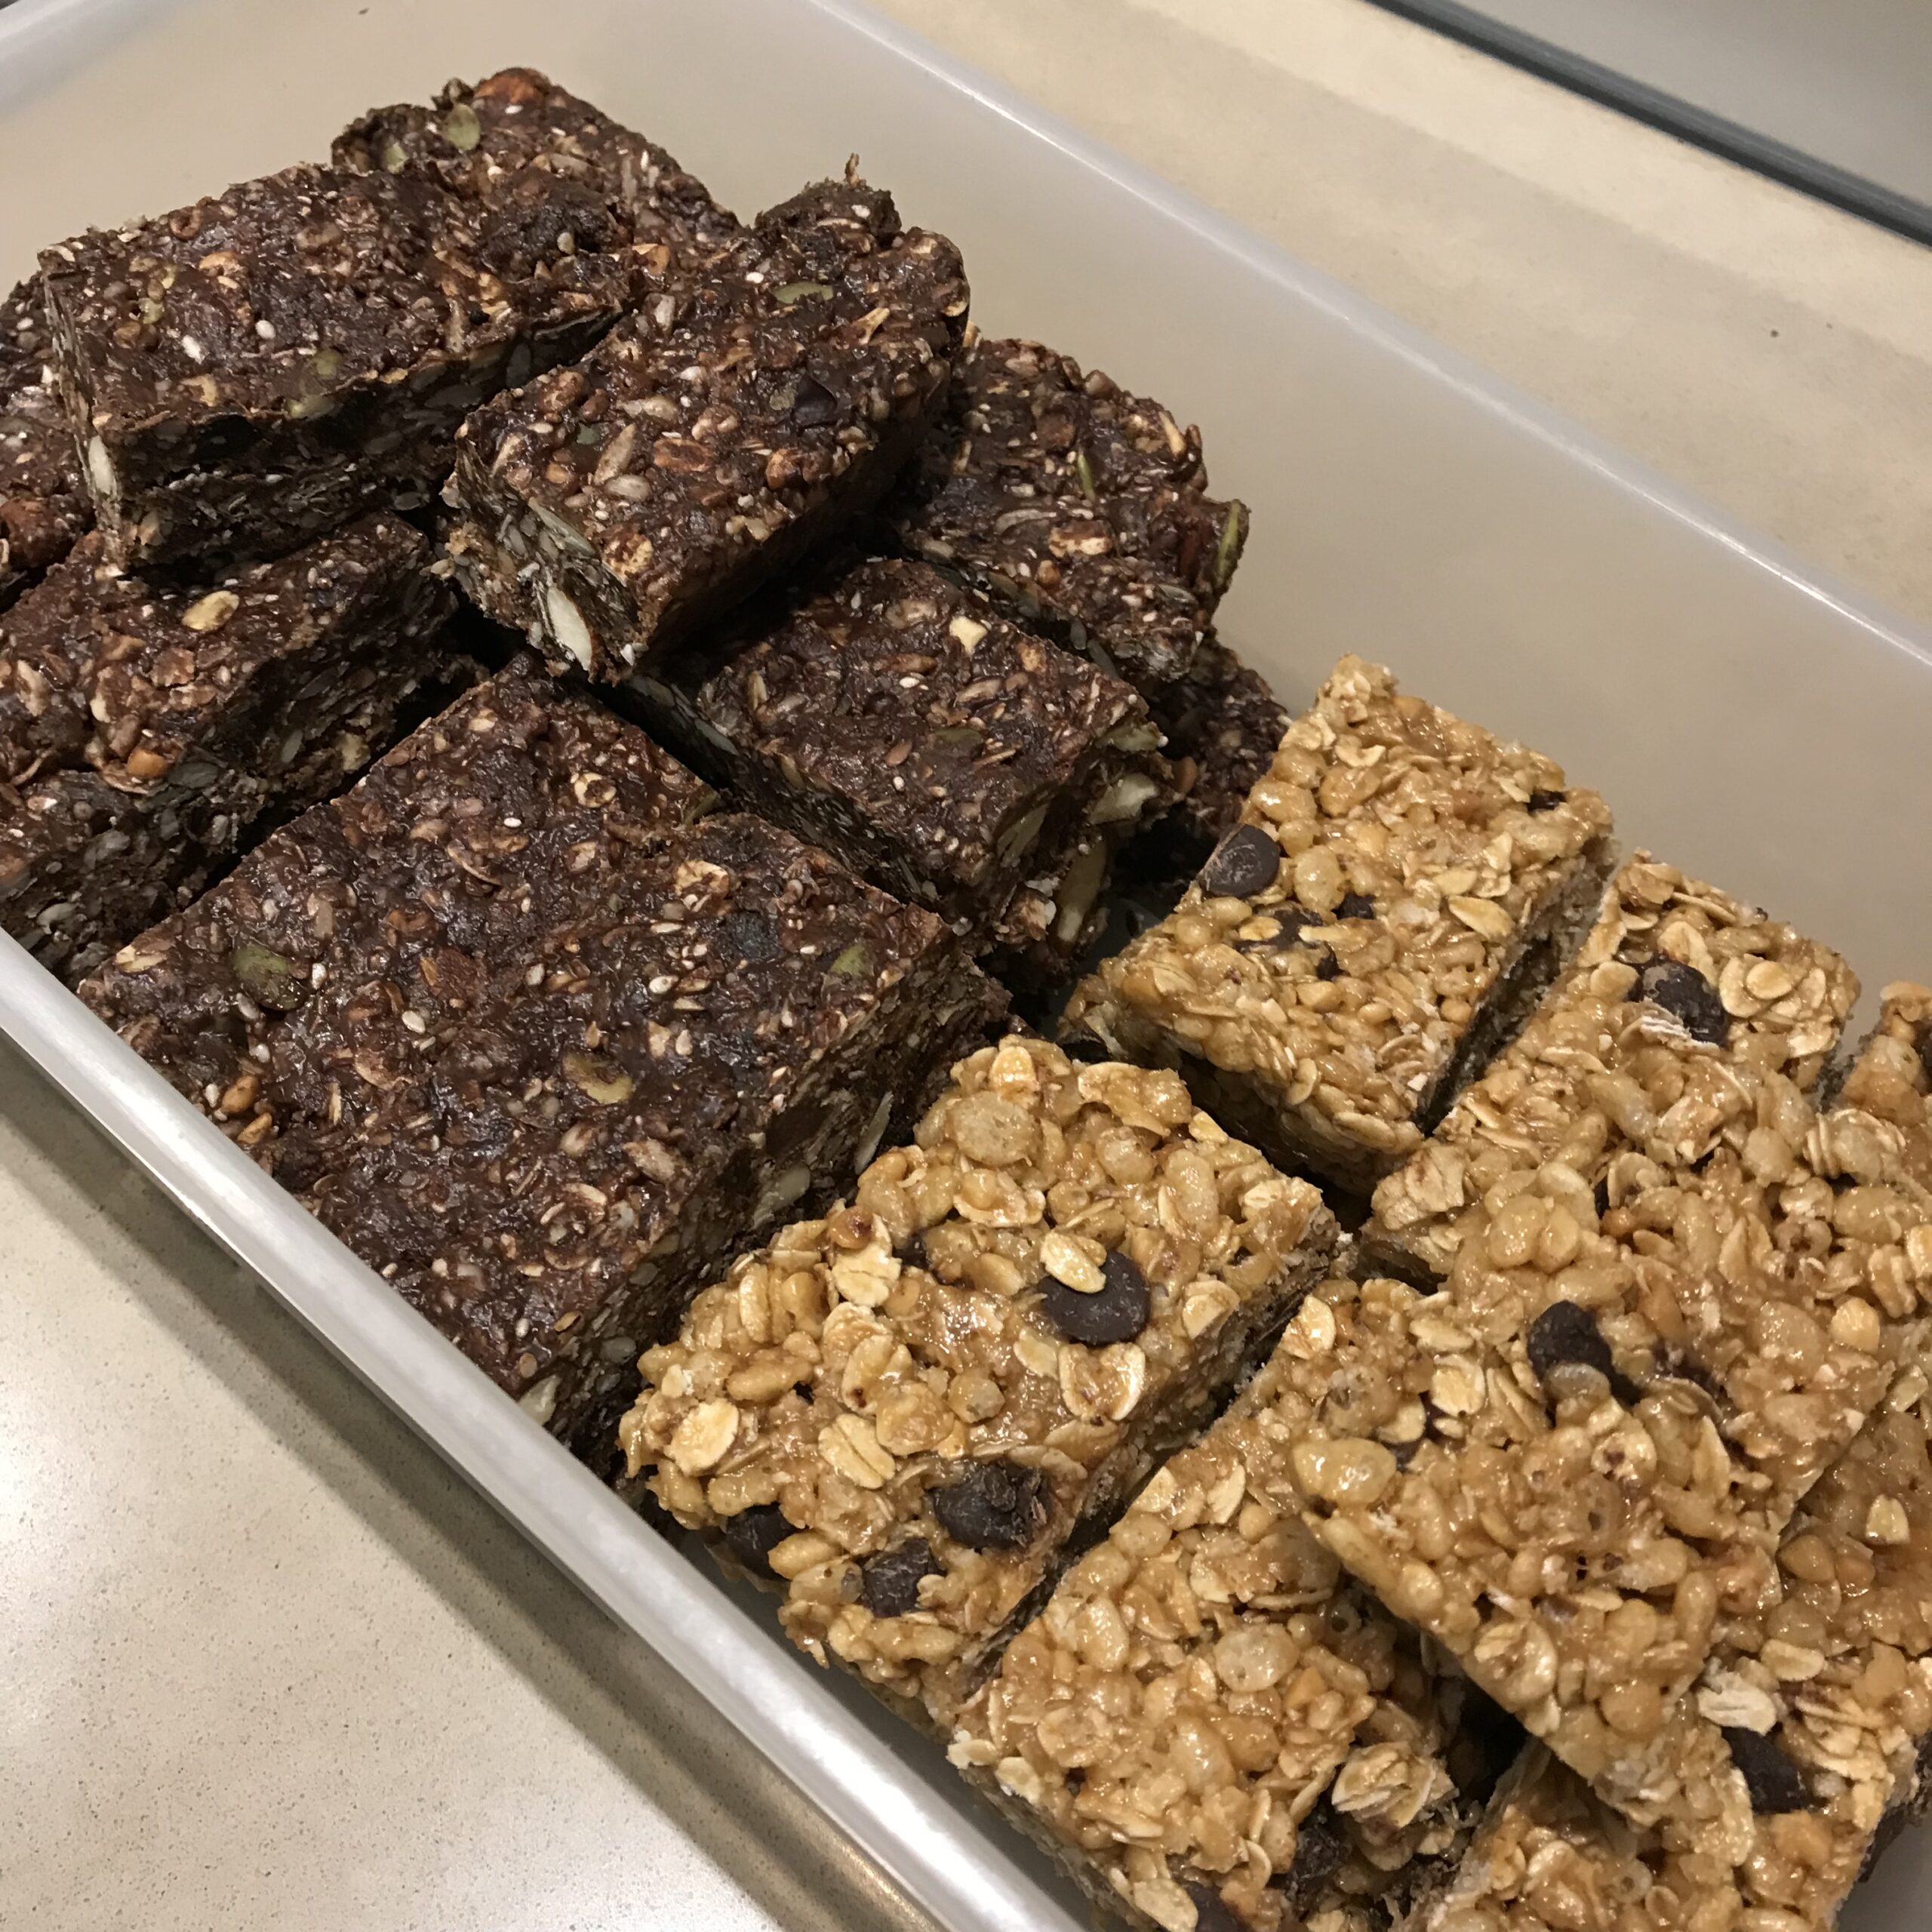
These quick and easy granola bars are a welcome, healthy addition to children’s lunch boxes and provide a delicious snack for the rest of the family. They don’t require any baking and are perfect for kids to make themselves.
Both recipes are fairly flexible, so feel free to substitute different seeds or nuts or to leave out something you don’t like or don’t have, such as coconut. The second recipe has honey as a sweetener, while the first one relies on dates for sweetness. Both contain chocolate chips, but leave them out if you prefer. If you don’t have all the seeds, double up on the ones you have.
Superfood Granola Bars
1 cup peanut butter (or another nut butter)
2 cups pitted dates, pureed in food processor
3 Tbs cocoa powder (optional)
1 cup porridge oats
¼ cup coconut flakes or desiccated coconut
1 tsp cinnamon
¼ tsp salt (optional)
2 Tbs sesame seeds
2 Tbs flax seeds
2 Tbs hemp seeds
2 Tbs chia seeds
¼ cup pumpkin seeds
¼ cup sunflower seeds
½ cup almonds (or walnuts, peanuts, pecans, hazelnuts or macadamias)
½ cup chocolate chips
Place peanut butter in a small bowl and zap in the microwave for 20 seconds, or until softened. Add the pureed dates and, if using, the cocoa powder and mix well. Place remaining ingredients in a large mixing bowl, add the date mixture and mix thoroughly.
Grease a shallow square or oblong dish or container. This can be metal, glass, silicone, ceramic or plastic. Mine was 20cm or 9″ square dish and I sprayed it with oil. If the container is too big the muesli bars will be too thin.
Tip mixture into the container and use your hand or the bottom of a glass to flatten it evenly. Refrigerate for 2-3 hours, then cut into bars. Stored in an airtight tin they will keep for a week or more, though I doubt they will last that long.
Makes 12-16
Rice Krispie Granola Bars 2 cups Rice Krispies or another brand of puffed rice breakfast cereal
1½ cups porridge oats
¼ cup coconut flakes or desiccated coconut
¾ cup honey
1 cup peanut butter (or another nut butter)
1 tsp vanilla essence
¼ cup chocolate chips (dark, milk, white, your choice)
Place Rice Krispies, porridge oats and coconut in a large mixing bowl. Heat honey in a saucepan or in the microwave, just enough to make it liquid, then mix in the peanut butter and vanilla till smooth. Mix into the dry ingredients and lastly add the chocolate chips.
Grease a shallow square or oblong container. This can be made of metal, glass, silicone, ceramic or plastic. Mine was 20cm or 9″ square and I sprayed it with oil. If the container is too big the granola bars will be too thin.
Tip mixture into the container and use your hand or the bottom of a glass to flatten it evenly. Refrigerate for 2-3 hours, then cut into bars. Stored in an airtight tin they will keep for a week or more, though I doubt they will last that long.
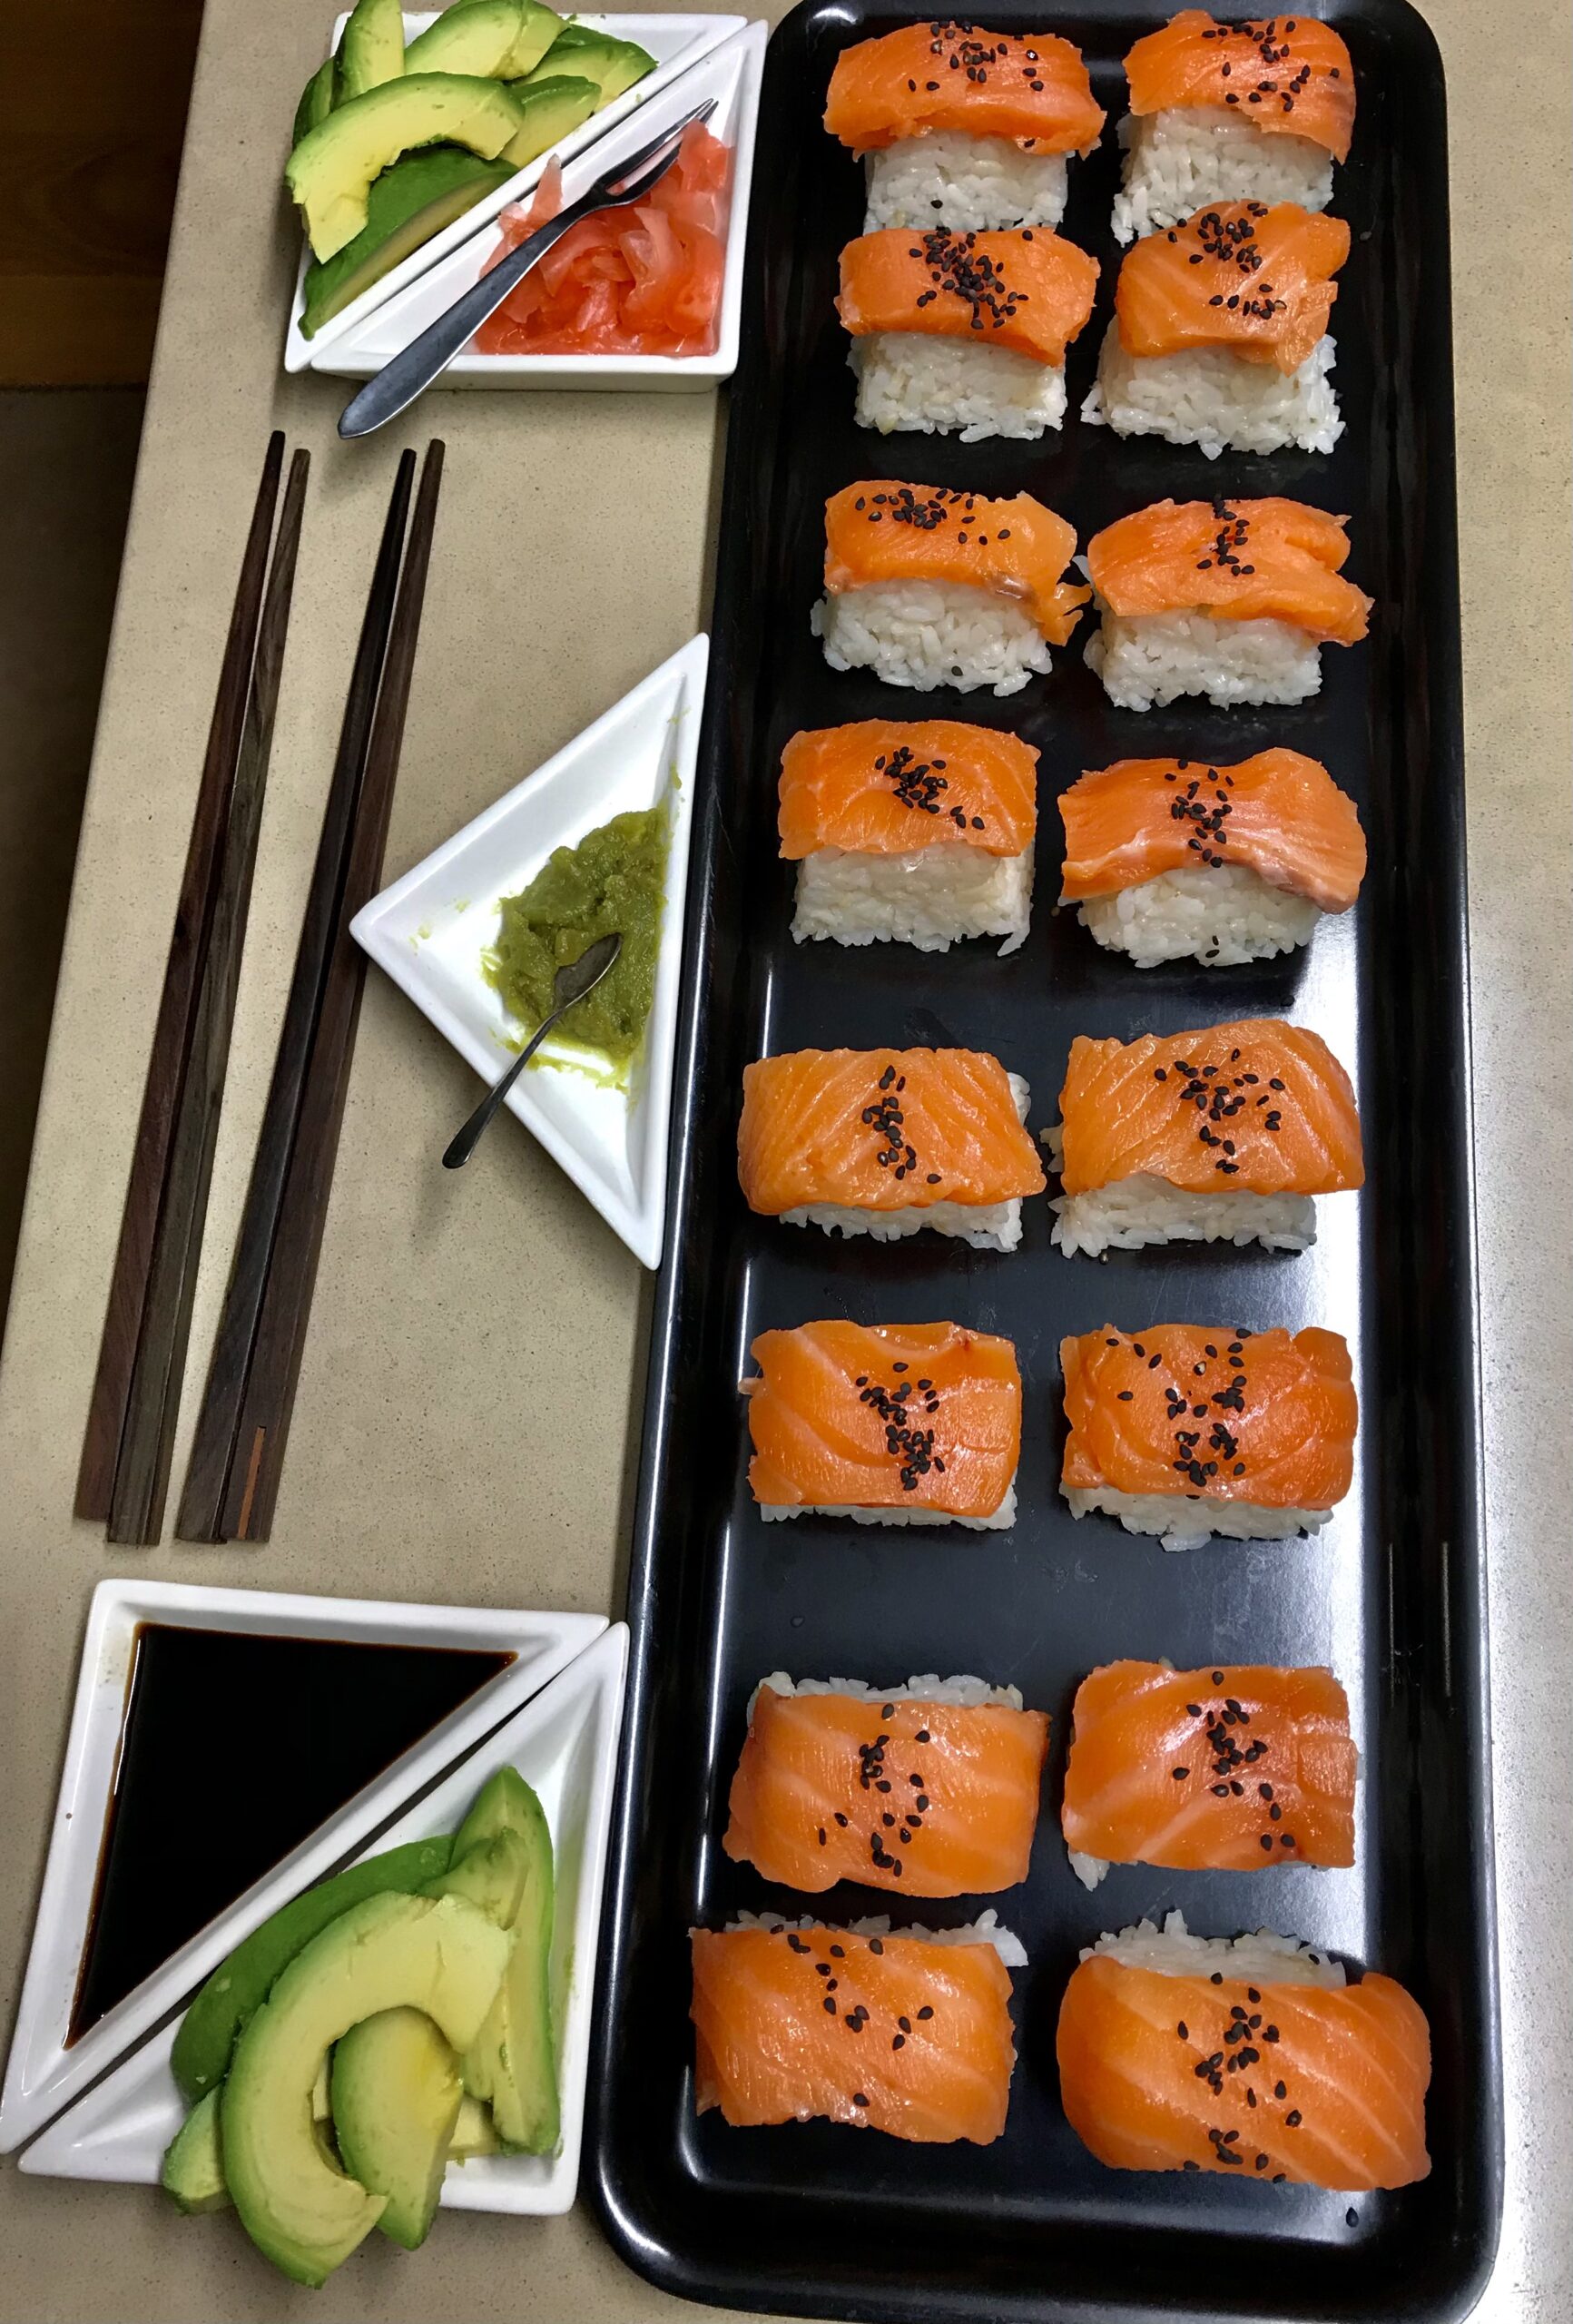
Salmon sushi make a quick and tasty, not to mention healthy meal, especially if you make them using an ice cube tray. I made the rice cakes a bit too tall, so the ratio of rice to salmon wasn’t quite right. Next time I won’t fill the ice cube holes so full.
1 cup sushi rice
1¼ cups water
1-2 Tbs Mirin
1-2 Tbs Rice Wine vinegar
Salt and pepper to taste
2 salmon fillets, skin removed To serve:
Black sesame seeds
Wasabi paste
Soy sauce
Pickled Ginger
Sliced avocado
Place rice and water in a saucepan with a good pinch of salt and bring to the boil. Cover and turn down the heat as low as possible. If you have a heat diffuser use it under the pan. Cook rice for 15 minutes, then turn off the heat and let it sit for 15 minutes to continue cooking in the steam.
Oil an ice cube tray – I used a spray can. You may need more than one ice cube tray depending on how many holes it has. Fill with the rice, pushing down firmly, then refrigerate for a couple of hours or more.
To serve, tip out the rice cakes and arrange them on a serving tray. Thinly slice the salmon and drape a piece over each rice cake. Sprinkle with black sesame seeds.
Serve with wasabi paste, soy sauce, pickled ginger and sliced avocado.
Makes 16-20 sushi to serve 2-3 as a light meal or more as an aperitif.
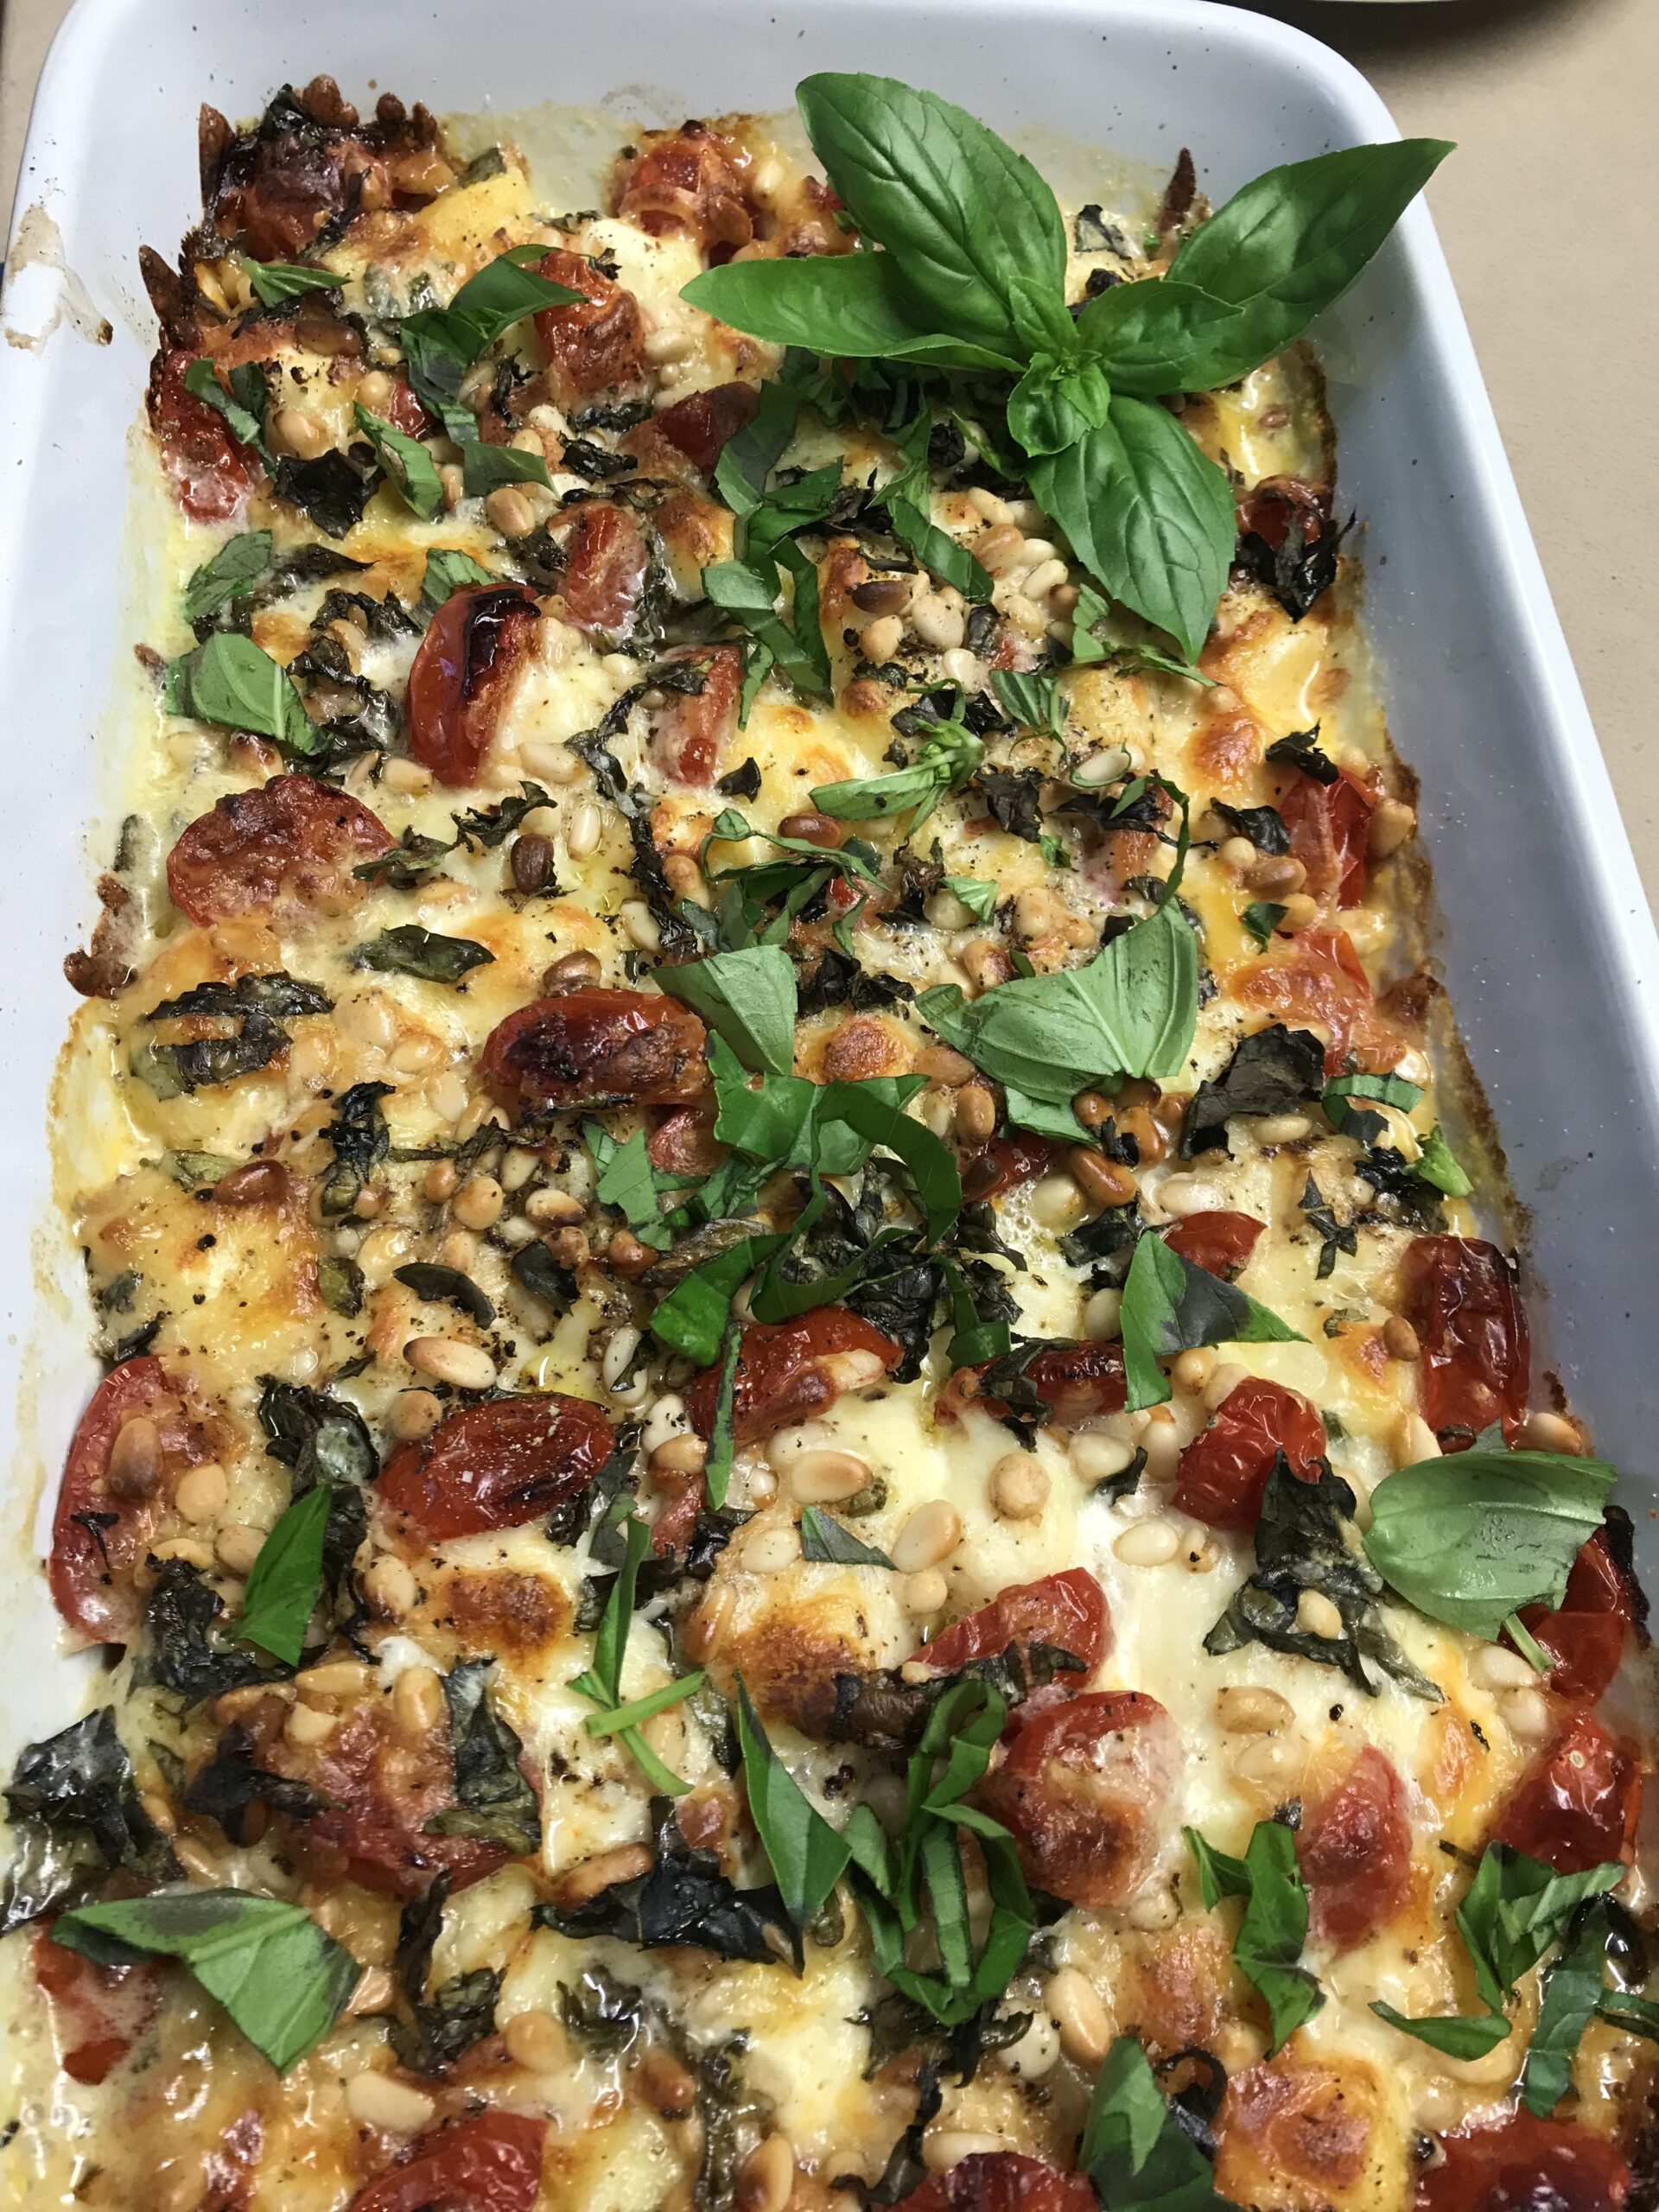
This is a very quick and easy dish to feed your kids or grandkids, using a packet of bought gnocchi.
It can be thrown together in no time at all, but if you feel like making your own gnocchi, by all means do so. I made it with the packet variety when a couple of the grandkids were coming for dinner and it was really quite tasty.
500g packet potato gnocchi
2 Tbs olive oil
250g cherry tomatoes, halved (or larger tomatoes, quartered)
125g fresh mozzarella, cut into chunks, or use small bocconcini balls
1 cup fresh basil leaves
Salt and freshly ground black pepper
1/3 cup pine nuts (optional)
¾ cup cream
1 cup grated cheddar cheese
Preheat oven to 200°C. Place gnocchi in a bowl, cover with boiling water and leave to stand for 2-3 minutes. Drain well. Tip gnocchi into a shallow lasagne-type dish. Add the olive oil and seasoning and mix well. Tuck the tomatoes, mozzarella chunks or bocconcini balls and most of the basil in between the gnocchi. Scatter the pine nuts over, drizzle with the cream and sprinkle with the grated cheddar.
Bake for 20-30 minutes or until golden brown and cooked. Garnish with remaining basil and serve with a green salad.
This recipe is adapted from one by Yotam Ottolenghi. The flatbreads are easy to make, but you could buy some Naan bread or wraps and use those instead. Any leftover flatbreads can be frozen. Just thaw and reheat briefly in a frying pan.
Flatbreads:
400g plain flour (see note below)
½ cup plain yoghurt
1 tsp salt
1 tsp dried yeast
180ml warm water
1 tsp sugar
Ghee (or oil and butter) for frying Oven-Roasted vegetables
1 tsp ground cumin
1 tsp smoked paprika Mint Yoghurt:
2 cups plain yoghurt
2 Tbs chopped mint
1 tsp lemon juice
1 Tbs olive oil
Good pinch of salt
Place flour and salt in food processor and add yoghurt. In a small bowl, mix yeast with warm water and sugar and leave to stand for 10 minutes until frothy. Add to the food processor and process until mixture forms a ball. If it seems too dry to form a ball add a bit more warm water, a tablespoon at a time with the motor running. Once dough has formed into a smooth ball, tip onto a lightly floured surface and form into a sausage shape. Cut into 8 even-sized pieces, then knead and roll each into a ball and place on a tray. Cover with a tea towel and leave for an hour and a half, or until doubled in size.
Meanwhile prepare the oven-roasted vegetables according to the recipe link, seasoning them before roasting with the cumin and paprika, as well as the oil, salt and pepper. Any mix of vegetables will do. You might like to add some tomatoes as in the photo.
Line a sieve with a piece of muslin or similar cloth (I use a man’s cotton handkerchief I keep for this purpose), scrape in the yoghurt and stand over a bowl so the liquid drains out. Leave for an hour or two or overnight in the fridge. Blitz mint, lemon juice, oil and salt in a mini-blender, spice grinder or use a mortar and pestle. Mix this paste into the strained yoghurt.
At serving time, on a lightly floured surface, roll out each flatbread ball thinly to form a circle about 25cm in diameter. Heat some ghee (or a drizzle of oil and a small piece of butter) in a large non-stick frying pan and cook flatbread on high for about 2 minutes each side. Keep warm in a low oven covered with a tea towel while you cook the rest, adding a little more ghee or oil and butter as required.
Serve flatbread spread with Mint Yoghurt and topped with warm roasted vegetables.
Makes 8 servings
Note: if available use half plain flour and half strong bread flour