I began collecting recipes when I was at school. Some of the recipes in my large collection have been in my family for generations, others were passed on by friends and chefs around the world. Many have been adapted over the years to make them lighter or update their presentation. I’ve served them to royalty, PMs and other VIPs and there have been no complaints. I hope you are inspired to make some of them.
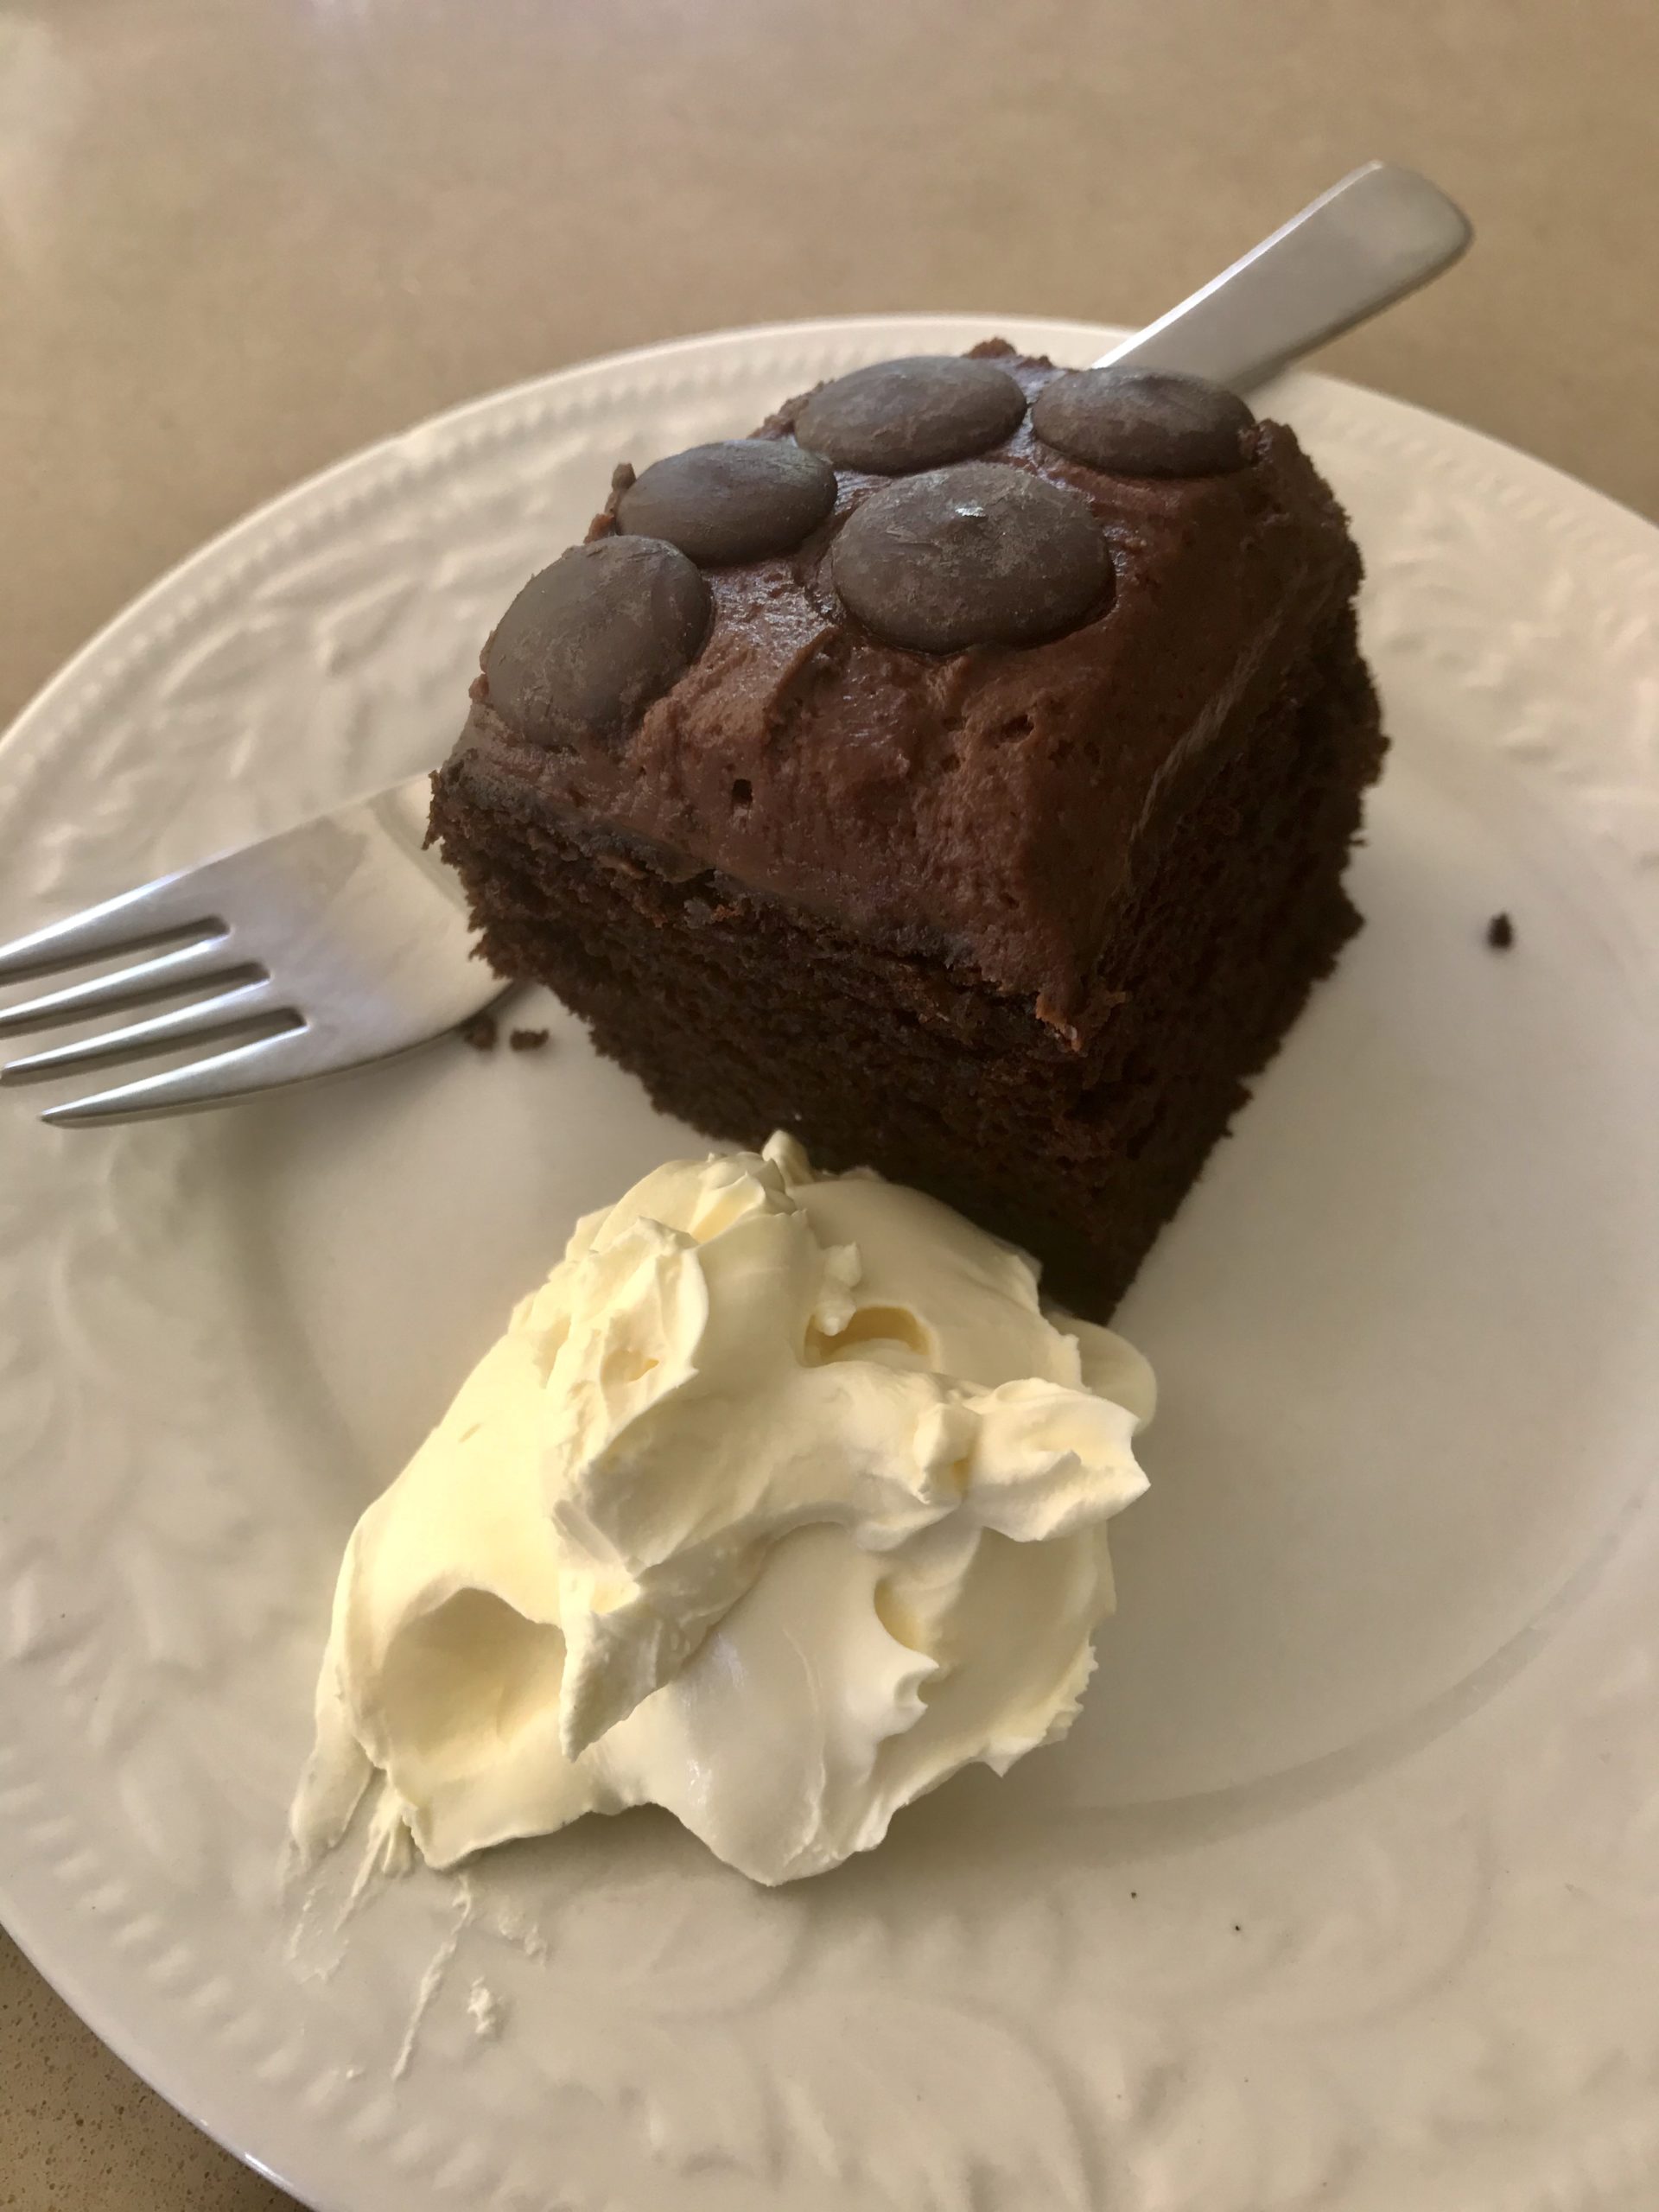
Delicious as a snack with a cup of tea or coffee, or as a dessert with cream and berries, everyone needs a good chocolate brownie recipe. The last time I made this with my granddaughter Natalia, we swapped the chocolate chips for M and Ms, at her suggestion. She rushed off on her bike to buy a packet.
½ cup butter (125g)
2 cups brown sugar
2 eggs
1¾ cups self raising flour (or plain flour and 2 tsp BP)
Pinch salt
1 tsp vanilla
½ cup cocoa
1 cup chocolate chips or chopped nuts (e.g. walnuts, macadamias, pecans) or a mixture
Preheat oven to 180°C. Butter a 9 inch or 22cm square tin and line with baking paper. Or use a silicone pan which doesn’t need greasing.
Place butter and sugar in food processor and mix well, scraping down the sides halfway through. Or use electric beaters in a bowl. Add eggs, mix, then gradually add the sifted flour, salt, vanilla and cocoa, scraping down the sides again halfway through. Add chocolate chips or nuts and process very briefly, just enough to mix them in.
Scrape into tin and smooth the top. Bake for 15-20 minutes. Don’t overcook as it’s better undercooked than overcooked.
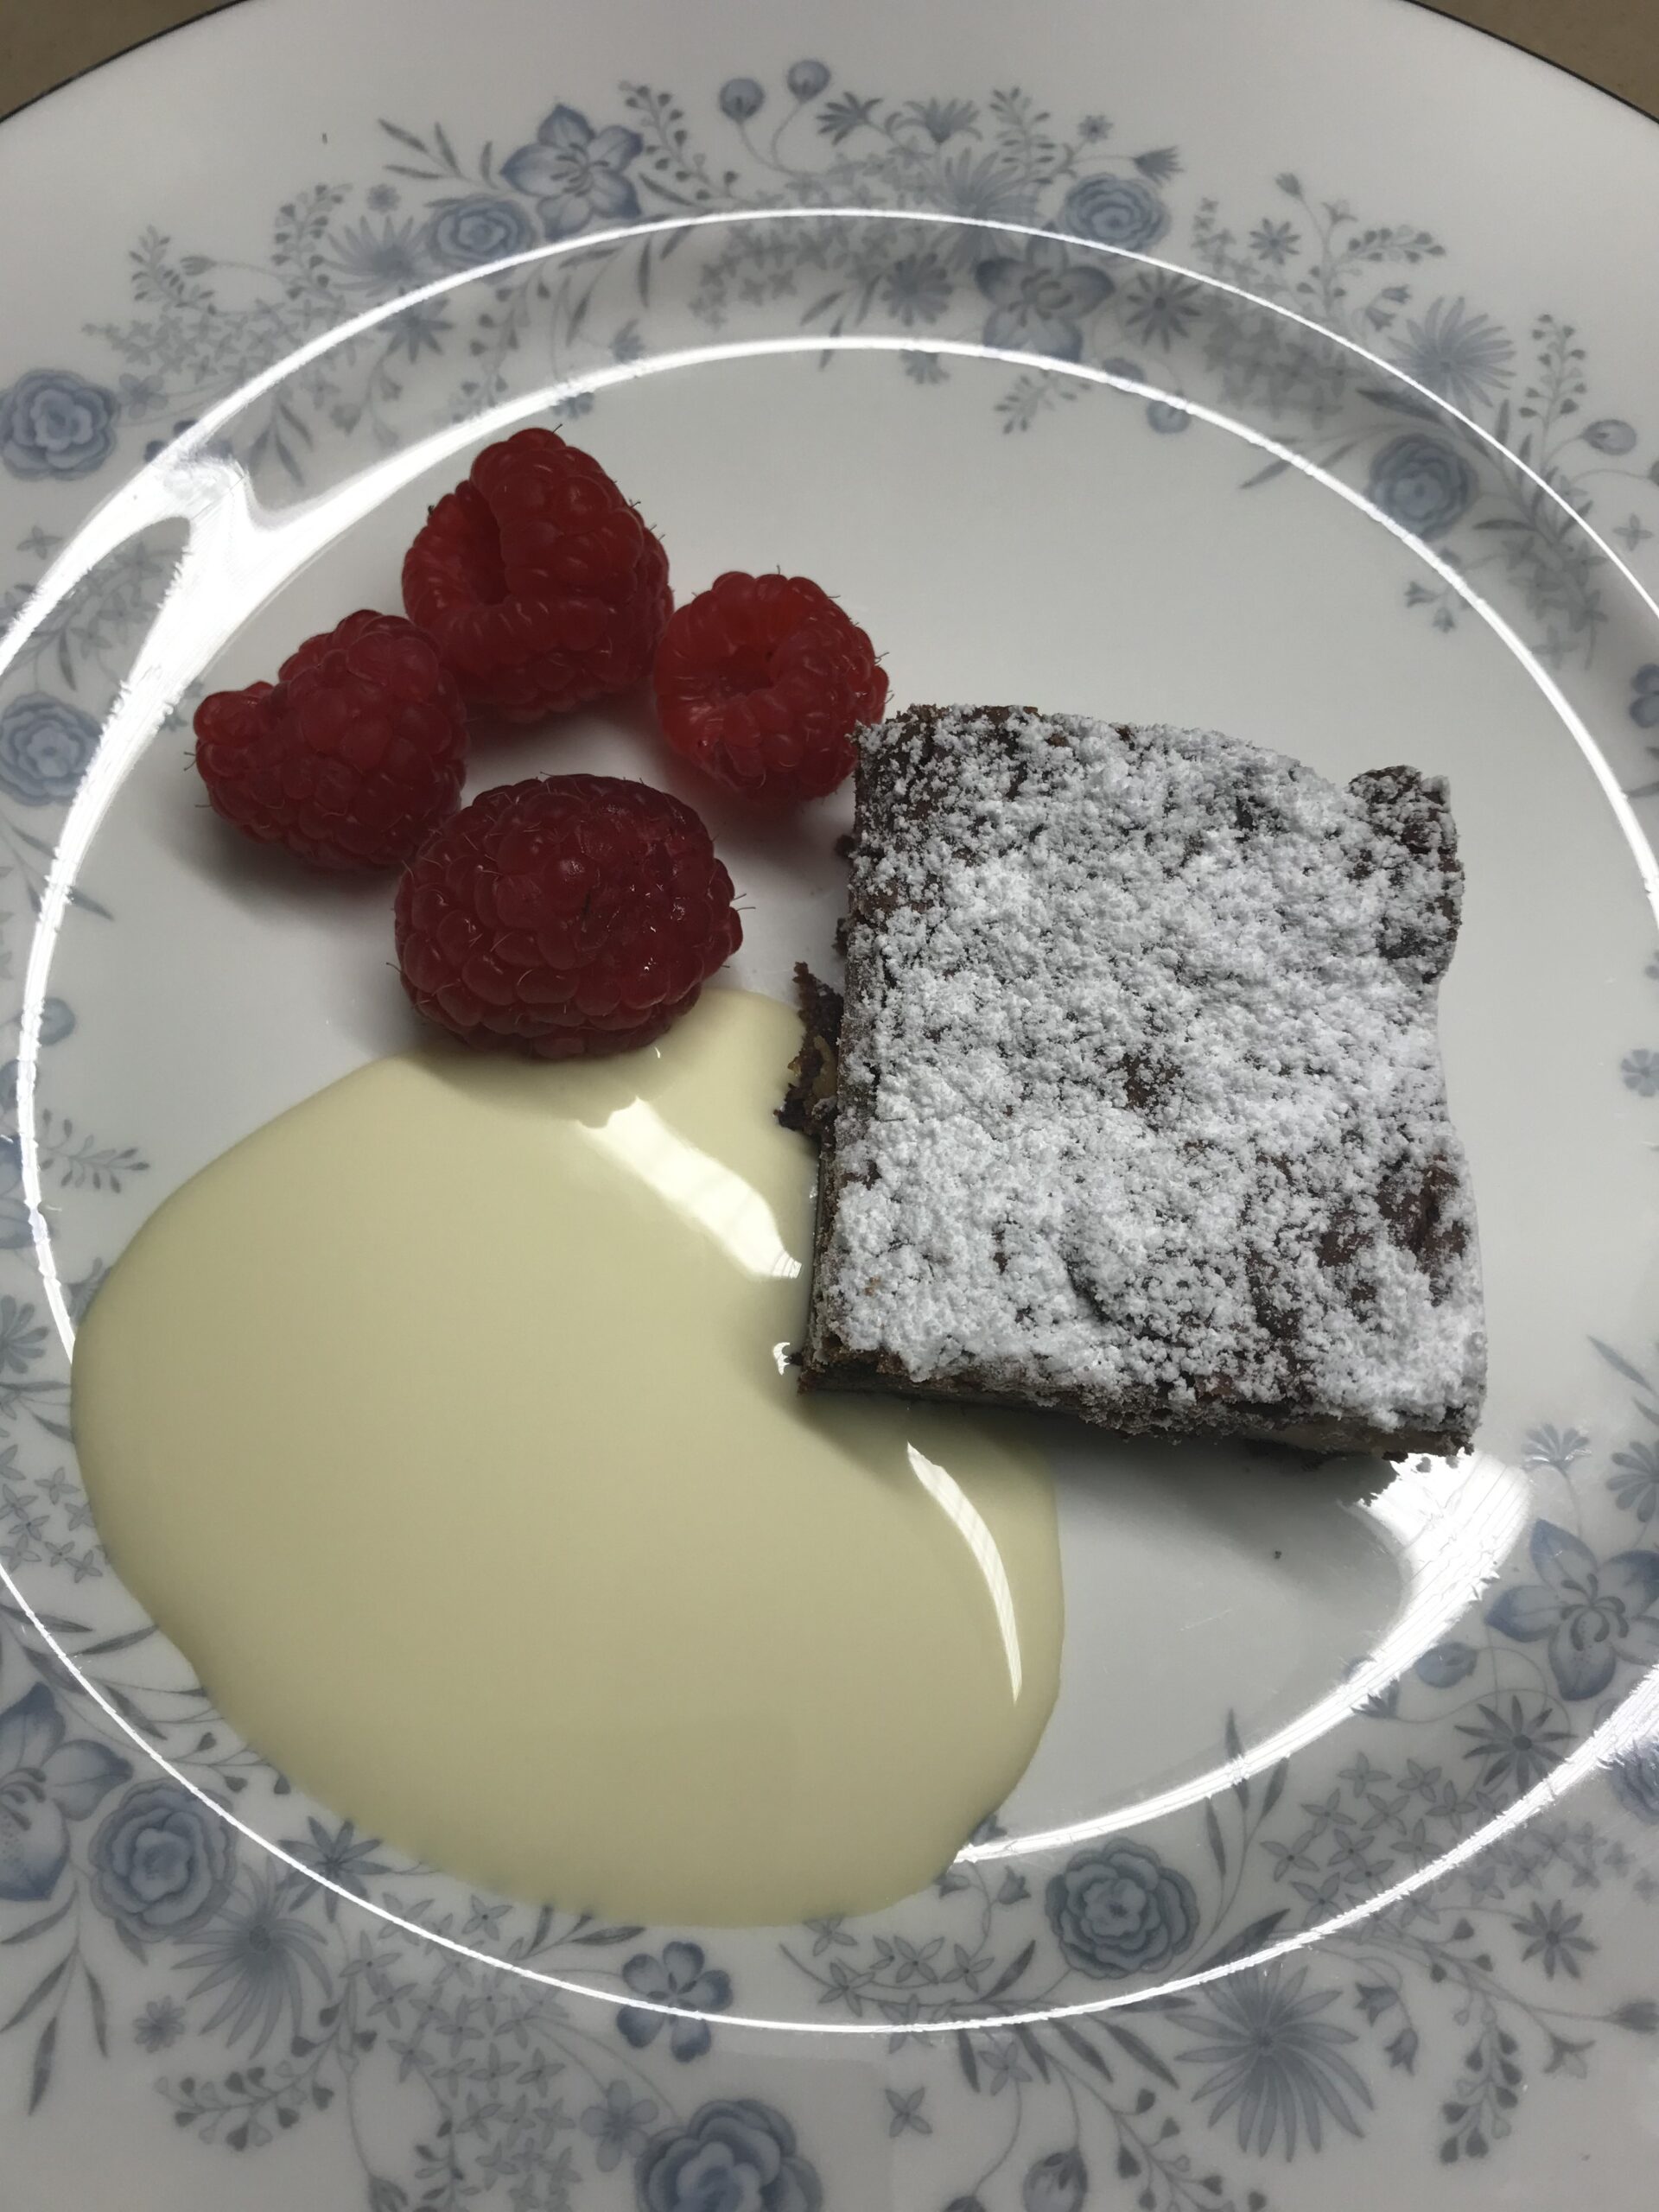
Crisp on the outside, with a soft and gooey centre, this traditional Scandinavian chocolate cake is a bit like a brownie. Kladdkaka means sticky cake in Swedish.
Serve it on it’s own, with a dusting of icing sugar and a cup of coffee, or with whipped cream or ice cream and a few berries as a delicious dessert.
2 large eggs
1½ cups sugar
½ cup plain flour
¼ cup cocoa
pinch of salt
125g butter, melted
1 Tbs vanilla extract
Extra cocoa powder To serve: Icing sugar
Fresh berries such as strawberries or raspberries
Whipped cream or ice cream
Prepare an 8 inch (20cm) cake tin by lining the bottom with baking paper, then buttering the bottom and sides and giving a good coating of extra cocoa powder, shaking out any excess. Preheat oven to 180°C.
In a large bowl with electric beaters whisk eggs and sugar until thick and pale. Fold in sifted flour, cocoa and salt and lastly the butter and vanilla. Scrape into cake pan and bake for 20 minutes. The top of the cake will be firm, but it will still be soft in the centre. The cake will sink as it cools.
Cool cake then dust with sifted icing sugar. Serve as it is, or with berries and whipped cream or ice cream.
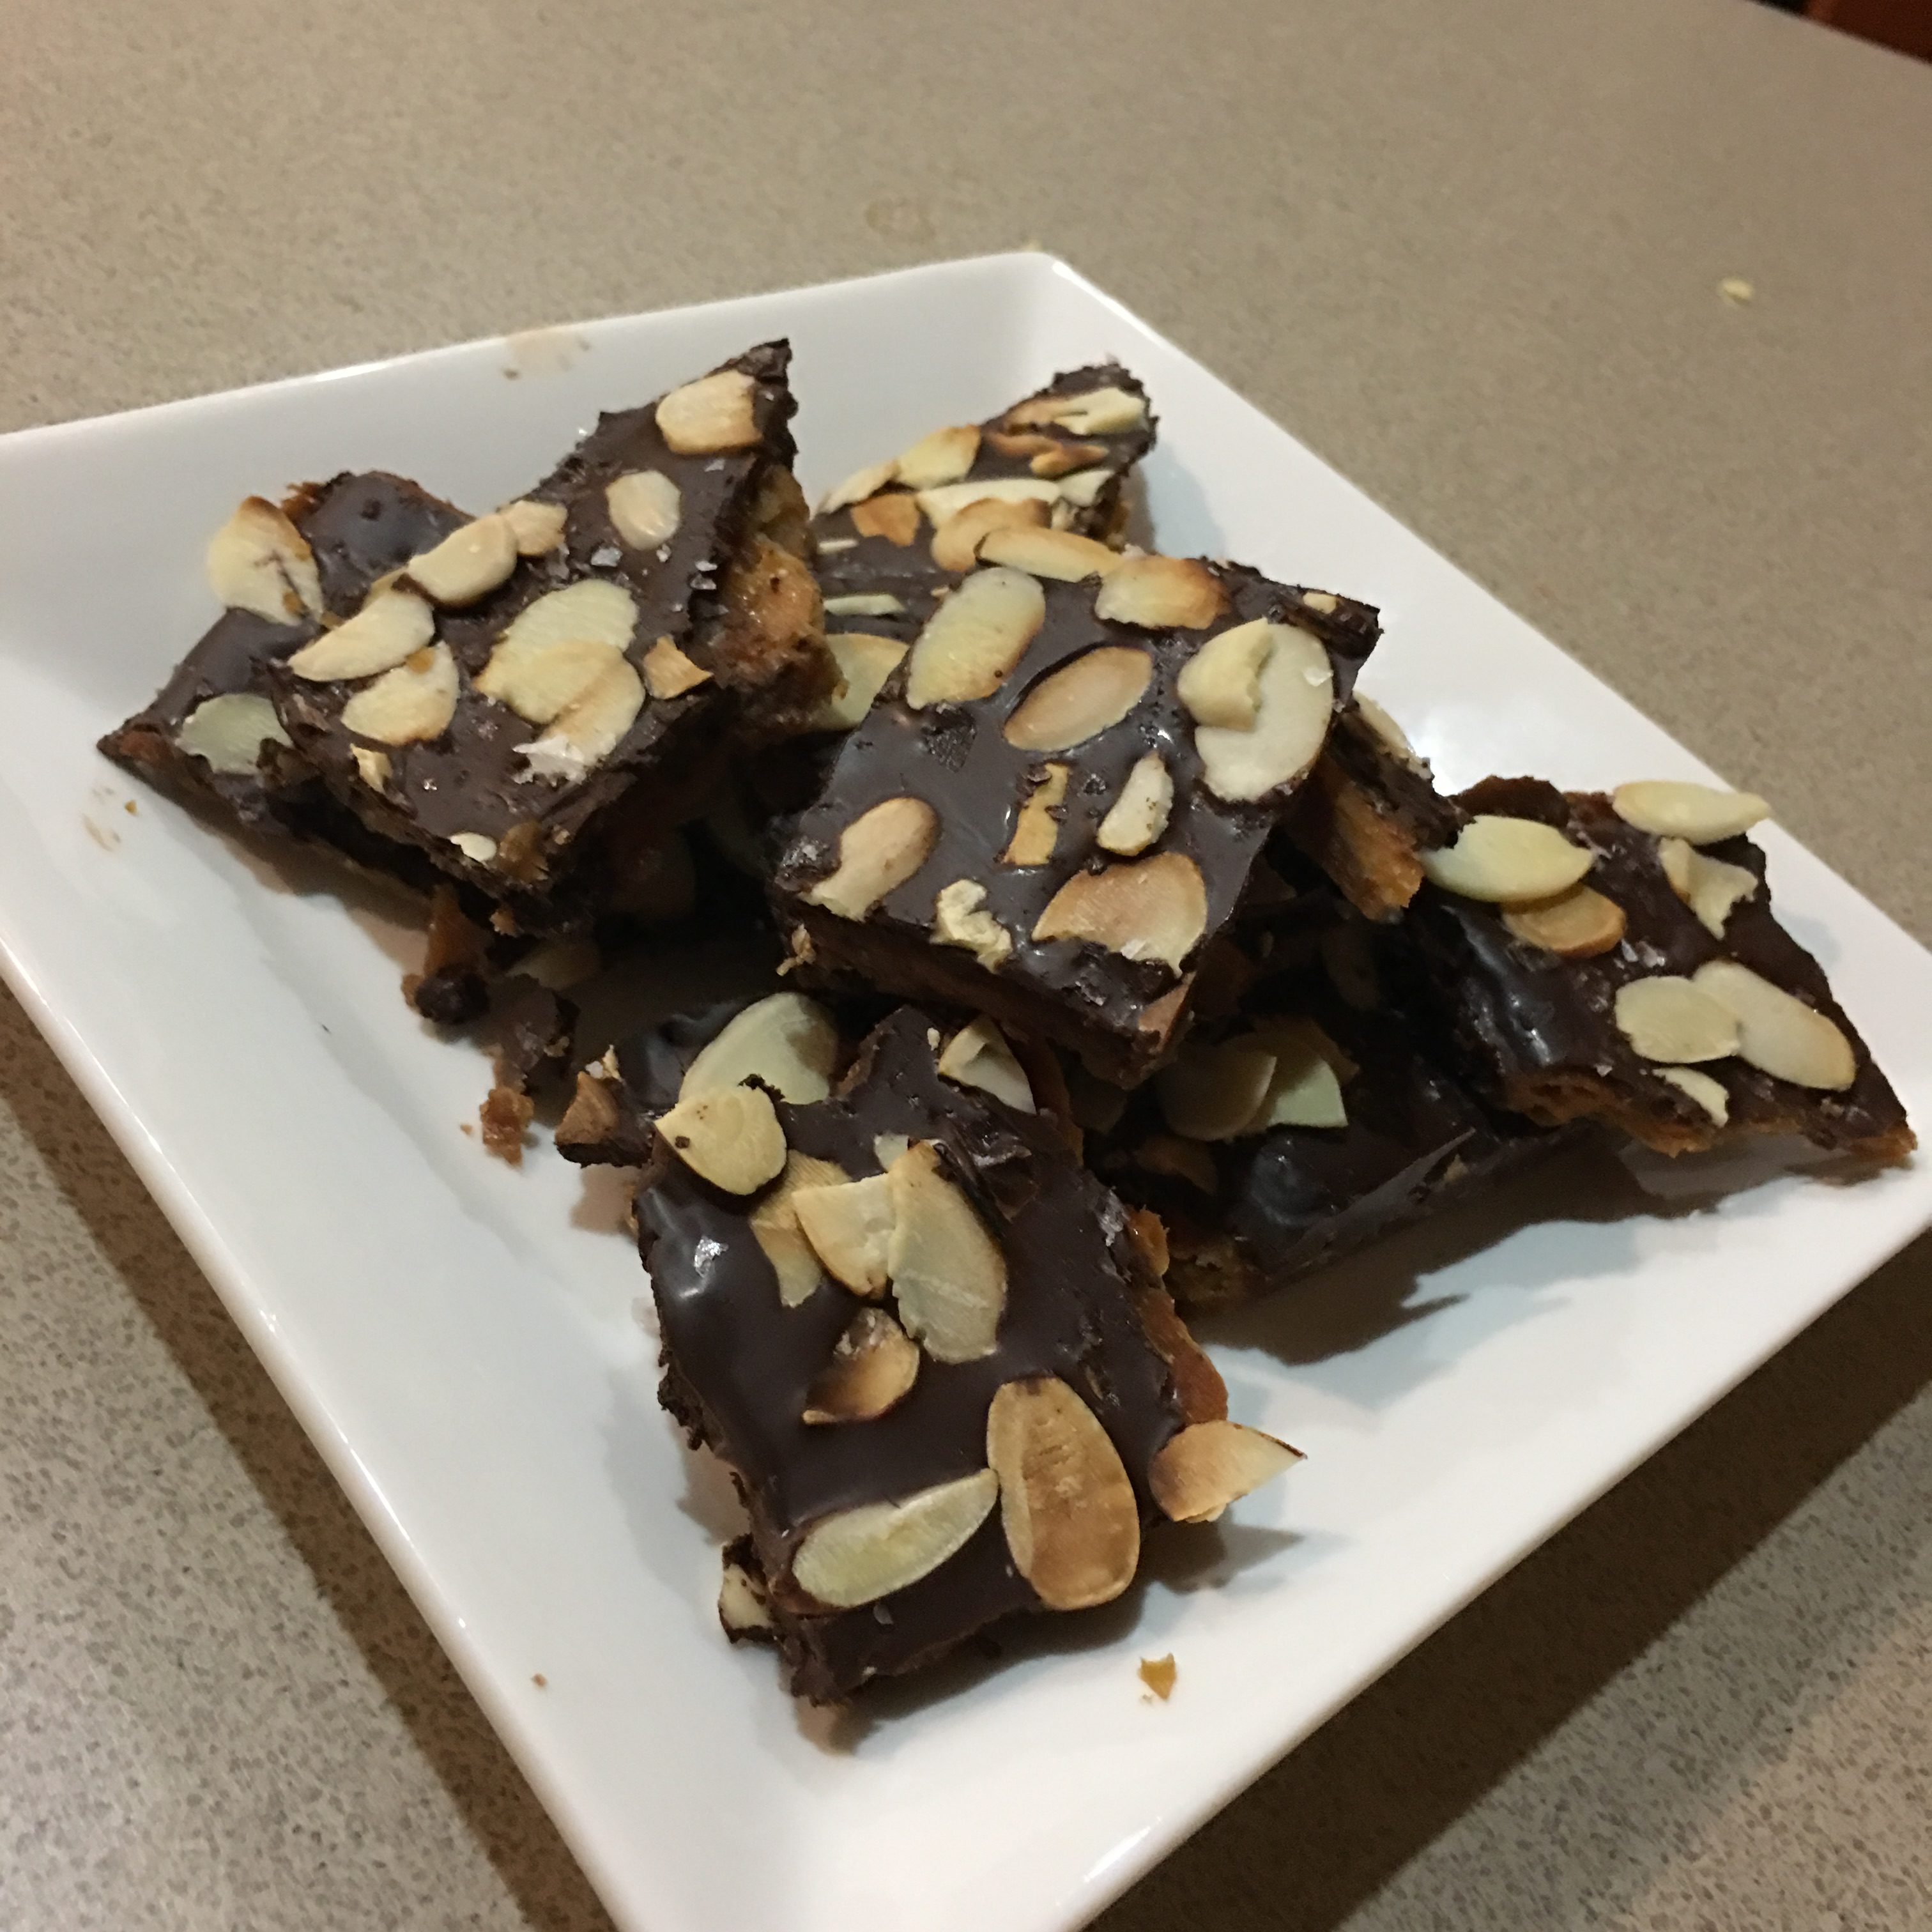
I was staying at Hill House, a dairy farm in County Durham in my early teens when I learnt to make this recipe. They called it Triple Decker Slice and everyone loved it. There are heaps of versions online, often called Millionaire’s Shortbread, but this is my version. I’ve added the salt flakes, which weren’t in the original recipe, but appeal to anyone who likes salted caramel.
This slice is high in sugar and calories, so I don’t make it often, but when I do it always puts a smile on Matthew’s face.
If you can find dulce de leche or Nestle Top n Fill, make Filling (1). If not then make Filling (2).
Shortbread:
125g butter at room temp
½ cup soft brown sugar
1 cup plain flour
½ cup cornflour Filling (1):
250g dulce de leche or Nestle Top ‘n Fill
125g butter
½ cup soft brown sugar Filling (2): 1 can condensed milk
2 Tbs golden syrup
125g butter
½ cup soft brown sugar Topping: 250g dark chocolate
2 Tbs Copha or butter To finish:
Maldon sea salt flakes (optional)
Preheat oven to 170°C. Mix butter and sugar in food processor. Add flour and cornflour and process till mixture sticks together into a ball. Press into a greased shallow rectangular baking tin measuring about 25x30cm, lined with greased baking paper. You don’t need to roll it out, just drop lumps evenly over the tin, then press with your fingers till you have a more or less even thickness. Bake 15-20 mins. It should be very lightly coloured, not brown.
Heat filling ingredients (1 or 2) and when bubbling cook gently for 2-3 mins, stirring. If using Filling (2) you will need to cook it a bit longer, say 5-7 minutes, to achieve the caramel colour. Pour over the shortbread and spread evenly. When caramel has cooled, melt chocolate with Copha or butter, pour over and spread evenly. If liked sprinkle with salt. Cut into squares when cold.
Since the start of the coronavirus lockdown I participated in an online recipe exchange from which you are supposed to receive lots of recipes. I only received two and this is one of them, from another Linda who lives in Chile. Appropriately named for when you’re going stir crazy while in isolation.
This quick and easy chocolate cake surprisingly doesn’t contain any eggs. Delicious on its own or with a dollop of sour cream, as shown in the photo.
3 cups plain flour
2 cups sugar
2 tsp bicarbonate of soda
1 tsp salt
½ cup cocoa powder
¾ cup vegetable oil
2 tsp vanilla essence
2 Tbs vinegar
2 cups cold water Chocolate Icing:
250g cream cheese at room temp
¼ cup cocoa powder
1½ cups icing sugar
Chocolate buttons to decorate (optional)
Preheat oven to 175°C. You can either mix this cake in a bowl or in a food processor. Sift the dry ingredients into a bowl or food processor and mix. Add remaining ingredients and mix till smooth, stopping to scrape down any mixture stuck to the sides. Spread into a cake pan. I used a 22 cm (9 inch) square silicone pan so I didn’t need to grease and line it with baking paper. You know your pan and whether or not cakes stick. Bake for 30-40 mins or until firm to touch in the middle.
Ice with your favourite icing or this one which uses cream cheese. Place cream cheese in a bowl and mix till smooth, gradually adding the sifted cocoa and then the sifted icing sugar. You might find one cup of icing sugar is enough. If liked decorate with chocolate buttons. Cut into 16 squares.
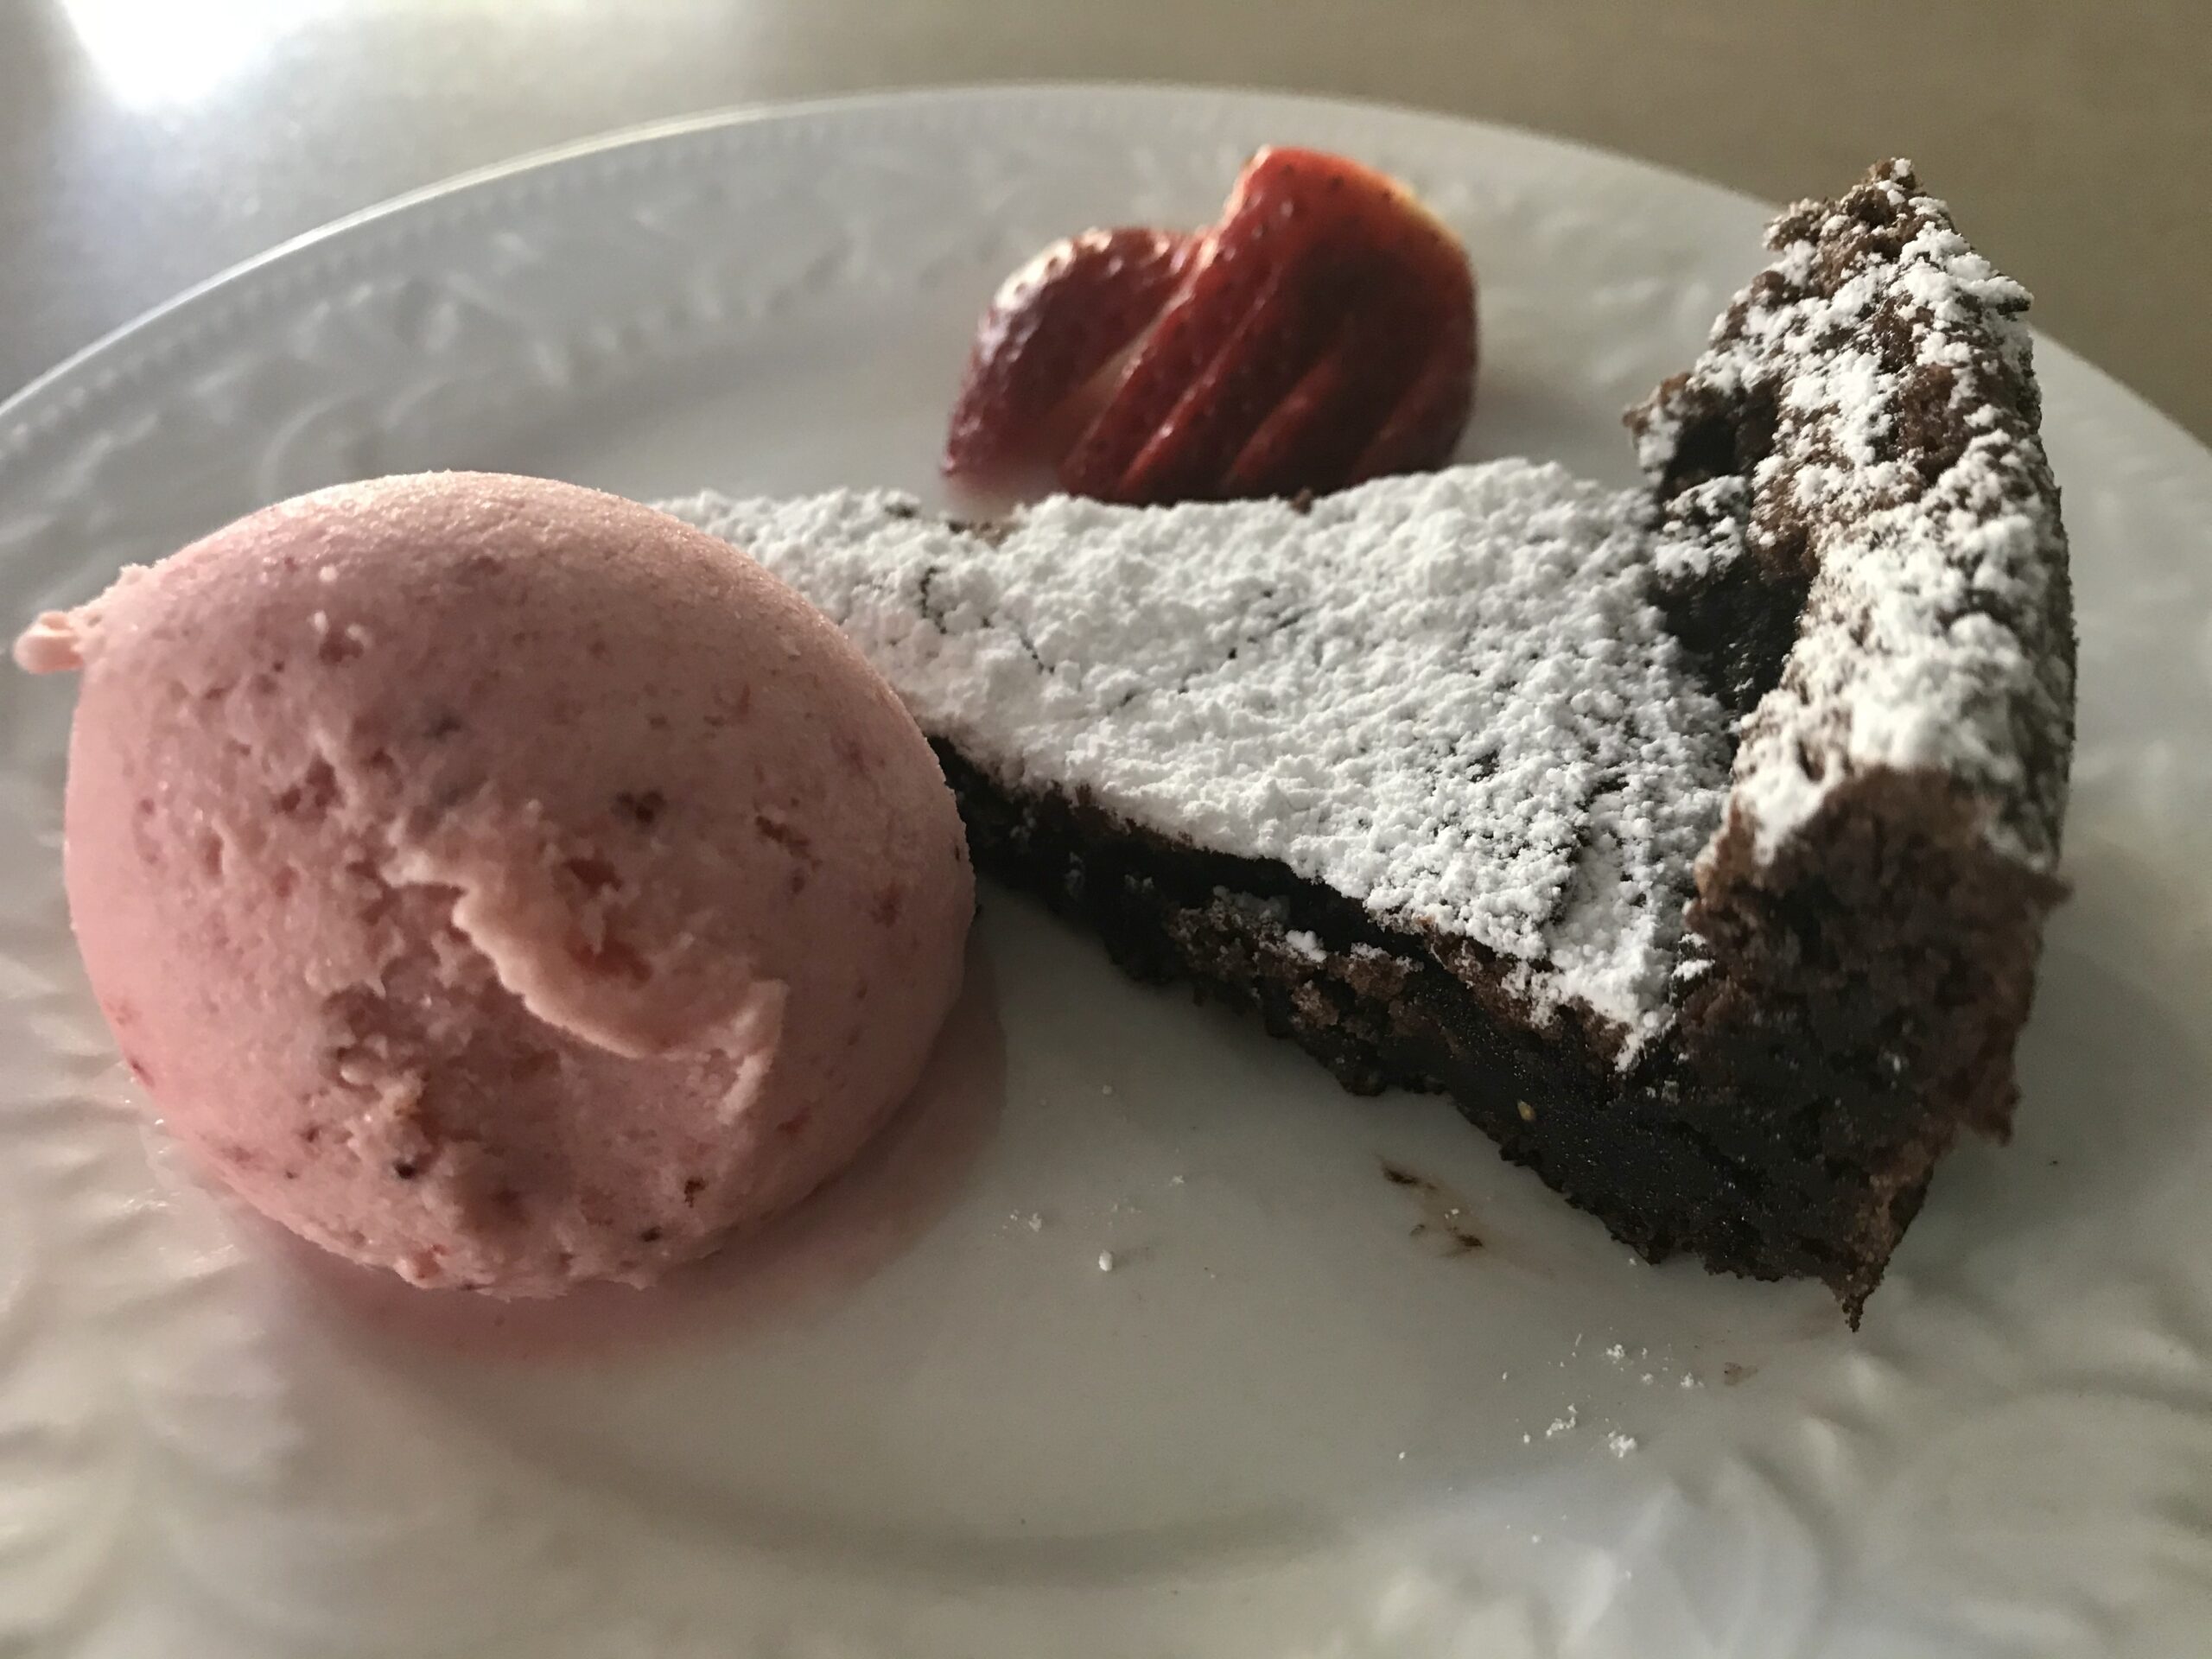
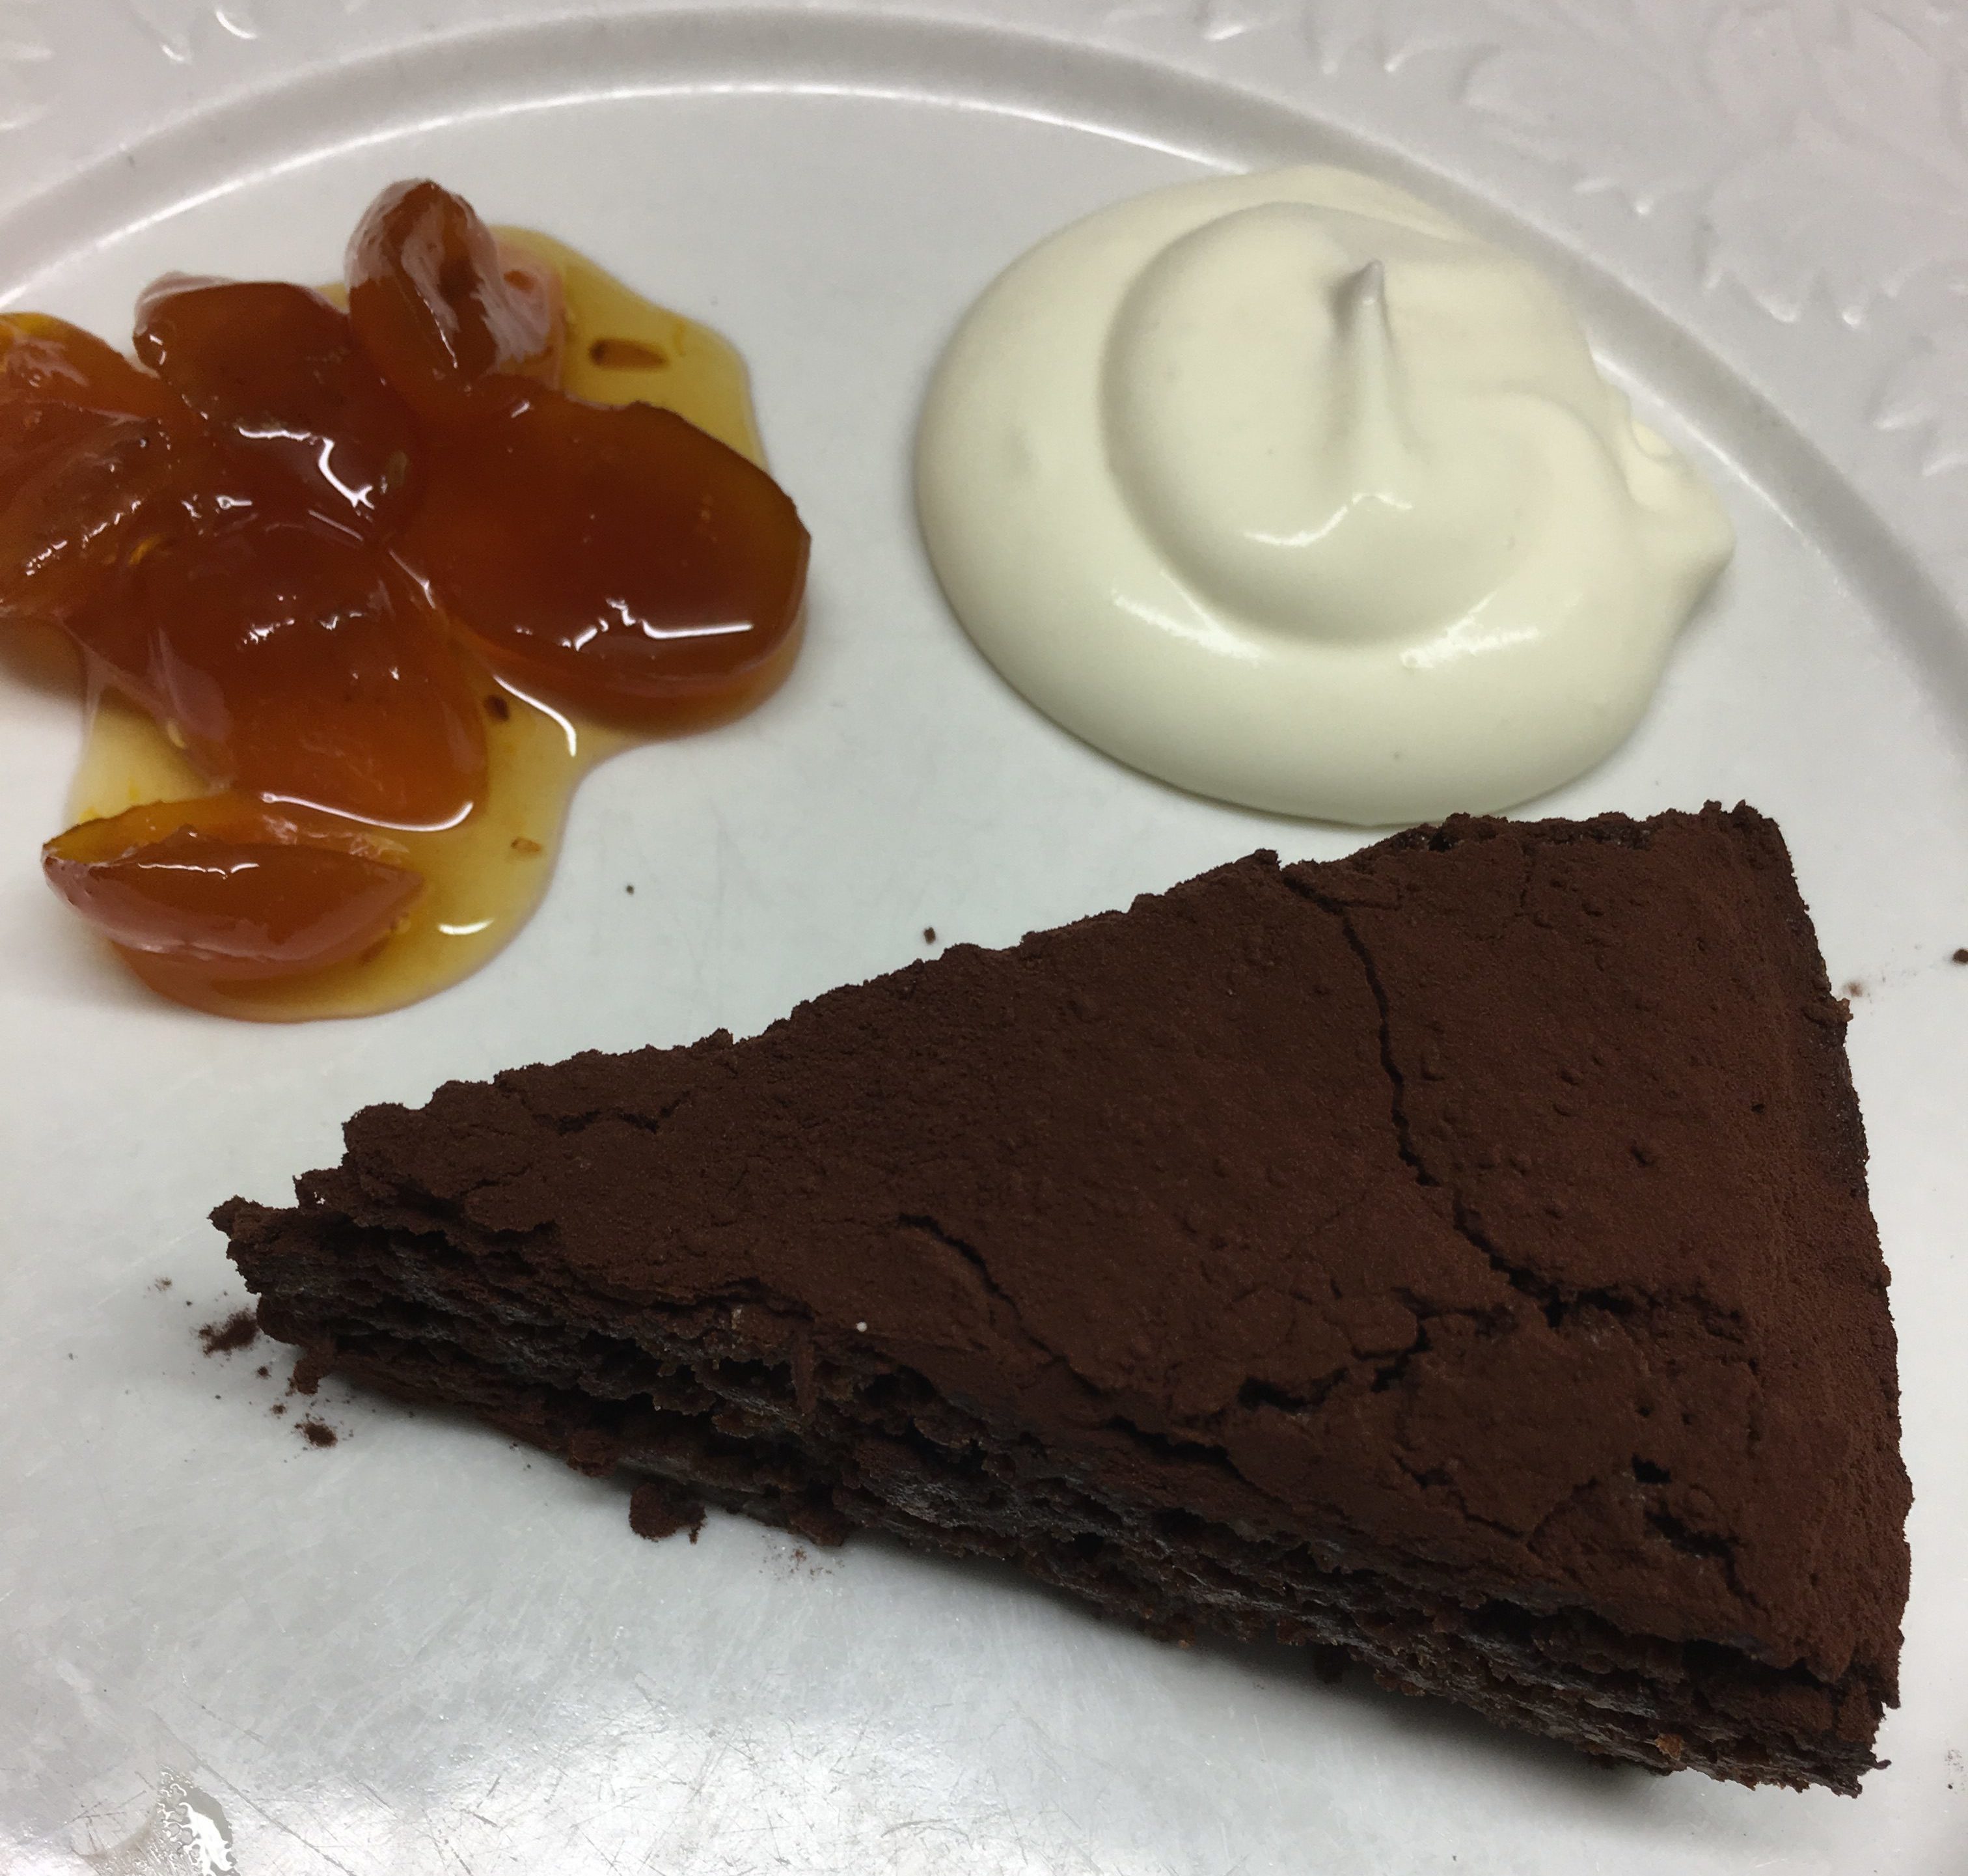
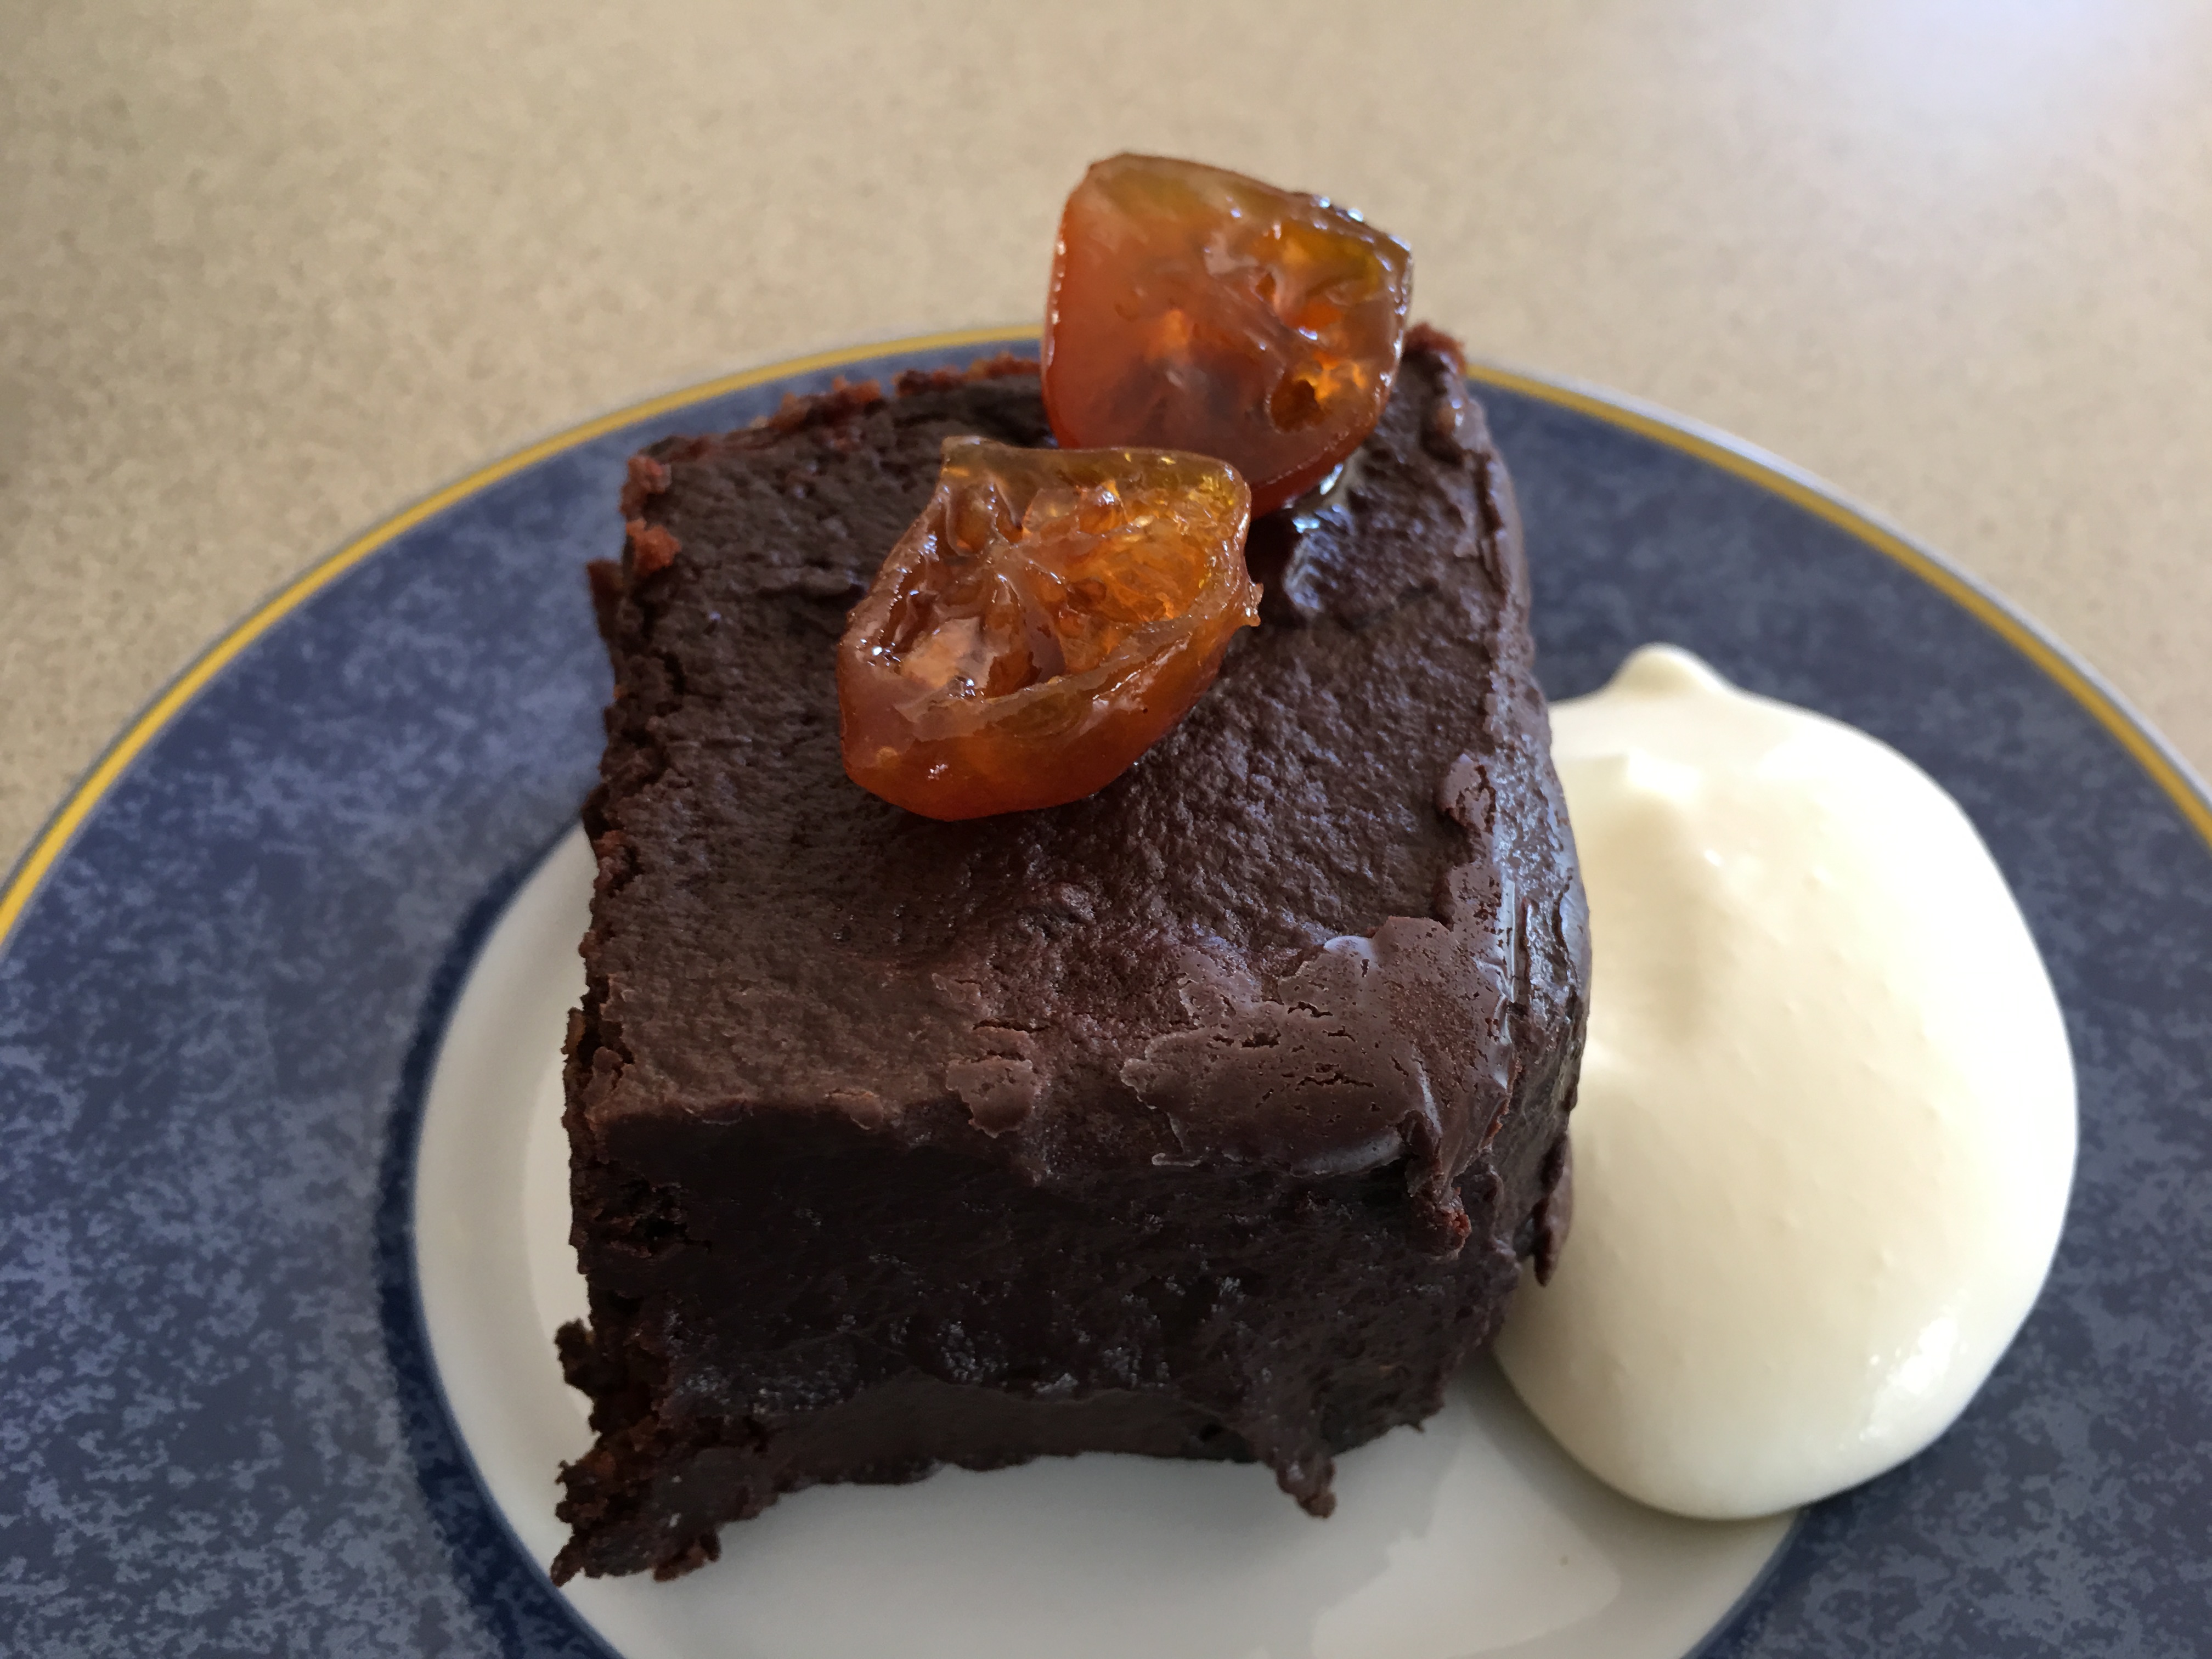
My friend Fiona follows a gluten-free diet. I love the nutty texture of her Gluten Free Chocolate Cake which keeps her sane when she’s studying for law exams.
Today’s recipe is adapted from Fiona’s. I’ve adjusted the quantities slightly, adding less sugar and a bit more chocolate and nuts. I’ve also added a topping of unsweetened cocoa powder, an idea from one of Yotam Ottolenghi’s chocolate cake recipes.
I served the cake as a dessert, with whipped cream and some cumquats I preserved a year ago, but it’s perfectly delicious just as it is, with a cuppa. As a dessert you could also serve it with berries or a ball of coffee ice cream.
250g dark chocolate
250g butter
250g almond meal*
4 eggs, separated
1 cup sugar
½ tsp baking powder
Pinch of salt To serve:
About 2 Tbs unsweetened cocoa powder
Candied oranges or cumquats or fresh berries
Whipped cream
Preheat oven to 180°C. Heat butter in a saucepan and when melted add the chocolate, broken into squares and turn off the heat. As chocolate melts, stir to combine. Mix in egg yolks, then sugar, almond meal, salt and baking powder. In a large bowl whip egg whites with electric beaters until soft peaks form. Scrape in the chocolate mixture, in two lots, gently using a spatula to thoroughly combine.
Scrape mixture into a greased and bottom-lined 22cm round cake tin and smooth the top. Bake for 35-45 minutes. Check after 35 minutes. When ready cake will feel firm on top and a skewer inserted in the middle will come out clean. If you have a fan-forced oven you may find the cake is ready in just over half an hour, as mine was. Chocolate cakes are best under-cooked rather than over-cooked.
When cool, remove cake from tin and cover the top with cocoa powder, using a sieve. Serve cake with berries and whipped cream or just as it is.
Serves 12-16
* buy almond meal or make your own by blitzing nuts in food processor until they resemble breadcrumbs. I used half bought and half I made using unskinned almonds. If you don’t have any almonds substitute walnuts, pecans, pine nuts or even a mixture.
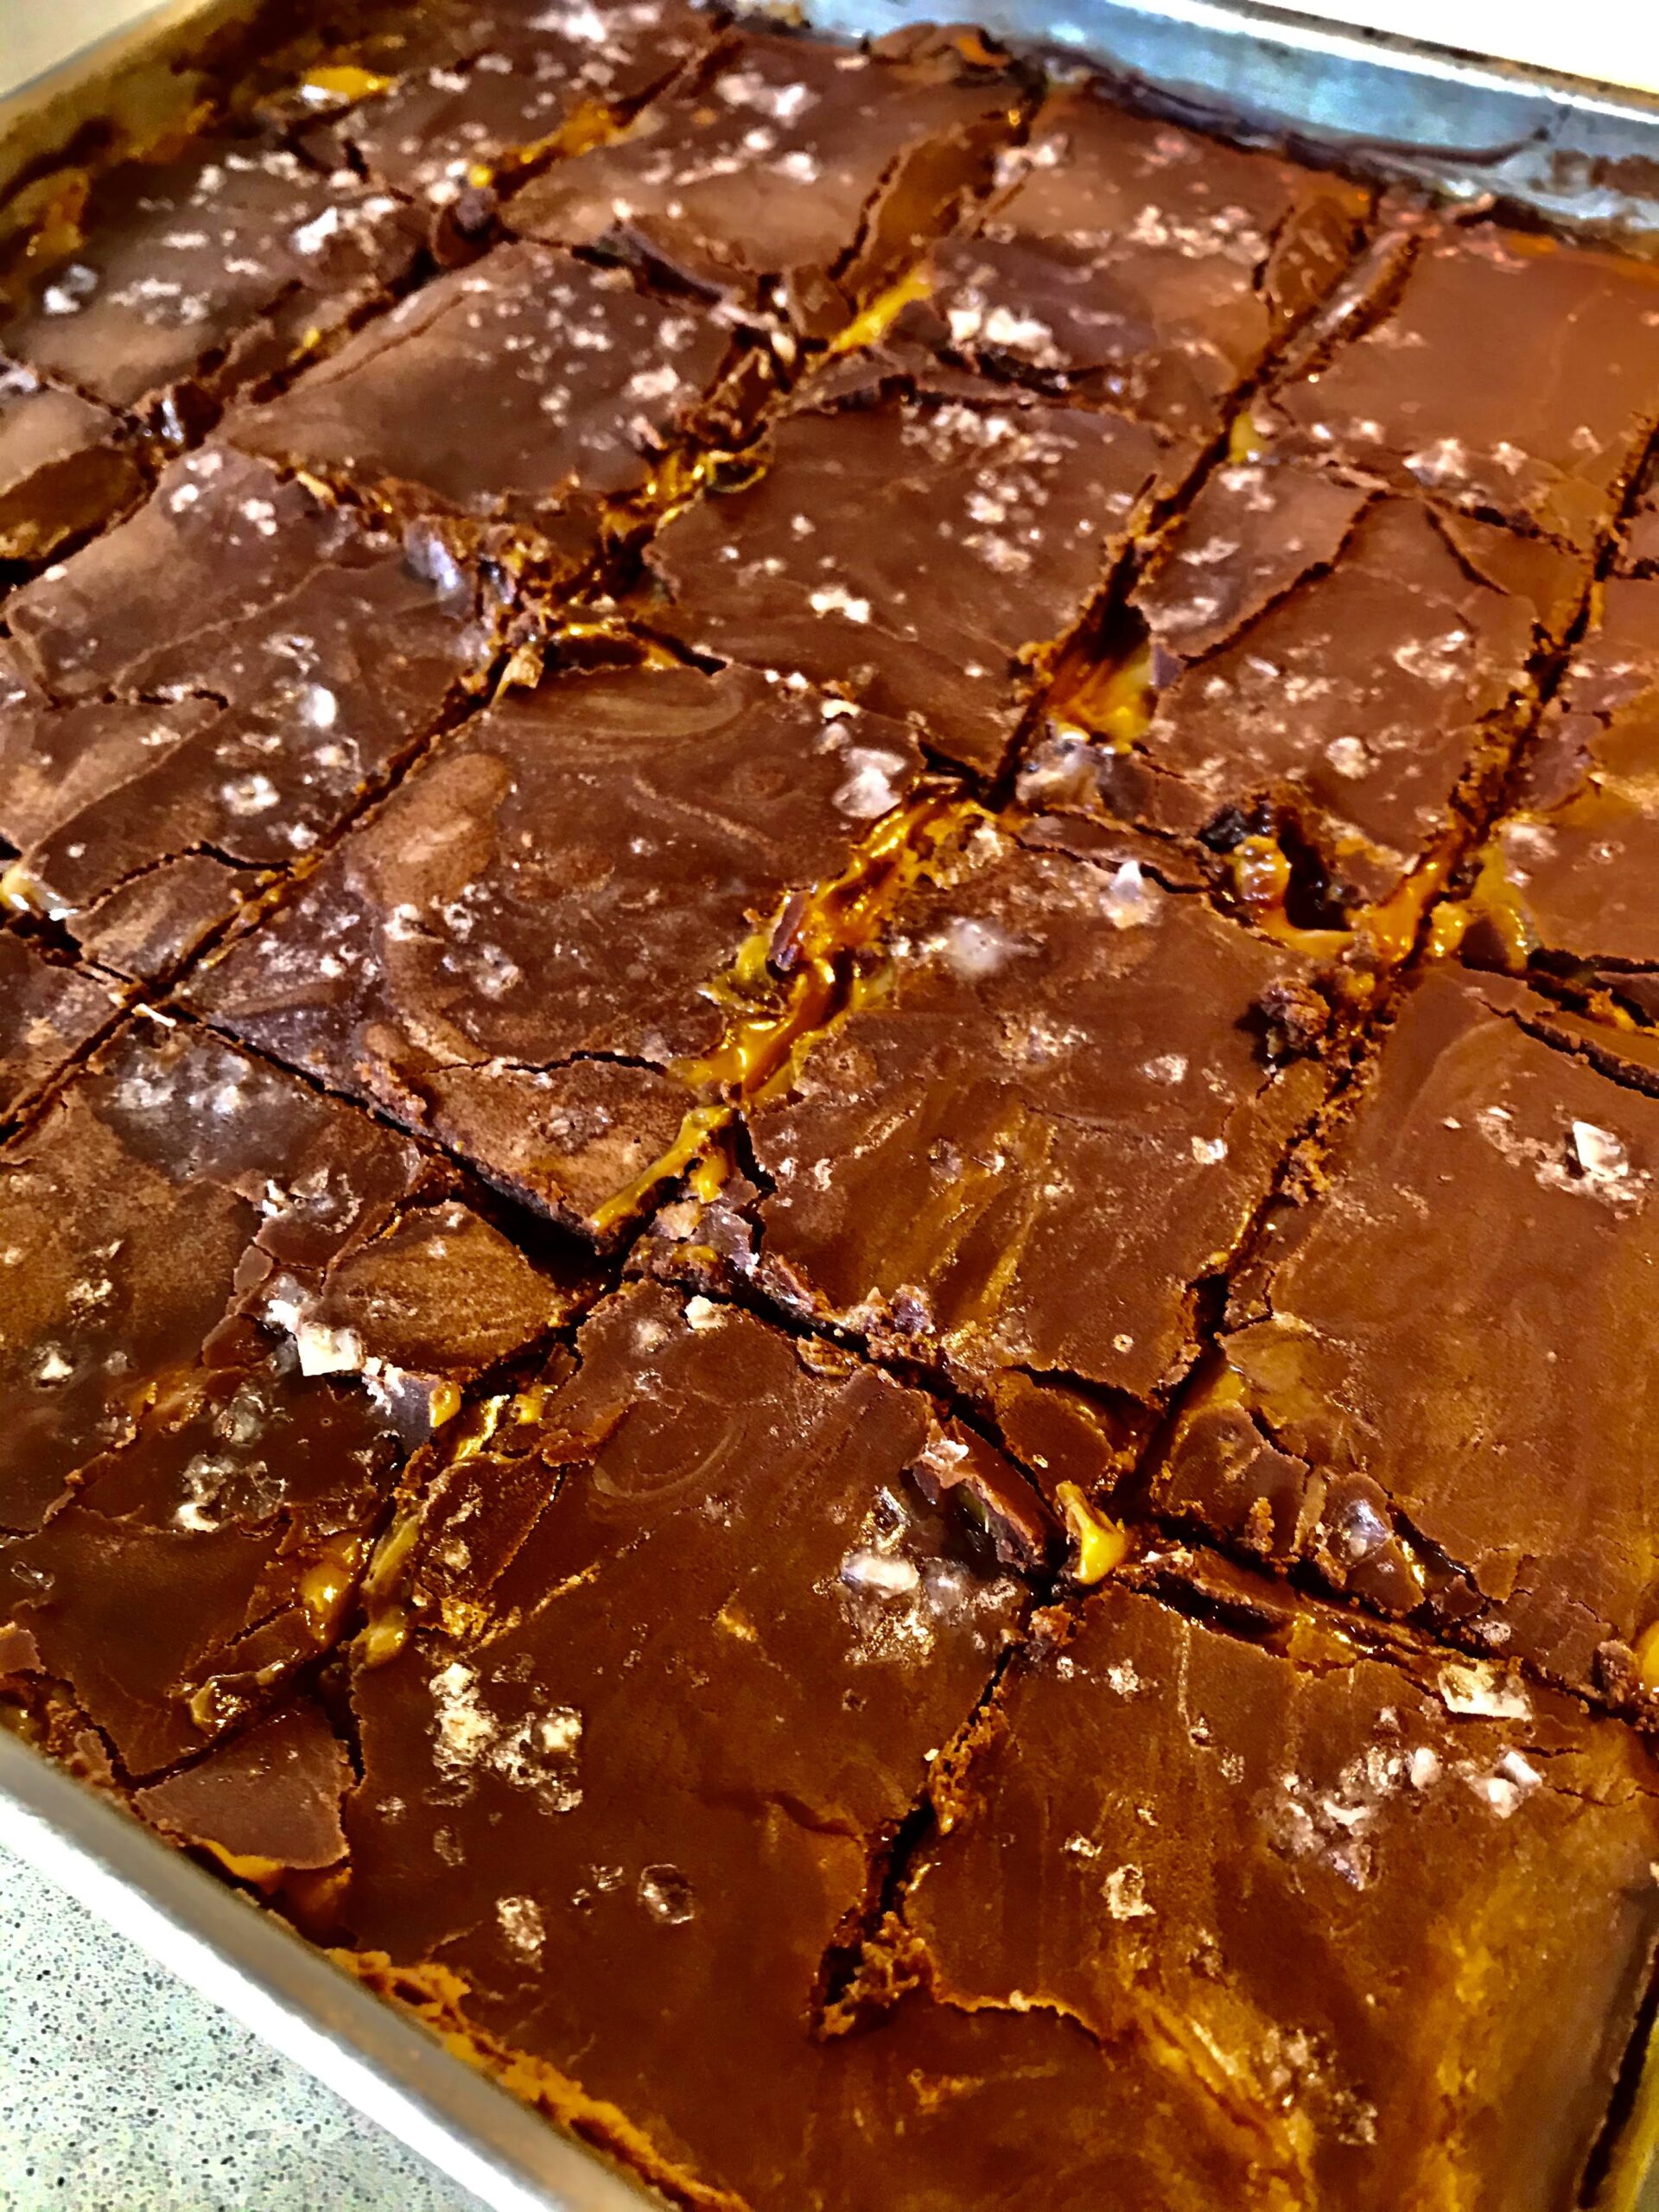
This recipe is adapted from one by David Lebovitz. One of those sweet, sinful snacks you have to hide, to avoid overindulgence. Trouble is, I know the hiding place.
When a friend emailed to ask for the recipe I wrote back asking if she also wanted contact details for Weight Watchers. She thought I was suggesting she was fat so I said she would be if she ate too much of this. It’s something you might describe as moreish, a word which I see has made it into the English dictionary and which has nothing whatsoever to do with Moorish, used to describe things with an Arabian flavour.
About 6 sheets Salada crackers (called Saltine in other countries)
250g unsalted butter
1 cup brown sugar
Large pinch of salt
½ tsp vanilla essence
250g dark chocolate
1 small piece of Copha (vegetable shortening) the size of a large walnut
1 cup flaked almonds (optional)
Salt flakes
Line a shallow baking sheet approximately 28x42cm with baking paper. Or use two smaller tins which come to about the same total area. Cover with the crackers, breaking them as necessary to cover the whole area like a jigsaw puzzle.
Preheat oven to 180°C. Melt butter and sugar in a saucepan, then boil for 3 minutes, stirring all the time. Add salt and vanilla then pour over the crackers, spreading evenly. Bake for 15 minutes, watching carefully that it doesn’t burn.
Melt chocolate and Copha in a bowl over boiling water, then spread evenly over the caramel. If using nuts, toast them lightly in a dry frying pan over moderate heat then sprinkle over the chocolate. Sprinkle with a few salt flakes. Cool.
To serve, break into uneven sized pieces
Variations: use milk chocolate or a mix of half milk and half dark
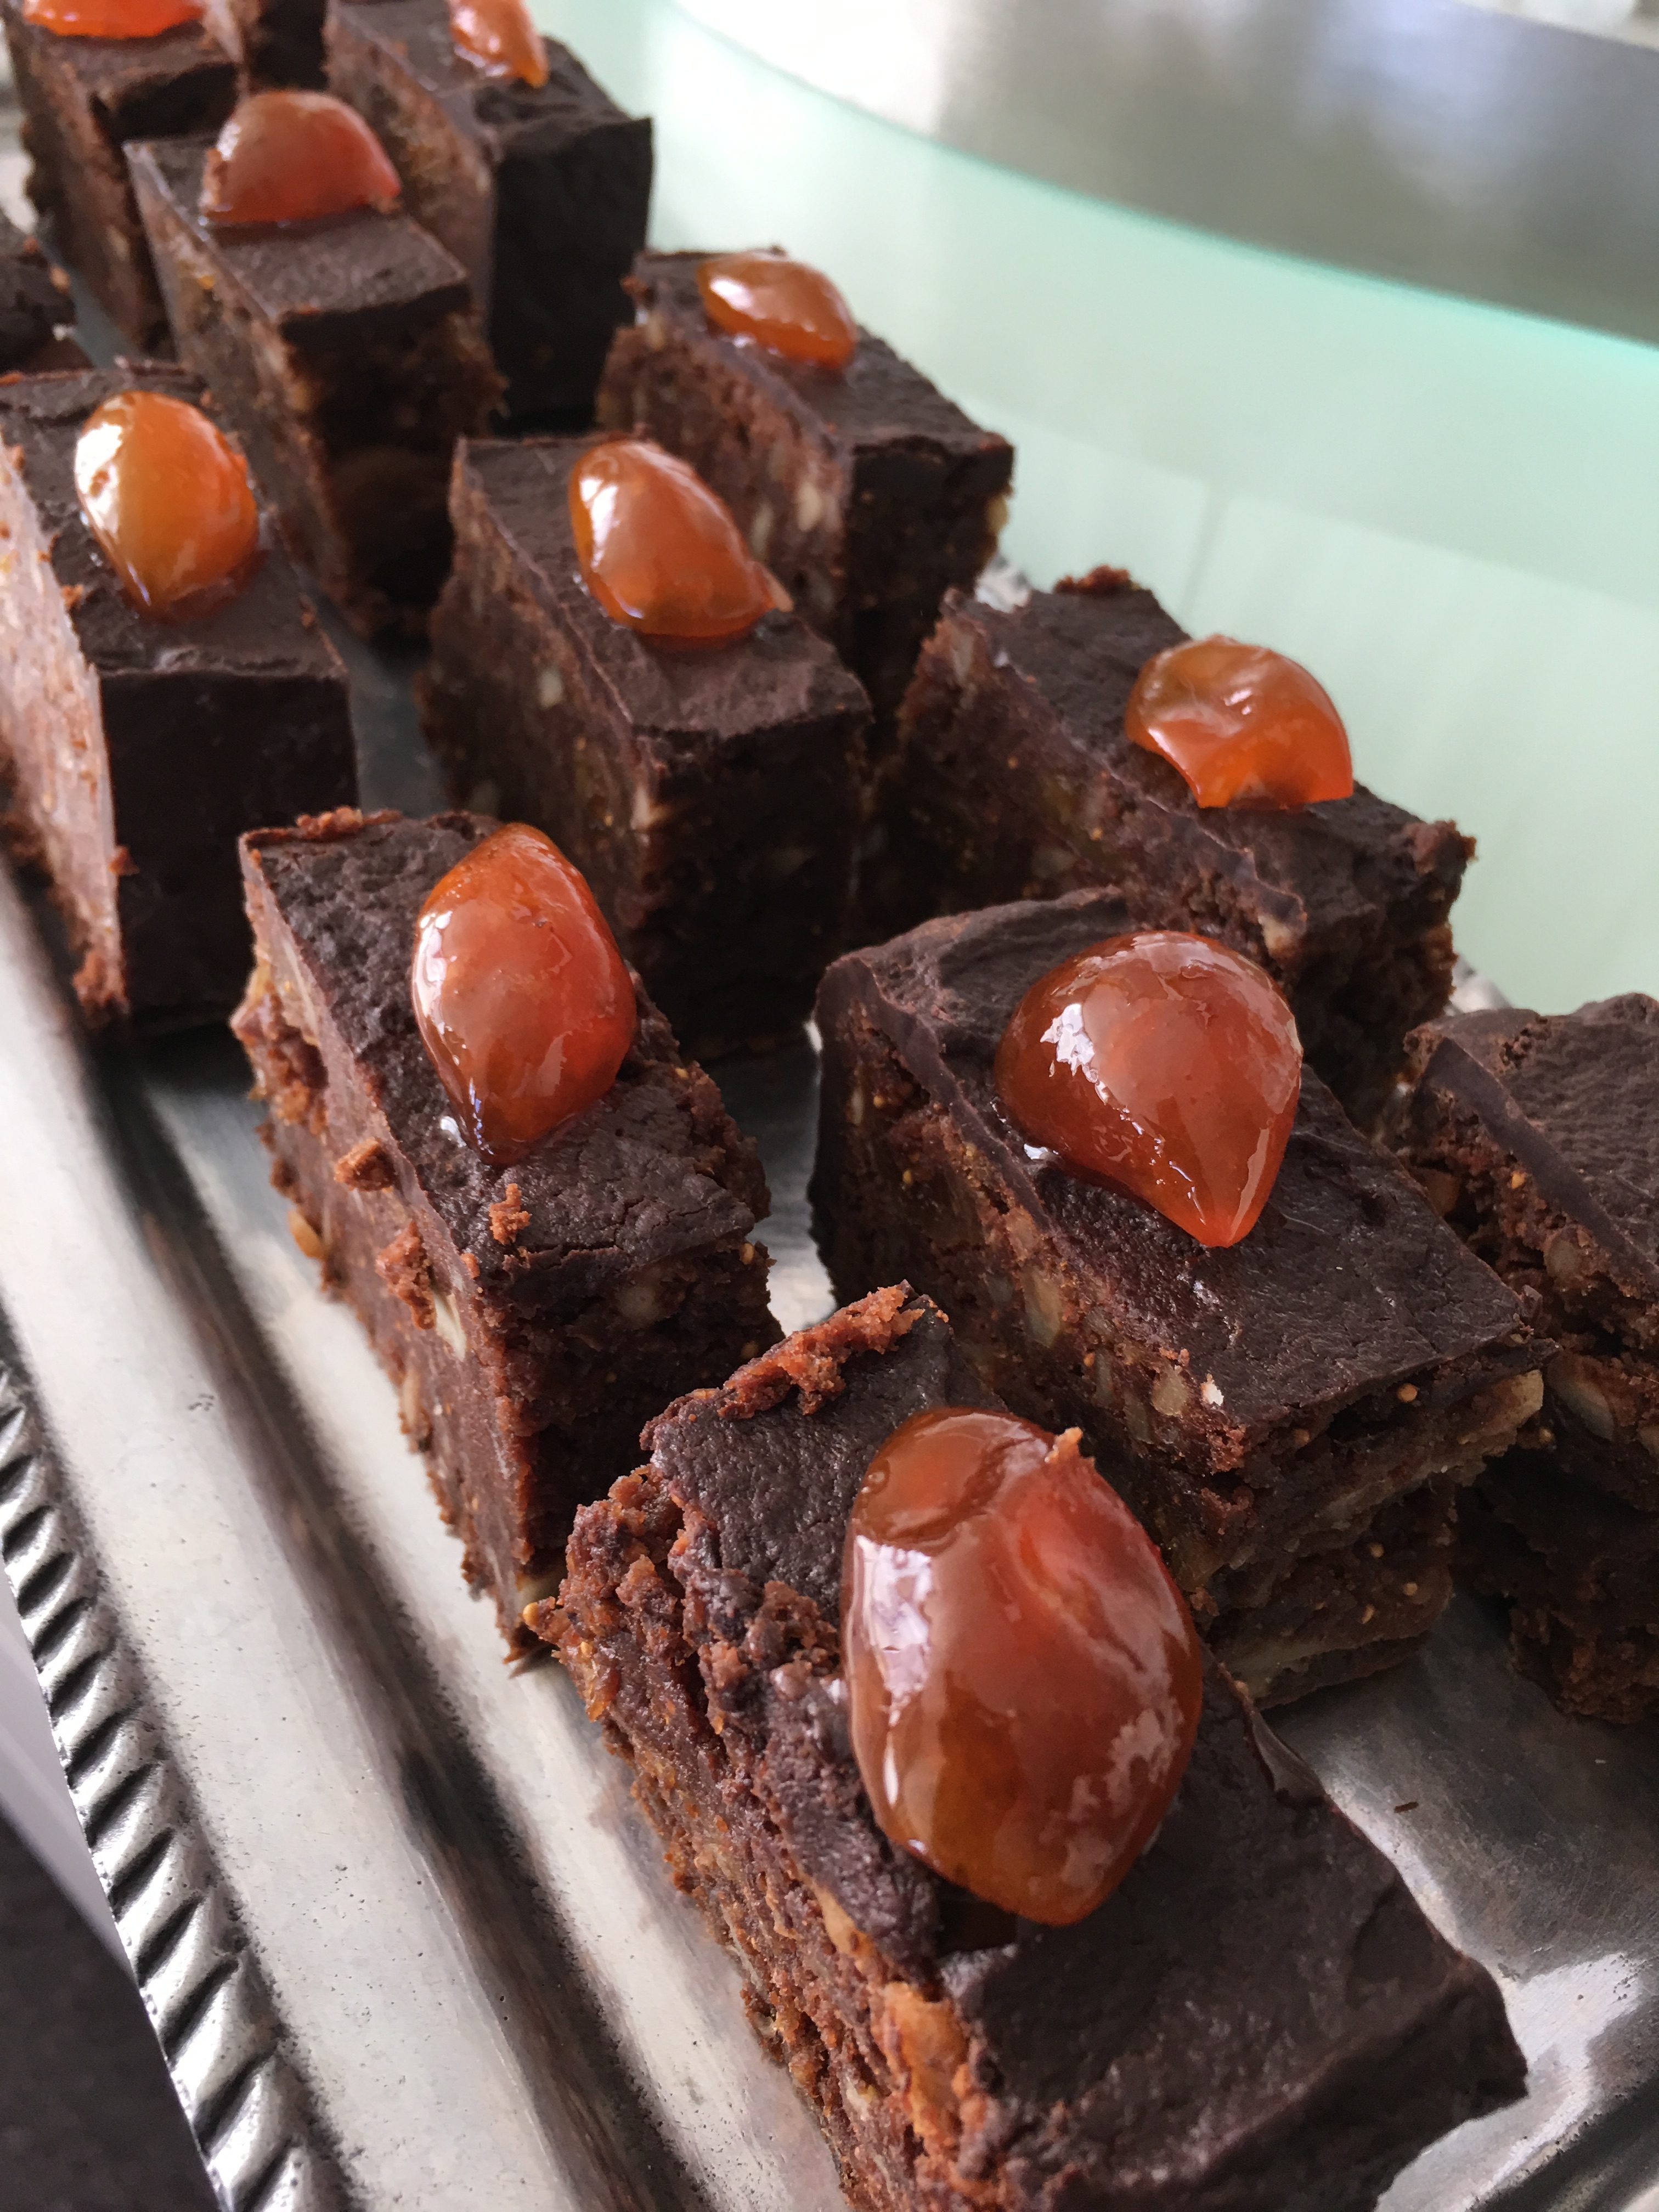
This recipe caught my eye when it was published recently in Gourmet Traveller, so I saved the link. Friends coming to stay for the weekend is a good excuse to bake a cake so I thought I would give this a try. As a fan of chocolate, figs and hazelnuts it seemed to tick all the boxes. I wasn’t disappointed.
I’ve cut down on the sugar in the cake from 300g to 200g and cut it out altogether in the chocolate ganache. The muscat and figs are sweet, so you could try cutting down even more on the sugar in the cake, say to 150g. Maybe add a few more figs to compensate.
The original recipe said to use muscat or brandy. I used a muscat-style fortified wine made in Australia by Angoves and called Bookmark Crema All’Uovo. I bought the bottle several months ago at Dan Murphy’s to make that wonderful Italian dessert called Zabaione. If I hadn’t had any of that I would have used port rather than brandy. The packet of dried figs I bought weighed 375g, so I used them all.
The original recipe tells you how to make Candied Oranges to serve with the cake. I had some candied cumquats I made several months ago, so that’s what you can see as a garnish in the photo. To make the original Candied Oranges, search for the GT recipe.
To make the cake gluten-free, use gluten-free bread for the breadcrumbs.
Cake:
1 cup (250ml) muscat or port
300-400g dried figs, de-stemmed and coarsely chopped
420g hazelnuts, toasted and peeled
250g unsalted butter, at room temp
200g caster sugar
6 eggs
250g dark chocolate, melted
½ cup fresh breadcrumbs Ganache: ½ cup cream 150g dark chocolate To serve:
Whipped cream
Candied oranges or orange peel (optional – bought or home-made)
Place muscat or port in a saucepan with the figs. Bring to the boil then simmer, stirring from time to time, for 10 minutes or until figs have absorbed the wine.
Preheat oven to 160°C. Place hazelnuts in food processor and process coarsely. Tip out. Make bread into breadcrumbs in food processor, then tip out. Place butter and sugar in food processor and process until smooth. Gradually add the eggs, one at a time, then the melted chocolate, stopping to scrape down the sides from time to time. Scrape mixture into a large bowl and mix in the figs, the ground nuts and the breadcrumbs.
Scrape mixture into a large cake pan, greased and bottom-lined with baking paper. I used a 22cm square pan, but you could use a round one. Bake for 50-55 minutes, or until cake feels firm on top and a skewer inserted in the middle comes out clean. Err on the slightly undercooked side, as the cake will continue to cook after you remove it from the oven. Leave to cool, then remove from pan and pour over the chocolate ganache, using a knife to spread it evenly over the top and sides.
Ganache: heat cream in a small saucepan. When boiling, turn off heat and add the chocolate, broken into squares. Leave to melt for a few minutes then stir until smooth. Allow to cool for a few minutes, so it’s a bit thicker for spreading.
Serve cake as it is, or with whipped cream and candied oranges or orange peel.
Serves 16
Variations: use walnuts or almonds instead of hazelnuts, or a mixture.
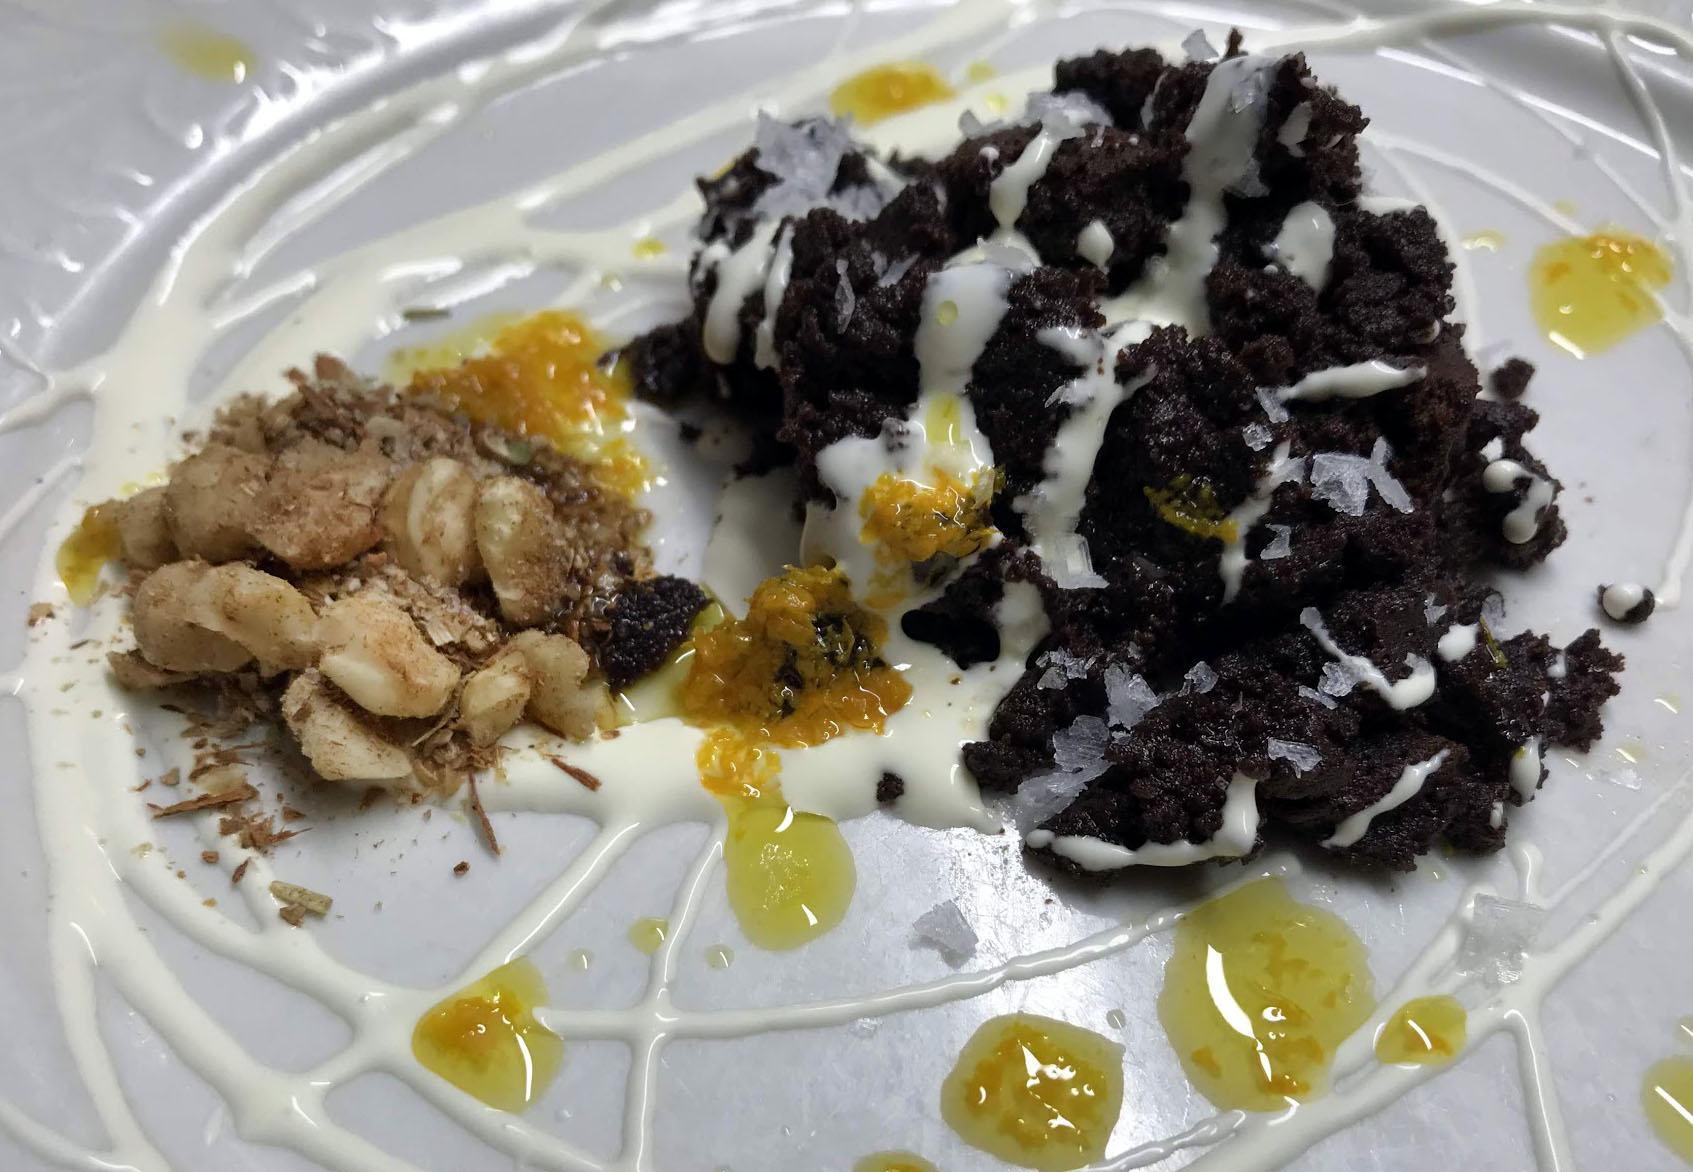
I recently made this dessert from one of my favourite chefs, Yotam Ottolenghi. The flavour combination of chocolate, nutty spice mix, slightly sweetened crème fraîche and orange oil is amazing. But Ottolenghi says to bake the chocolate ganache and although I only baked mine for 8 minutes it was rather dry. And I don’t think you need the eggs or the sugar in the ganache.
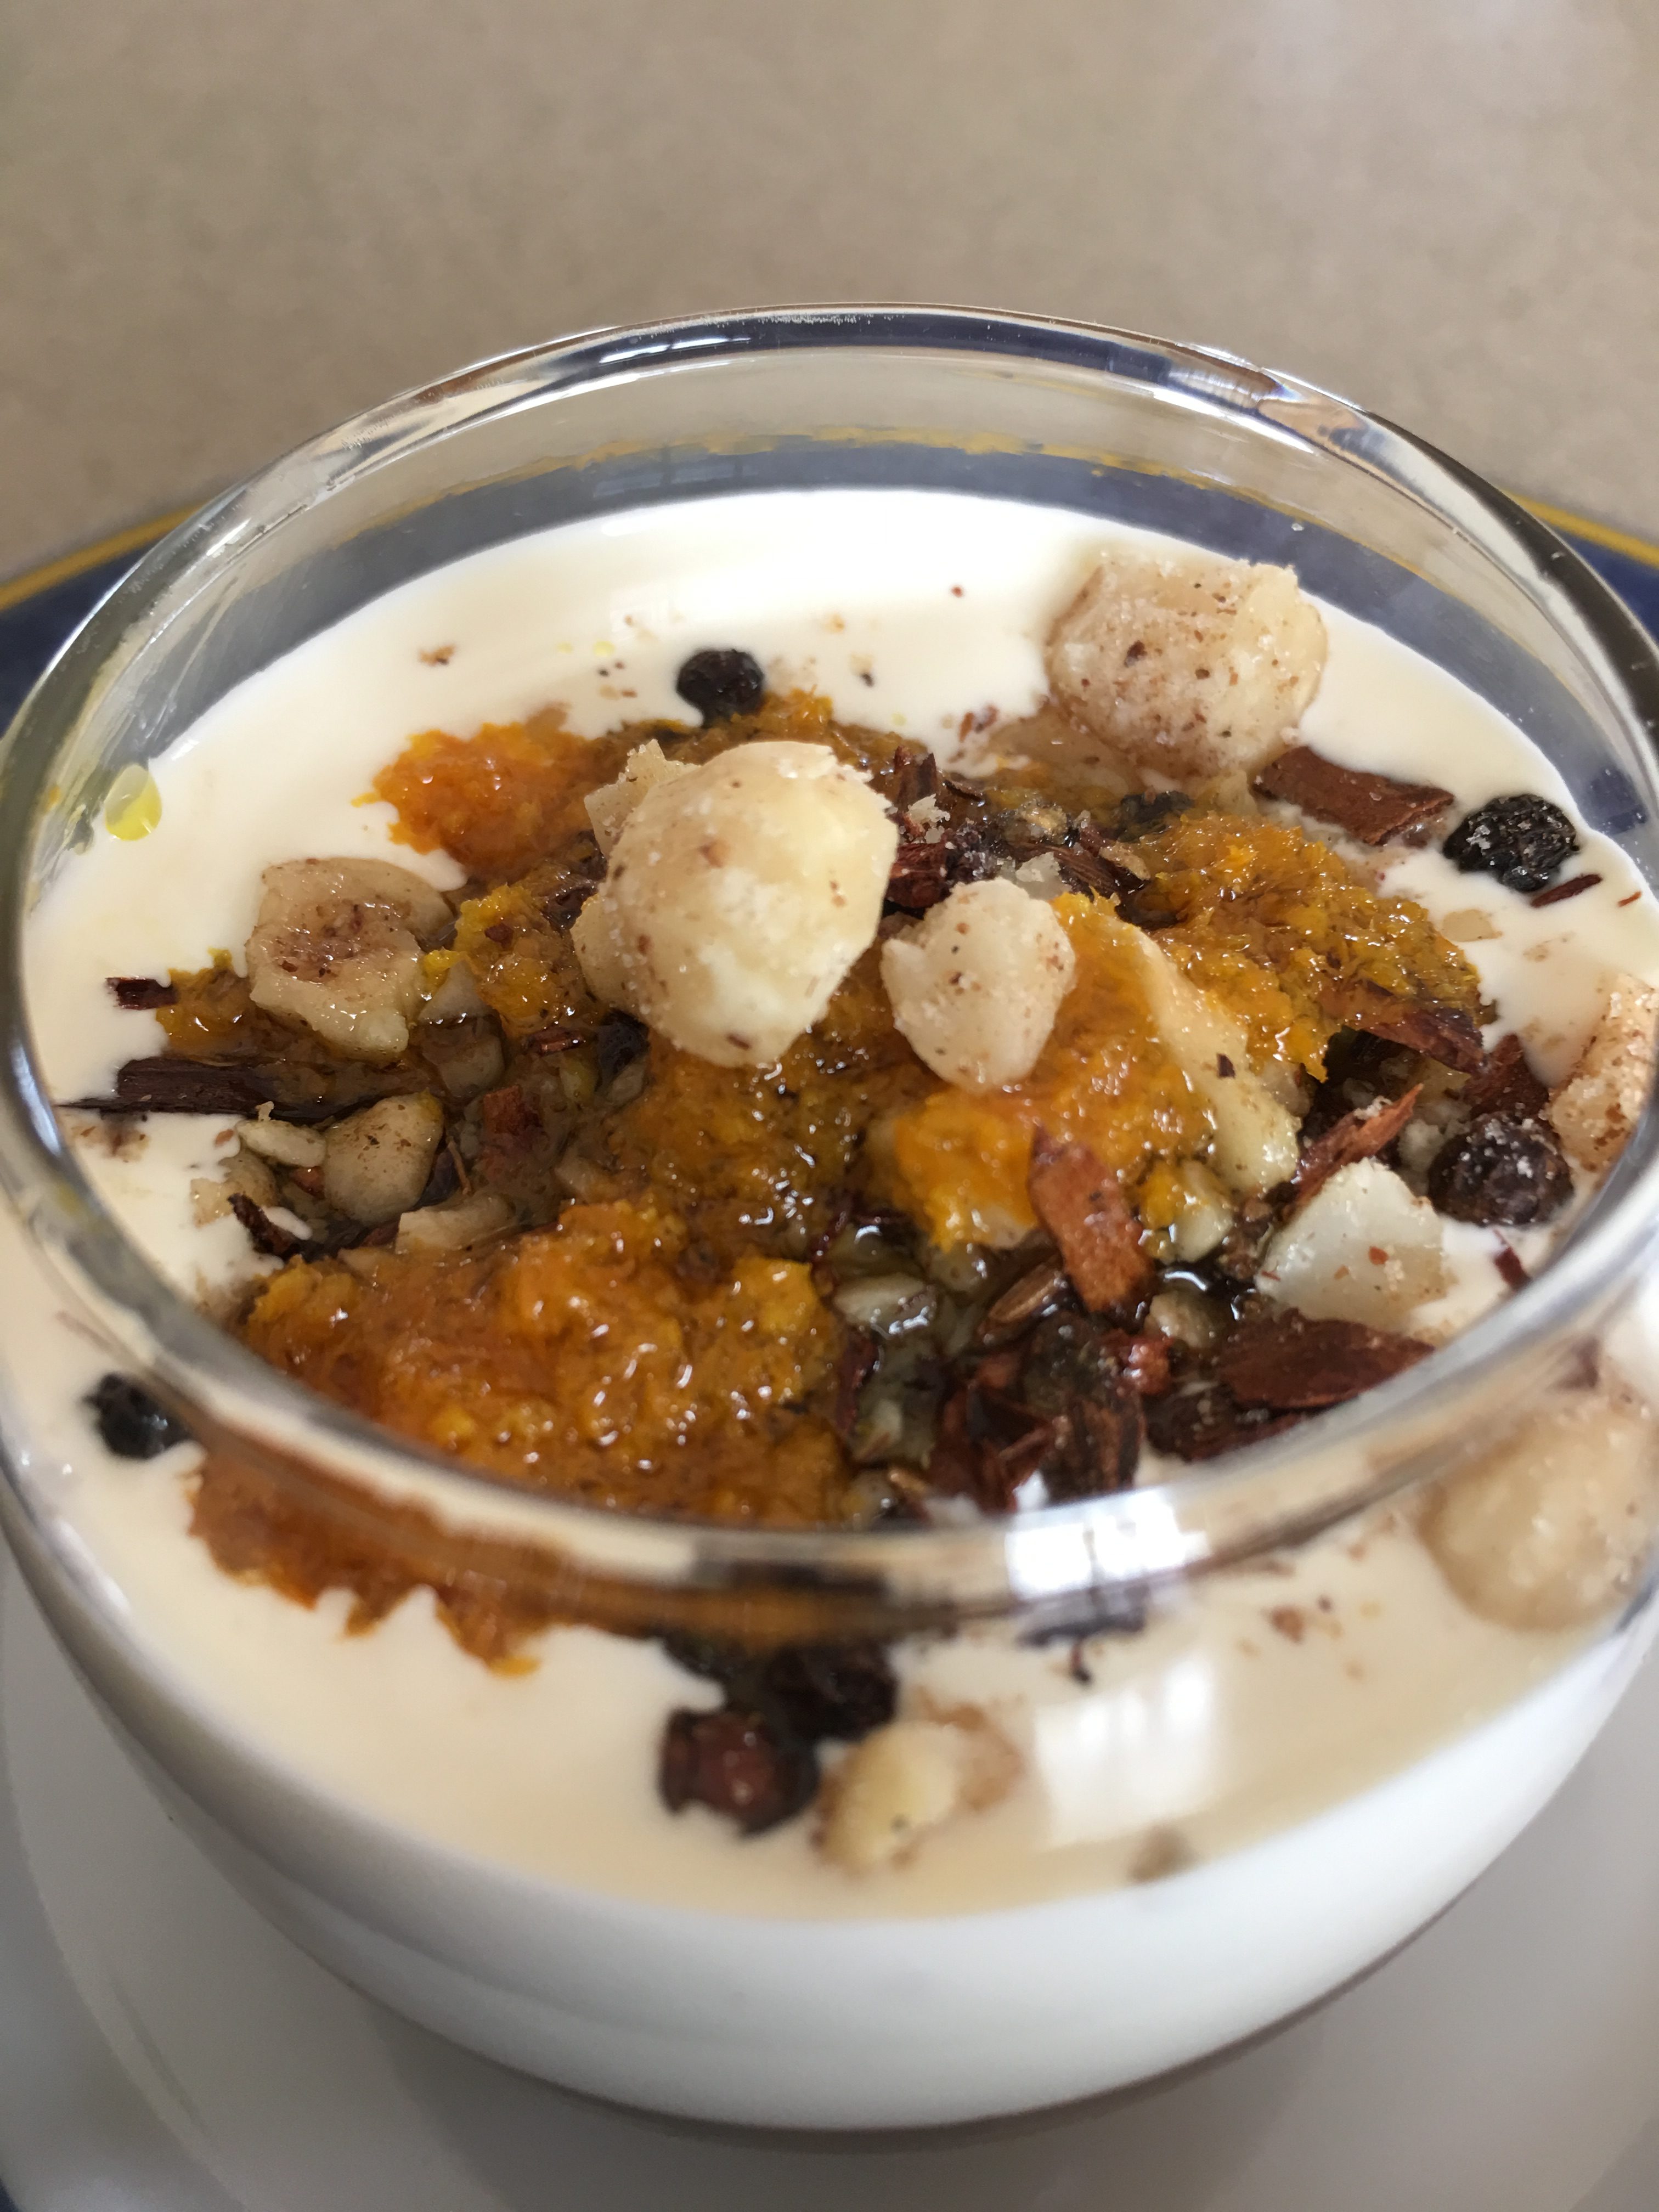
So the second time I made my usual chocolate ganache (which unlike YO’s doesn’t contain eggs, uses cream instead of butter and doesn’t contain any sugar) and I didn’t bake it. You could still plate it as above but I served it in little tea light glasses with the crème fraîche, nutty spice mix and a drizzle of orange oil on top, as you can see in the second photo. I doubled the orange oil as there wasn’t enough the first time.
Chocolate Ganache:
250g dark chocolate (70-80% cocoa solids)
300ml thick or whipping cream Creme Fraiche:
300g crème fraîche or sour cream
2½ tsp sifted icing sugar Hazelnut Spice Mix:
2 tsp coriander seeds
¾ tsp black peppercorns
1 small cinnamon stick
1 whole star anise
8 cardamom pods
¾ tsp caster sugar
2 Tbs hazelnuts Orange Oil:
Finely grated zest of 1 orange
2-3 Tbs olive oil To serve:
Maldon salt flakes
Ganache: heat cream to boiling point in a saucepan. Add chocolate broken into squares, remove from the heat and allow chocolate to melt. Stir till smooth then scrape into a shallow bowl, cover and refrigerate for several hours or overnight.
Hazelnut Spice Mix: place all ingredients except sugar in a frying pan and stir for 2-3 mins until lightly toasted and fragrant. Transfer to a spice grinder or mortar and pestle and grind until fairly fine. Mix in the sugar.
Orange Oil: place both ingredients in a jar with a lid and shake.
Just before serving mix icing sugar and crème fraîche or sour cream. Don’t do this ahead of time as the sugar can make the cream go runny.
Check the chocolate ganache and if it’s rock hard remove it from the fridge a couple of hours before serving.
Arrange some hazelnut spice mix on 8 plates. Scoop a heaped tablespoon size portion of the chocolate ganache onto each plate, using a spoon dipped in hot water and re-dipping each time. Garnish with the crème fraîche and orange oil. Finish with a tiny pinch of salt flakes.
Alternative way to serve: pour chocolate ganache into 8-10 small shot glasses or tea light glasses and refrigerate. Serve topped with a dollop of cream, a sprinkle of the hazelnut spice mix and a drizzle of the orange oil. Finish with the salt flakes.
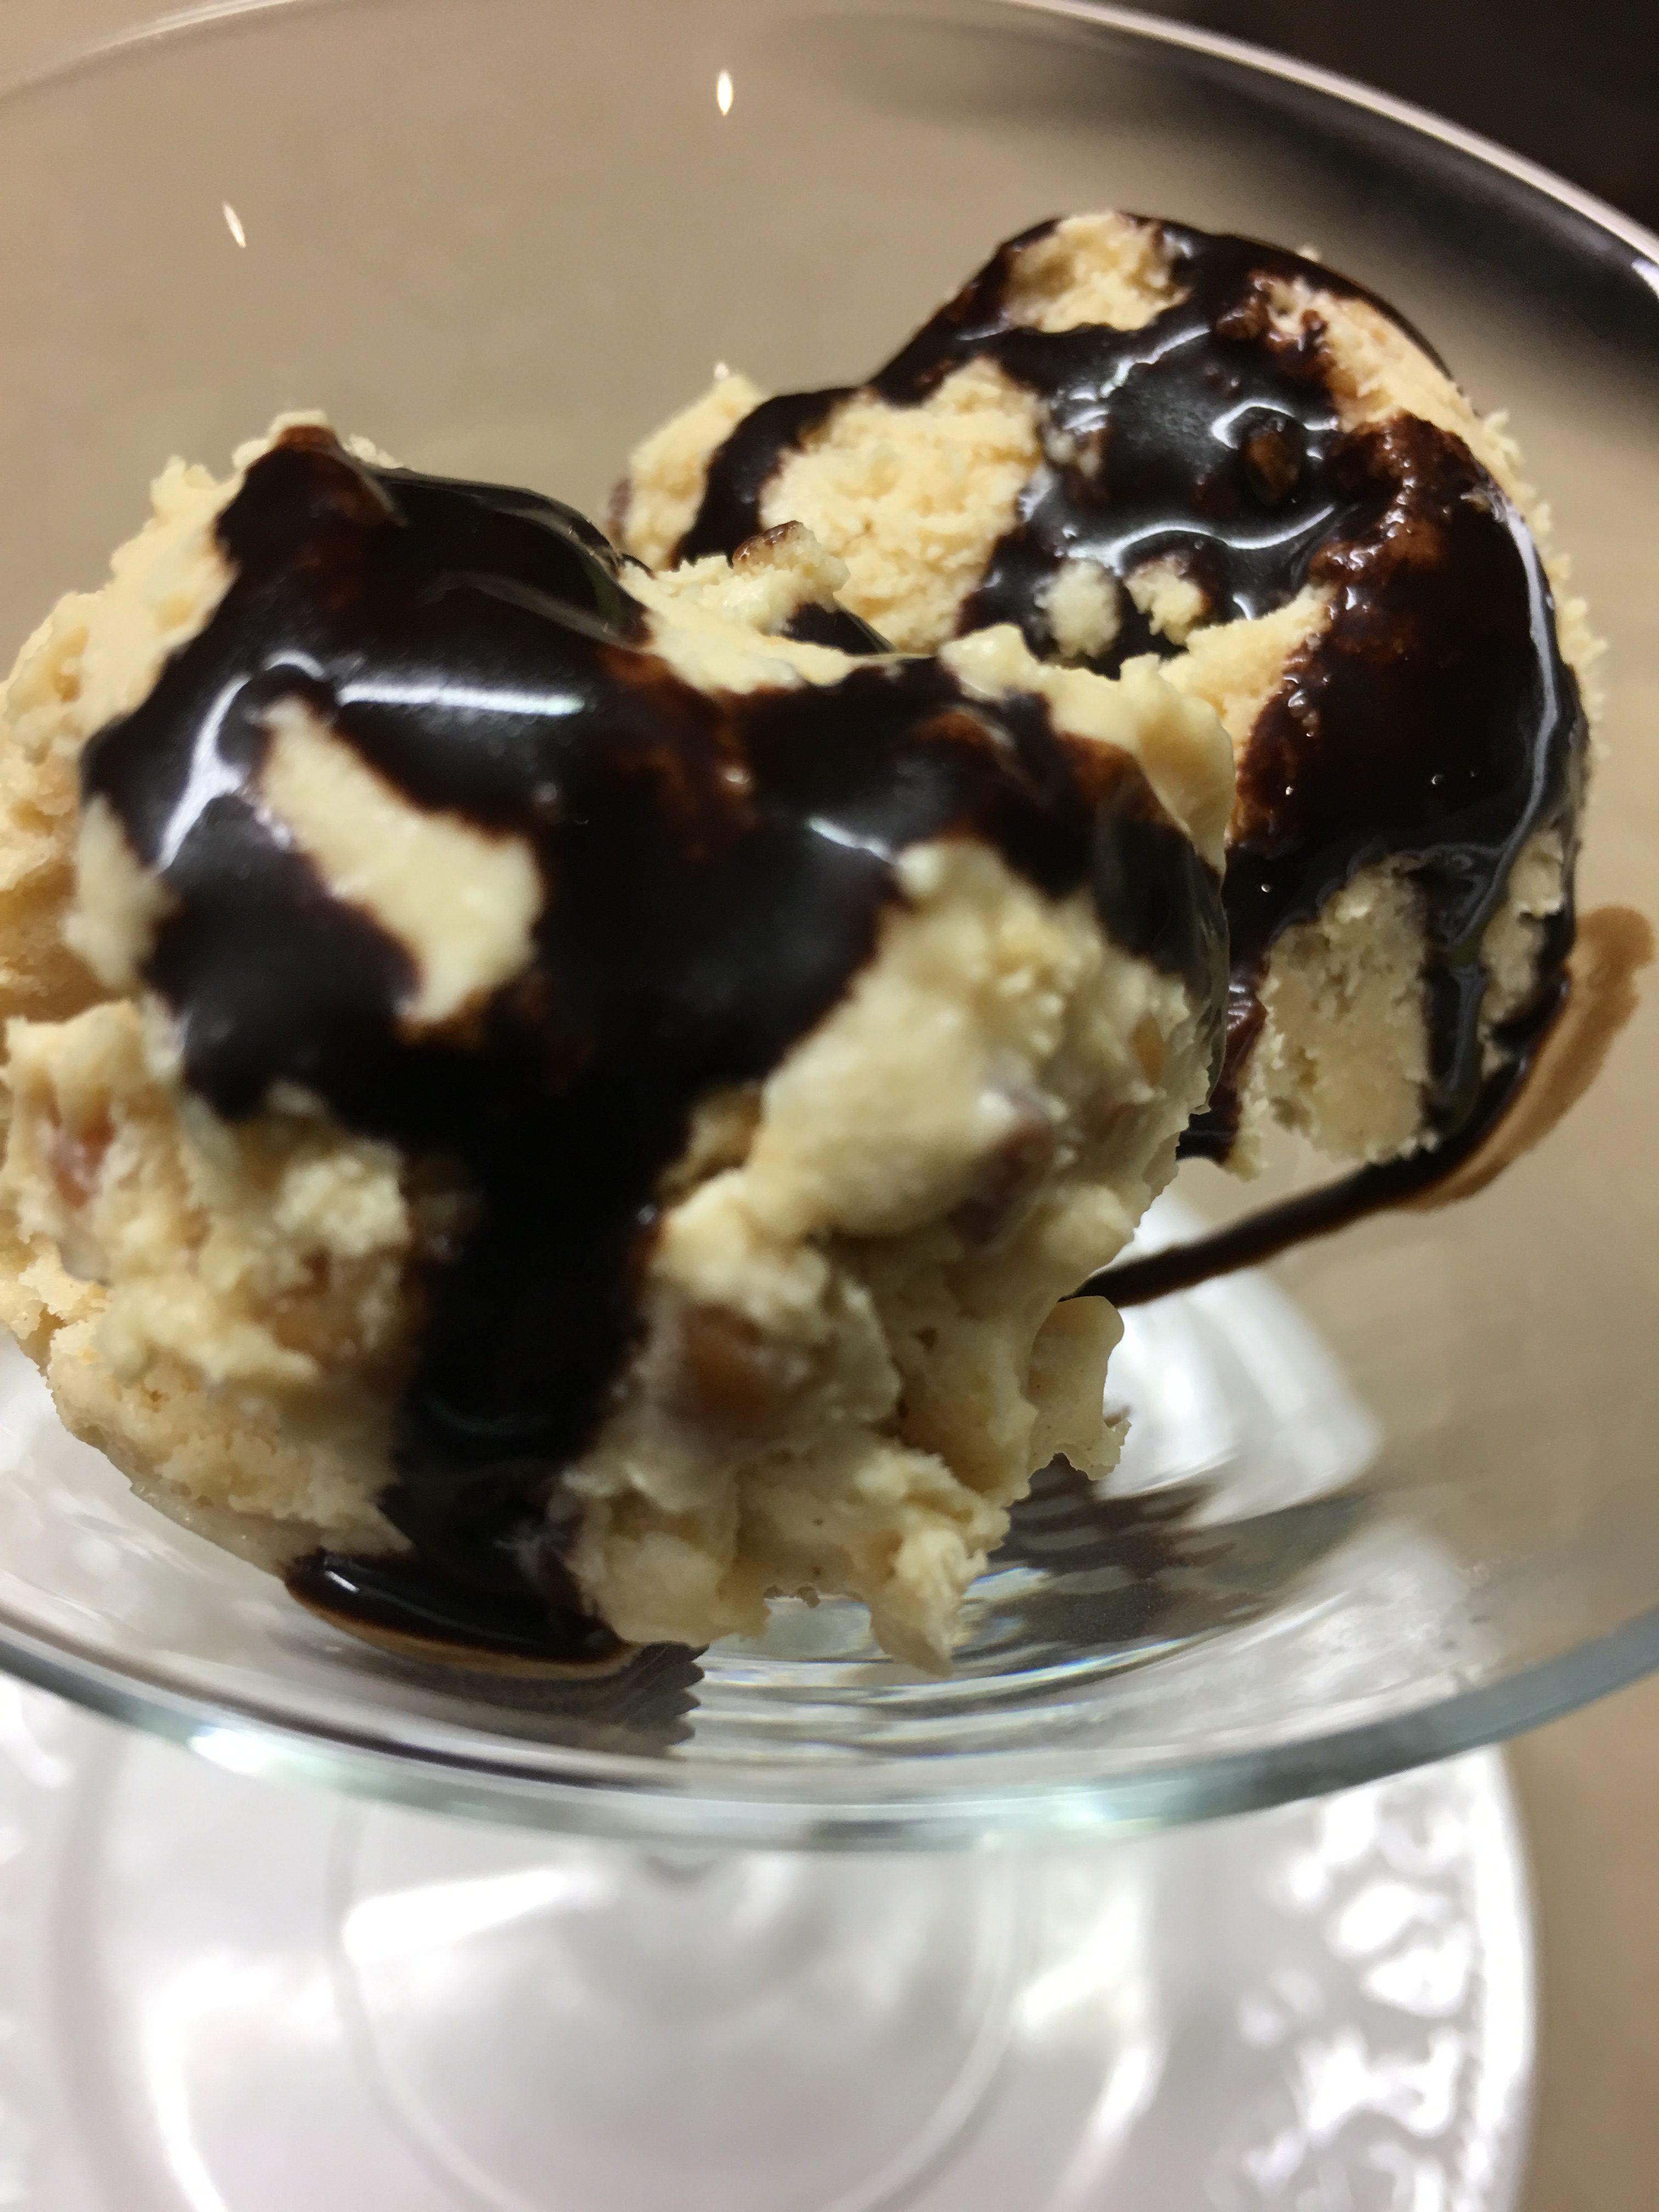
When the kids were growing up I used to make a quick and easy chocolate sauce with a recipe from my mother in law. It goes well with ice cream, waffles and pancakes and disappeared faster than I could make it.
On a recent trip to Denmark we spent a delightful weekend with our dear friends Vickie and Frants on the island of Fyn. Vickie served a delicious chocolate sauce with ice cream and when she explained the recipe I realised it was almost identical to mine, which I hadn’t made in ages.
Last weekend I went on a bit of a cooking spree and made a few things for the fridge and freezer, including peanut butter ice cream and chocolate sauce to serve with it. For Matthew, not the kids who are long gone. The recipe makes about a cup of sauce, so if you have a house full of kids you might like to double it. If you can’t find golden syrup, honey or maple syrup should work. The ice cream is very quick to make and you don’t need an ice cream machine.
Peanut Butter Ice Cream:
1 cup peanut butter (smooth or crunchy)
A generous ½ cup of sugar
600 ml cream
125 ml milk
1 tsp vanilla essence
A pinch of Maldon salt flakes Chocolate Sauce:
½ cup water
½ cup sugar
4 Tbs cocoa powder
2 Tbs Golden Syrup
A piece of butter the size of a walnut
1 tsp vanilla essence
For the ice cream, use electric beaters to mix the peanut butter with the sugar until smooth. Gradually beat in the cream and milk and continue beating until thick. Add the vanilla and salt, then scrape into a plastic container and freeze.
For the sauce, place all ingredients except the butter and vanilla in a large saucepan, as it tends to bubble up. Heat, while whisking until smooth, then boil at a steady boil without stirring for 4-5 mins. Remove from the heat, add the butter and vanilla. Serve immediately or store in the fridge, covered and reheat in the microwave for about 30 secs. If it gets a bit thick add a tablespoon or so of water before heating. And if it’s too “dark” add some cream.
Serve ice cream topped with the sauce.
Makes about 1 litre of ice cream and 1 cup of sauce
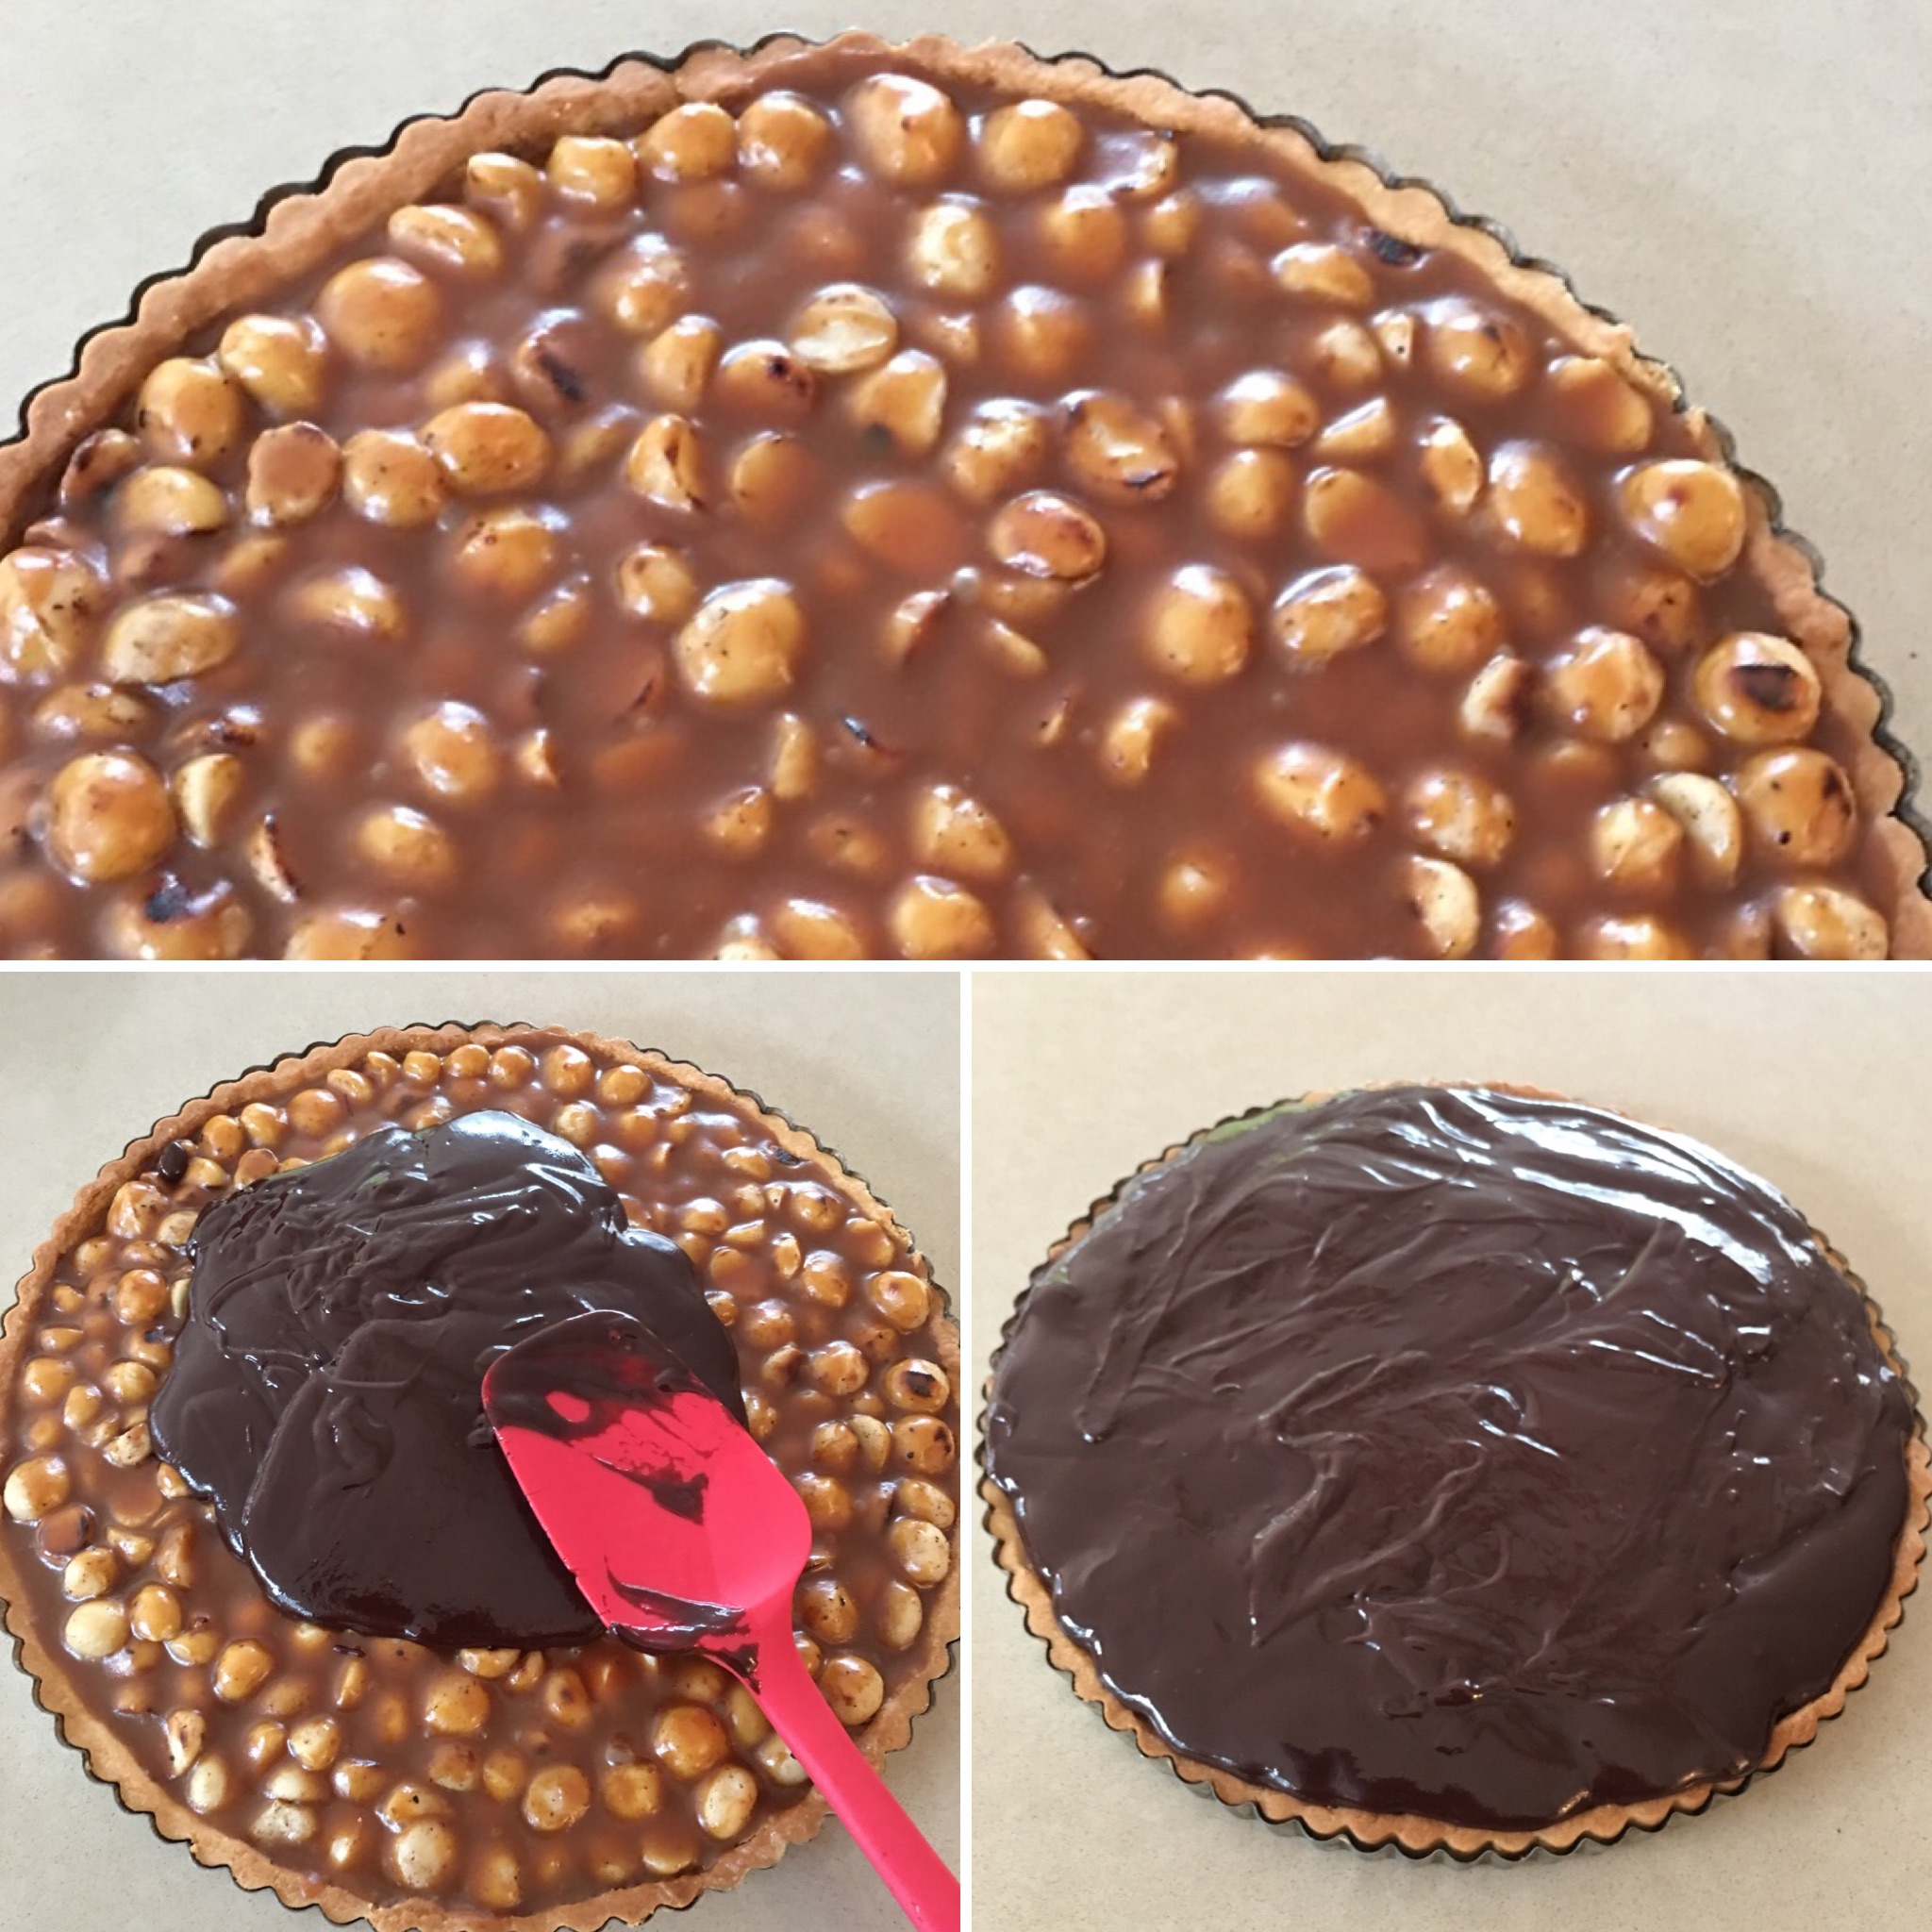
Matthew loves anything with salted caramel, so I knew this would be right up his alley.
I used a 28 cm metal flan tin with a loose bottom. If your tin is a bit smaller the filling will be thicker and you may have a bit more pastry left. Use a shallow tin rather than a deep one you would use for a quiche.
1 batch of Sweet Shortcrust Pastry made into a 25-30 cm pastry shell
Or 1 bought pastry shell
400g macadamia nuts Salted Caramel:
1 cup sugar
¼ cup water
1 cup cream
80g unsalted butter
1 tsp salt Chocolate Ganache: 1 cup cream
1 Tbs liquid glucose (corn syrup)
300g dark chocolate
30g unsalted butter To serve:
Sea salt flakes
Whipped cream
Make pastry according to the recipe at the link. Follow the instructions down as far as refrigerating for 15 mins. Bake 10 mins, remove paper and weights, then bake for a further 8 minutes (instead of 3 minutes), or until fully cooked and golden. Place macadamia nuts in a large non-stick frying pan and stir over moderate heat until slightly coloured. Spread over the base of the pastry shell.
For the salted caramel, heat sugar and water in a saucepan over medium heat until sugar dissolves, then cook, without stirring but swirling from time to time, until it turns into a rich amber caramel (10-14 minutes). Carefully add cream and stir until smooth. Remove from heat and stir through butter and salt. Spoon evenly over the nuts in the tart shell, then leave to set.
For chocolate ganache, bring cream and glucose to the boil in a saucepan then remove from heat. Add chocolate broken into squares and butter, stirring until melted. Allow to cool for a few minutes, stirring occasionally, until glossy. Spread ganache over the salted caramel, then stand in a cool place until set. Serve at room temperature or chilled with flakes of sea salt scattered on top. It’s very rich so cut into small servings. Whipped cream is optional.