Baked Beef and Onions

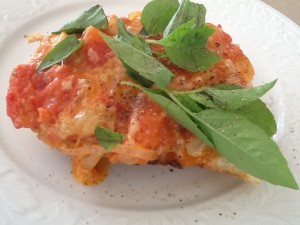
I have quite a collection of individual dishes and found these oval ones in a secondhand shop.  They are ideal for freezing individual servings of lasagne, chicken parmigiano or baked beef and onions, a dish I often make the day after we have roast beef, to use up the leftover meat and gravy.

The photo looks a bit oily and I suppose it is a bit of a high cholesterol dish – but it’s low in carbs and really delicious!  Any leftovers make a great filling for a toasted sandwich.

Baked Beef and Onions

About 400g leftover roast beef, thinly sliced
2 onions, thinly sliced
1 Tbs butter
1 Tbs olive oil
½ to one cup leftover gravy (see below)
½ cup grated cheddar cheese (or a mixture of leftover bits!)

Arrange sliced beef in a shallow ovenproof dish or 4 individual dishes, lightly greased.  In a frying pan heat butter and oil and saute onions over gentle heat until rich golden and quite tender. Add gravy then spread over the beef. Cover with grated cheese. Can be made ahead to this stage and kept covered, in the fridge, for a day or so.  Or you can freeze them.  Bake 20-25 mins at 200°C or until golden.  Serve with a green vegetable or salad.

Serves 4

Note: if you don’t have quite enough gravy add a dash of cream and a dash of tomato ketchup, but avoid adding water as the result will be watery.

Nana’s gravy: remove the roast (chicken, beef, lamb, pork or whatever) from the roasting pan and keep warm, covered loosely with foil.  Discard all but 2-3 Tbs of fat from the roasting pan, keeping all the brown bits.  Place pan over gas flame, add 2-3 Tbs plain flour and cook, stirring with a wooden spatula, for 2-3 mins or until flour is cooked.  Gradually add 2 cups water, 2 Tbs dry sherry, 2 Tbs cream (Nana used the top of the milk), and a good pinch sugar.  Taste the gravy adding salt and pepper to taste.  If the gravy lacks a bit of flavour or looks a bit pale you can add a stock cube.  The good old Oxo was used a lot in England back then to add colour and flavour to beef gravies and casseroles. Normally the gravy will taste fine without, but sometimes with a particularly lean piece of roast beef and insufficient pan juices I have been known to cheat a bit.  Sometimes just half a beef Oxo cube is just what’s required to give a bit of colour.  Let gravy simmer while you carve the meat, adding a bit more water as necessary to keep it the right consistency.  Push it through a sieve it you want it to be perfect gravy without any bits.  For family I usually don’t bother.

Beef and Polenta Pies

Last weekend we had lunch at The Old Cheese Factory at Reidsdale.  There was a cool wind, but we sat outside because we had two dogs with us.  Matthew had a nice time talking to the owners Robert and his son Gary about growing apples, asparagus and other gardening stuff. They make their own cider, ginger beer, apple juice, elderberry wine, elderflower sparkling wine and other beverages.  We tasted most of the above and found them all delicious.  The cider is dry, just the way I like it. The Old Cheese Factory serves simple lunches at weekends (best to book) and they also run bread-making, cheese-making and sausage-making classes taught by local artisans from Braidwood.

Matthew and I had the Ploughman’s lunch with a glass of apple cider.  Catherine more sensibly chose a hot dish, described as a beef and eggplant pie with red wine and polenta and a glass of apple juice.  She said the pie was delicious – a variation on a shepherd’s pie.  I decided to make something similar using mushrooms instead of eggplants and the result made a tasty family meal.

Beef and Polenta Pies

Beef filling:
1 Tbs olive oil
1 large onion, chopped
2 cloves garlic, crushed
250g mushrooms
500g lean minced beef
1 Tbs tomato paste
1 tsp sugar
1/4 cup sherry or red wine
1 beef stock cube
2 tsp dried mixed herbs or oregano
1 tsp ground cumin
1 cup water
Extra half cup of water mixed with 3 tsp cornflour
salt and freshly ground pepper to taste
Polenta topping:
2 cups milk
1 cup water
3/4 tsp salt or garlic salt
1 cup instant polenta
1/4 cup grated Parmesan cheese
2 Tbs butter
1 egg, beaten
1/4 cup grated Parmesan, extra

Heat oil in a large frying pan.  Cook onion and garlic over a moderate heat until softened but not browned.  Wipe mushrooms and cut in halves or chunky slices – you don’t want them to get lost in the filling.  Add to the pan with the mince and keep stirring for about 5 minutes or until the meat has browned a bit.  Add remaining ingredients except cornflour mixture and simmer for 15-20 minutes or until meat is tender.  Add cornflour mixture and stir till thickened.  Adjust seasoning – you may not need any salt if stock cube is salty.  Spray six 1 cup souffle or ramekin dishes with oil and divide filling among them.

Bring milk, water and salt to the boil in a medium saucepan.  Add polenta and stir constantly for 3-5 mins until polenta thickens and pulls away from sides of pan.  Add parmesan, butter and egg and remove from heat.

Preheat oven to 180°C. Place 2-3 Tbs of polenta on top of meat filling – whatever fits – and spread with a knife to cover completely.  You will probably have some polenta left over.  Sprinkle with extra cheese.  Place pies on a baking tray and bake for about 25 mins or until golden brown. Serve immediately with a salad or green vegetable.

Note: Unbaked pies can be stored in the fridge, loosely covered, for a day or so. For larger appetites make in four larger dishes, or if preferred use one large dish.

Serves 4-6

Mediterranean Tartlets

These delicious tartlets make a perfect lunch in summer – combining all the flavours of the Mediterranean in one easy and adaptable dish.  The layers can be prepared the day before and assembled just before serving.  Vegetarians who don’t eat fish can omit the prawns.  If you can’t find yellow capsicum use all red ones.

Three sheets ready-rolled puff pastry squares (25x25cm)
100g feta cheese, crumbled
400g peeled cooked prawns, tails left on (optional)
½ cup black olives, pitted and halved
½ cup semi-dried tomatoes, chopped (optional)
Onion Marmalade:
3 large onions, finely chopped
2 Tbs butter
2 Tbs olive oil
1 Tbs white balsamic or white wine vinegar
2 tsp sugar
Grilled Vegetables:
4 small eggplants (the long thin ones)
4-6 zucchini (courgettes)
2 red capsicum (peppers)
2 yellow capsicum (peppers)
olive oil spray
Pesto:
2 Tbs pine nuts, lightly toasted
1 clove garlic, crushed
3 Tbs grated Parmesan
1 cup basil leaves
4-5 Tbs olive oil

Preheat oven to 200°C.  Cut each pastry square into four smaller squares, approx 12.5 x 12.5cm.  Place on baking sheets lined with baking paper, prick with a fork then bake for about 15 mins or until golden brown.  Cool and store in a container with a lid.  If you can’t find ready-rolled pastry use block puff pastry and roll it out yourself.

In a large frying pan cook onions with butter and oil over a medium to low heat for about 40 minutes, stirring often, until soft and golden.  Don’t let them brown.  Towards the end of the cooking time add vinegar and sugar.  Store covered in the fridge.

Wash and dry eggplants and zucchini and slice lengthwise about half a centimetre thick.  Spray both sides with oil then pan fry, grill or cook on a griddle until lightly browned and tender.  Place peppers on an oven tray and cook under a hot grill, turning once, until somewhat blackened and blistered.  Remove, cover loosely with foil and when cool enough to handle remove skins, seeds and membranes and cut into 4 – 5 lengthwise strips.  Store vegetables, covered, in fridge.

Place all ingredients for pesto in food processor.  Process to a puree, stopping to scrape down halfway through and store in a container in the fridge.

To serve, place pastry squares on individual serving plates.  Spread with onion marmalade, then top with some grilled eggplant, zucchini and peppers.  Arrange a few prawns on top, then crumbled feta, olives and semi-dried tomatoes.  Thin down pesto with some extra olive oil, then drizzle over the tarts.  Serve with a rocket salad.

Serves 12

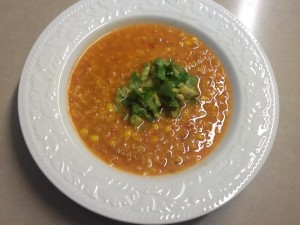
Blanca’s Chilled Avocado Soup

This recipe comes from my dear friend Blanca Bulnes who lives in Santiago but spent 4 years in Canberra when her husband was the Chilean Ambassador to Australia.  It’s quick and easy to make and perfect for a warm summer’s day.

1 litre chicken or vegetable stock
4 large avocados
1 cup thick Greek yoghurt
½ cup cream
1 Tbs grated onion
2 tsp lemon juice
salt and pepper to taste
1-2 tsp ground cumin (not in original recipe but if you like cumin it makes a nice addition)
To serve:
chopped parsley, or toasted slivered almonds or red pepper puree (see below)

Home made chicken stock is best for this recipe.  Leave it in the fridge to chill, then remove any fat from the surface.  Otherwise make up a litre of stock using a cube. Vegetarians can use vegetable stock.

In a food processor mix avocado flesh with yoghurt, cream and some of the stock.  Scrape into a bowl and add remaining ingredients.   Chill for several hours or overnight. Serve garnished with chopped parsley or toasted slivered almonds or a drizzle of red capsicum/pepper puree.

Red Pepper Puree: place 2 capsicums on an oven tray and spray with oil.  Place under a very hot grill until slightly blackened and blistered, then turn and grill the other side.  Cover loosely with foil and leave until cool enough to handle.  Remove skin, seeds and membranes then blitz in a food processor with enough olive oil to make a smooth red paste.  Store covered in the fridge.

Lemon Meringue Pie

At 3pm on the first Tuesday of November Australia comes to a virtual standstill.  The Melbourne Cup, Australia’s major thoroughbred horse race, has been run since 1861.  Even people who never bet on horses place a bet in this race.  Lunches with sweepstakes are organised all over the country by those who can’t make it to the Flemington racecourse in Melbourne.  Ladies come dressed to kill, wearing their best hat, in order to create the right atmosphere.

Asked to bring a plate to a Melbourne Cup buffet lunch I decided to make an old English favourite, Lemon Meringue Pie.  As you can see, the lemon tree outside our kitchen window is laden with fruit.  Last year we picked all the lemons and put them in a second fridge we keep in the garage for drinks.   After a few weeks they started to go off, so this year we’ve decided to leave them on the tree and pick them as we need them.  Not sure if this will affect next season’s crop, but we’ll find out.

My ceramic quiche dish holds about a litre of filling, so this makes quite a large pie.  If you find you have too much filling,  put the excess into little glasses  to eat with a dollop of cream.


1 large fully-baked sweet shortcrust pastry shell
¾ cup caster sugar
¾ cup lemon juice
1 Tbs grated lemon rind
2 cups water
½ cup cornflour
3 eggs, separated
75g unsalted butter
½ cup caster sugar, extra

Keep the egg white from making the pastry and use it in the meringue.

Mix cornflour with some of the water to a smooth paste in a small bowl.  Heat lemon juice, sugar, remaining water and grated rind in a saucepan.  When boiling add cornflour mixture and stir until thickened with a wooden spatula.  Remove from heat and mix in egg yolks and lastly butter.  Cool a bit then push through a sieve to remove any bits of cooked egg white and spoon evenly into the pastry case.

With electric beaters whip the four egg whites (one left from making the pastry) with a pinch of salt until they hold soft peaks, then gradually add the extra sugar and continue whipping until you have a glossy meringue.  Pile onto the lemon filling, covering completely so there are no gaps.  Bake at 170°C for 10-15 minutes or until lightly browned.  Remove from the oven and cool.  Serve chilled.

Serves 10-12

Mango Semi-freddo with Macadamia Praline

Catherine drove from Newcastle to Canberra, to stay with us for a few days.  On the way she bought a tray of mangoes from a vendor by the side of the road.  James and Karen hosted a family BBQ on Sunday evening and I volunteered to bring dessert.  Catherine suggested we make a mango semi-freddo with praline, so we had a look at a couple of recipes online and a few more in my large collection of cookbooks and devised this between us.  A triangular tin bought in Paris about 10 years ago in a kitchen shop called E. Dehillerin made a perfect mold.  I could spend hours in that shop.  The mold is also a good shape for pâté and terrines.

Mango Semi-freddo with Macadamia Praline

2 large mangoes, flesh pureed in a food processor
4 eggs, separated
400ml cream
⅓ to ½ cup plus 2 Tbs caster sugar
1 tsp vanilla essence
½ cup caster sugar
Praline:
80-100g macadamia nuts, roughly chopped
⅓ cup caster sugar 

Make praline:  Place nuts in a small frying pan and stir for a minute or two over medium heat until lightly toasted. Tip out.  Add sugar to pan.  Heat and swirl until you have a nice caramel, then add nuts, mix through and tip out onto a piece of foil.  Leave to cool then break into pieces and blitz very briefly in food processor.  It should remain quite chunky.

Line a plastic or metal mold which holds 1.5 to 2L with plastic wrap, leaving excess hanging over.  Take out three large bowls.  Place egg yolks and sugar (⅓ to ½ cup according to taste) in one, cream in another and egg whites and a pinch of salt in the third.  With electric beaters, whip egg whites until soft peaks, then add remaining 2 Tbs sugar and whip till thick.  With the same beaters (no need to wash) whip egg yolks and sugar till pale and frothy and lastly the cream till thick.  Scrape cream and meringue into egg yolk mixture, add vanilla essence, then whip the whole lot together until well mixed.   Taste and if liked add a little more caster sugar.

Tip praline into mold to cover the bottom. Tip in about half the semi-freddo mixture, then drizzle with half the mango puree.  Use a knife to swirl the mango evenly through, then pour in remaining semi-freddo, drizzle with the rest of the mango puree and repeat the swirling.  If you have too much filling pour into small glasses and freeze individual ones.

Freeze for several hours or overnight.  Remove from freezer about 20 mins before serving.  Tip out onto a serving plate and cut into thick slices with a knife dipped in hot water.  You may need to hold a cloth rung out in hot water on the outside of the mold for a few seconds to loosen this dessert.

Serves 10-12

Note: this recipe contains raw eggs

Little Crumblies

When we were living in Paris fruit crumbles, which originated in England, appeared on almost every bistro menu.  Selling British grub to the French is no mean feat, so I always regard it as one of the UK’s biggest culinary successes.

When we were living in Chile in the 1990s we had a Mapuche Indian chef called Jacinto who could make just about anything into what he called a Crumbly.  But he hadn’t quite grasped the need for a Crumbly to be sweet, not savoury.  He once proudly served an apple crumbly which looked fantastic but which the kids refused to eat.  I was abstaining as I sometimes do at dessert time – otherwise I’d be roly-poly – so James said “Mum, you try it, it’s disgusting.”  Turns out Jacinto had put the usual layer of apples underneath, but had made the crumbly topping from some savoury sage and onion stuffing, left over from the Christmas turkey.  It was interesting, but it really didn’t go with vanilla ice cream.

If I have any left over stewed fruit, or a few apples which are looking a bit tired and need using, I make individual crumblies in small souffle dishes.  To make the stewed apples go further you can mix in a few frozen raspberries or blackberries.   I buy both by the kilo and always have them in the freezer. The crumblies in the photo are made from rhubarb from the garden, cooked briefly with a dash of water and sugar to taste.  Once cooked crumblies will keep in the fridge for several days, ready to be whipped out, zapped for a minute in the microwave and eaten with a dollop of cream, or just as they are.  They just hit the spot and are not large enough to be overly filling. People with larger appetites might prefer to use larger dishes.  If you haven’t got a kilo of fruit, just use what you have and adjust the topping accordingly – it’s basically 2 parts flour to 1 part each of butter and sugar.  Any leftover crumble topping can be stored in a jar with a lid in the fridge and used another time.

Fruit Crumbles
800g -1 kg sweetened stewed fruit
250g plain flour
185g butter
3-4 Tbs brown or white sugar, to taste
2 Tbs porridge oats or macadamia nuts (optional)

Preheat oven to 180°C.  Cook peeled and sliced apples (rhubarb, peaches or whatever you are using) with a little water and sugar to taste until half cooked, but looking like a compote.  They will continue to cook in the oven.  Don’t use too much water. It should be a thick compote. If using raspberries or blackberries add them now and don’t cook them.  Grease 10-12 small dishes and fill them about two thirds full with the fruit filling.

Place flour, butter (cut into chunks) and sugar in food processor.  Process with the pulse button until it forms crumbs. There should still be small bits of butter visible.  If using oats or nuts add them now and process very briefly.  Cover fruit with crumble, place dishes on a baking tray and bake for about 25 minutes or until browned and bubbling.  Serve now or cool and refrigerate, covered, then reheat in microwave for about a minute each.  Serve with cream or vanilla ice cream.  If preferred make crumble in one large dish.

Serves 10-12 if made in small dishes

Sesame Cheese Biscuits

These delicious biscuits are family favourites to serve with drinks.  They’re a traditional Aussie recipe and were made by all the ladies of a certain age – my mother in law, her sister and my dear friend Joan Tyrrel who passed away last year. While the recipe says to use cheddar, you can use any hard cheeses, including a mixture of leftover bits and pieces! At their best when fresh, they will keep in a tin with a lid for up to a week, if they last that long.

Sesame Cheese Biscuits
200g plain flour
200g butter
200g cheddar cheese, grated
1-2 tsp dry English mustard or cayenne pepper (optional)
Sesame seeds to coat

Preheat oven to 180C.  Place flour and butter in food processor and process until fine crumbs.  If liked add some English mustard powder or cayenne pepper at this stage.  Add grated cheddar and continue to process until mixture forms a ball.  Tip out then pinch off pieces the size of a large walnut and roll into balls.  Roll balls in sesame seeds to coat them all over, then arrange on baking trays lined with baking paper.  Press each biscuit lightly with a fork and leave a space between each one as they will spread while cooking.  On a hot day it’s a good idea to refrigerate the biscuits for about half an hour before cooking.  Bake for about 15 minutes or until golden.  Cool on cake racks.

Makes about 45 biscuits

Note: you can make this recipe with less or more ingredients, just keep the weights of flour, butter and cheese equal

Baked Quinces

Yesterday I gave a cooking demonstration to ten members of a women’s group I belong to.  We take it in turns to host our monthly meeting which takes the form of a cooking demonstration, followed by lunch.  Conversation is all in Spanish.  In case you are wondering what on earth we were drinking it was cranberry juice with soda water!

As you can see from the photo, we started off with a Tomato, Mozarella and Pesto Tian, which was the first recipe to appear on this blog.  This was followed by Maggie Beer’s Baked Quinces served with Labneh – a delicious alternative to whipped cream to serve with desserts.  If preferred you can leave the skins on the quinces – just rub off the “fur” – but the texture will be slightly different.

Baked Quinces with Honey and Labneh

4-6 quinces, peeled, quartered and cored
4-6 Tbs honey
1/2 cup fruit juice (e.g. apple, orange)
1 cinnamon stick, broken in two
50g unsalted butter
To serve
Extra honey or golden syrup
Labneh
1 kg plain Greek-style yoghurt

Pre-heat oven to 150C.  Place quinces in a heavy iron casserole with a lid, such as Le Creuset.  Add remaining ingredients, then bake in the oven for 2-3 hours or until the quinces are tender, but still hold their shape and are the colour of burnished pumpkins.  Stir and turn the fruit once or twice during cooking time.  Serve warm (two quarters per person) with a dollop of labneh.  If liked drizzle with a little extra honey or golden syrup.

Labneh
Line a large sieve with a piece of muslin or a man’s handkerchief and place over a bowl, allowing space under the sieve for liquid to accumulate.  Tip the whole container of yoghurt into the sieve, then cover – I find a shower cap is ideal for this job.  Leave in the fridge overnight or longer.  Discard the liquid (although I have to say that our Golden Retriever loves it) and store the labneh in a covered container in the fridge.  Serve as an alternative to whipped or thick cream.  If liked you can sweeten the labneh with a little icing sugar and add some vanilla paste, but I like it plain.  Keeps in the fridge for a week or two.

Serves 8-12

Margarita Ice Cream

The reason I’ve been a silent blogger for the past couple of weeks is the following. My family brought my dear friend Elaine in from Chile as a surprise for my birthday. As I was greeting the guests at the party she rang on my daughter’s mobile. And as I was speaking to her and saying how I wished she could have been there, in she walked. What a great birthday gift! Anyway I’ve spent the past fortnight doing touristy stuff in Canberra and Sydney with Elaine and having an absolute ball.

Elaine has now returned to Santiago and over the four day Easter break I will be doing some cooking. Am having fun using my new iPad to take photos of the dishes. This recipe for Margarita Ice Cream is another from Nigella Lawson and it’s delicious. As you can see it looks great served in Martini glasses with the rims dipped in a mixture of caster sugar and salt.  We had a full house for lunch today and the ice cream had started to melt by the time we got organised with a camera, so it’s not the best photo!

Margarita Ice Cream

500ml thick/double cream
1/2 cup fresh lime juice (125ml)
3 Tbs Cointreau or Grand Marnier
2 Tbs Tequila
150g icing sugar
To serve:
Lime zest
A Tbs each of salt and caster sugar, mixed

With electric beaters, whip cream until thick but not stiff, then gradually whip in the remaining ingredients. Pour into a plastic container and freeze for several hours or overnight. Due to the alcohol content it will not set rock hard, so there’s no need to remove it from the freezer 10 minutes before serving time, as you usually do with home-made ice cream.  Use an ice cream scoop dipped in hot water to make balls and serve in Martini glasses, the edges dampened with a little water, then dipped in a mixture of salt and caster sugar. That sounds like a lot of salt to go with ice cream, but you won’t use it all. Garnish with lime zest. Serve on its own or accompanied by fresh fruit.