I began collecting recipes when I was at school. Some of the recipes in my large collection have been in my family for generations, others were passed on by friends and chefs around the world. Many have been adapted over the years to make them lighter or update their presentation. I’ve served them to royalty, PMs and other VIPs and there have been no complaints. I hope you are inspired to make some of them.
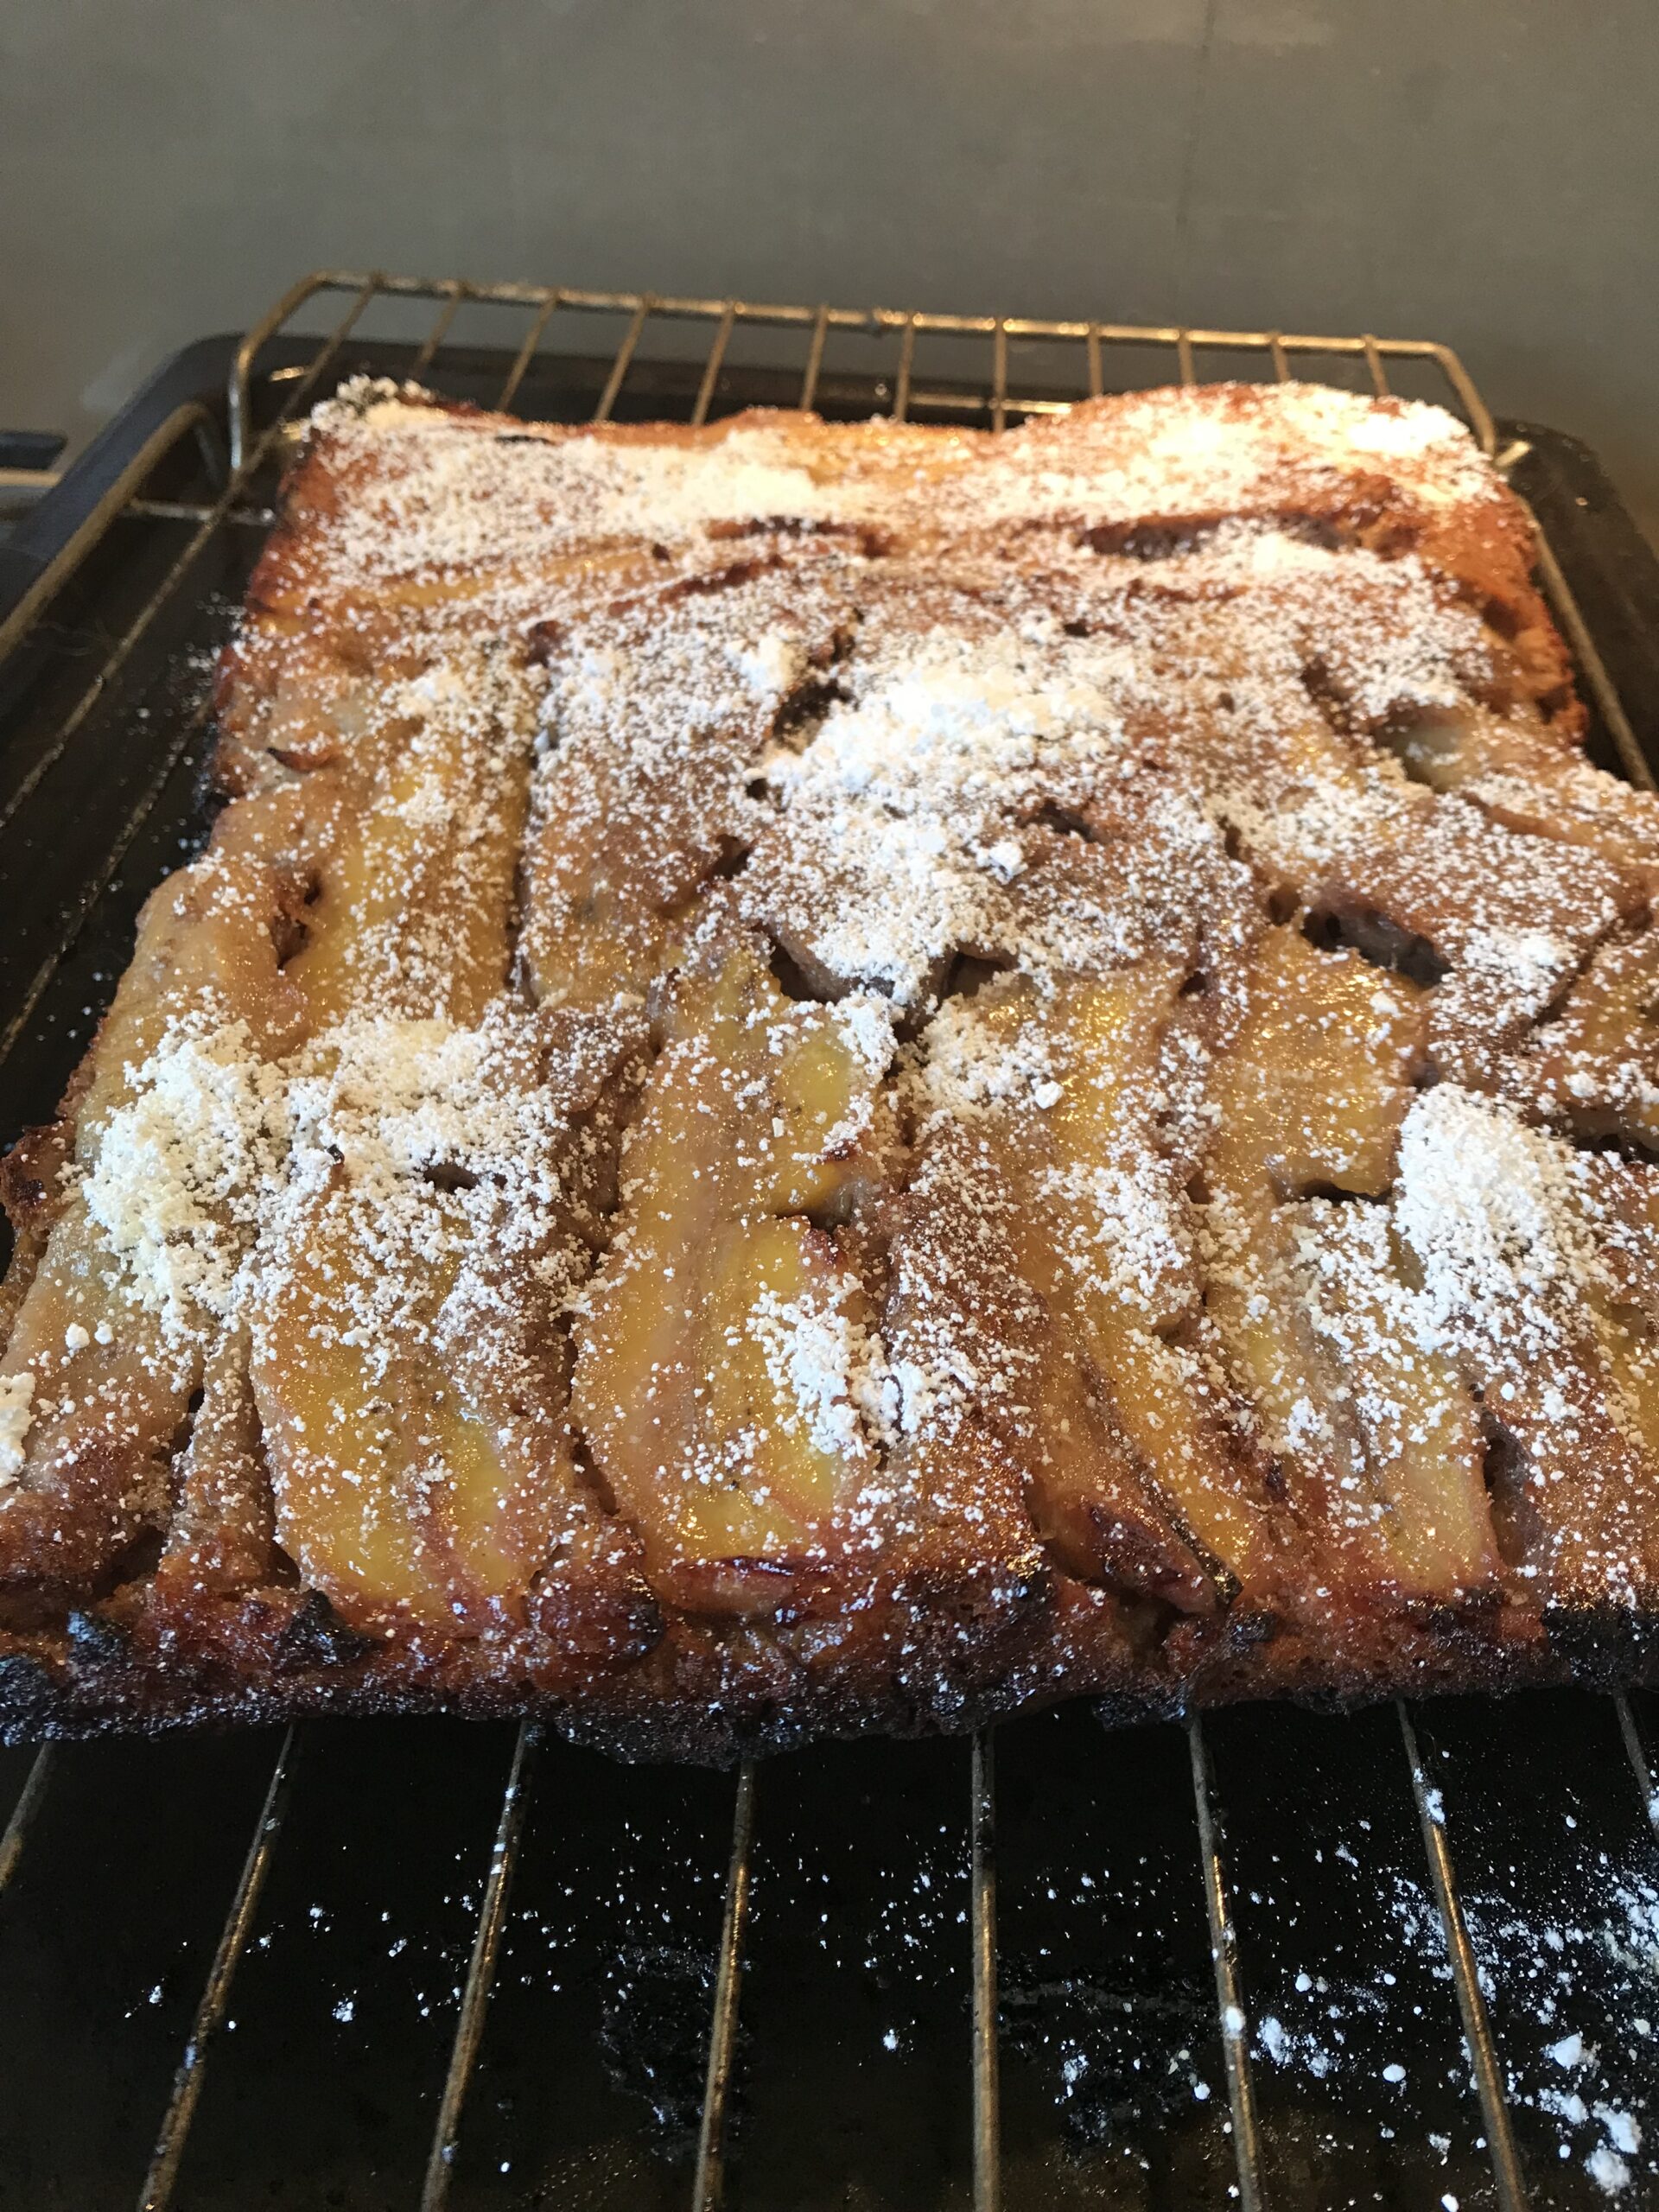
This banana cake is moist and nutty. Give it a try, even if you’re not following a gluten-free diet. Regular self-raising flour can be used instead, if you’re not worried about gluten.
The mixture can also be used to make about a dozen banana muffins. Grease a 12-hole muffin pan, fill each one almost to the top with cake mix, arrange some banana pieces on top, then spoon over the topping. Serve as a cake or as a delicious dessert, with a scoop of vanilla ice cream.
Cake mix:
1 cup nut meal made in the food processor (almonds, walnuts or pecans)
2 eggs
1 tsp vanilla essence
¼ cup milk
¼ cup vegetable oil
2 Tbs maple syrup
1 cup gluten-free self-raising flour (or ordinary SR flour can be used)
½ tsp baking powder Topping:
4-5 ripe bananas, peeled and halved lengthwise
¼ cup brown sugar
30g butter To serve:
Icing sugar (optional)
Preheat oven to 180°C. Grease and bottom-line a shallow slab pan about 35x25cm. Or use a large loaf pan, two smaller ones or a 12-hole muffin pan.
Make nut meal in food processor by processing the nuts until they look like fine breadcrumbs. Add remaining cake mix ingredients and process till combined, scraping down the sides halfway through. You can use a balloon whisk to do this instead. Spoon cake mixture into the tin or tins and spread evenly with a knife.
Arrange banana halves over the cake mix, cut side up. Melt butter in a small saucepan and mix in the brown sugar, stirring to dissolve. Spoon butter and sugar mixture evenly over the bananas. Bake for 35-45 minutes or until golden brown all over and puffed. Check it’s cooked in the middle by inserting a toothpick which should come out clean. Individual muffins will take less time than one large cake.
Serve warm or at room temperature, dusted with icing sugar.
Makes about 12 servings
Note: buy nut meal/flour or make your own by blitzing shelled walnuts, pecans, almonds, or a mixture, in a food processor.
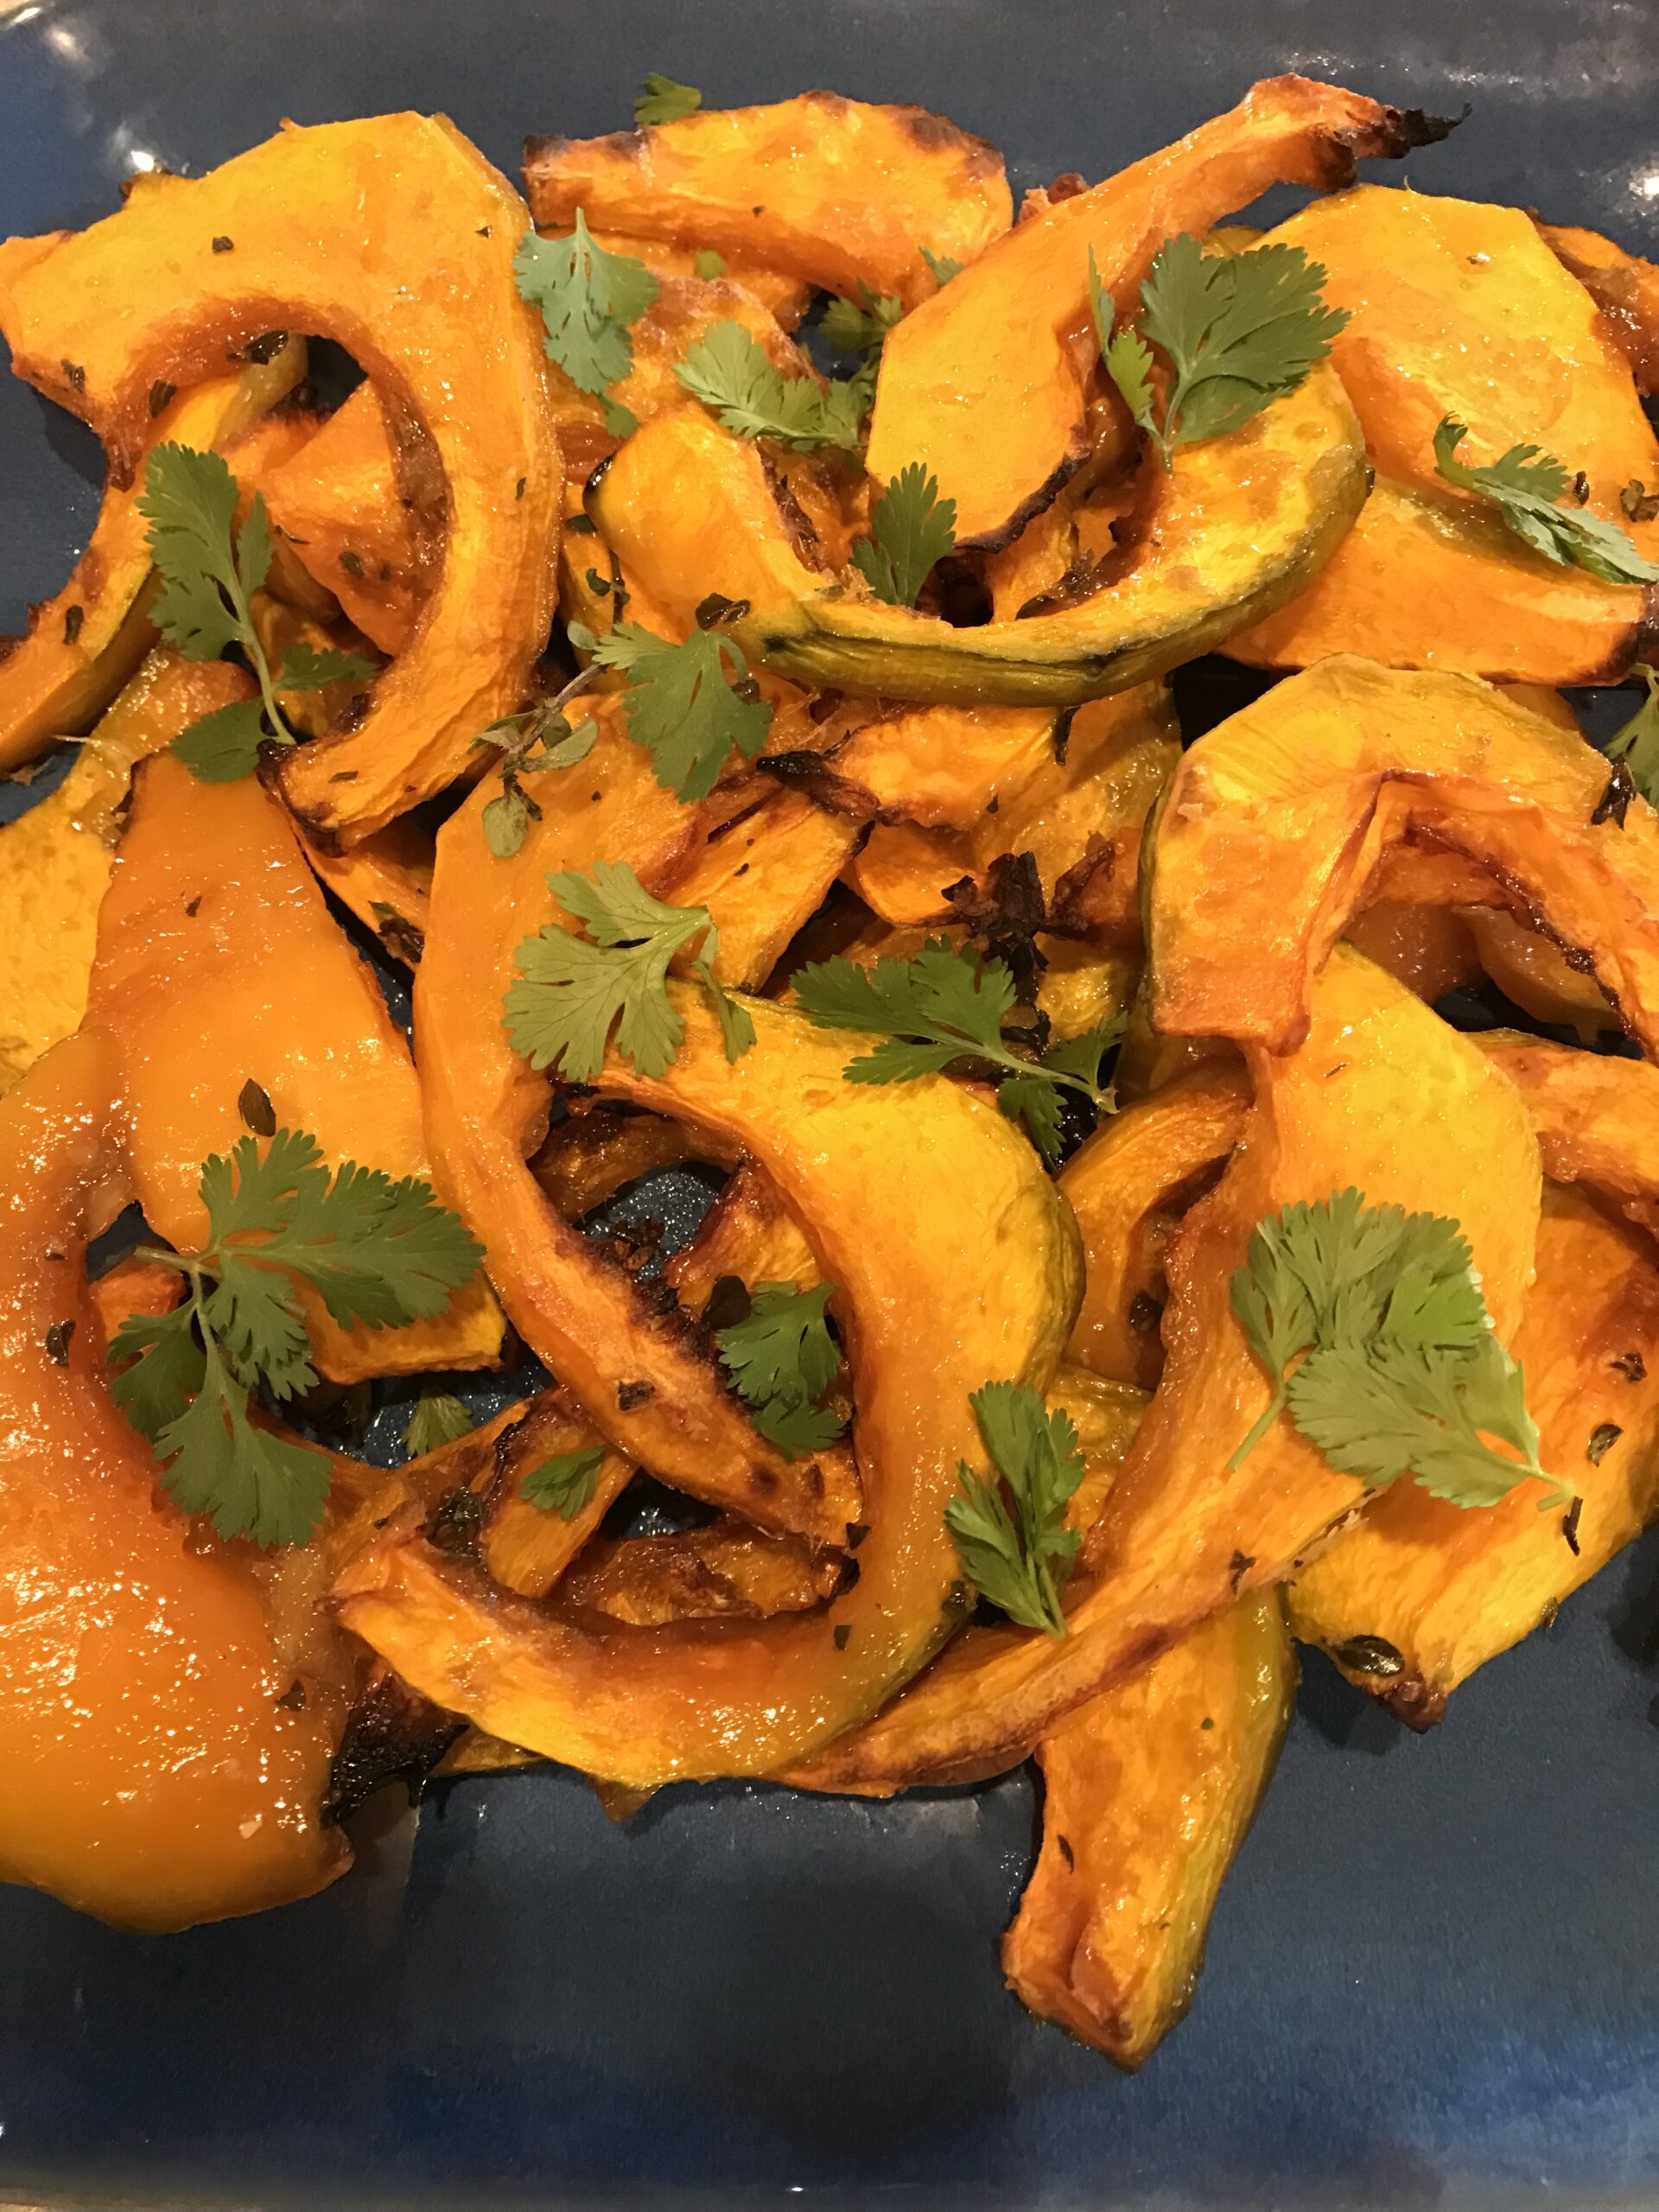
This simple recipe for pumpkin is quick and easy to prepare. Delicious served as a side dish with any main course. Leftovers are nice cold in wraps or salads. I used a butternut pumpkin, known as butternut squash in some countries.
1kg pumpkin, peeled and cut into 1cm wedges (see photo)
1 Tbs grated fresh ginger
2 Tbs olive oil
2 Tbs maple syrup
1 Tbs fresh thyme, chopped
1 tsp salt To garnish:
Fresh coriander leaves
Toasted pine nuts (optional)
Preheat oven to 180°C. Line a large shallow baking sheet with baking paper. Place all ingredients except pumpkin in a bowl and mix well. Add pumpkin and turn to coat, then spread over the baking sheet, in one layer. Drizzle with any oil and syrup mixture left in the bowl. Bake for 30-40 minutes, or until cooked and starting to brown and caramelise around the edges. Turn once or twice during cooking time.
Serve garnished with the coriander and, if using, the pine nuts.
Serves 8
Substitution: if you don’t have any maple syrup substitute honey.
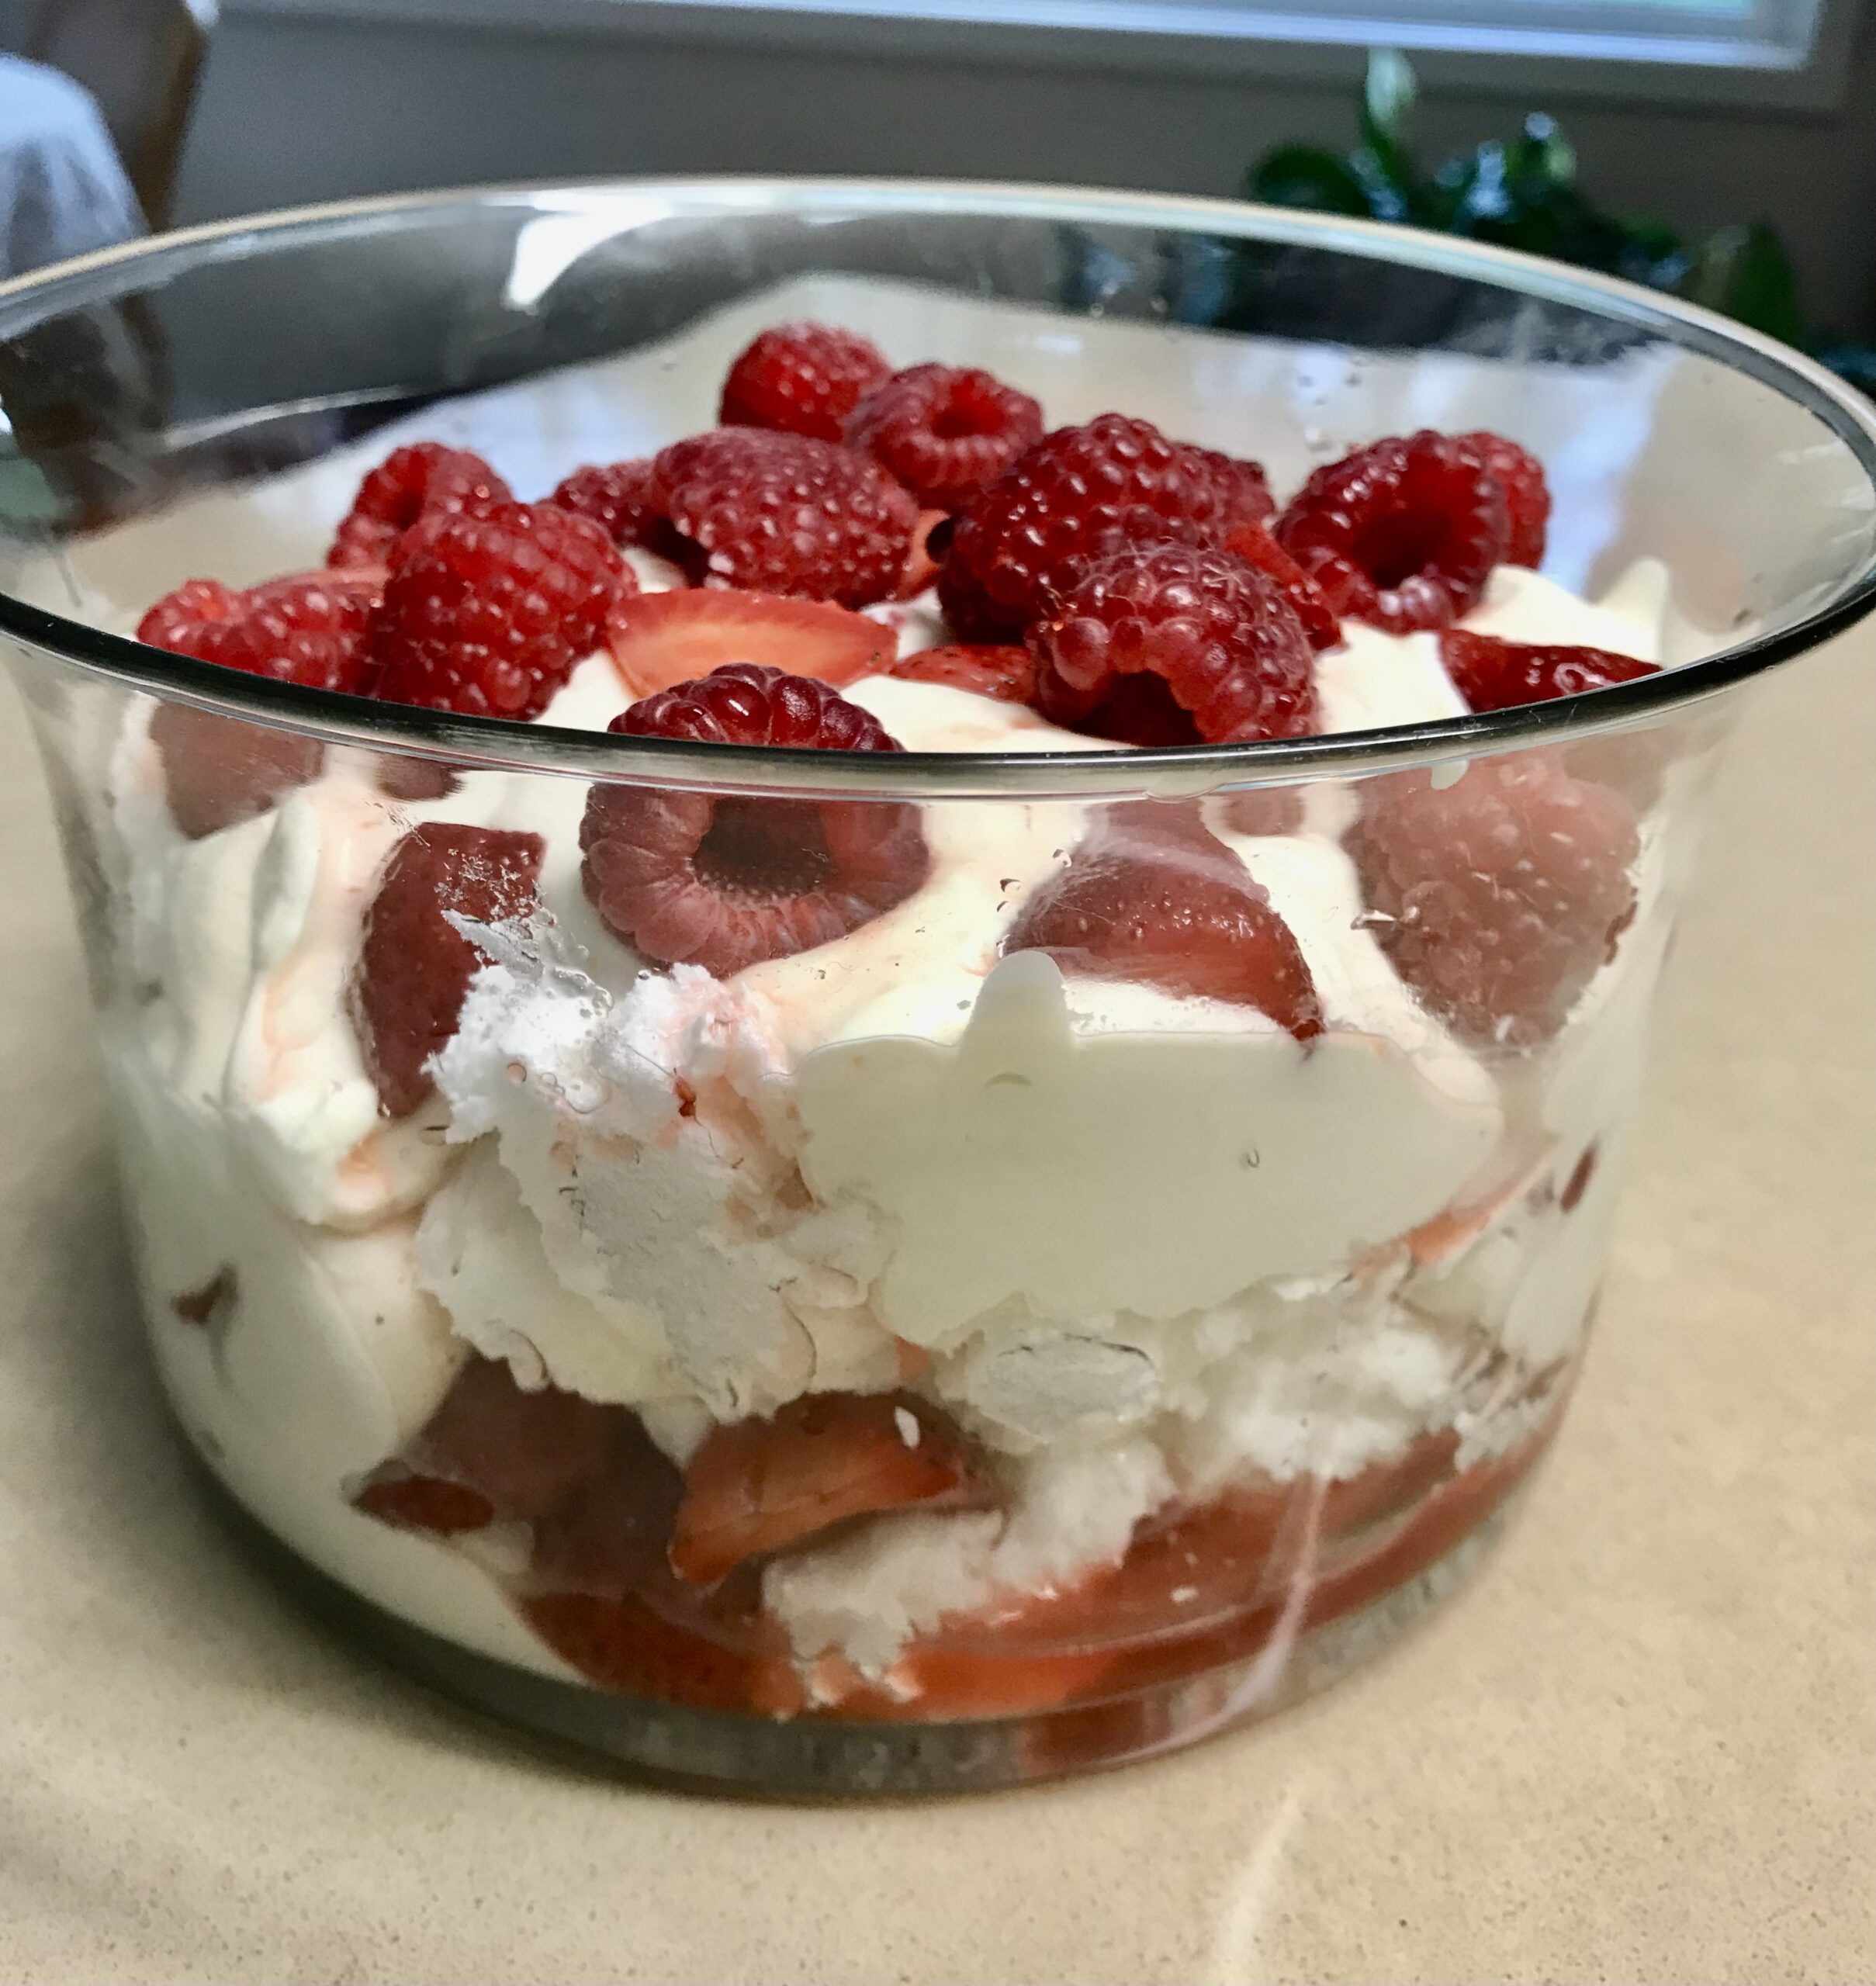
Looking for a quick and easy dessert to serve over the Canberra Day long weekend? Eton Mess, a traditional English dessert which makes the most of the summer berries is quick, easy and delicious.
A mixture of meringue, berries and whipped cream, this dish was first mentioned in print in 1893 and is thought to have originated at Eton College in England, where it’s served at the annual cricket match against Harrow School.
In the 6th episode of the TV series The Gilded Age, which I’m currently watching, the French chef is asked to prepare a British meal. For dessert he makes Eton Mess, which he describes disparagingly as a mess made by a bunch of schoolboys.
The traditional recipe for this sumptuous dessert uses broken up meringues, either home-made or shop bought. I prefer to use a pavlova base, because the meringue is crunchy on the outside, but soft and marshmallowy on the inside. In Australia pavlova bases are sold in most big supermarkets. I’m not sure if they are available in other countries, except perhaps New Zealand, but you can always make your own or use broken up hard meringues, which are more readily available around the world.
I like to use half fresh cream and half sour cream or crème fraîche, but if preferred you can use all fresh cream.
1 pavlova base to serve 12 (or about 12 large individual meringues)
250 ml whipping cream
250 ml sour cream or crème fraîche
1 Tbs icing sugar
1 tsp vanilla essence
500g strawberries
2-3 tsp caster sugar
150-200g raspberries (or blueberries, blackberries, blackcurrants etc)
Chocolate sprinkles (optional)
Wash strawberries, cut in half or slice if large and place in a bowl with the caster sugar. Mix and leave aside for an hour or two, so the juices start to run.
I used about three-quarters of a large pavlova base for this dish. Break off chunks and arrange about half of them in a large glass serving dish, or break up the hard meringues. If preferred, make individual servings using large whisky tumblers.
Scatter half the strawberries and half the raspberries or other berries over the meringue. Place the cream, sour cream, icing sugar and vanilla in a bowl and whip using electric beaters until soft peaks form. Place blobs of the whipped cream over the meringue and fruit, then the rest of the pavlova/meringue pieces, the juices from the strawberries, the remaining cream and lastly the rest of the strawberries and raspberries. They are not shown in the photo, but if liked decorate the top with some chocolate sprinkles, which always look nice with berries and cream. Refrigerate until serving time and serve within a couple of hours.
Serves 6-8
Note: if liked, add a tablespoonful of a liqueur such as Kirsch, Grand Marnier, Cointreau or Curaçao to the strawberries and sugar.
This simple vegetable curry is perfect for using up all the odds and ends of vegetables from the bottom drawer of the fridge to produce a tasty family meal. I used sweet potato, pumpkin, green beans, potatoes and frozen peas. Other vegetables such as cauliflower, zucchini, carrots, capsicum, broccoli and eggplants also work well in this recipe.
If you’re not sure how many vegetables to prepare, I filled a one-litre measuring jug twice to overflowing. The quantity is flexible, but basically you need a big bowl full. If you don’t have enough vegetables, add a drained can of chickpeas.
3 Tbs vegetable oil
1 large onion, diced
2 cloves garlic, crushed
1 red chilli, seeded and finely chopped (optional)
1 Tbs grated fresh ginger (optional)
3 Tbs curry paste or powder
1 tsp paprika or turmeric
1 can tomatoes, chopped
1 can coconut milk
2 cups chicken or vegetable stock
1 tsp sugar
8-10 cups prepared vegetables (see list above)
2 cups frozen peas or 2 handfuls spinach leaves
Extra water as required
Salt and freshly ground black pepper To serve:
Steamed rice
Plain yoghurt
Chopped fresh coriander
Fruit chutney
Prepare vegetables by cutting them into large chunks and pieces that will cook in a similar time. Heat oil in a large, heavy-bottomed pan and cook the onion and garlic gently, until soft but not coloured. Add the chilli, ginger, curry paste and paprika or turmeric and cook, stirring for a couple of minutes. Add the tomatoes, coconut milk, stock, sugar and all the vegetables apart from the peas or spinach. Simmer, stirring from time to time, for 20-25 minutes, or until the vegetables are cooked. Add more water as required during cooking and season to taste with salt and pepper. Lastly add the frozen peas or spinach and cook for a minute or two.
Serve the curry garnished with coriander and accompanied by steamed rice, a bowl of plain yoghurt and some fruit chutney.
Serves 6
Note: if you prefer a non-creamy curry leave out the coconut milk and add more stock. If you have coconut cream rather than milk, that works too. This is a very flexible recipe.
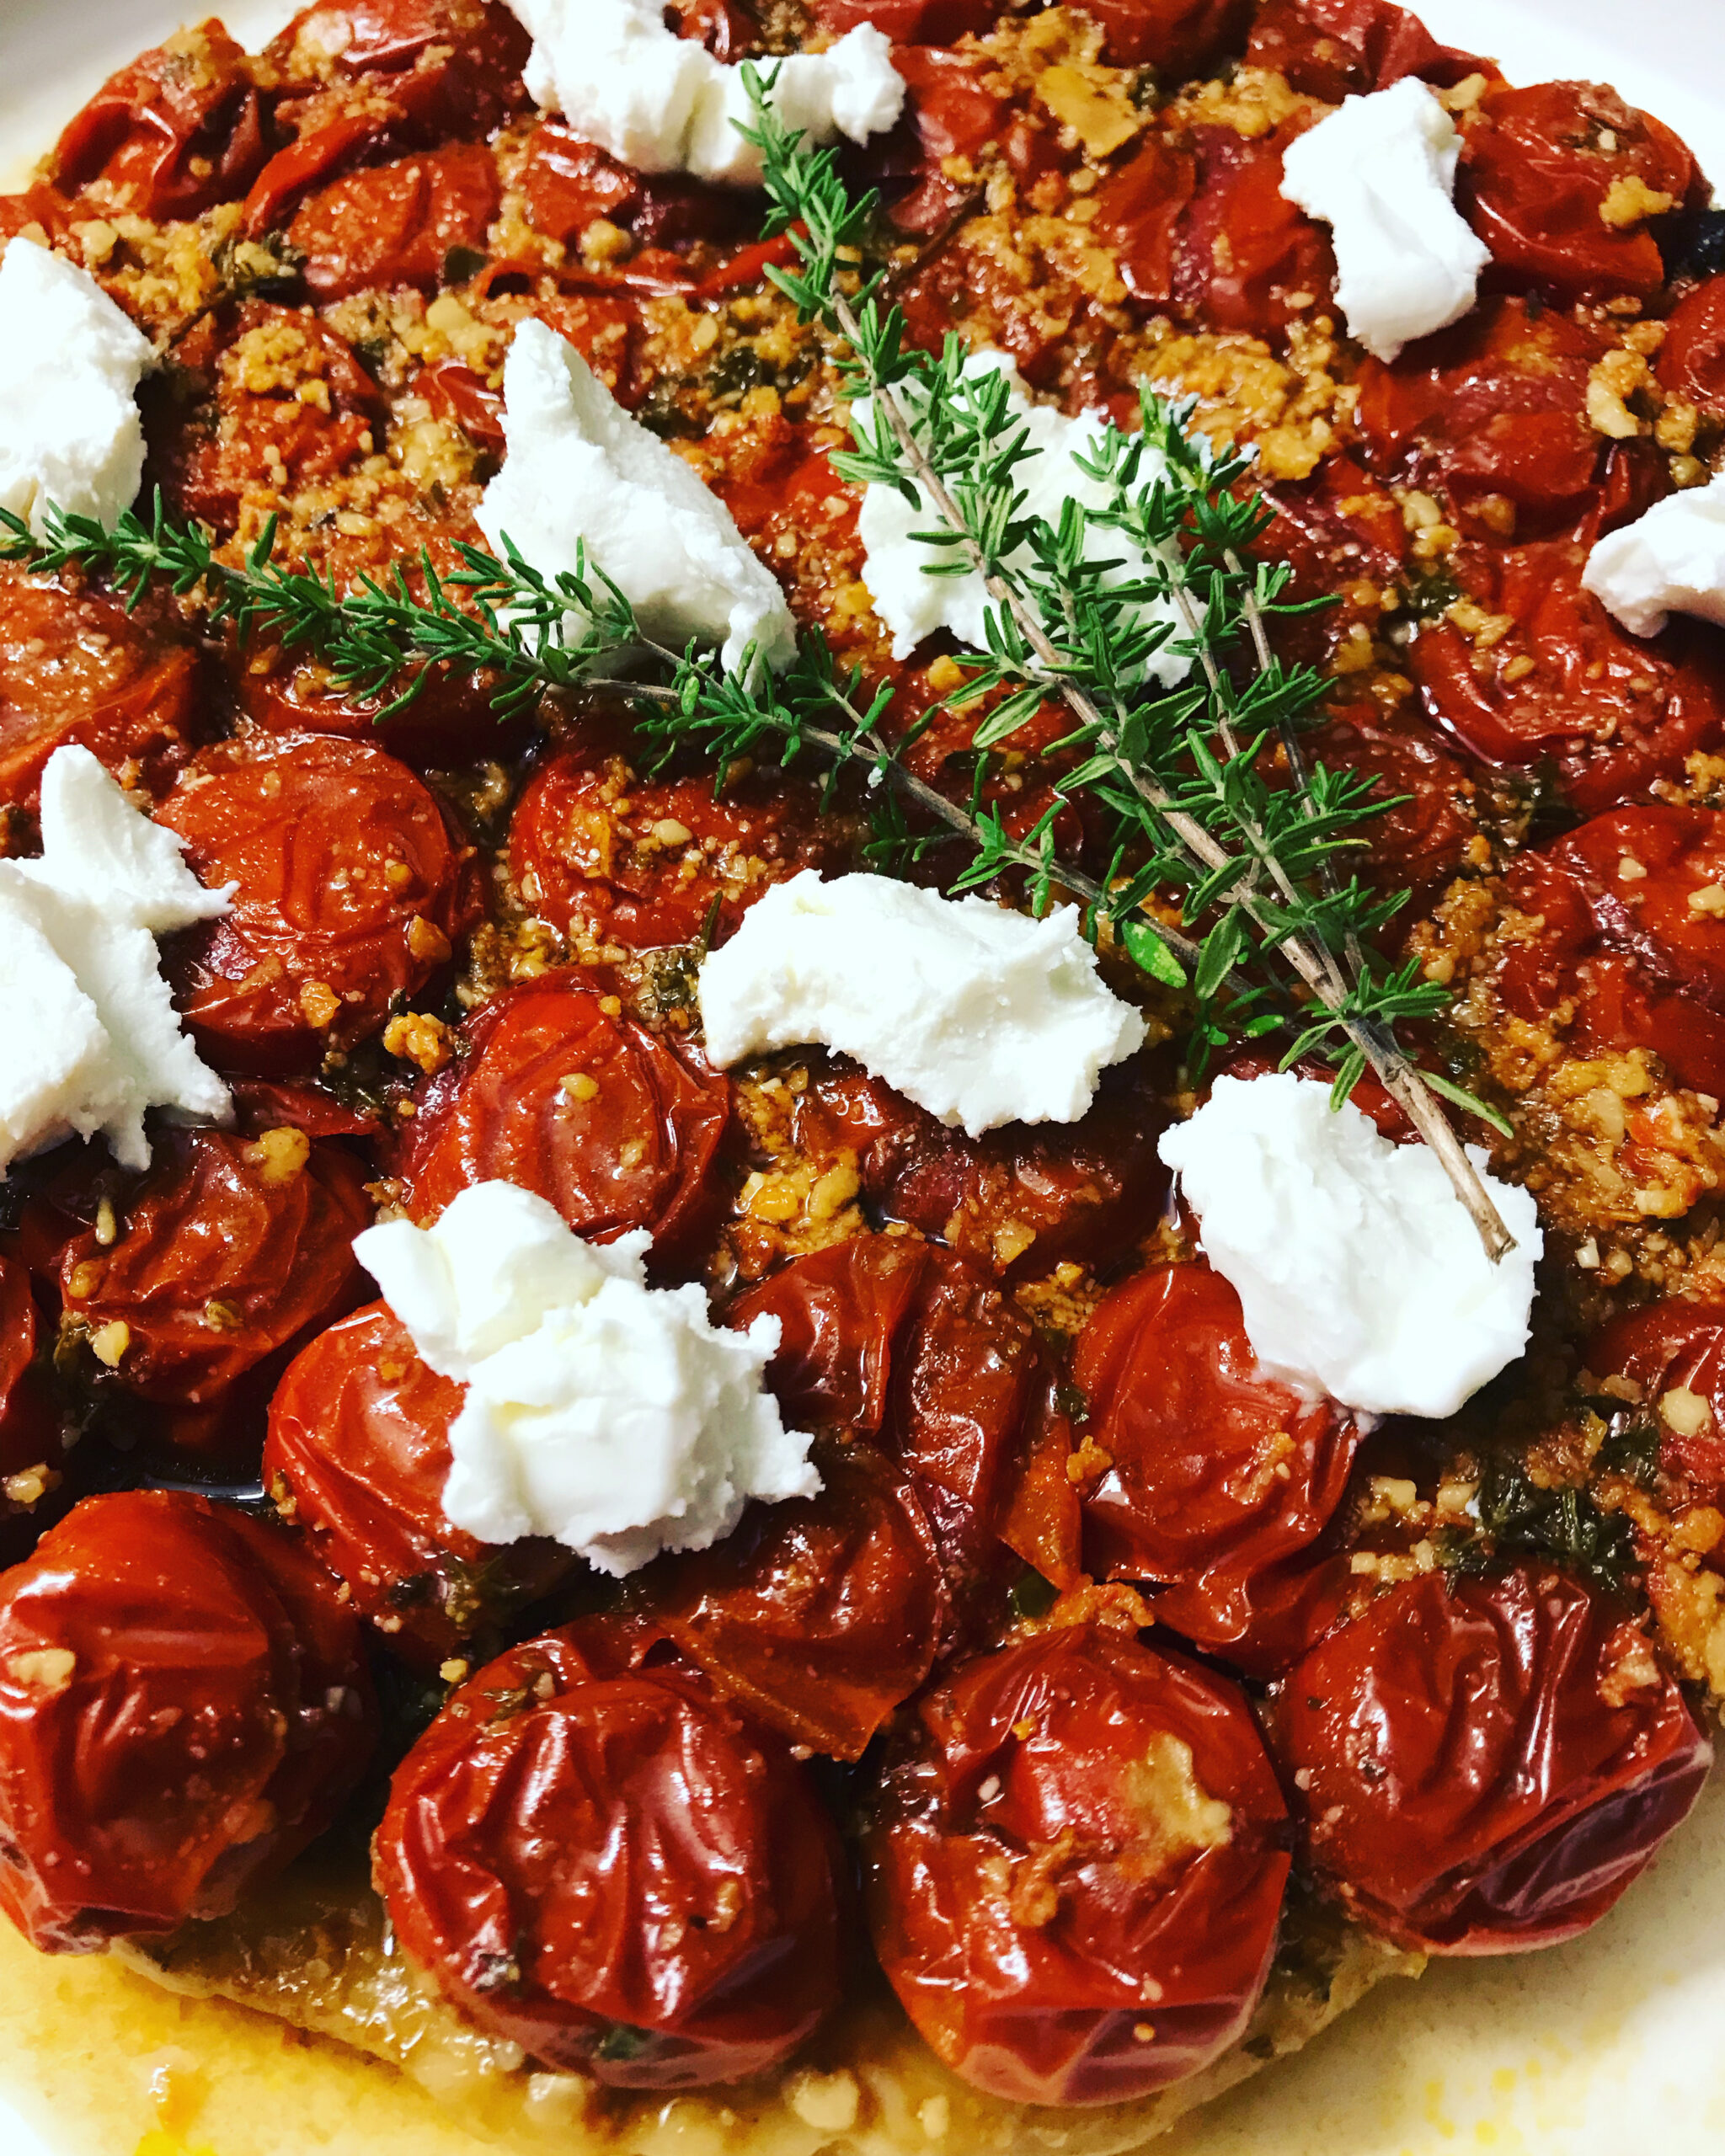
Many readers will be familiar with the delicious French apple tart called Tarte Tatin. Caramelised apples covered with pastry, cooked until golden and crisp and then inverted onto a serving plate.
This is a tomato version which is perfect to make when you have, as we do at the moment, heaps of cocktail tomatoes in the garden.
About 375g puff pastry
2-3 Tbs balsamic glaze
1 Tbs caster sugar
3 Tbs fresh thyme leaves, plus a few sprigs to garnish
About 500g cocktail tomatoes (enough to cover base of the pan) To serve:
Rocket, toasted pine nuts and grated Parmesan salad
Crumbled goat cheese Sun-dried Tomato Pesto:
¼ cup sun-dried tomatoes in oil, drained
¼ cup toasted pine nuts
¼ cup fresh basil leaves
1 Tbs (a 5cm or 2″ chunk) Parmesan cheese
Make the pesto by blitzing all the ingredients together to form a nice chunky paste. Preheat the oven to 180°C.
Cut a circle of baking paper to fit the bottom of a 20cm (8 inch) tart tin. Drizzle the balsamic glaze over the paper, then sprinkle with the sugar and thyme leaves. Arrange the tomatoes over the base – they should cover it completely and snugly. Dollop the tomato pesto all over the tomatoes, as evenly as you can. Roll out the pastry, cut a circle 25cm (10 inches) in diameter. Place on top of the tomatoes and tuck in the edges.
Bake for 30-35 minutes, or until pastry is puffed and golden brown. Let the tart rest for 5-10 minutes then carefully invert onto a serving plate and remove the paper. Serve warm or at room temperature, garnished with crumbled goat cheese and thyme sprigs, with a lightly-dressed salad of rocket, toasted pine nuts and grated Parmesan.
This quick and easy recipe for individual chocolate fondant puddings – the ones with delicious molten chocolate centres that were all the rage in restaurants some years back – is adapted from one by Australia’s best-selling cookbook author, Donna Hay.
I used individual silicone moulds, but any small containers, such as metal dariole moulds, ramekins or coffee cups, will do. To make them gluten-free leave out the flour and increase the almond meal by a quarter of a cup. Make your own almond meal by blitzing almonds, with or without skin, it doesn’t matter, in a food processor until finely ground. I made the full recipe of six puddings, but only cooked two and froze the rest uncooked and covered. They take a few minutes longer to cook from frozen.
¾ cup almond meal
¼ cup plain flour
¼ cup icing sugar
2 egg whites
100g butter, melted
160g dark chocolate, melted
12 squares dark chocolate, extra To serve:
Thick pouring cream
Cocoa powder
Preheat oven to 170°C and grease six individual moulds with oil or butter. Place almond meal, flour, sugar, egg whites, melted butter and chocolate in a bowl and mix well with a balloon whisk. Spoon half the mixture into the six moulds, press two squares of chocolate into the middle of each, then cover with remaining mixture. Bake for 12-15 minutes until set on top. Test by pushing with your finger. Stand for 3-4 minutes, then loosen the edges with a knife, tip out and serve with cream and a dusting of cocoa powder through a sieve.
Serves 6
Substitutions: if you don’t have almonds use walnuts.
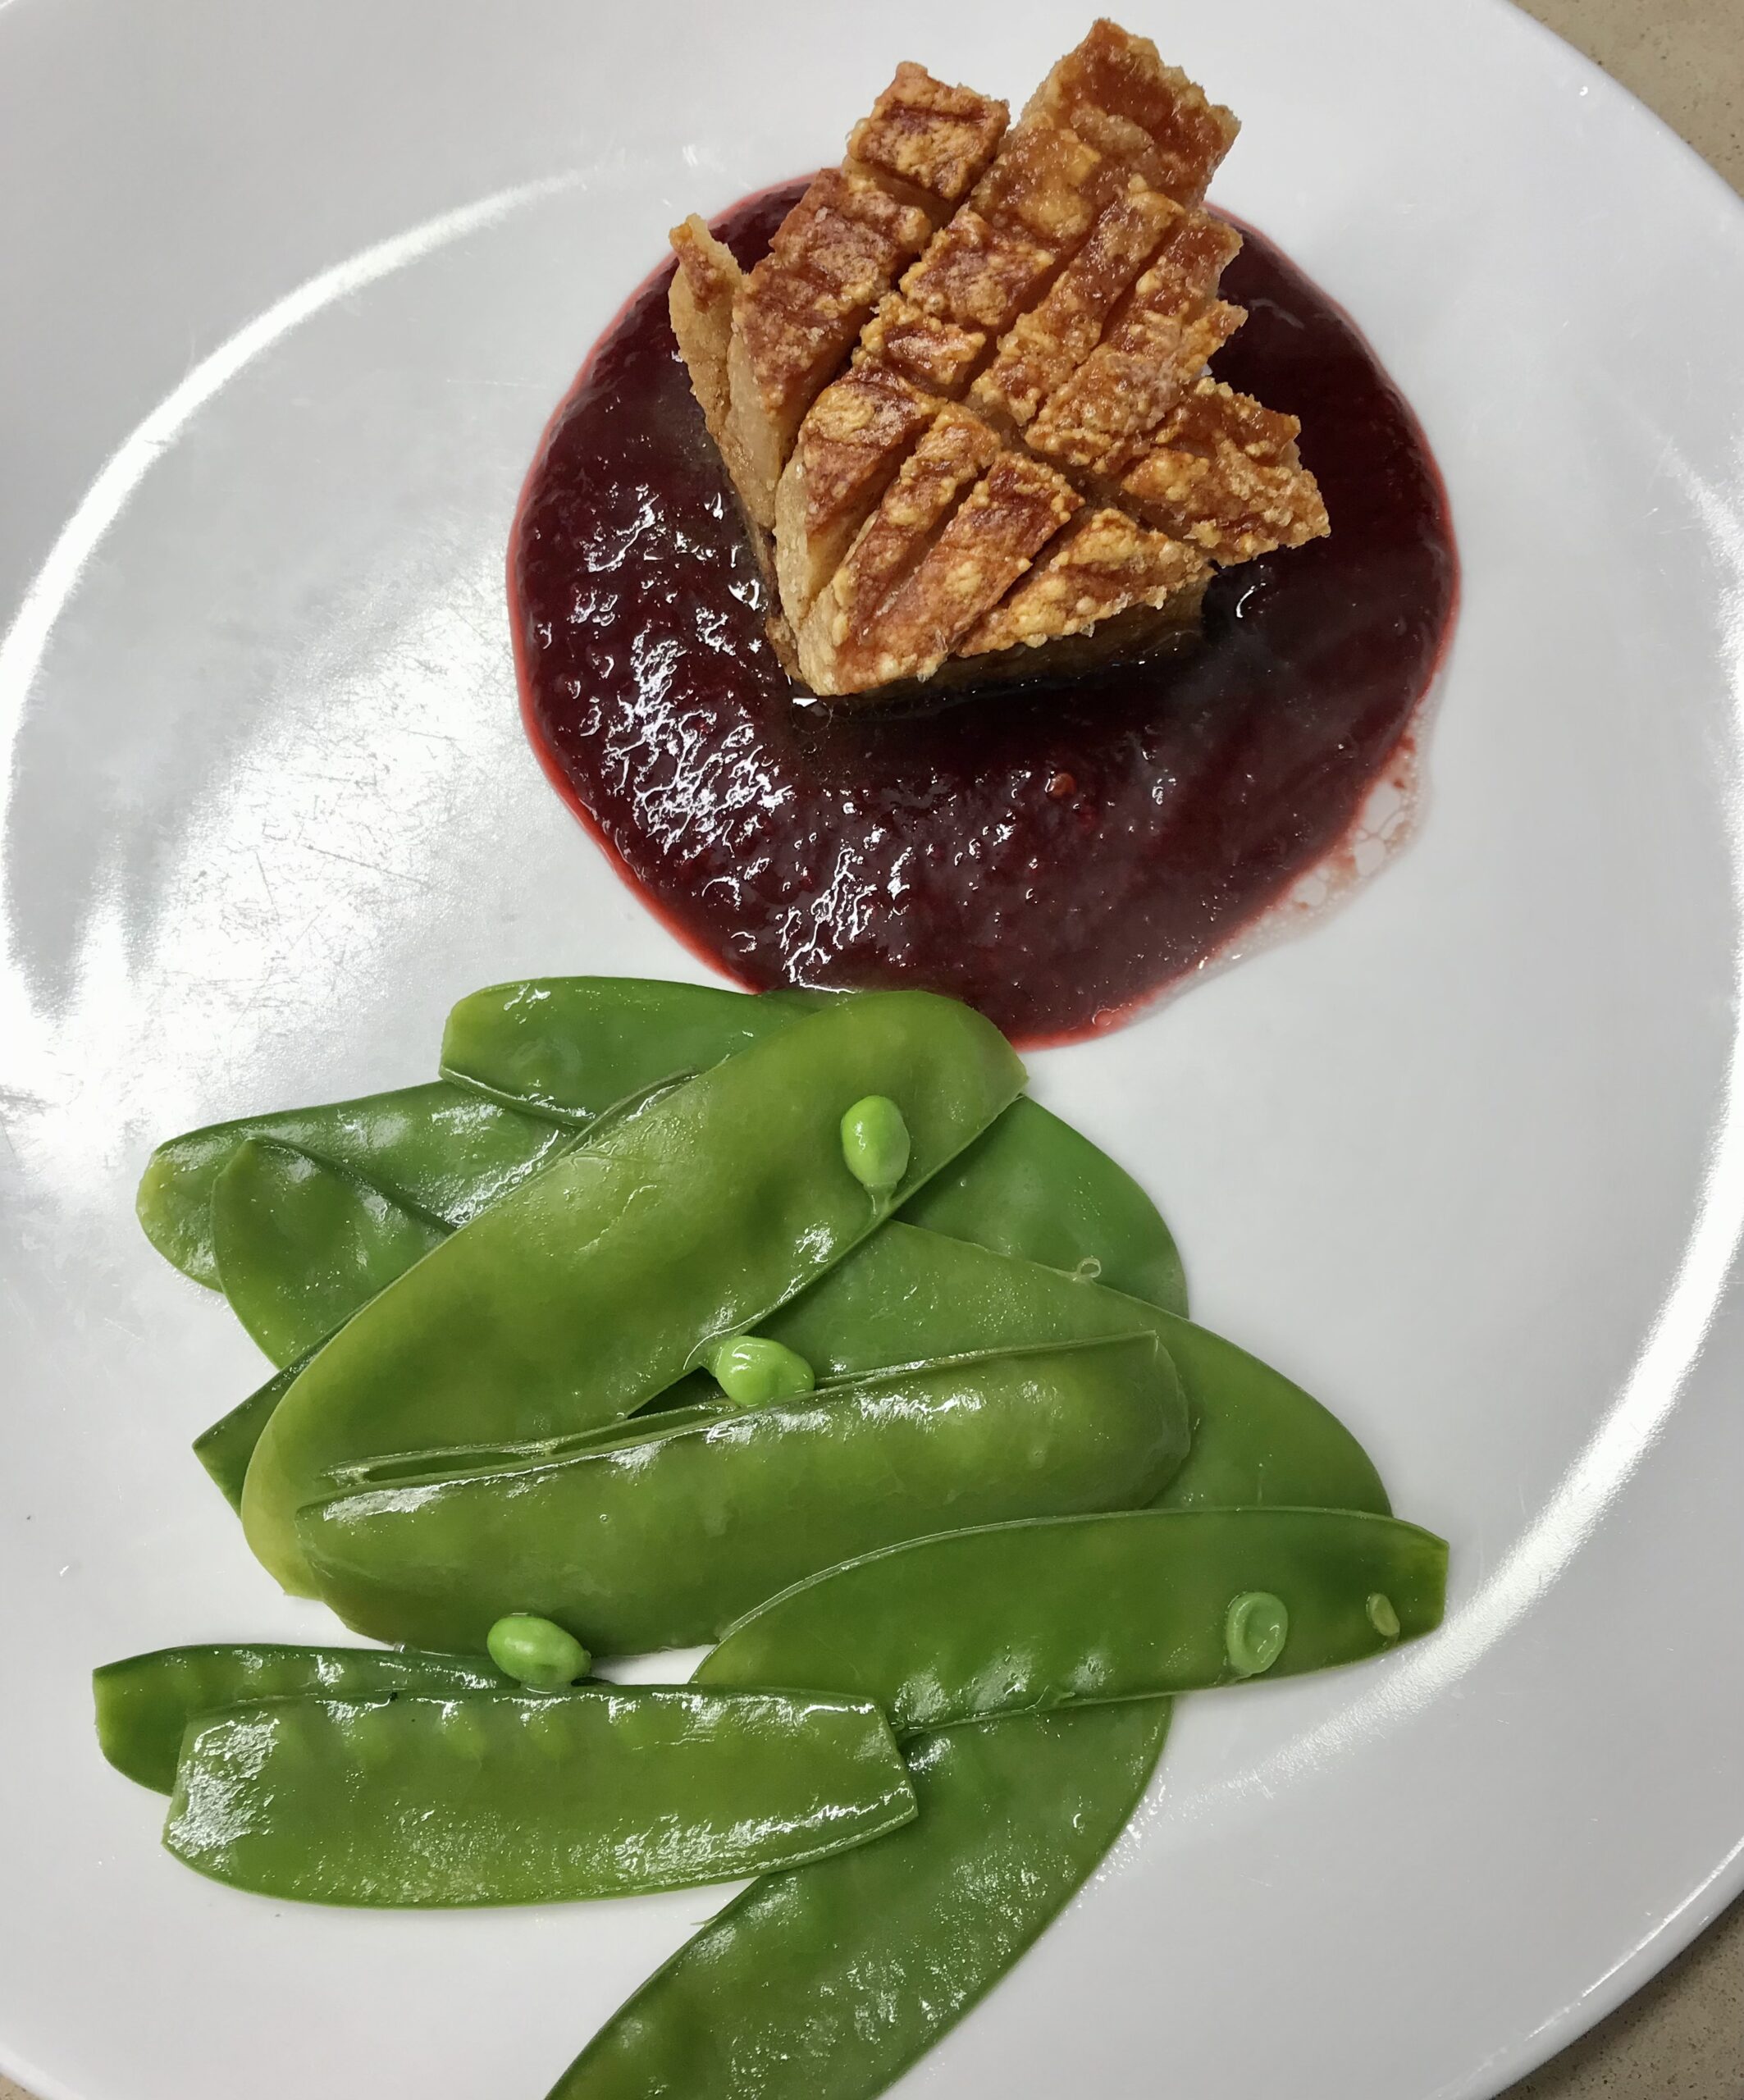
This dish was inspired by a starter we were served at a black tie dinner at the Commonwealth Club in Canberra. It was created by Executive Chef, Mr Karl Krautler.
Karl used salmon confit while I used home-made salmon gravlax. I added some pickled radish slices and a few pink peppercorns and made larger servings to serve as a light main course. This quantity is enough for two light mains or four starters.
There’s a recipe on this blog for Gravlax which you can use in this dish – slice thickly then cut into small cubes. Or use what I call my quick Gravlax. Just buy between two and four salmon portions (preferably without skin) and put them in a plastic container with a tablespoonful each of sugar and salt and maybe a small slug of gin or vodka (optional). Refrigerate for 2-3 days, turning once or twice, then pat dry, wrap with clingfilm and use within a day or so or freeze. Very useful for all sorts of dishes, including canapés.
1 small cauliflower or ½ large
2-3 Tbs cream
Salt and freshly ground black pepper
250-300g cubed salmon Gravlax (see above for link)
1 Lebanese cucumber, half the peel removed (if preferred remove it all)
¼ preserved lemon
1 Tbs extra virgin olive oil
2-4 tsp lemon or lime juice, to taste
Sliced pickled radishes (see note below)
2-3 tsp pink peppercorns
A few micro-herbs or tiny rocket leaves
Extra virgin olive oil to drizzle
Break cauliflower into florets, place in a saucepan, cover with water and bring to the boil. Cook for 15 minutes or until tender then drain and blend in food processor with the cream and seasoning.
When cool spread some cauliflower cream on two serving plates (or four if doing starters). Discard pulp from the preserved lemon, then finely dice the skin. Mix with the salmon, oil and lemon juice. Arrange the salmon evenly over the cauliflower cream, then decorate with the cucumber (seeds removed, cut into chunks), radish slices (whole or halved), pink peppercorns and micro-herbs. Drizzle a little oil around each serving.
Serves 2-4
Pickled radishes: thinly slice 1 or 2 bunches of radishes (discarding the ends) and place in an empty jar. Heat ½ cup each sugar, water and vinegar in a saucepan with a tsp mustard seeds. Pour over the radish slices. Keep in the fridge. Give them a few days to mature before use.
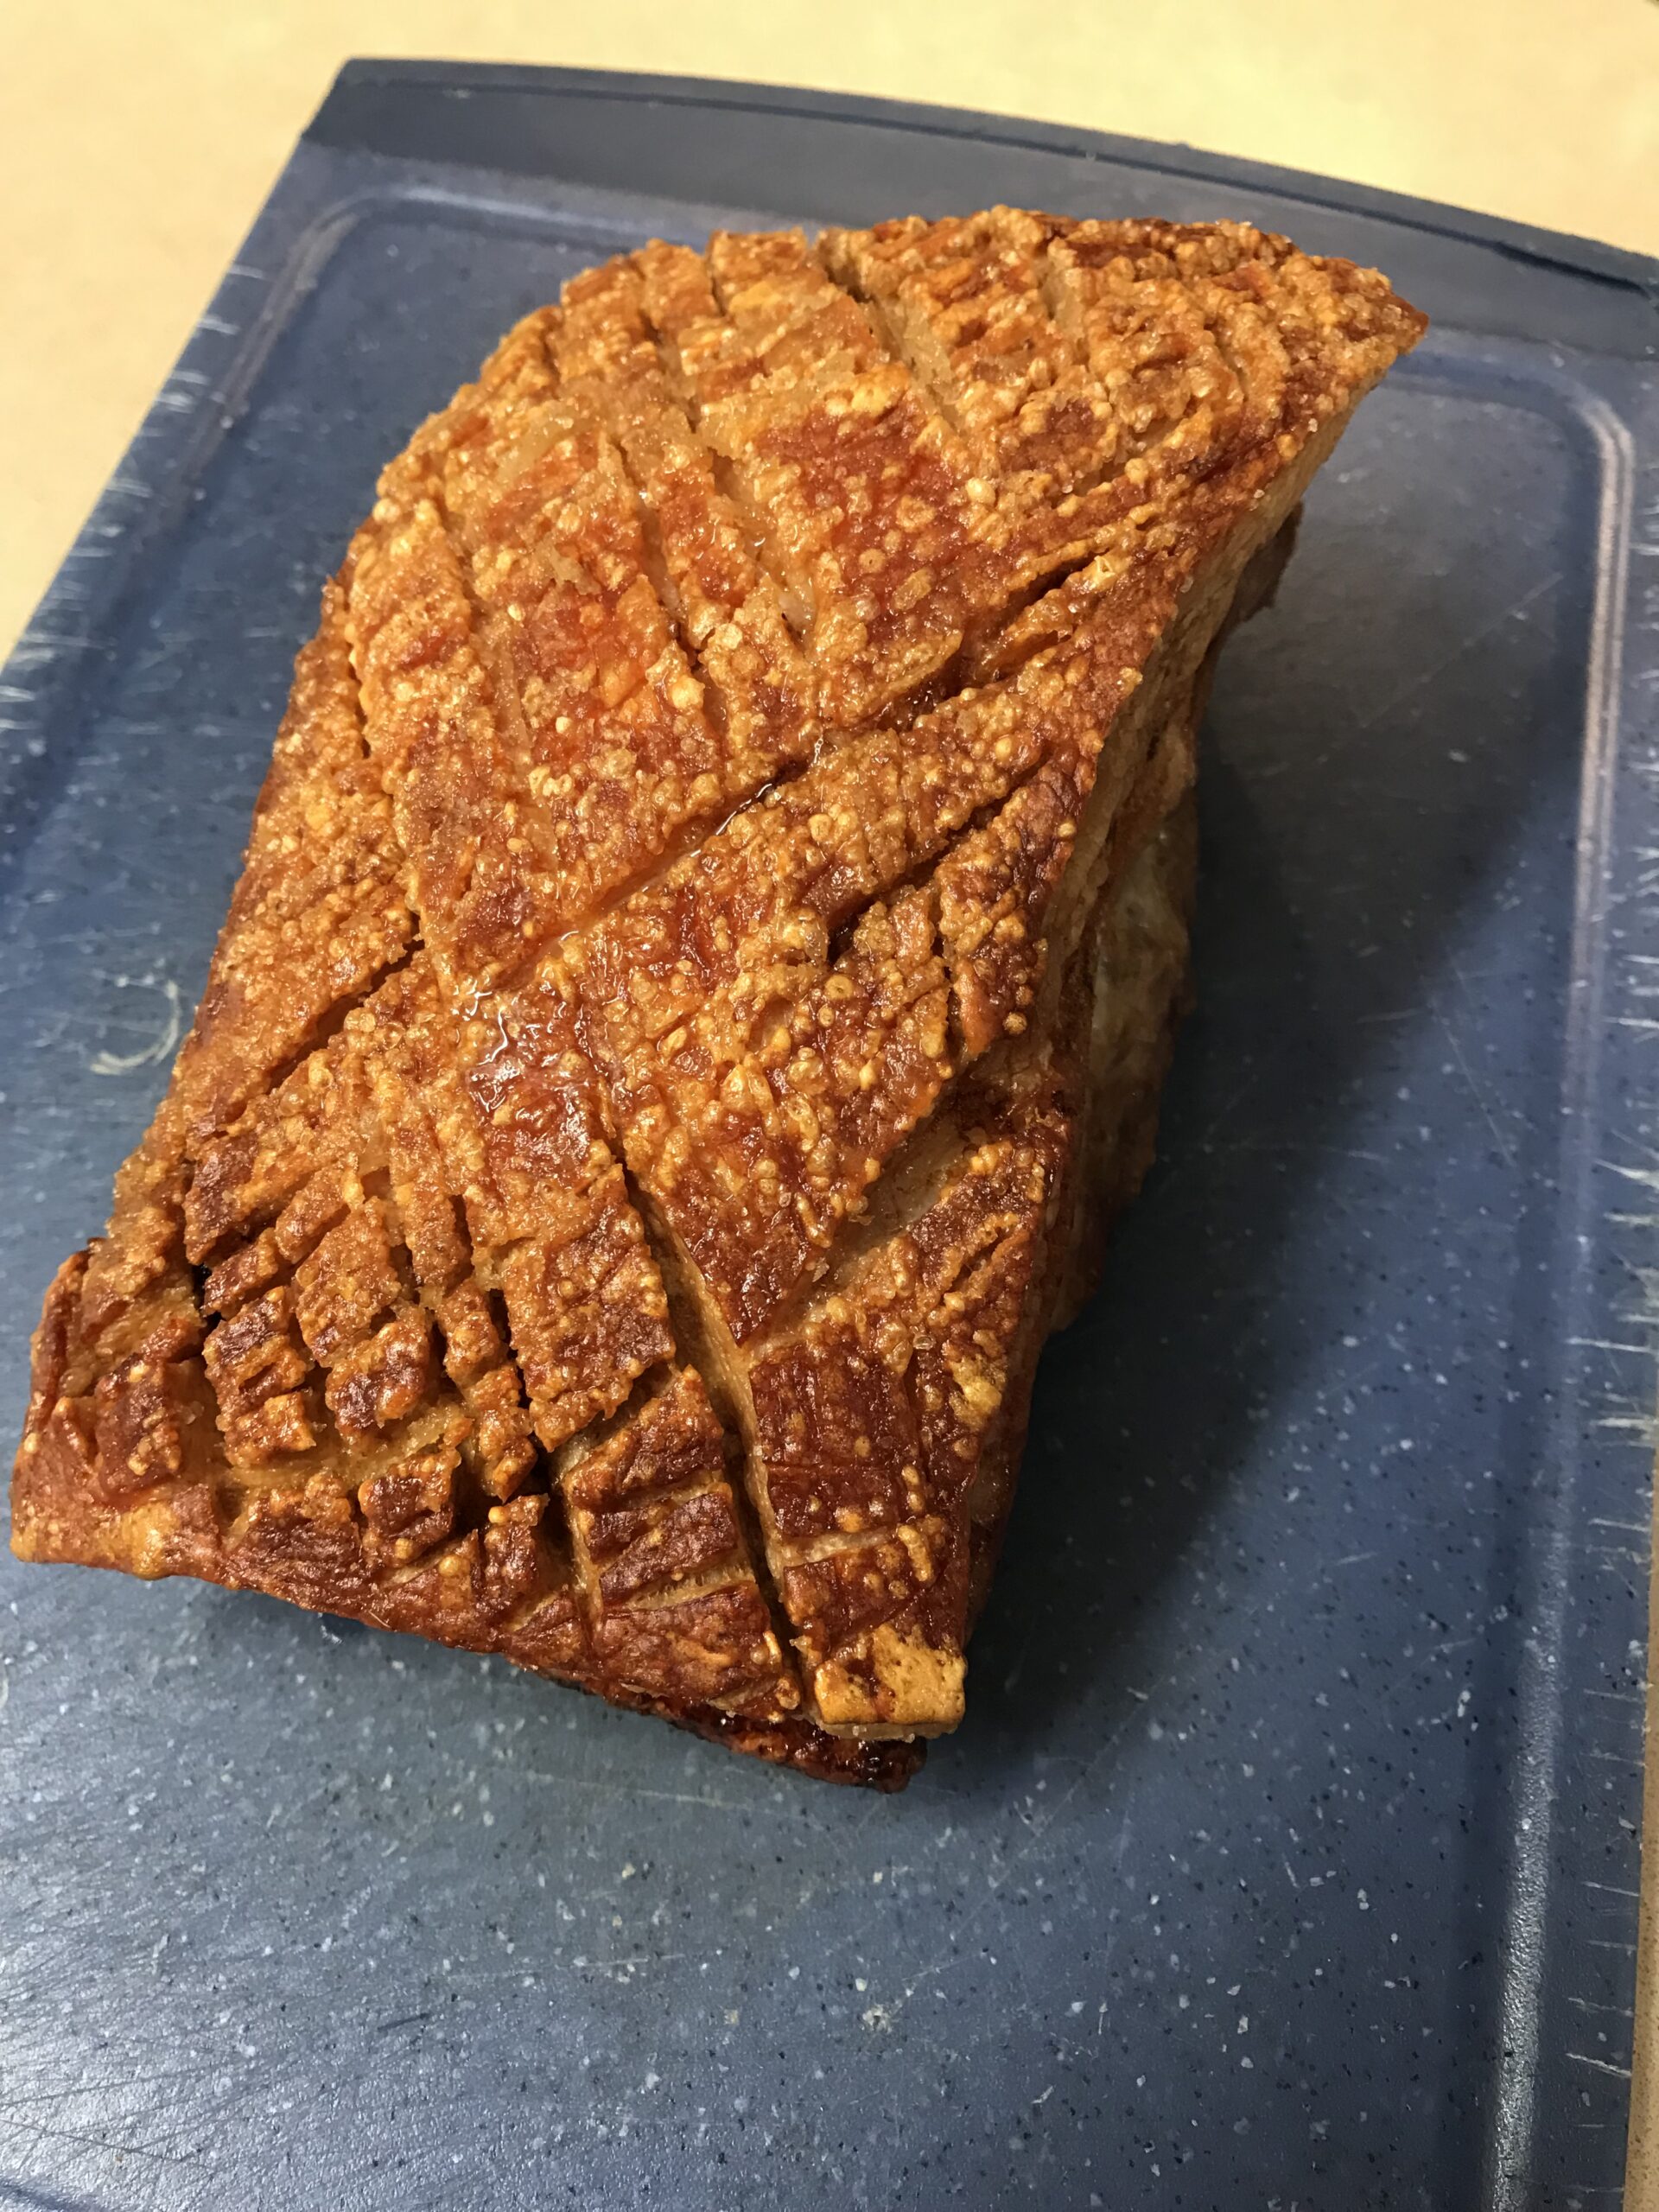
I recently gave away my deep fat fryer, to make room in the cupboard for a newly-acquired air fryer.
Deep fried food isn’t good for cholesterol levels and I never knew what to do with all that half-used oil. I put the deep fat fryer on a local Facebook “buy nothing” website and a friendly Turkish man collected it within an hour. Better his cholesterol than ours.
I bought a smallish 5 litre air fryer for under $100. It has a five litre capacity which is big enough to make a family-sized batch of chips (French fries) when the grandkids come, or as a treat for us – steak and chips or fish and chips for dinner never fails to put a smile on Matthew’s face.
Since it arrived a couple of weeks ago I’ve tried my new gadget on chips and calamari rings – the ready crumbed frozen ones you buy in a supermarket – and suffice it to say, I’m hooked. They took less than half an hour to cook from frozen and were perfect. There are only two settings to deal with on the model I bought – temperature and time. You can pull out the drawer at any time to give the food a shake and see how it’s doing. No. 1 son was impressed and put it on his Xmas Wish List.
Last night it was time to put the machine to the ultimate test – crispy roast pork belly. As you can see from the photos, it was amazing and all done in less than an hour. Two big pluses with an air fryer are firstly that the kitchen stays cool (this will be great in mid-summer) and secondly the oven doesn’t get spattered with pork fat. I haven’t done a whole roast chicken yet, but that’s on the list.
800g – 1kg boneless pork belly, with skin
2 tsp salt
Oil spray Plum Sauce:
6 medium plums, stoned (see note below)
2 cloves garlic, chopped
½ red onion, chopped
2 Tbs tamari sauce (or substitute ketchup manis or soy sauce)
1 tsp chilli flakes (or to taste)
1 Tbs chopped fresh ginger
Sugar, honey or maple syrup to taste
Preheat air fryer to 200°C for three minutes. Cut through the pork skin with parallel cuts in two directions. Rub all over with salt, place in the air fryer basket and spray the skin with oil. Cook for 25 minutes, then lower the heat to 160°C and cook for a further 30 minutes, or until cooked to your liking. Serve with the sauce and a steamed green vegetable.
Sauce: Place all ingredients except sweetener in a medium saucepan and simmer for 20 minutes or until everything is soft. Cool then blend until smooth. Sweeten to taste with a little sugar, honey or maple syrup. I used a tablespoonful of sugar.
Serves 4
Note: Freeze stoned plums during the season, six to a bag. They are useful to make this recipe, or to add to fruit crumbles. The plum sauce keeps in the fridge for up to a week or in the freezer for several months.
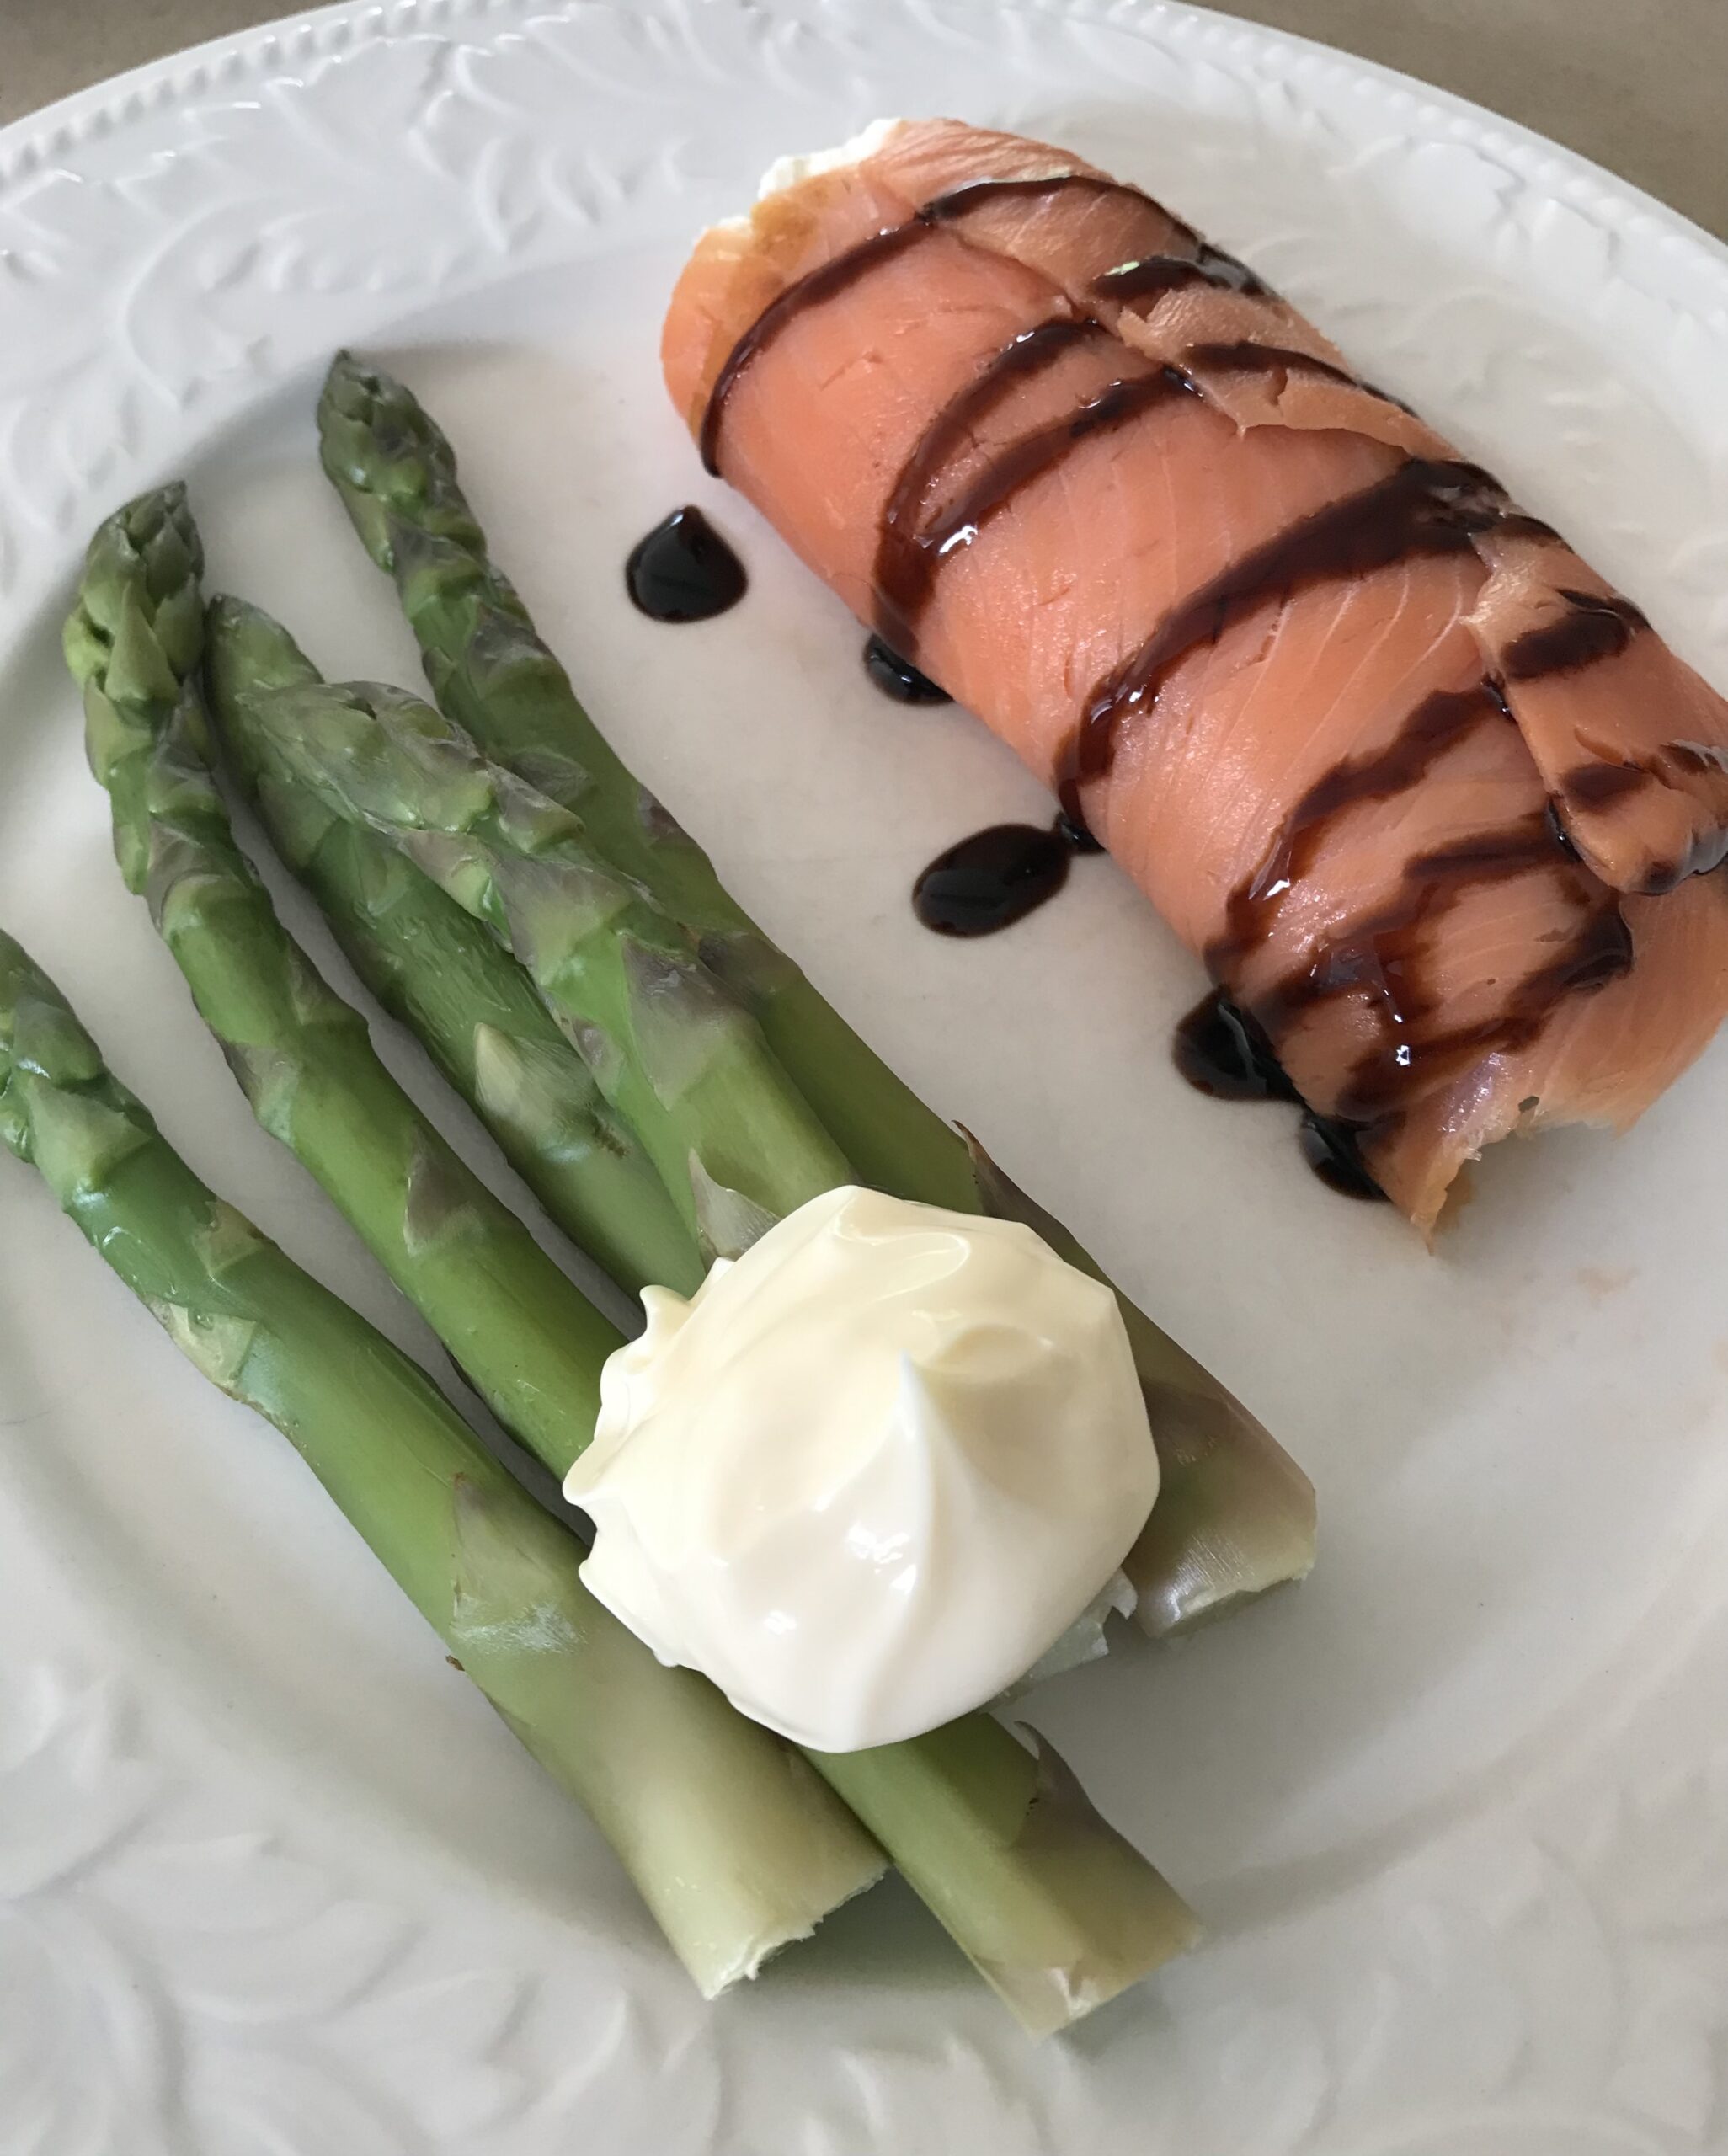
I’m always on the lookout for tasty, low carb lunches which can be made quickly. During the asparagus season we often have this easy combo. Aldi sells a fresh creamy ricotta in a 500g plastic container like a sieve, which we really like. It’s enough to make this recipe two or three times. Often the simplest of recipes are the best.
The smoked salmon rolls are quite filling, so if preferred use only two slices and less ricotta filling, to make them smaller.
6 slices smoked salmon
1 cup fresh ricotta cheese (or substitution see below)
2 Tbs chopped chives
Balsamic Glaze
10-12 spears of fresh asparagus
Kewpie mayonnaise or butter (optional)
Place 3 slices of smoked salmon on a chopping board, slightly overlapping, to make a rough circle or square. Mix the ricotta with the chives and season if you like – I don’t find it’s necessary. Place half the mixture on the smoked salmon in a sausage shape in the middle, then roll up into a neat package. Repeat and place one on each of 2 serving plates. Meanwhile cook the asparagus for about 6 minutes in boiling water, drain and pat dry. Arrange asparagus on the plates. Drizzle a little balsamic glaze over the smoked salmon packages. Serve with kewpie mayonnaise or butter on the asparagus.
Serves 2
Substitutions: soft goat’s cheese, queso fresco in South America, cottage cheese.
When I was growing up in the UK in the sixties, Mum used to make a chicken curry, using leftover chicken from the Sunday roast.
We were a family of five, so it’s hard to imagine there being any leftovers from one chicken, but meat was expensive and servings were small. Dad did the carving and gave everyone their modest ration. You were expected to fill up on veggies.
The Sunday roast rotated: chicken, beef, lamb, pork and back to chicken again and produced the protein element for Sunday, Monday and Tuesday’s main meal. After removing the chicken meat to make a curry on Monday, the carcass went into a pot with some sliced leeks, carrots, potatoes, onions and stock to make a hearty soup for Tuesday. Leftover lamb or beef was usually made into rissoles or a shepherd’s pie.
Mum’s curry wasn’t a proper Indian curry, but we didn’t know any better. Special events in our family were often celebrated in a Chinese restaurant rather than an Indian one. If you grew up in England you might recognise my Mum’s curry, because she wasn’t the only Mum who made it. Anglo-Indian recipes were passed around amongst the officer’s wives who had been posted to India and subsequently became quite popular in England during Victorian times. Grandpa was in the Army and although they were never posted to India one of her Army chums had taught Nana to make this curry, as well as an Anglo-Indian kedgeree which she passed on to Mum.
Occasionally I buy a cooked chicken at the supermarket when they’re half price and make Mum’s curry, with a few tweaks. She used curry powder, while I use curry paste. Fresh ginger, chillies, garlic and a few ground spices, plus a couple of handfuls of fresh spinach, mixed in just before serving, are also good additions. Mum sometimes added a handful of raisins or canned pineapple cubes, but I don’t.
Once the chicken has been added the curry only needs to heat through, so be careful not to overcook it. Side dishes are optional, but go down well, especially if the curry is a bit spicy. This will depend on how much curry paste you use and whether or not you add fresh chilli. Side dishes also make the curry go further. Mum was an expert at making a small amount of meat feed a family.
1 Tbs butter or ghee
1 Tbs vegetable oil
1 large onion, finely diced
3 cloves garlic
3-4 Tbs curry paste (your favourite or whatever you have on hand)
1 Tbs finely grated or chopped fresh ginger
1 fresh green chilli, finely chopped (optional)
1 tsp ground coriander
1 tsp ground cumin
1 400g can tomatoes, including juice, chopped
½ a 400g can coconut cream or milk (optional) or ½ cup water
1-2 tsp sugar, to taste
Salt and freshly ground black pepper, to taste
Leftover roast chicken, cut into bite-sized pieces (half a kilo or so)
A couple handfuls baby spinach leaves, or larger leaves, shredded (optional) To serve:
Chopped fresh coriander Side dishes:
Steamed rice
Fruit chutney
One or two sliced bananas mixed with shredded coconut
1 small diced cucumber mixed with plain yoghurt
Diced tomato and onion
Naan bread, warmed
Steam the rice and prepare the side dishes.
In a large deep frying pan heat the butter and oil and cook the onion and garlic, gently, until soft but not browned. Add the curry paste, ginger, chilli and ground spices and cook, stirring over low to moderate heat, for a couple of minutes. Add the tomatoes and coconut cream/milk or water and simmer the sauce for a few minutes while you wait for the rice to cook. Add sugar and seasoning to taste.
Add the chicken a couple of minutes before serving and, if using, the spinach. Don’t overcook – serve as soon as the chicken is heated through, adding a little more water if necessary. Garnish with coriander and serve with steamed rice, naan bread and side dishes. If you add the spinach you can skip the coriander if you like, as you have some greenery.
Serves 4-6
Note: adding about half a 400g can of coconut milk or cream to the sauce is optional, but it does make it nice and creamy. Freeze the unused half to use another time.

 Cake mix: