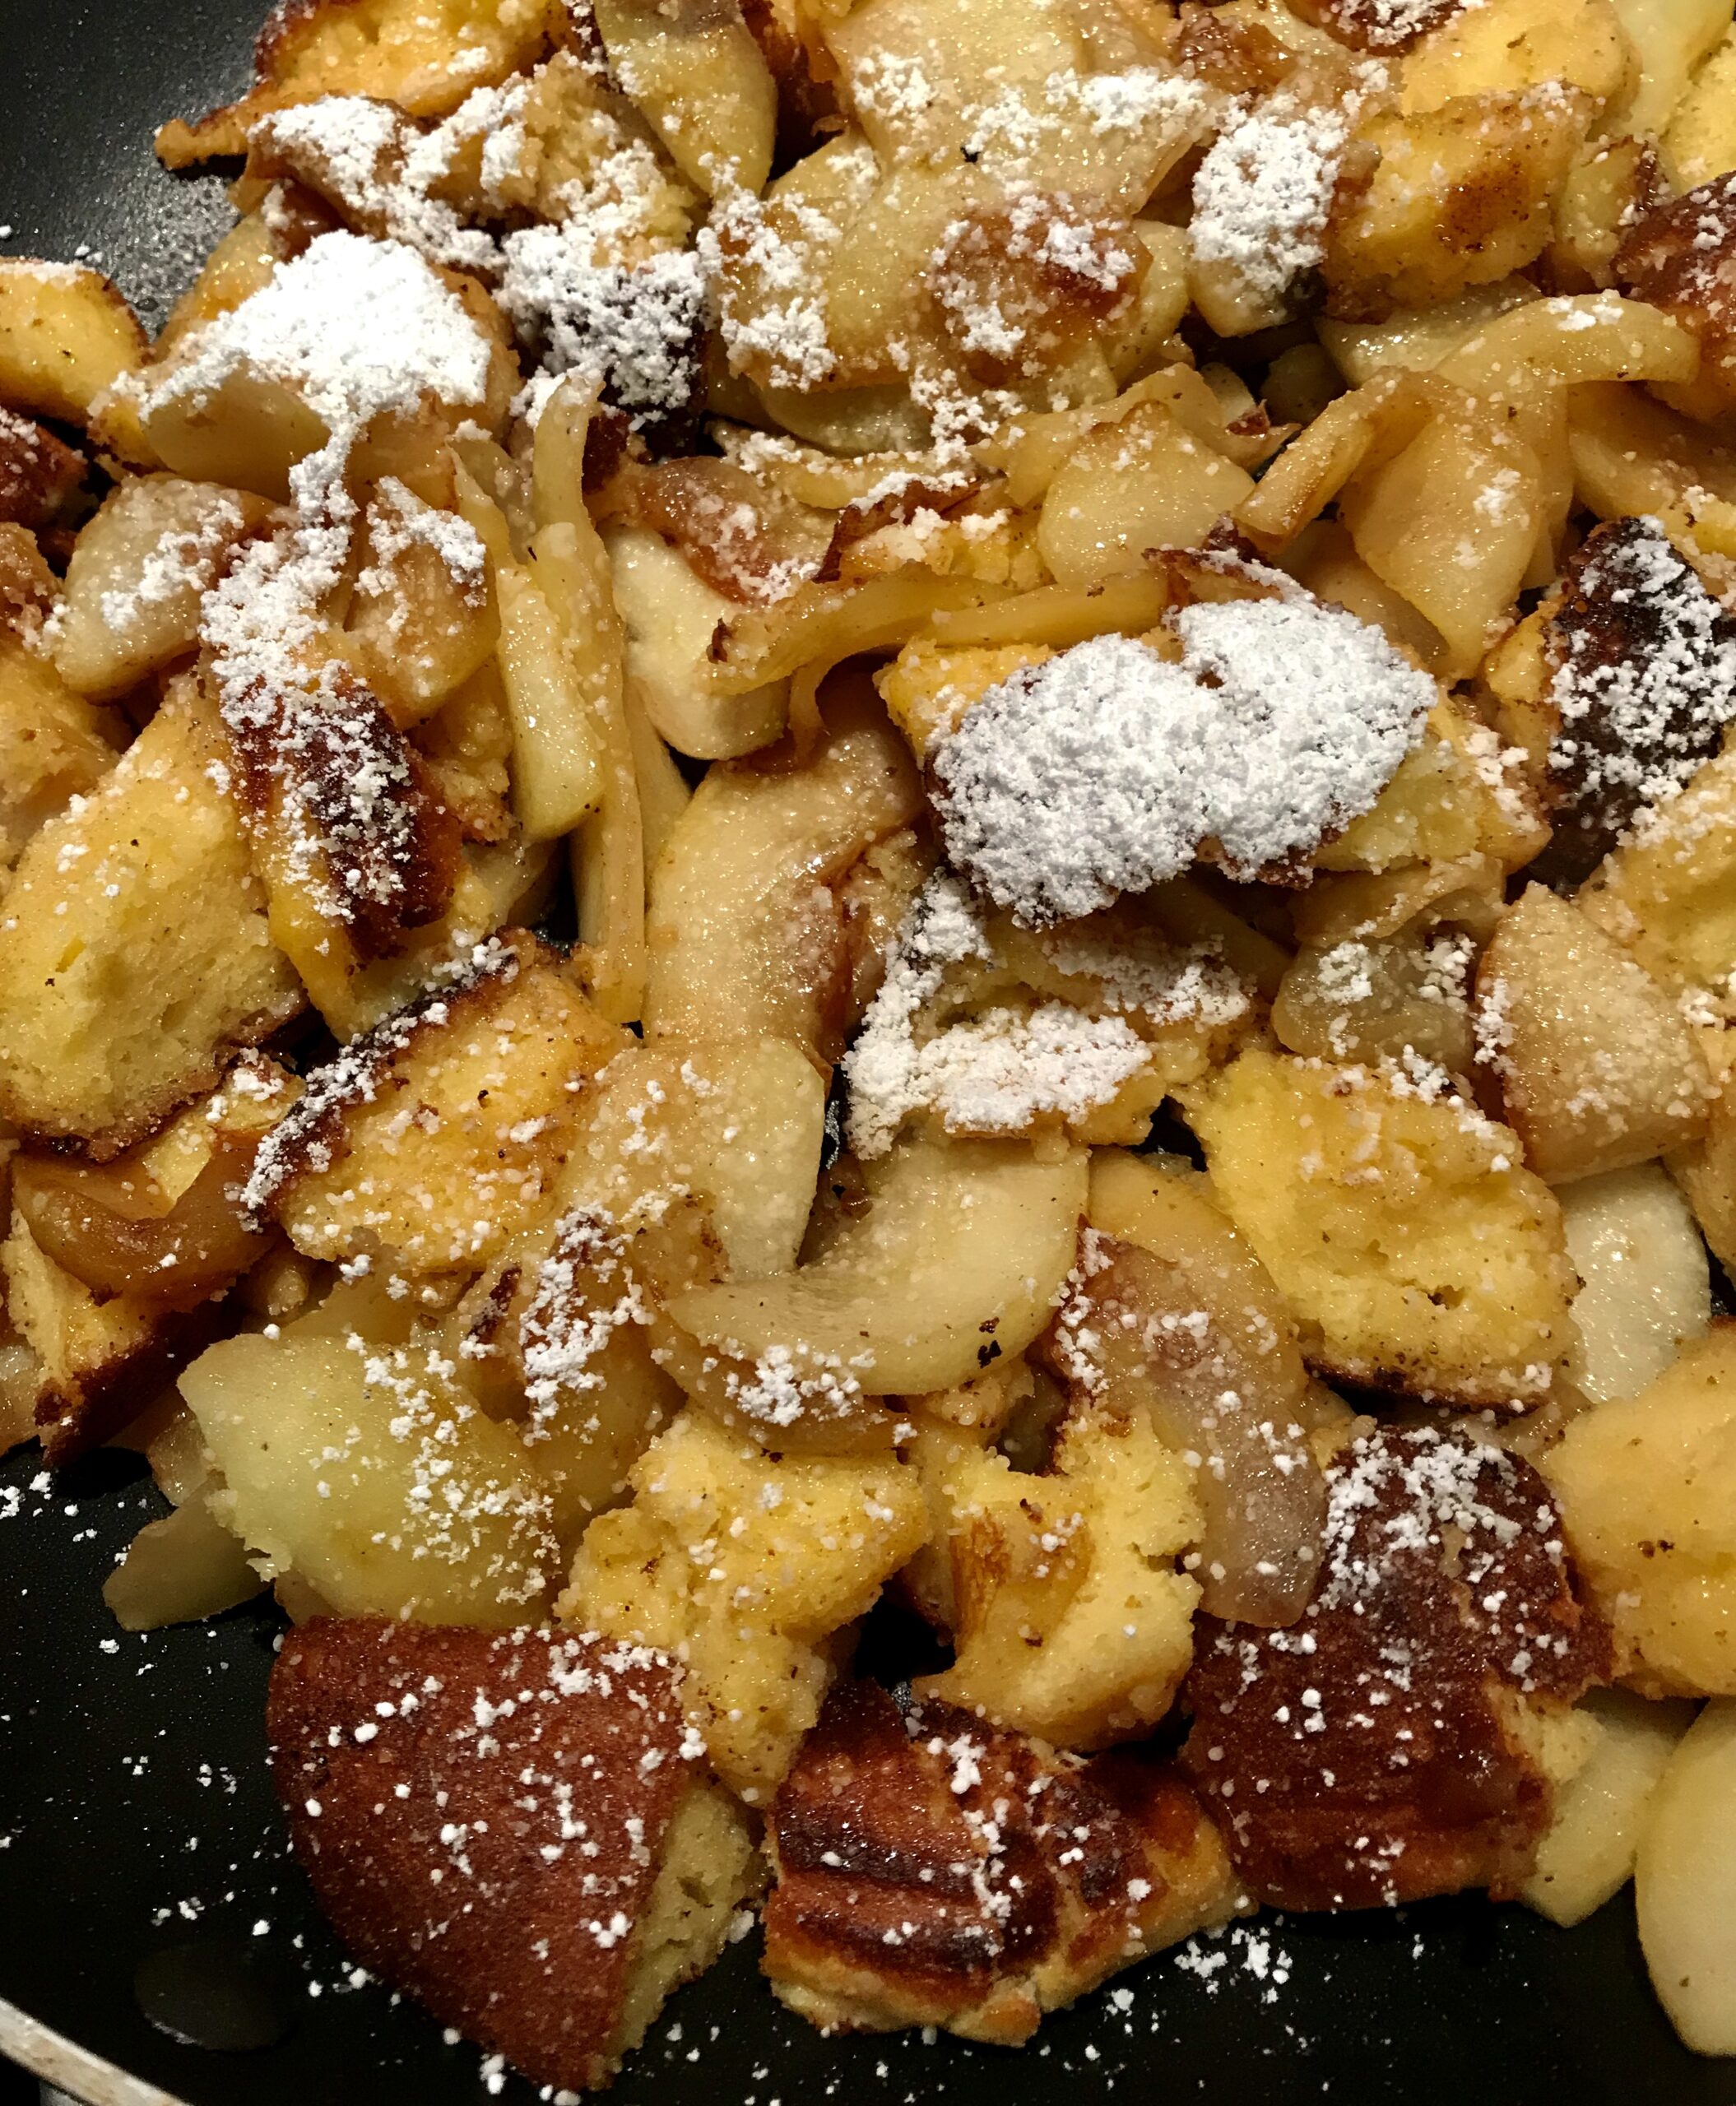
Filipino Chicken Curry

This quick and easy curry is not too spicy, making it ideal for a family meal which includes kids.

It reminds me of the simple curries my mother used to make using ready-made curry powder, rather than all the different spices. Serve with steamed rice and chutney.

1 kg boneless, skinless chicken thighs
Salt and freshly ground black pepper
1 Tbs vegetable oil
1 large onion, finely chopped
2 cloves garlic, crushed
2 Tbs curry powder or paste, or to taste
1 can coconut milk
1 can tomatoes (diced or whole)
1 Tbs sugar

Cut chicken into 2cm chunks and season with salt and pepper. Heat oil in a large frying pan and gently fry the onion and garlic for a few minutes until soft but not brown. Add curry powder or paste and the chicken and continue to fry, stirring, for 2-3 minutes or until chicken is starting to colour.

Add coconut milk, tomatoes (chop them if they aren’t already) and sugar. Simmer for 20-30 minutes or until chicken is tender and sauce has thickened. If the sauce is getting too thick before the chicken is ready add a small dash of water. Serve with steamed rice and chutney.

Serves 6-8

Harissa Carrots

Since the first of his seven cookbooks hit the shelves in 2008, Yotam Ottolenghi has brought vegetables to a whole new level.

This recipe from his latest book Simple is a real winner.  He sprinkles fresh pomegranate seeds over the carrots just before serving, but I didn’t have any. They’re still delicious just as they are.

Who would think the humble carrot could taste so amazing?

2 tsp cumin seeds
2 tsp honey
2 Tbs Harissa (or another chilli paste such as Sriracha)*
20g unsalted butter, melted
1 Tbs olive oil
¾ tsp salt
1 kg baby carrots (or regular carrots cut in halves lengthwise)
To serve:
Juice of ½ a lemon
1-2 Tbs chopped coriander leaves
Seeds from 1 pomegranate (optional)

Preheat oven to 200°C. In a large bowl mix the cumin, honey, harissa, butter, oil and salt. Add the carrots, mix well, then spread out in one layer on a shallow baking tray lined with baking paper. Roast for 25-35 minutes, or until cooked al dente and beginning to brown a bit.

To serve, drizzle with the lemon juice and sprinkle with the coriander and pomegranate seeds, if using. Serve hot or at room temperature.

Serves 6-8

* use less chilli paste if you don’t like things hot and/or you’re serving kids

Fiona’s Gluten Free Chocolate Cake

My friend Fiona follows a gluten-free diet. I love the nutty texture of her Gluten Free Chocolate Cake which keeps her sane when she’s studying for law exams.

Today’s recipe is adapted from Fiona’s. I’ve adjusted the quantities slightly, adding less sugar and a bit more chocolate and nuts. I’ve also added a topping of unsweetened cocoa powder, an idea from one of Yotam Ottolenghi’s chocolate cake recipes.

I served the cake as a dessert, with whipped cream and some cumquats I preserved a year ago, but it’s perfectly delicious just as it is, with a cuppa. As a dessert you could also serve it with berries or a ball of coffee ice cream.


250g dark chocolate
250g butter
250g almond meal*
4 eggs, separated
1 cup sugar
½ tsp baking powder
Pinch of salt
To serve:
About 2 Tbs unsweetened cocoa powder
Candied oranges or cumquats or fresh berries
Whipped cream

Preheat oven to 180°C. Heat butter in a saucepan and when melted add the chocolate, broken into squares and turn off the heat. As chocolate melts, stir to combine. Mix in egg yolks, then sugar, almond meal, salt and baking powder. In a large bowl whip egg whites with electric beaters until soft peaks form. Scrape in the chocolate mixture, in two lots, gently using a spatula to thoroughly combine.

Scrape mixture into a greased and bottom-lined 22cm round cake tin and smooth the top. Bake for 35-45 minutes. Check after 35 minutes. When ready cake will feel firm on top and a skewer inserted in the middle will come out clean. If you have a fan-forced oven you may find the cake is ready in just over half an hour, as mine was. Chocolate cakes are best under-cooked rather than over-cooked.

When cool, remove cake from tin and cover the top with cocoa powder, using a sieve. Serve cake with berries and whipped cream or just as it is.

Serves 12-16

* buy almond meal or make your own by blitzing nuts in food processor until they resemble breadcrumbs. I used half bought and half I made using unskinned almonds. If you don’t have any almonds substitute walnuts, pecans, pine nuts or even a mixture.

Salted Caramel Slice

This recipe is adapted from one by David Lebovitz. One of those sweet, sinful snacks you have to hide, to avoid overindulgence. Trouble is, I know the hiding place.

When a friend emailed to ask for the recipe I wrote back asking if she also wanted contact details for Weight Watchers. She thought I was suggesting she was fat so I said she would be if she ate too much of this. It’s something you might describe as moreish, a word which I see has made it into the English dictionary and which has nothing whatsoever to do with Moorish, used to describe things with an Arabian flavour.

About 6 sheets Salada crackers (called Saltine in other countries)
250g unsalted butter
1 cup brown sugar
Large pinch of salt
½ tsp vanilla essence
250g dark chocolate
1 small piece of Copha (vegetable shortening) the size of a large walnut
1 cup flaked almonds (optional)
Salt flakes

Line a shallow baking sheet approximately 28x42cm with baking paper. Or use two smaller tins which come to about the same total area. Cover with the crackers, breaking them as necessary to cover the whole area like a jigsaw puzzle.

Preheat oven to 180°C. Melt butter and sugar in a saucepan, then boil for 3 minutes, stirring all the time. Add salt and vanilla then pour over the crackers, spreading evenly. Bake for 15 minutes, watching carefully that it doesn’t burn.

Melt chocolate and Copha in a bowl over boiling water, then spread evenly over the caramel. If using nuts, toast them lightly in a dry frying pan over moderate heat then sprinkle over the chocolate. Sprinkle with a few salt flakes. Cool.

To serve, break into uneven sized pieces
Variations: use milk chocolate or a mix of half milk and half dark


Fried Halloumi with Lemon and Olives

I first ate halloumi cheese at my brother’s house when he was living in the UK in the 1980s. He cooked it on a barbecue and the kids decided to call it squeaky cheese, because of the noise it makes against your teeth when you eat it.

This recipe makes a good side dish for lunch or nibbles with drinks.

2-3 Tbs olive oil
250g halloumi cheese
2 Tbs flour mixed with some salt and freshly ground black pepper
1 lemon
½ cup olives, stoned and sliced (green or black)
1 Tbs chopped fresh marjoram, oregano or parsley
1 birdseye chilli, seeded and finely chopped
Extra olive oil

Slice cheese a bit more than half a centimetre thick and cut into manageable sized pieces. Dust with seasoned flour. Heat olive oil in a frying pan and cook the cheese slices on both sides until golden. Drain on paper. While cheese is cooking remove peel from the lemon with a vegetable peeler then chop finely. Remove juice from the lemon.

When cooked, place halloumi in a small serving dish. Mix lemon juice and rind, olives and herbs and sprinkle over. Top with the chilli, if using. Drizzle with extra olive oil and serve as a snack or part of a mezze with fresh bread.

Proper Baked Beans

First produced in 1901, Heinz Baked Beans have maintained their popularity for well over a century. One of the best known advertising slogans launched in the UK in 1967 was Beanz Meanz Heinz.

I’ve never been a fan, but have several friends who eat them when they need some comfort food.

Proper Baked Beans, made from scratch by soaking dried beans, now that’s a different story. I think they’re quite delicious. In this recipe the beans aren’t actually baked, although you could always cook them in the oven rather than on the stove top, if preferred. In fact Heinz Baked Beans, despite the name, aren’t baked either. Raw beans are placed in the cans with the sauce, then sealed and cooked in very large pressure cookers.

500g dried white beans (eg haricot blanc, white kidney beans)*
2 Tbs canola or olive oil
250g smoked streaky bacon, chopped
2 onions, chopped
2 cloves garlic, crushed
2 x 400g cans tomatoes, chopped
500ml water
2 Tbs tomato paste
100g brown sugar (or less if preferred)
200ml vinegar
Salt and freshly ground black pepper
To serve:
Hot buttered toast
Chopped fresh herbs
Grated Parmesan (optional)

Cover beans with cold water and leave to soak overnight. Drain and rinse thoroughly then place in a large saucepan, cover with water and simmer for an hour, or until cooked. Beans vary and could take up to two hours. Add more water as necessary. Drain.

In a large heavy-bottomed saucepan heat the oil. Add the bacon, onions and garlic and cook over moderate heat, stirring often, until onions are soft and bacon is starting to brown. Add tomatoes, tomato paste, sugar, vinegar and water. Bring to the boil then add the cooked beans. Reduce to low and simmer for an hour and a half, or until you have a thick sauce and very tender beans. Add a dash more water from time to time if necessary.

Check seasoning and serve on toasted and buttered Turkish or Sourdough bread, garnished with chopped herbs and a little grated Parmesan, if liked.

Serves 8

*If preferred, substitute 3-4 cans of drained canned beans and skip the first paragraph of the recipe.

Japanese-style Ceviche

This delicious recipe was given to me by my daughter Catherine who got it from her chef friend, Tim. Catherine and her husband love raw fish and meat dishes, so they eat a lot of ceviche and carpaccio. If you’ve never eaten raw fish, this is a good way to start as it honestly doesn’t taste raw. The recipe serves 2 as a starter or one as a main, but it’s easy to multiply the ingredients to serve 4 or 8. It’s also very quick to make.

The black sesame seeds add a nice colour contrast and the fried shallots add a bit of crunch. They make a great garnish for all kinds of savoury recipes.

1 portion salmon (about 180g) or use a firm white fish
1 small or half a large avocado, cubed
Zest and juice of 1 lime or ½ lemon
2 tsp sesame oil*
2 tsp Mirin
1 Tbs pickled ginger, finely chopped*
1 spring onion, thinly sliced
1 Tbs Kenko Creamy Sesame Dressing*
Salt and freshly ground black pepper, to taste
To garnish:
Black sesame seeds*
Fried shallots*
Fresh coriander leaves
Lettuce leaves
Olive oil (optional)

Remove skin and any bones from salmon then cut into small cubes. Mix with remaining ingredients. Taste and see if it needs a little more lime juice or sesame oil.

Serve immediately on lettuce leaves, garnished with black sesame seeds, coriander, fried shallots and a drizzle of oil. You can leave out the lettuce leaves and the olive oil if preferred.

Serves 2

* sold in Asian supermarkets. For the Kenko Dressing you will need to find a shop that sells Japanese ingredients. If you can’t find it substitute ordinary mayonnaise mixed 50-50 with soy sauce. Not quite the same but it will do.

Roasted Eggplant with Saffron Yoghurt

Another Yotam Ottolenghi recipe I tried recently. As you can see, I rather overdid the saffron, which made the yoghurt sauce a rather lurid yellow, but it was still delicious. Pomegranate seeds add a lovely splash of red, but if you don’t have any use chopped roasted red peppers or perhaps a few dried goji berries, soaked briefly in hot water, then drained.

3 medium eggplants, cut into 2cm slices or wedges
Olive oil for brushing
2 Tbs toasted pine nuts
A handful of pomegranate seeds
A few basil leaves
Salt and freshly ground black pepper
Sauce:
A pinch of saffron strands or powdered saffron
3 Tbs hot water
180g thick Greek-style yoghurt
1 clove garlic, crushed
2½ Tbs lemon juice
3 Tbs olive oil
Salt and freshly ground black pepper, to taste

Make sauce by infusing saffron in hot water for 5 minutes, then whisking in the remaining ingredients. Sauce will keep in the fridge for up to 3 days.

Preheat oven to 220°C. Place eggplant on an oven tray, brush both sides with olive oil and season with salt and pepper. Roast for 20-35 minutes, or until golden brown. Cool. Eggplants will keep in the fridge for up to 3 days. Bring to room temperature before serving.

Arrange eggplant on a serving platter, slightly overlapping. Drizzle with the sauce, sprinkle with the pine nuts and pomegranate seeds, then scatter with a few basil leaves.

Serves 4

Lancashire Hot Pot

Lancashire Hot Pot originated in the north west of England and was a popular winter dinner throughout the British Isles when I was growing up. My mother, who didn’t have a large culinary repertoire, made it regularly and we loved it.

It’s basically a lamb stew covered with sliced potatoes, cooked until crisp. In the old days it would have been made with mutton, something we don’t see in the shops these days because the animals are killed much younger. My mother fried the onions and meat in dripping or lard, but I prefer to use butter or canola oil, or a combination.

2 Tbs butter or oil or 1Tbs of each
1 kg stewing lamb, cut into 2cm cubes
2 Tbs plain flour
Salt and freshly ground pepper to taste
1 large or 2 smaller onions, diced
500g carrots, peeled and cut into slices or chunks
2 cups beef stock (or water and 2 beef stock cubes)
3 Tbs sherry or red wine (optional)
1 Tbs Worcestershire sauce
750g potatoes, peeled and thinly sliced
1 Tbs melted butter or oil, for brushing
1 tsp dried thyme

Preheat oven to 170°C. Mix lamb with the flour, salt and pepper. Heat butter or oil in a large frying pan and cook the meat over high heat, stirring, until browned. Place in a casserole dish. Add onions to the frying pan and cook, stirring from time to time, until softened. Add to the casserole with the carrots, stock, sherry and Worcestershire sauce. Mix well. Cover and cook for 30-60 minutes, or until meat is almost tender.

Remove lid and cover the meat with the sliced potatoes, starting from the outside and overlapping them slightly. Brush with melted butter or oil, sprinkle with thyme then cover with the lid or a piece of foil. Return to the oven for 45 minutes  or until potatoes are tender. Turn oven up to 200°C. Remove lid or foil and cook casserole until potatoes are browned and crisp. Serve with a green vegetable.

Serves 6

EQ Grilled Chicken Salad

My friend Dawn can’t eat gluten or dairy products, so the Gluten and Dairy-Free Grilled Chicken Salad at EQ Cafe and Lounge in Deakin caught her eye when we had lunch there recently. I decided to join her. It was delicious, not to mention healthy, so I was inspired to have a go at making it at home.

Goji berries are native to Asia and have recently become available in dried form in mainstream Australian supermarkets. The cheapest I could find were from Aldi, which sells 150g of Organic Chinese goji berries for $5. There is currently no clinical evidence that these berries are going to lower your cholesterol or cure you of anything, but they do add a nice splash of red to this salad. Substitute diced red capsicum or halved cherry tomatoes if you don’t have goji berries.

Quantities are approximate. I bought a 120g pack of rocket from Aldi and used about two thirds in the salad and one third in the pesto.

About 80g rocket, washed and spun dry
1 cup finely shredded red/purple cabbage
1 endive (witlof) cut into 1cm wide lengthwise strips
16 sugar snap peas
¼ cup dried goji berries
¼ cup red wine (or if preferred use water)
¼ cup hazelnuts, lightly toasted
200-250g chicken tenderloins trimmed and dried on paper towels
Salt and freshly ground black pepper
1 Tbs olive oil
Salt and freshly ground black pepper
Rocket pesto:

1 small clove garlic
About 40g rocket, washed and spun dry
2 Tbs pine nuts
2 tsp lemon juice
100 ml olive oil (approx)
Salt and freshly ground black pepper, to taste
Lemon Vinaigrette:
2 Tbs olive oil
2-3 tsp lemon juice
1 tsp honey (optional)
Salt and freshly ground black pepper, to taste

Place vinaigrette ingredients in a jar with a lid and shake.

Place red wine in a small saucepan and heat to boiling point. Add goji berries, turn off the heat and leave to cool, then drain thoroughly.

Make pesto by placing all ingredients except oil in food processor. Process for 30 seconds, then gradually add the oil with the motor running, until you have a thick pouring consistency.

Mix the rocket and red cabbage with the lemon vinaigrette. In two shallow salad bowls arrange the salad in layers. First the rocket and red cabbage, then the endive, sugar snap peas, goji berries and hazelnuts. Brush chicken with oil, season, then grill or pan fry until golden brown on both sides and cooked through. Slice each fillet into 2-3 pieces, arrange on top of the salad. Drizzle the salad (especially the chicken) with the pesto – you won’t need it all.

Serves 2 as a main course