Peanut Butter Balls

If I make a recipe and Matthew says he really likes it I never make it again. Well that’s his story, which is a real exaggeration. When he tells people this sob story I usually roll my eyes.

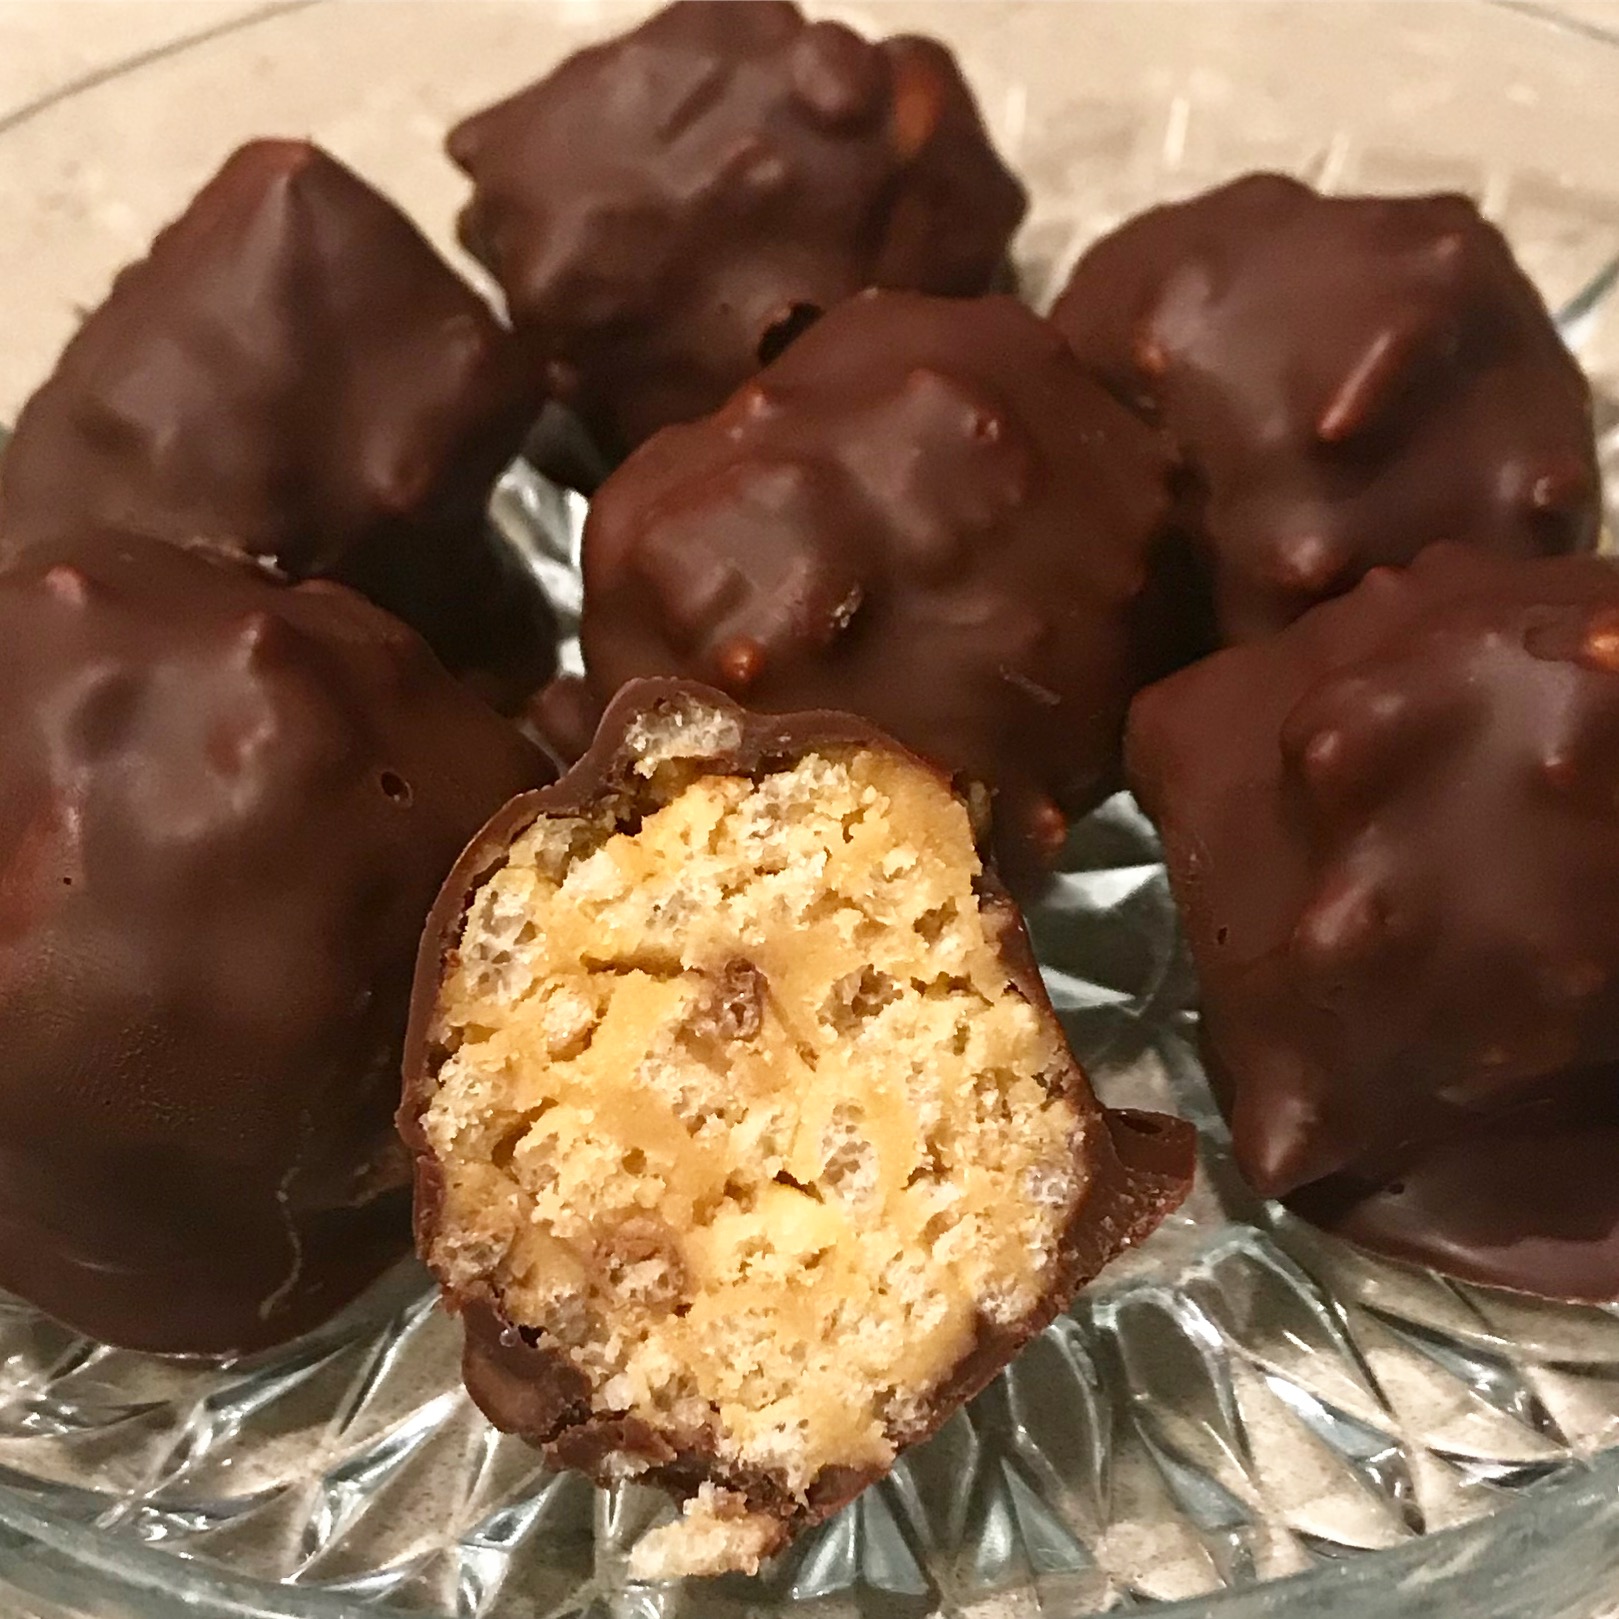
One of his absolute favourites is Peanut Butter Balls, which taste a bit like the American chocolates by Reece’s, called Peanut Butter Cups. If Matthew had his way I would make them every week, but they’re fiddly and time-consuming. Not the initial mixing, but the coating in melted chocolate. And they all disappear in no time flat.

Once I made them a few days before friends came around for dinner. I was planning to serve them with coffee, but guess what, they had all disappeared. So the next time I sneakily put them in the freezer, but that didn’t work either. Matthew found them and informed me smugly that peanut butter balls thaw nicely in the time it takes to boil the kettle.

So to put a smile on his face I made a batch for him to share with our son-in-law on Father’s Day next Sunday.


1 cup smooth peanut butter
125g butter
3 cups Rice Bubbles (Rice Krispies)
1 cup icing sugar, sifted
300g dark or milk chocolate, or half and half
A small piece of Copha (or coconut oil) the size of a large walnut

Place peanut butter and butter in a bowl, cover then zap in the microwave for a minute or two to melt. Mix in rice bubbles and icing sugar then refrigerate for an hour or until firm. Line a baking tray or two with baking paper. Scoop out heaped teaspoonsful and arrange on the trays. Refrigerate again until firm, then use your hands to squeeze them into nice round balls. Put back in the fridge while you prepare the chocolate.

Place chocolate squares in a bowl with the Copha or coconut oil over a pan of simmering water. When melted and smooth remove chocolate from the heat and take the balls out of the fridge. Coat each one in chocolate using two forks and leave to set on the paper-lined trays. Work quickly otherwise they will start to fall apart. Find somewhere to hide them in the fridge!

Makes about 50


Chocolate Biscuit Cake

This quick cake requires no baking making it great for last-minute entertaining. Serve it with raspberries or raspberry coulis and cream. Add a dash of brandy or a liqueur to the coffee mixture for a more grown-up flavour. It’s adapted from a recipe I found in an IKEA cook book.

250g unsalted butter
250g dark chocolate
1 cup icing sugar
2 eggs
1 tsp vanilla essence
1 cup hot water mixed with 1 heaped Tbs instant coffee
1 packet of plain rectangular biscuits such as Marie (you need 23-25)
To serve:
Icing sugar
Raspberries or raspberry coulis
Whipped cream or pouring cream

Cut butter into cubes and place in microwave-safe bowl with the chocolate, broken into squares. Cover, otherwise it will splatter. Heat for about 2 minutes on high, stopping halfway to stir, or until melted.

Meanwhile place icing sugar in food processor and process to remove any lumps, then add the eggs. When mixed add the melted butter and chocolate and the vanilla essence.

Line a loaf pan with foil or plastic wrap. If using a silicone pan you don’t need to line it. Spoon about 4 tablespoons of chocolate mixture into the pan and spread over the base. Dip each biscuit briefly in the coffee mixture before arranging them in the cake pan. Lay a single layer of biscuits over the chocolate, then continue alternating chocolate and biscuits, ending up with chocolate.

Refrigerate for several hours or overnight. Remove cake from loaf pan, dust with icing sugar, then slice and serve with fresh or frozen raspberries or raspberry coulis and whipped or thick pouring cream.

Serves 8-10

Mango and Passionfruit Ice Cream Cake

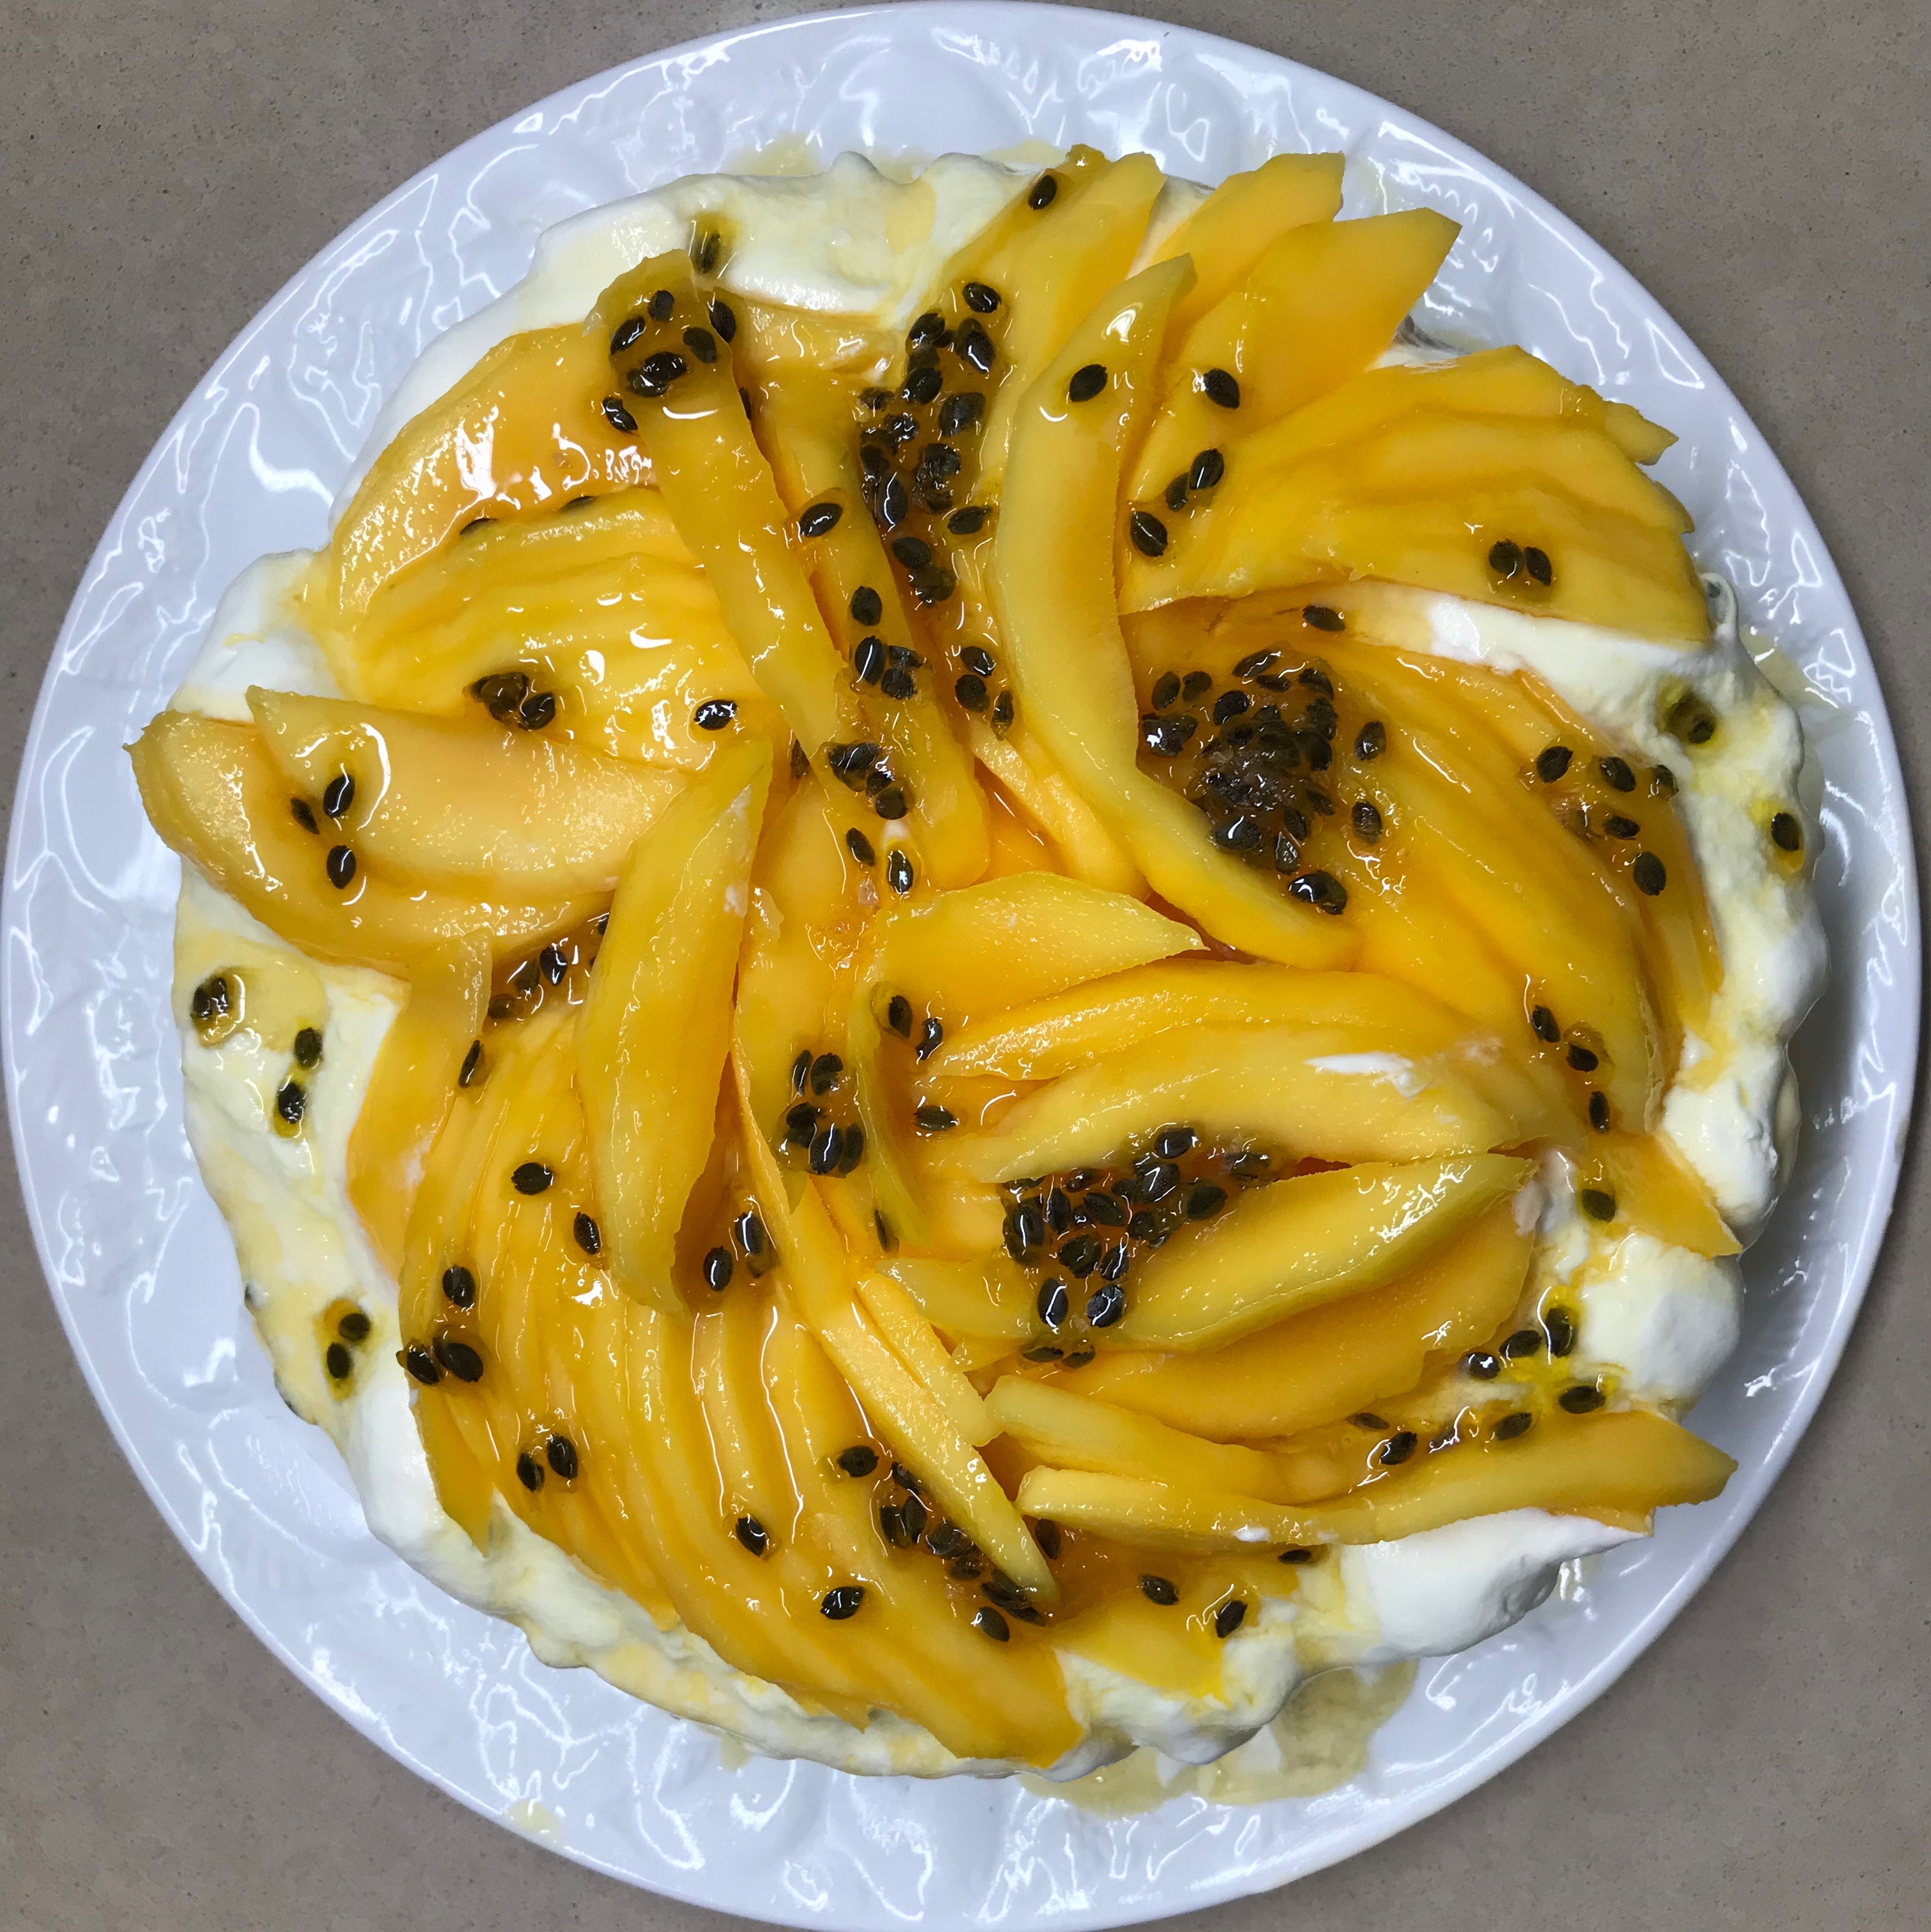
The December/January edition of Delicious magazine had a photo on the front of a really quick and easy Mango and Passionfruit Ice Cream Cake which was just perfect for a recent birthday party we hosted.

The recipe uses a bought pavlova so it’s only possible for readers who live in Australia, where you can buy a pavlova base in any supermarket. Readers elsewhere will have to make their own pavlova or modify the recipe and mix 500g of broken up store-bought meringues into the ice cream. The recipe also uses a four litre carton of store-bought ice cream. Easy peasy.

It was absolutely delicious, but a number of variations occurred to me, so I have listed them below. You will no doubt come up with a few of your own.

If you use homemade ice cream rather than store-bought you will need to take the cake out of the freezer 10-15 minutes before serving because homemade ice cream always freezes much harder than store-bought and the cake will be too difficult to slice.

1 x 500g store-bought pavlova base
4L vanilla ice cream
12 passionfruit
A few drops of yellow food colouring (optional)
1/3 cup whisky or water
½ cup sugar
300ml whipping cream
2 ripe but firm mangoes, thinly sliced

You will need a springform cake pan 25cm in diameter with a clip closure – i.e. the same diameter as the pavlova. Choose a flat serving plate which will fit in the freezer. Place the pavlova on the plate then undo the springform pan and take out the base, which you don’t need. Place the ring over the pavlova so it sits down on the plate, then close it.

Spoon the ice cream into a large mixing bowl and let it stand for a few minutes to soften slightly while you add the pulp of 8 of the passionfruit and, if liked, a few drops of yellow food colouring. Mix gently but thoroughly then spread on top of the pavlova, smoothing the top. Freeze overnight – no need to cover.

Place whisky or water, sugar and pulp from the remaining 4 passionfruit into a small saucepan. Heat gently, stirring, till sugar has dissolved then simmer for 6-8 minutes or until thickened, then cool. Can be made ahead and kept in a jug or jam jar.

To serve, whip cream until stiff and slice mango thinly. Remove ice cream cake from freezer. Briefly hold a tea towel wrung out in very hot water around the sides, run a thin knife around the outside of the cake, then release the clip and lift off the tin. Spread whipped cream over the top, cover with sliced mango and drizzle with passionfruit sauce. Serve immediately.

Serves 16

Four Variations: 

  • Use chocolate ice cream, cover the whipped cream with strawberries, whole or sliced if large, then drizzle with chocolate ganache
  • Use plain vanilla ice cream or Quick Raspberry Ice Cream, cover the whipped cream with fresh raspberries, then drizzle with raspberry coulis
  • Dissolve 4 Tbs instant coffee in 2 Tbs hot water then mix thoroughly into the ice cream, mix about 200g broken up Halva into the whipped cream and drizzle with chocolate sauce
  • Use caramel or salted caramel ice cream, cover the whipped cream with sliced bananas and toasted macadamias or peanuts (optional), then drizzle with caramel sauce


Ottolenghi’s Rice Salad with Nuts, Sour Cherries & Grilled Salmon

While staying with our son and daughter-in-law in London they served this unusual rice salad from Yotam Ottolenghi’s latest cookbook Plenty More.

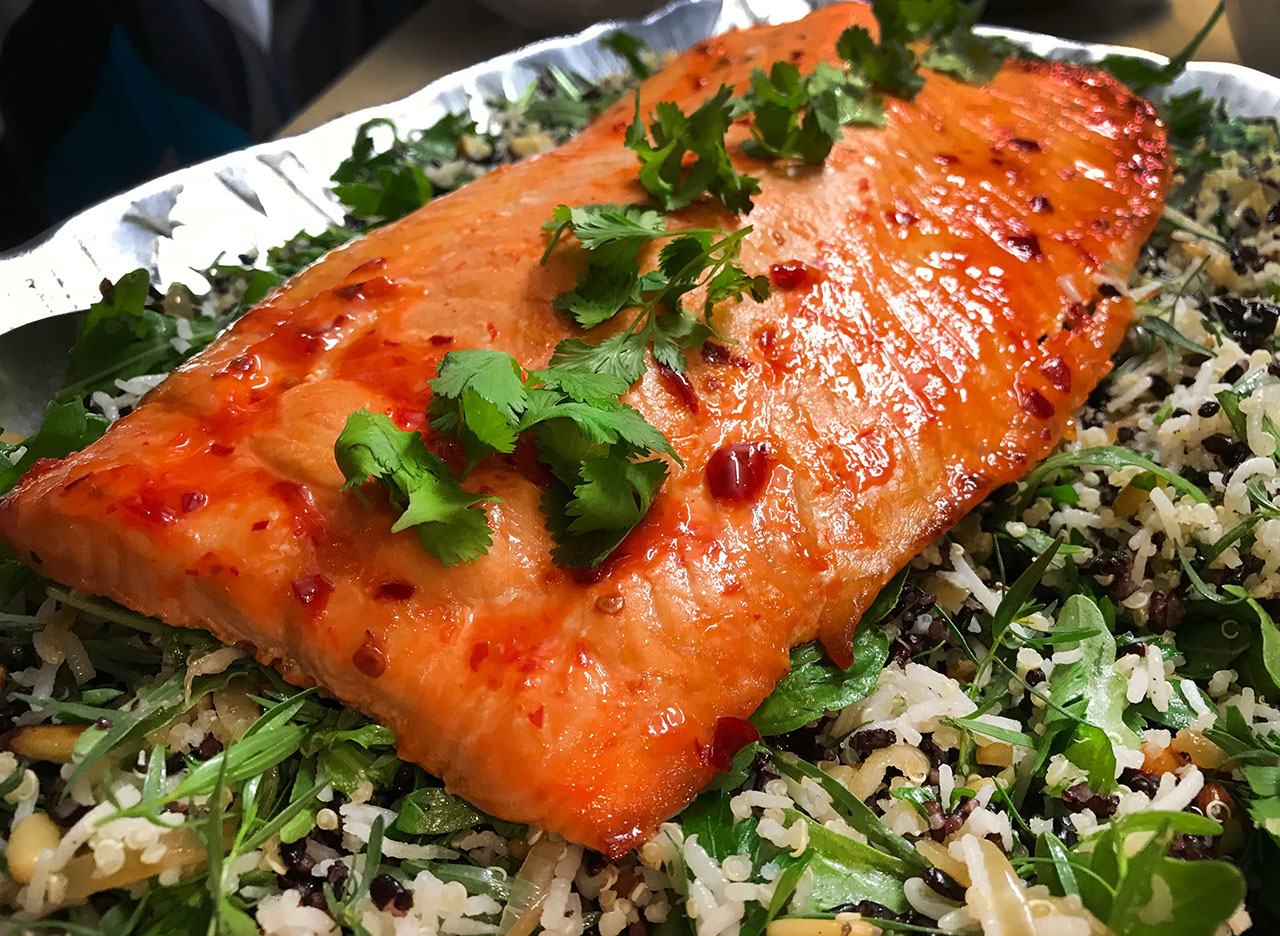
It’s delicious on its own, but they served it on individual plates, topped with a portion of pan-fried salmon with crispy skin. For a recent buffet dinner I made one and a half times the rice salad, then baked a one kilo side of skinned and deboned salmon (from Costco), brushed with Thai sweet chilli sauce, at 200°C for 8-10 minutes and placed it on top of the salad. I prepared all the ingredients for the salad earlier in the day and mixed everything together 10 minutes before serving. The salmon can be hot or at room temperature.

I couldn’t find wild rice in Coles, Woolworths or Aldi. The health food store had a packet of 125g for $9.95 which works out at $80 a kilo. Ridiculous! Black rice, which costs around $10 a kilo can be found in all major supermarkets in Australia. It’s a very good substitute and a great colour contrast to the basmati, so I used that.

Ottolenghi cooks the basmati rice by the absorption method. I prefer to cook it in plenty of boiling water, the same as the wild/black rice and the quinoa, so you have more control over when to stop the cooking process. You want all the grains to have a bit of bite to them – al dente as the Italians say.

1 cup wild rice or black rice
1¼ cups basmati rice
4 Tbs olive oil
2/3 cup quinoa
60g almonds, skins on, coarsely chopped
60g pine nuts
3 Tbs sunflower oil
2 medium onions, thinly sliced
1 cup chopped flat leaf parsley
2/3 cup chopped basil leaves
1/3 cup chopped tarragon leaves
2 cups rocket leaves
2/3 cup dried sour cherries (I bought them in Costco)
¼ cup lemon juice
Grated rind 1 lemon
2 cloves garlic, crushed
Salt and freshly ground black pepper
Grilled salmon portions to serve (optional)

Place wild rice in a pan, cover with plenty of water, bring to the boil then simmer for 35 minutes until cooked but firm. Drain, rinse under cold water, drain again. Cook basmati rice in plenty of boiling salted water until cooked but firm. Drain, rinse and drain.

Cook quinoa in boiling water for 9 mins then drain, rinse and leave to drain. Place the almonds and pine nuts in a small frying pan with one tablespoonful of olive oil and a pinch of salt. Cook stirring until just starting to colour then set aside. Heat sunflower oil in a large frying pan and add the onions, a pinch of salt and some ground black pepper. Cook over high heat for 5-8 minutes, stirring often, until onions are soft with a few crispy bits. Drain on paper towels.

In a large salad bowl place all the grains, chopped herbs, rocket, fried onion, nuts and sour cherries. Add the lemon juice and zest, the remaining 3 Tbs olive oil, the garlic, half a teaspoon of salt (or to taste) and some pepper. Mix well then stand for 10 minutes before serving.

Serve the salad as it is or topped with grilled, pan fried or baked salmon.

Serves 8

Substitutions: 

  • use dried cranberries instead of sour cherries
  • use black rice or brown rice instead of wild rice
  • use skinned almonds if that’s all you have
  • use more parsley and basil if you don’t have any tarragon
  • if you don’t have any quinoa just leave it out

Mango Kulfi

To make traditional Indian or Pakistani ice cream, known as Kulfi, you begin by cooking sweetened flavoured milk over a low heat, stirring continuously to stop it from sticking and burning, until the volume is reduced by half. The milk takes on a distinctive flavour due to the caramelization process and this is the base you use to make the ice cream.

Having read a few articles and recipes online, I decided to replace the cooked milk with what is called Manjar or Dulce de Leche in South America. If you can’t find this use a can of Nestle Caramel Top n Fill, which is readily available in Australian supermarkets.  Kulfi can be made in any flavour, but mango kulfi is very popular in India, so as I had a packet of frozen mango in the freezer I thought I would give it a try.

This method of making ice cream in a food processor with frozen fruit virtually turns your food processor into an ice cream machine. As the frozen fruit breaks up it freezes the other ingredients. As you can see from the photo of the Kulfi when it was ready to go into the freezer, it already had the consistency of ice cream. Quick Raspberry Ice Cream is another recipe on this blog which uses this speedy food processor method. You can use any frozen fruit but the pieces must be fairly small or the motor will struggle.

250g Dulce de Leche or Manjar (or 1 can Nestle Caramel Top n Fill)
300ml cream (thickened, whipping, double)
1kg frozen mango pieces (I bought mine at Aldi)
Ground cardamom to taste
Pinch of salt
Grated rind and juice of 1 lime (save a little zest for garnish)
Lime Syrup to serve (optional)
Juice of 1 lime
½ cup water
¼ cup sugar
Lime zest

Place Dulce de Leche or Caramel topping in food processor with cream. Process until mixed and then, with the motor running, slowly add the mango cubes through the feed tube. Depending on what size food processor you have, you may need to make the Kulfi in two batches. Mine was just big enough. Keep mixing until all the mango cubes have been pureed, stopping to scrape down the sides with a spatula from time to time. Add cardamom (half a teaspoonful then mix and taste and see what you think), the salt and the lime zest.

Scrape Kulfi into a plastic container, cover and freeze for 3-4 hours or overnight. Remove from freezer 15 mins before serving. Scoop into bowls, drizzle with lime syrup and garnish with a little lime zest.

Lime Syrup: Place lime juice, water and sugar in a small saucepan and heat to dissolve sugar. Continue cooking until reduced by a third to a half and syrupy. Cool.

Serves 8-10

Little Piggy Rolls

Sausage rolls have been in my repertoire for donkey’s years and there’s already a recipe on this blog.They are always popular and freeze well either uncooked or almost cooked which is what I do, so they just need a brief heating through before serving.

The food blog Belly Rumbles by Sara McCleary featured a recipe recently for decorating sausage rolls to look like little pigs. As four of our grandkids were coming to stay I thought it would be fun to make them some Little Piggy Rolls. Belly Rumbles uses the filling below which has bacon and cheese added. Use this or the traditional filling on my previous blog, which just uses pork mince.

5 sheets ready-rolled puff pastry (each 25cmx25cm)
1 egg beaten with 1 Tbs water, to glaze
Filling:
500g pork mince
1 small onion, very finely chopped
3 rashers bacon, finely chopped
125g grated or finely diced cheddar cheese
2 tsp Worcestershire sauce
2 eggs
2 Tbs chopped Parsley
1 Tbs tomato sauce (ketchup)

Mix all ingredients for filling then follow the method on my previous blog for Sausage Rolls. I used 4 and a half sheets of puff pastry, cut the four whole sheets in half and made 4 sausage rolls from each of the 9 halves. Total 36.

I decorated 16 as Little Piggies and 20 with sesame seeds (as per traditional recipe). I used the remaining half sheet of pastry to make the features. Usually I would get 12 sausage rolls per sheet of pastry, but I wanted them a bit bigger for the Piggies.

To decorate the Little Piggies you will need enough extra pastry for the ears, snouts and tails and whole black peppercorns for the eyes.

When the sausage rolls are ready to go in the oven, arrange them on oven trays lined with paper, putting the join/seam underneath so you can’t see it. Use extra pastry to cut out ovals for the snouts, triangles for the ears and long strips for the curly tails. I didn’t have an oval cutter so I used the small round lid from a bottle of vanilla essence, then stretched them a bit to make them oval.

Brush the sausage rolls with egg wash, then arrange the snouts, ears and tails in place, as shown in photo. Use peppercorns for the eyes and the pointy end of a chopstick to make the nostrils. Brush features with egg wash.

Cook sausage rolls according to previous recipe. Serve warm. Can be frozen raw or almost cooked, then just heated through before serving.

Makes about 36

Coleslaw with Carrot Dressing

This is an unusual coleslaw because it doesn’t contain any mayonnaise. If you have a food processor with a grating attachment it’s very quick to make, but you can of course do the grating by hand.

½ large white cabbage or 1 small one
1 head broccoli or half a cauliflower, coarsely chopped or sliced
6 sliced spring onions
½ cup pumpkin seeds or sunflower seeds
½ cup sliced almonds, chopped walnuts or pecans (optional)
1 cup dried cranberries or raisins
Carrot dressing:
2 carrots
1 tsp honey
2 cloves garlic, crushed  (optional)
1 Tbs sesame oil
½ cup olive oil
Salt and freshly ground black pepper, to taste

Place the thinly shredded cabbage in a large salad bowl with the broccoli or cauliflower (I used cauli in the photo, but broccoli would have been more colourful) and the spring onions. Stir the seeds and nuts over a medium heat in a dry frying pan, until lightly toasted and add to the bowl.

Using the grating attachment of your food processor, grate the carrots. Then, leaving the carrots in the bowl, switch to the metal mixing blade, add remaining ingredients and mix until you have a bright orange dressing. Add to the salad bowl, mix well then scatter the dried fruit over the top.

Serves 6-8

Variations: add some shredded red cabbage or strips of red capsicum.


Little Cauliflower Cheeses

This recipe makes 12 delicious little cauliflower cheeses. Instead of flour it uses breadcrumbs to hold the mixture together. Serve as a side dish, snack or healthy addition to school or office lunch boxes.

It’s a very adaptable recipe. Use broccoli or asparagus instead of cauliflower. Grated Parmesan or crumbled feta instead of cheddar.

1¼ cups breadcrumbs, preferably Panko
500g cauliflower florets
1 egg
250ml light cream or evaporated milk or half cream and half milk
¾ cup grated cheddar cheese
2 rashers bacon, finely chopped (or use ham)
1 tsp fresh thyme, chopped (or use another fresh herb)
25g butter, melted
Salt and freshly ground pepper

Preheat oven to 200°C. Lightly grease a 12 hole one-third of a cup muffin pan. Keep half a cup of cauliflower florets. Place the rest in a food processor and process till finely chopped. Place in a bowl with the breadcrumbs, egg, cream and half a cup of the grated cheddar. Mix well and season to taste, then divide among the muffin pan holes.

Slice remaining cauliflower thinly and mix with the bacon, thyme, melted butter and remaining cheddar. Top the muffins with this mixture. Bake 20-30 mins or until risen, golden and firm to the touch. Don’t overcook as they will be dry if you do. Cool 10 mins in pans then run a knife around to remove. Serve warm or at room temperature garnished with some fresh thyme leaves.

Makes 12

Variation: for a vegetarian version leave out the bacon and add some chopped pitted olives.

Salmon en Croute with Dill Mayonnaise

This recipe takes a little longer than most of the recipes on this blog, but it’s really not that complicated and an elegant way to feed a crowd.

I bought the salmon at Costco because their salmon never has any bones in it. If there’s one job I really hate it’s removing salmon bones with tweezers. In Australia puff pastry comes in pre-rolled squares which measure about 25x25cm. If you live somewhere it’s sold in a block you will need enough to roll out to a rectangle which is a bit bigger than double the size of the salmon.

1 side of salmon (skinless and boneless)
Puff pastry (I used three 25x25cm squares)
2 leeks
1 bunch spinach
50g butter
Salt and freshly ground black pepper
½ cup cream
Salt and freshly ground black pepper to taste
1 egg, beaten
To serve:
1 cup mayonnaise (preferably home made)
1 bunch dill, stalks discarded

Clean leeks to remove any grit then chop finely, using all the white part and some of the green. Heat half the butter in a frying pan and cook leeks gently, stirring often, for 10 minutes or until soft but not brown. Add cream and cook until evaporated. Season to taste. Wash spinach and remove stalks. Place in a large saucepan with just the water clinging to the leaves and cook, stirring, until wilted right down. Place in food processor with the remaining butter and process to a slightly chunky puree. Season to taste. Prepare the leeks and spinach the day before and keep refrigerated.

Roll out pastry. I used three ready-rolled squares. Two squares stuck together and one square cut in half and stuck together lengthwise then joined onto the two big squares along the long side. Roll over the joins with a rolling pin so they stick. If using a block of pastry you will need to roll it out thinly to a rectangle slightly larger than twice the size of the salmon. Place pastry on a lightly greased baking tray – I used the shallow oven tray which came with my oven. If liked, line the tray first with baking paper.

Spread the leek mixture down the centre of the pastry in the shape of the salmon, then lay the salmon on top and cover with the spinach. Make sure the salmon is covered entirely by the leeks on the bottom and the spinach on the top. Fold in the two ends of the pastry which should be 2-3 cm longer than the fish. Cut diagonal slashes into the pastry on the two sides as far as the salmon, then bring them in alternately to create a pseudo-plait, pinching the ends together. If it doesn’t look like a work of art, don’t worry it will look amazing when it’s cooked. If liked, arrange a row of diamond shapes, made from pastry off-cuts, down the join in the middle, to cover any imperfections. Refrigerate until serving time.

Preheat oven to 180°C. Brush pastry all over with beaten egg. Bake for 30-40 minutes or until well-browned. Place mayonnaise and dill in food processor and process until smooth.

Serve slices of the salmon pie with the dill mayonnaise. New potatoes and a steamed green vegetable such as broccolini, asparagus, green beans or snow peas go well with this.

Serves 8-10

Salted Caramel Pots de Creme

As we were about to fly out of Los Angeles I was browsing through cookbooks in the airport bookshop and came across one published by a restaurant in LA called Gjelina. Some of the recipes made my mouth water, so a visit to this restaurant is definitely on the “to do” list for next time.

Salted Caramel (or Butterscotch) Pots de Crème is one of Gjelina’s signature dishes and everyone says they’re to die for. As with all good recipes, word has got around and there are now several different versions online. Before attempting to make them I read through several variations, as well as numerous comments from readers who had tried them. The variations included different amounts of egg yolks and cream, how long to cook the desserts to ensure they set and whether to serve them with whipped cream or crème fraîche. Our verdict is that they are nice with either, so it’s up to you.

This dessert is sweet and sinful but OMG it’s good.

75g butter
½ cup brown sugar
600ml cream
1 tsp salt
1 tsp vanilla essence
3 egg yolks
Caramel:
½ cup sugar
6 Tbs water
To serve:
Whipped cream or Crème fraîche (or sour cream)
Maldon salt flakes

Preheat oven to 165°C. Melt butter and brown sugar then let it bubble over moderate heat for 3-4 minutes. Swirl pan occasionally and watch it doesn’t burn. Whisk in the cream slowly with a balloon (hand) whisk. Return to the boil, stirring then add the salt and vanilla. Whisk egg yolks in a mixing bowl then pour in the hot cream mixture, whisking all the time. Strain through a sieve into a jug then pour into 6 small ramekins or coffee cups.

Place ramekins in a baking dish or pan and pour boiling water to come halfway up. Cover with foil then bake for an hour, or until set but still slightly wobbly. Cool then refrigerate overnight, covered.

Caramel: Place sugar and water in a pan and heat until dissolved. Cook over moderate heat, swirling the pan from time to time, until whisky-coloured. Carefully spoon a little caramel on top of each dessert, tipping so it covers. You don’t need much – max one tablespoon for each pot. The caramel will set hard and you need to serve the desserts soon afterwards. If you do this stage ahead of time and put the desserts back in the fridge the caramel may become chewy. Actually it’s quite nice but much harder to eat chewy toffee than hard caramel in polite company! So I suggest you add the caramel topping close to serving time..

Serve the pots de crème with whipped cream or crème fraîche or sour cream and a few flakes of Maldon salt flakes.

Serves 6