Chinese Spoon Canapés

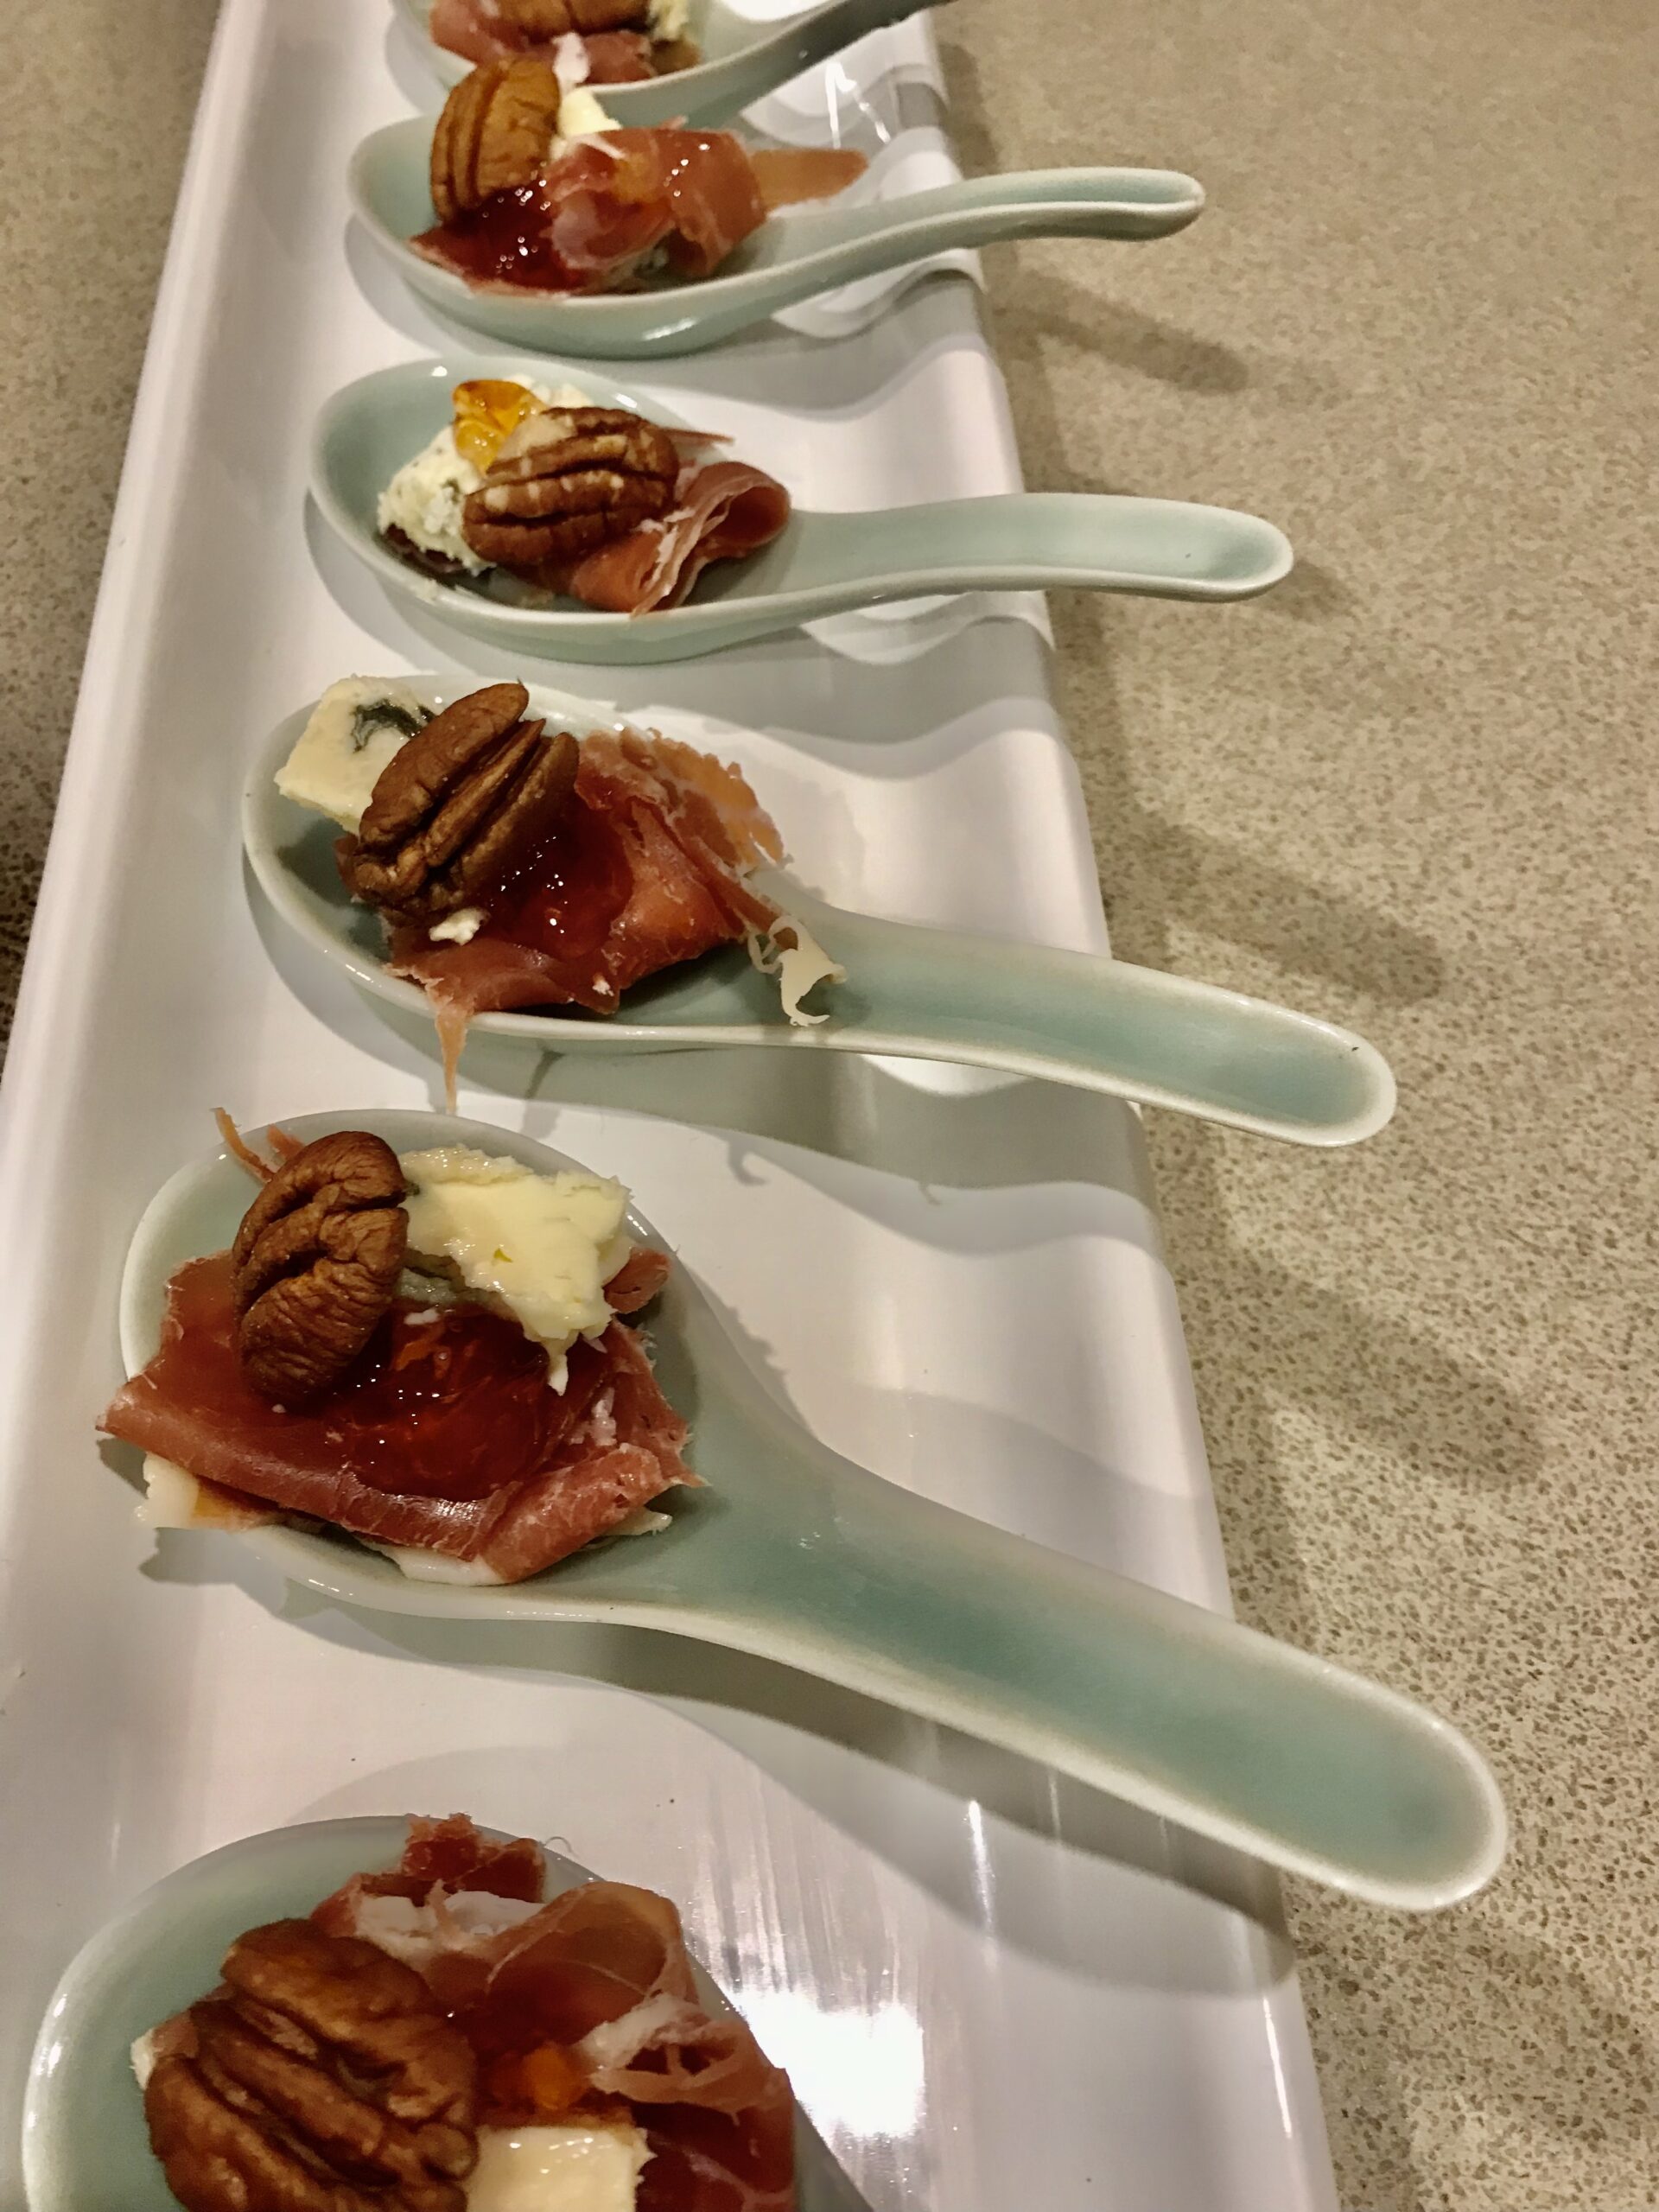
Chinese spoons are great for serving tasty morsels with drinks. Find them in Asian stores or collect them from second-hand shops, known as Op shops in many countries. I have more than two dozen and use them a lot.

When serving a canapé on a spoon you don’t need a base of bread, toast or a cracker. The spoon takes its place. I like to keep the ingredients on hand to make my favourite combinations. So I’ve usually got prosciutto and soft blue cheese in the fridge (plus the walnuts and jam in the pantry) and when I’ve used them I add them to my shopping list. Same goes for the gravlax or smoked salmon, kewpie mayonnaise and pickled grapes.

Kewpie mayonnaise is a Japanese product sold in the Asian section of Australian supermarkets. Once you have pickled grapes (which are home made) in the fridge you’ll find they go with lots of things as a tasty, fresh garnish, so make more than you need.

I haven’t put an ingredients list or method for the first two ideas. Just arrange the components on the spoons as shown in the photos. You can whip up a tray of one or two of these combinations in no time at all.

(1) Prosciutto (or jamon serrano), creamy blue cheese, a lightly toasted walnut or pecan half, half a teaspoon of fruit jam or jelly or paste and a coriander leaf (optional, not in photo).
You can use virtually any sweet jam, jelly or paste such as cranberry, plum or quince.

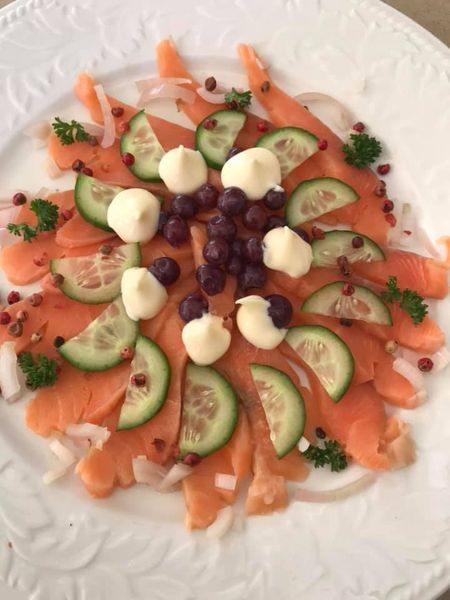
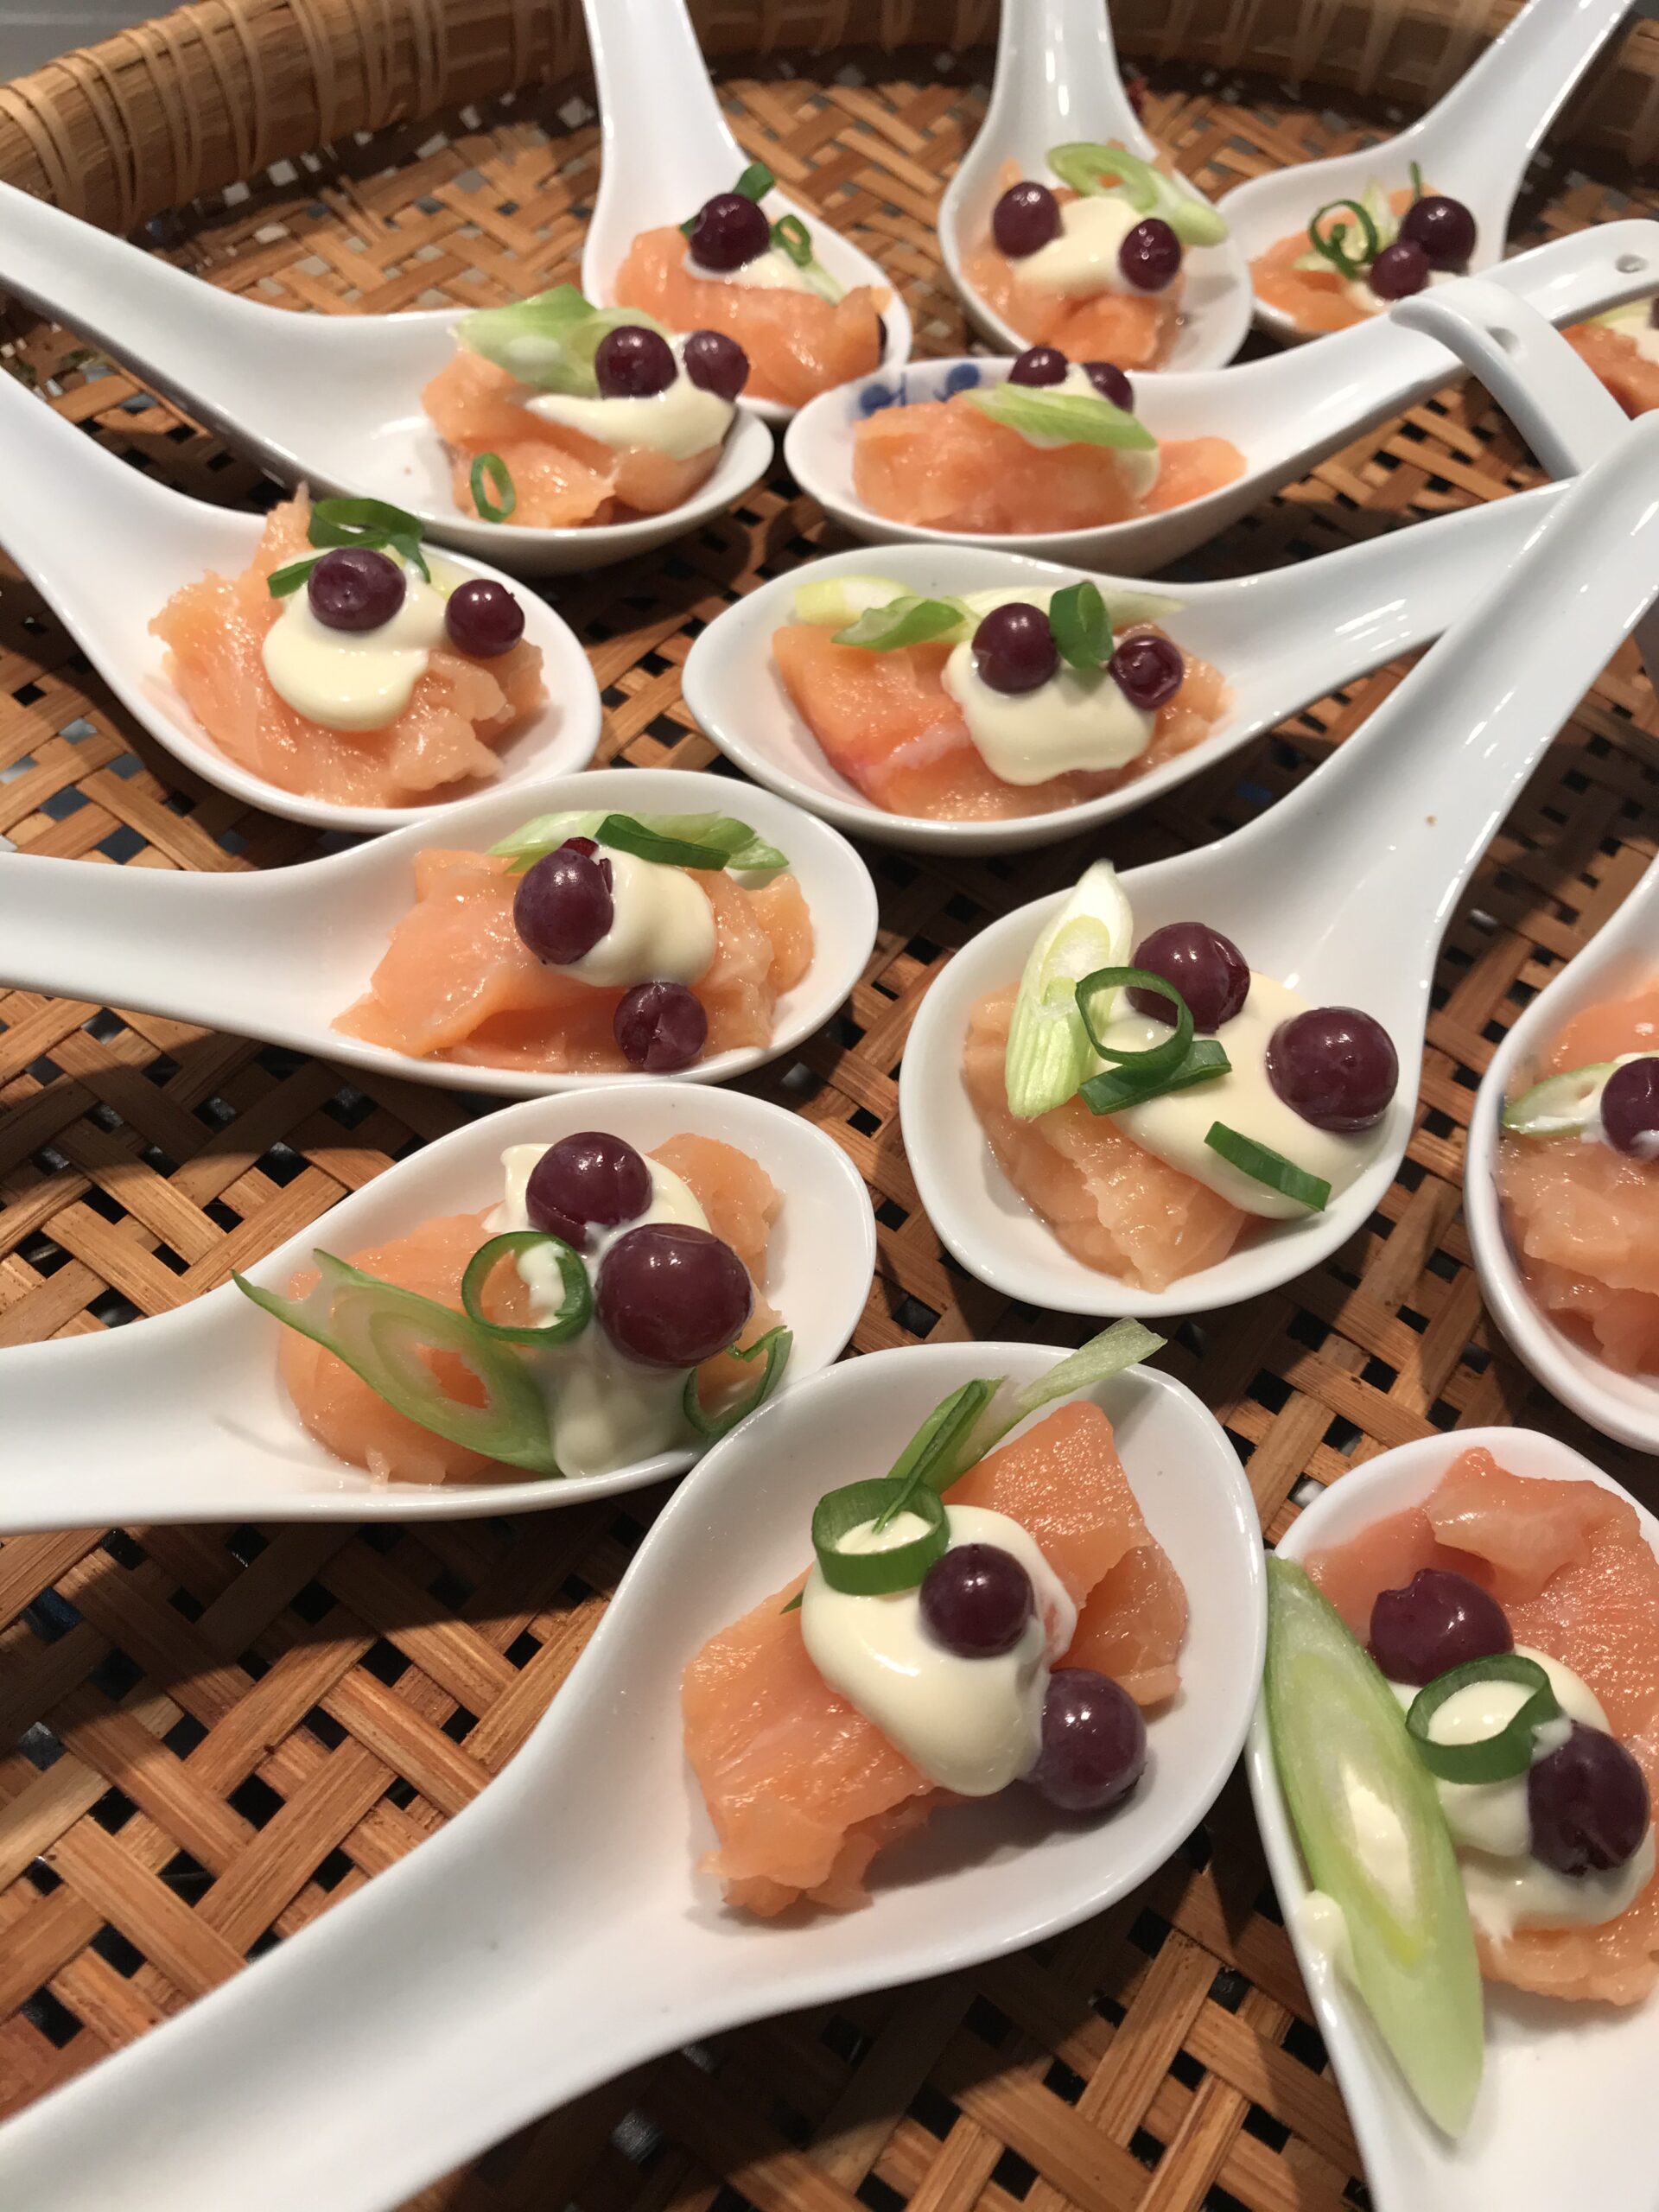
(2) Gravlax (or smoked salmon or trout) with kewpie mayonnaise, spring onion and pickled grapes.
The pickled grapes are home-made and keep for a couple of weeks in the fridge. The ones in the photo are very small ones we grow and freeze. They keep for months in the freezer and I take them out as I need them for pickling. If you use larger fresh grapes, cut them in halves or quarters.

(3) Tuna and Avocado Spoons with Wasabi Dressing

200-250g piece of sashimi-grade tuna
1 or 2 avocados, halved and thinly sliced
Fresh Coriander leaves
Lightly toasted sesame seeds to garnish – photo shows white but black ones look good
Dressing:
1 Tbs lemon juice
1 Tbs soy sauce
1½ Tbs sesame oil
2 tsp finely grated fresh ginger
1 Tbs brown sugar
¼ tsp wasabi paste, or to taste

Slice tuna thinly. This is easier to do if the tuna has been frozen and is only partially thawed. Arrange a piece on Chinese spoons, top each with a slice of avocado and a coriander leaf. Drizzle with dressing, sprinkle with sesame seeds and serve when the tuna has thawed – it will only take a few minutes.

Dressing: Place all ingredients in a jar with a lid and shake vigorously.

Makes 16-20 spoons

Easy Peasy Salmon Sushi

Salmon sushi make a quick and tasty, not to mention healthy meal, especially if you make them using an ice cube tray. I made the rice cakes a bit too tall, so the ratio of rice to salmon wasn’t quite right. Next time I won’t fill the ice cube holes so full.

1 cup sushi rice
1¼ cups water
1-2 Tbs Mirin
1-2 Tbs Rice Wine vinegar
Salt and pepper to taste
2 salmon fillets, skin removed
To serve:
Black sesame seeds
Wasabi paste
Soy sauce
Pickled Ginger
Sliced avocado

Place rice and water in a saucepan with a good pinch of salt and bring to the boil. Cover and turn down the heat as low as possible. If you have a heat diffuser use it under the pan. Cook rice for 15 minutes, then turn off the heat and let it sit for 15 minutes to continue cooking in the steam.

Oil an ice cube tray – I used a spray can. You may need more than one ice cube tray depending on how many holes it has. Fill with the rice, pushing down firmly, then refrigerate for a couple of hours or more.

To serve, tip out the rice cakes and arrange them on a serving tray. Thinly slice the salmon and drape a piece over each rice cake. Sprinkle with black sesame seeds.

Serve with wasabi paste, soy sauce, pickled ginger and sliced avocado.

Makes 16-20 sushi to serve 2-3 as a light meal or more as an aperitif.

Mazza’s Ceviche Dip

Ceviche originated in Peru, as a means of keeping fish before refrigeration was available. Some people don’t like the idea of eating ceviche, because the fish is not cooked. In fact the lemon or lime juice “cooks” the fish without heat and softens the texture, so it doesn’t taste raw.

This delicious recipe from my dear friend Mazza has been known to convert quite a few people who didn’t think they liked ceviche or have never tried it. Served with corn chips, it’s great to pass round with pre-dinner drinks. If preferred, skip the corn chips and serve it on Chinese spoons. With the addition of tomato ketchup it’s not a traditional ceviche recipe, but a good crowd pleaser.

Choose best quality white fish and give it a few hours in the fridge before serving.

500g firm white fish fillets, cut into 1-2cm cubes
2 Tbs chopped spring onions
½ red onion, finely chopped
Juice of 1lime
1 large tomato, skinned, seeded and chopped
¾ cup tomato sauce (ketchup)
2 tsp oregano
1 small red chilli, including seeds, finely chopped (leave out the seeds if preferred)
1 clove garlic, crushed
1 Tbs chopped lemon grass
Lots of chopped fresh coriander
Freshly ground black pepper to taste
To serve:
Corn chips

When you cut up the fish discard any stringy bits. Mix all ingredients together and refrigerate for a few hours.

Serve with corn chips.

Note: if you don’t have any lemon grass, remove the peel from half to one lemon with a potato peeler and chop it very finely. Other possible substitutions: lemon instead of lime juice, white instead of red onion and parsley instead of coriander.

Thai Chicken Salad with Peanut Crust

This recipe was given to me by my friend Barbara and I’ve made it twice over the holiday period. I’ve added a little dressing to the salad and served the chicken sliced on top, rather than mixed through the salad.

1 cup roasted peanuts
¼ cup red curry paste
1 cup coriander leaves, loosely packed
1/3 cup coconut milk
700g to 1kg chicken breasts
Salt to taste (if using salted peanuts you can leave it out)
Salad:
1 or 2 cucumbers depending on size (400g)
1 cup bean sprouts
1/3 cup fresh mint leaves
1 small red onion, halved and thinly sliced
Dressing:
1 Tbs olive oil
2 tsp lemon juice
Salt and freshly ground black pepper
Garnish:
Thinly sliced red chilli (optional)

Preheat oven to 180°C. Place peanuts, curry paste, coriander and coconut milk in food processor and process to form a slightly chunky paste. Spread on both sides of the chicken breasts and arrange on a baking tray with non-stick baking paper. Bake for 25-30 minutes or until cooked through – test with a knife.

Halve cucumbers lengthwise and remove seeds with a small teaspoon, then slice. Mix salad ingredients with dressing and arrange on serving plate. Slice chicken and arrange on top. Garnish with the chilli.

Serves 4-6

Substitutions: use cashews instead of peanuts. Any curry paste will do.

Lobster & Mango Salad with Thai Dressing

This salad is perfect for a New Year’s Eve buffet. I’ve been making it for about 20 years and it’s always a hit. One of my top ten cold recipes.  If preferred, use peeled prawns instead of lobster as I have in the photo. You will need a kilo of prawns to end up with half a kilo once they are peeled. Serve on individual plates as a starter or on one large platter as part of a buffet.

500g cooked lobster (crayfish) meat, or cooked shelled prawns
2 slightly underripe mangoes, skinned, sliced and cut into julienne sticks
1 med red chilli, seeded and finely chopped
1 bunch spring onions, white & some of the green, thinly sliced on the diagonal
1 bunch coriander, leaves picked off (keep the stalks for the dressing)
A handful of basil leaves, picked off and torn in half if large
60g baby spinach
1 cup beansprouts
Dressing:
¾ cup lime juice
80g palm sugar or brown sugar
1 stalk lemongrass, white part only
Stalks from 1 bunch of coriander
2 Tbs Fish sauce
Garnish:
¾ cup unsalted cashews
Extra Virgin olive oil

Make dressing: Heat lime juice in a small saucepan with palm sugar and stir to dissolve. Place in food processor with remaining ingredients. Process till fairly smooth, then tip into a jar with a lid. Can be made ahead and refrigerated.

Slice lobster meat into large chunky pieces. If using prawns just peel, devein and leave whole. Mix with a little of the dressing and the chilli and refrigerate till serving time. Toast cashews in a dry pan, over medium heat. Wash spinach, basil, beansprouts and coriander. Dry in a salad spinner then refrigerate in the spinner. Prepare mango and spring onions and refrigerate, separately. All ingredients can be prepared well ahead.

To serve, mix spinach, coriander leaves, basil leaves, beansprouts and spring onions with enough dressing to moisten. Divide between six individual plates or pile into one large serving dish. Arrange the lobster or prawns on top and garnish with the mango and cashews. Drizzle with extra dressing if liked. You may not need all the mango, depending on the size of the mangoes you use. Drizzle a little olive oil around the salad.

Serves 6 as a starter or light lunch, 4 as a main course or 10 to 12 as part of a buffet

Notes: if you don’t have lemongrass use a couple of strips of lemon or lime peel, removed with a potato peeler. If you don’t have unsalted cashews, salted ones will do. If you don’t have lime juice use lemon juice.

Gin-Cured Salmon with Kewpie Mayonnaise & Pickled Grapes

This delicious gin-cured salmon (inspired by a dish I had at one of our favourite Canberra eateries, Lambsheds is great to have ready in the freezer for the holiday season, whether you’re living in the northern or southern hemisphere. It’s so easy to make and guaranteed to impress your guests. I buy the salmon from Costco because they do a great job of deboning, you don’t even have to check. This recipe is a variation on a traditional Gravlax.

Serve the salmon as a starter or light lunch, or on Chinese spoons, as appetisers. I’ve been collecting Chinese spoons from second-hand stores for some time and have well over fifty. When asked to bring a plate to an end of year gathering this is what I have been taking this year.

If you don’t have time to make the cured salmon, the recipe works well using plain raw salmon (top sashimi quality, remove any brown bits and slice thinly) with the kewpie mayonnaise and pickled grapes. Kewpie mayonnaise is a Japanese product available in most supermarkets. Juniper berries and pink peppercorns (which are actually not peppercorns at all) are available from specialty shops such as The Essential Ingredient.

The grapes in the photos are very small ones we grow ourselves, so I leave them whole. They are delicious with cured salmon, smoked salmon, or on oysters, with a sliver of spring onion, for those who don’t insist in eating them “au naturel”.

1 side of salmon (about 1kg), skinned and de-boned
1/3 cup each salt, sugar and gin
1 tsp pink peppercorns
1 tsp cumin seeds
1 tsp juniper berries
2 tsp coriander seeds
Finely grated rind of 1 lime
To serve: 
Kewpie mayonnaise
Finely sliced spring onions or finely chopped onion
Pickled grapes (see below)
Baby cucumbers, sliced and halved (optional)
Pink peppercorns (optional)

Cut salmon in half across the middle of the fish. Place spices in a mortar and pestle and grind fairly finely. Place in a bowl with remaining ingredients and mix well. Spread about a third in a shallow glass dish, then place one piece of fish on top, then another third of the spice mix, the second piece of fish and remaining spice mix. Cover with plastic wrap or a plastic bag, then place a plate or a board on top and a couple of cans of tomatoes or whatever, to weigh it down. Refrigerate for 2-3 days, turning the fish once or twice.

Remove the salmon from the gin marinade, scrape off the spice mix and pat dry with paper towels. Wrap each piece in plastic wrap and freeze until needed.

To serve, slice salmon thinly and arrange on individual starter plates or Chinese spoons. Garnish with Kewpie mayonnaise, spring onions, baby cucumber (optional) and drained pickled grapes. If liked sprinkle with a few pink peppercorns.

Pickled grapes:
½ cup each water, white or cider vinegar and sugar
Black seedless grapes cut into halves or quarters, depending on size

Heat water, vinegar and sugar in a small saucepan until sugar has dissolved, then tip into a jam jar. Add grapes. The quantity varies, but they all need to be submerged in the liquid. Keep in the fridge.

Onion Quiche

Quiches can be made with a variety of fillings, but the best known is Quiche Lorraine, made with bacon, eggs and cream. It’s definitely the most popular in our house, closely followed by Onion Quiche.

Quiches can be frozen at any stage of the preparation. You can freeze the uncooked pastry, the uncooked quiche shell or the partly cooked quiche shell, with or without the filling poured in. While you can freeze a fully cooked quiche, I prefer to freeze them at the point where the filling has just been poured into the partly-baked pastry case. Place the quiche in the freezer until it has frozen completely, then wrap it in a plastic bag to stop the filling from sticking to the bag which would happen if you wrapped it before it had frozen.

When needed, put the quiche straight from the freezer into the oven and allow about 25% longer cooking time. Use a dish which can go straight from the freezer to the oven – most dishes are fine and you can of course make quiches in metal pans rather than ceramic. Baking the pastry case blind – before you add the filling – is the secret to avoiding a soggy bottom.

If you make two batches of the shortcrust pastry recipe below and divide it into 3 equal balls it will be just enough to make three large quiches. I usually do that and use one ball and freeze two for another time, wrapped in plastic wrap. If you only make one batch of pastry you will have enough for one large quiche with some leftover. You could use this to make some little tart cases. Cook them completely while empty, then fill with Lemon Curd or Raspberry Jam.

It’s always amazing to see how many onions go into this quiche – one whole kilo! Gently cooked for 45 minutes in butter and oil the onions produce one of my favourite quiche fillings from northern France.

Shortcrust Pastry:
250g plain flour
125g butter, cut into four
½ tsp salt
3-4 Tbs cold water
Filling:
1 kg onions, thinly sliced
50g butter
1 Tbs olive oil
1 Tbs flour
2 eggs
¾ cup cream
1 tsp salt
¼ tsp nutmeg
Freshly ground black pepper
60g grated cheese, preferably Gruyere or Emmental

Pastry: Place flour, salt and butter in food processor and process until it looks like breadcrumbs. With the motor running gradually add about 3 Tbs cold water through the feed chute, stopping the motor as soon as the mixture forms a ball. Tip out, form into a ball. While you only need one batch for this recipe you might like to make a second batch so you end up with two spare balls of pastry to use one day when you’re in a hurry. If you decide to do this, make a second batch of pastry, tip it out and make it into a large sausage shape with the first batch. Cut into three and wrap each third in plastic wrap. Refrigerate or freeze until needed. Can be refrigerated for 3-4 days or frozen for a month or two.

Preheat oven to 180°C. Roll out pastry and line quiche dish (mine is 25cm diameter and 3.5cm deep) then bake it blind. Don’t worry if you have to patch up a few holes, nobody will know when it’s cooked. To bake blind, line the pastry case with a piece of aluminium foil, pressing it down to fit, then tip in something to weigh it down and stop the pastry from rising in the middle. I use dried corn kernels which I keep in a jar and use over and over again. Dried beans or rice will also do the trick.

Bake the quiche shell for 5-10 mins, then remove the foil and corn and bake it for a few more minutes until very pale golden in colour.

Meanwhile for the filling heat butter and oil in a large heavy frying pan, add onions and cook very gently for about 45 minutes, or until tender and pale golden, stirring regularly. Add flour and cook, stirring, for 1-2 minutes, then cool. Onions can be prepared to this stage ahead of time and kept refrigerated.

In a mixing bowl beat eggs with cream, add the cooled onions, salt, nutmeg and black pepper to taste and pour into pastry case. Can be frozen at this stage.

Sprinkle with grated cheese and bake for 45 minutes or until puffed and golden brown. Serve warm or at room temperature.

Serves 6-8

Note: I have a slightly larger quiche dish which is 27-28 cm in diameter. If I use the bigger dish, to make more filling I just add two more eggs, making four in total.


Peanut Caramel Slice

If you have a packet of miso paste in the fridge, bought for a recipe which only required a tablespoonful or two and you’re wondering what to do with the rest, this is the recipe for you. If not, go and buy some.

Miso paste keeps for weeks in the fridge and is a useful addition to all sorts of dishes, both sweet and savoury. It adds an intensity of flavour known as umami, the fifth taste sensation after sweet, sour, bitter and salty. Try adding a tablespoonful to your next casserole or bolognese sauce.

This yummy slice has miso in the shortbread base where it combines with the other ingredients to make a very moreish snack. If you like peanut brittle you will like this slice which is totally addictive. If you don’t have any miso you could just leave it out.

Shortbread base:
125g butter at room temperature
5 Tbs sugar
1 egg yolk
1 Tbs miso paste
1 cup flour
2 Tbs cornflour
½ tsp salt
1/8 tsp baking powder
Caramel:
1 cup brown sugar
2 Tbs honey
50g butter
Good pinch of chilli powder (optional)
250g salted roast peanuts
½ tsp salt

Preheat oven to 180°C. Line the base of a 9″ (22cm) square cake pan with baking paper and grease the pan. Place butter and sugar in food processor and mix till creamy. Add egg yolk and miso then lastly the flour, cornflour, salt and baking powder. Mix well, stopping halfway to scrape down the sides. Put blobs all over the base of the tin, then press it to a uniform thickness with slightly damp fingers. Bake for 10 minutes or until golden.

Meanwhile, heat brown sugar, honey and butter in a saucepan until melted, stirring. Add chilli powder, peanuts and salt and mix well. Put blobs all over the shortbread base, then spread evenly with a knife. Put back in the oven for 10-15 minutes, or until golden brown.

Cool for 20 minutes, then cut into about 20 squares while still warm. Keep in an airtight tin. If kept in the fridge the slice will be more chewy. As an after dinner nibble cut the pieces in half again so you get 40.

Makes about 20 pieces

Variations: use slivered almonds, roughly chopped macadamias or a mixture of nuts instead of the peanuts.

Feta and Spring Onion Bouikos

The Middle East’s answer to cheese straws, these feta and spring onion bouikos are delicious. The recipe, slightly tweaked, came from a UK restaurant called Honey & Co.

Bouikos can be prepared ahead and left in the fridge until just before guests are due to arrive. They are at their best served warm, not quite so good at room temperature and should definitely be eaten on the day they are made. I doubt very much that you will have any leftover, but if you do please send them round here.

I’ve made them twice and used feta and cheddar both times, but I plan to try using other cheeses, such as a blue cheese and ricotta. You could even try adding some finely diced bacon.

2 spring onions
50g cold butter cut into four
40g grated sharp cheddar (about ¼ cup)
40g feta (about ¼ cup)
¾ cup plain flour
Good pinch salt
¼ cup sour cream
Nigella or Poppy seeds (optional)

Preheat oven to 180°C unless you are making these ahead and planning to refrigerate them till serving time. Line a baking tray with baking paper.

Place spring onions in a food processor and process to chop. Add remaining ingredients and process until mixture forms a ball, then stop the motor. Tip out onto a lightly floured surface then pat out or roll out to a rectangle with a thickness of about 1 cm. If using, sprinkle with Nigella or poppy seeds. Cut into 12 squares, then cut each square into two triangles. Arrange slightly apart on baking sheet then bake for about 15 minutes, turning the tray halfway through to ensure even colouring.

Makes about 24

Hummus

Hummus is available in every supermarket, but when I first learnt to make it, while we were living in Israel in the late 1970s, that wasn’t the case.

This recipe is quick and easy and, like anything homemade, much cheaper than the bought variety. With tahini and canned chickpeas in the pantry you can whip up a batch any time, as the other ingredients such as lemon juice, garlic and olive oil are part of most people’s everyday supplies. I’ve been using canned chickpeas for quite some time. They’re so convenient but, if preferred, by all means soak and cook some dried ones.

While hummus makes a delicious dip to serve with drinks, it’s also good as a spread in sandwiches, instead of butter, or as a component in several of the recipes on this blog, such as Roasted Veggies with Hummus or Baked Eggplant with Hummus Lentils and Pine Nuts.

Hummus keeps in the fridge for up to a week, but if preferred why not make half the recipe first time.

2 cans chickpeas, drained
1 tsp salt
4 cloves garlic, crushed
2/3 cup tahini paste, stirred
¼ cup lemon juice
¼ cup olive oil
Garnish: (optional)
Chopped parsley
Toasted pine nuts
Extra virgin olive oil
Paprika

Place chickpeas in food processor with remaining ingredients. Process, adding enough water to give the consistency of a dip. Keep in the fridge, covered, until needed.

To serve, add a little water if Hummus has become too stiff, then spread in a swirl onto a shallow dish and decorate with chopped parsley, toasted pine nuts, paprika and a drizzle of olive oil. The garnish is optional, but it looks and tastes great. Serve at room temperature with pita bread, crackers or raw vegetables such as carrots, cucumber and cauliflower.


Makes about 3 cups